
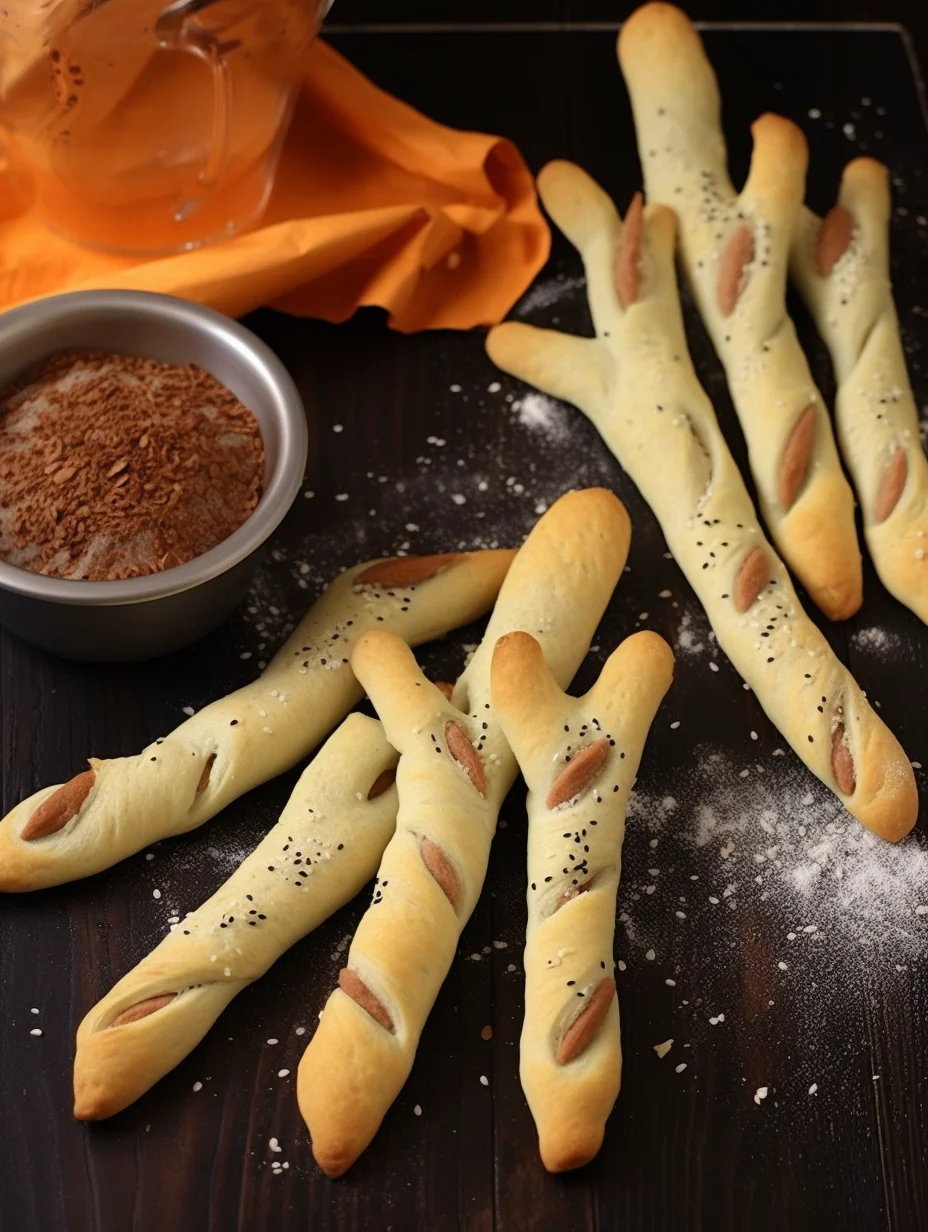
Witch’s Fingers Breadsticks are an incredible and spooky addition to any Halloween celebration or themed dinner. These unique breadsticks, shaped like witch fingers, boast not just a captivating appearance but also an amazing flavor that will delight your taste buds. They bring a fun twist to traditional bread baking, making them perfect for kids and adults alike. Whether you’re hosting a Halloween party, enjoying movie night, or simply want to impress your family with something different for dinner, this recipe for Witch’s Fingers Breadsticks will surely do the trick!
Imagine serving up a platter of these mystical breadsticks, their twisted forms enhanced with an enticing garlic flavor. Each bite is tender and flaky, making them an excellent accompaniment to soups, stews, or any dish that craves a sidekick. The eerie green almond “nails” complete the witchy look and provide an added crunch that customers crave. Kids will love to delve into the fun of eating them while adults will appreciate their impressive flavor profile. This recipe not only sparks joy but doubles as a conversation starter during gatherings.
As we navigate through the details of this recipe, you’ll discover why Witch’s Fingers Breadsticks aren’t just delicious but are also a wonderful way to elevate your culinary creativity. Get ready to have some fun in the kitchen as we explore why you’ll love making these finger-shaped delights!
Why You’ll Love This Recipe
Witch’s Fingers Breadsticks combine fun and flavor in the best way possible. Here are six compelling reasons why this recipe will be a hit for you and your guests:
1. Creative Presentation: Shaped like fingers, these breadsticks will grab attention and add a fun element to your table.
2. Simple Ingredients: With common pantry items, making these delightful treats is easier than you think.
3. Perfect for Sharing: Their fun appearance makes them great for parties, gatherings, or family dinners, encouraging everyone to dig in.
4. Flavorful Twist: Infused with garlic and herbs, these breadsticks bring a savory taste that’s hard to resist.
5. Customizable: Feel free to adjust the seasonings or toppings to match your preferences or dietary needs.
6. Kid-Friendly: Involve the little ones in crafting these spooky breadsticks; it’s an excellent opportunity for family bonding.
With all these enticing qualities, you’ll certainly fall in love with these Witch’s Fingers Breadsticks. The delightful combination of creativity and taste makes them a must-try!
Preparation and Cooking Time
Crafting Witch’s Fingers Breadsticks is a fun and engaging experience that fits seamlessly into any busy schedule. It only requires about 1 hour and 15 minutes to create these enchanting treats. Here’s a breakdown of the time involved:
– Preparation Time: 20 minutes
– Cooking Time: 25-30 minutes
– Rising Time: 30 minutes
These times can vary slightly depending on your kitchen setup and experience, but this general framework will guide you through making delicious breadsticks.
Ingredients
– 2 cups all-purpose flour
– 1 packet (2 ¼ teaspoons) active dry yeast
– 1 teaspoon sugar
– ¾ teaspoon salt
– 2 tablespoons olive oil
– ¾ cup warm water (about 110°F)
– 1 tablespoon garlic powder
– 1 teaspoon dried rosemary (optional)
– 1 egg (for egg wash)
– 20-30 whole almonds (for nails)
Step-by-Step Instructions
Creating Witch’s Fingers Breadsticks can be a delightful adventure. Follow these simple steps to craft your spooky treats:
1. Activate the Yeast: In a small bowl, combine warm water, sugar, and yeast. Let it sit for about 5-10 minutes until frothy.
2. Mix Dry Ingredients: In a large mixing bowl, whisk together the flour, salt, garlic powder, and dried rosemary.
3. Combine Mixtures: Add the activated yeast mixture and olive oil to the dry ingredients. Stir until a dough begins to form.
4. Knead the Dough: Transfer the dough onto a floured surface. Knead for about 5 minutes until smooth and elastic.
5. Let It Rise: Place the dough in a greased bowl, cover it with a damp cloth, and let it rise in a warm spot for about 30 minutes until it doubles in size.
6. Preheat Oven: During the last 10 minutes of rising, preheat your oven to 375°F (190°C).
7. Shape the Fingers: Once risen, punch down the dough. Divide it into 10 equal portions. Roll each piece into a finger shape, tapering one end for the “finger tip.”
8. Add Almonds: Press a whole almond into the tapered end of each finger to resemble a nail.
9. Prepare for Baking: Place the shaped breadsticks on a lined baking sheet. In a small bowl, beat the egg and brush it over each finger to give them a glossy finish.
10. Bake: Bake in the preheated oven for 25-30 minutes or until golden brown.
11. Cool: Allow the Witch’s Fingers Breadsticks to cool slightly on a wire rack before serving.
Following these steps will ensure you create an extraordinary and spooky treat effortlessly!
How to Serve
To elevate your presentation and serving experience, consider the following tips for serving your Witch’s Fingers Breadsticks:
1. Spooky Platter: Arrange the breadsticks on a dark-colored platter to enhance their eerie appeal. Consider using decorations like fake spider webs to set the theme.
2. Dipping Sauces: Pair the breadsticks with flavorful dips such as marinara sauce, garlic butter, or a pumpkin herb dip for a tasty twist.
3. Creative Presentation: For an extra spooky touch, decorate the platter with toy spiders or Halloween-themed decorations.
4. Serving Size: Offer a generous portion, ensuring everyone can enjoy these delightful finger-shaped treats. Smaller portions encourage sampling and sharing.
5. Drink Pairing: Serve with a themed beverage like a dark grape soda or a spooky punch to complement the Halloween vibe.
By focusing on these details, you can create an unforgettable dining experience that leaves your guests raving about your Witch’s Fingers Breadsticks!
Additional Tips
– Use Fresh Yeast: A fresh packet of yeast ensures better rising and flavor in your breadsticks.
– Experiment with Spices: Try adding other spices like paprika or oregano to give your Witch’s Fingers Breadsticks an extra kick.
– Don’t Skip the Egg Wash: Brushing with egg gives the breadsticks a beautiful golden-brown color.
– Serve Warm: For the best taste, serve these breadsticks warm right out of the oven, allowing the garlic aroma to fill the room.
– Be Creative with Shapes: While the classic finger shape is fun, feel free to experiment with other spooky shapes like ghosts or snakes for a Halloween twist.
Recipe Variation
Want to add your own twist to the Witch’s Fingers Breadsticks? Here are a few variations to consider:
1. Cheesy Fingers: Add shredded cheese to the dough for an extra cheesy delight. Great with a marinara dip!
2. Herb-Infused Dough: Mix in fresh herbs like thyme or basil for a fragrant aroma and additional flavor.
3. Sweet Version: Make a sweet dough by incorporating a bit of sugar and cinnamon, and shape them like ‘witch’s fingers’ for a dessert option.
Freezing and Storage
– Storage: Keep leftover Witch’s Fingers Breadsticks in an airtight container at room temperature for up to 2 days. This will maintain their texture and flavor.
– Freezing: If you want to prepare them in advance, freeze the shaped but unbaked breadsticks. Place them on a tray to freeze individually, then transfer to a freezer bag. They can be baked straight from the freezer; just add a few extra minutes to the cooking time.
Special Equipment
To make your Witch’s Fingers Breadsticks successfully, gather the following tools:
– Mixing bowls: For combining your ingredients smoothly.
– A whisk: To blend dry ingredients effectively.
– Rolling pin: Helps in shaping the dough into finger-like forms.
– Baking sheets: A must for placing and baking the breadsticks.
– Parchment paper: Useful for lining your baking sheets to prevent sticking.
– An egg wash brush: For that shiny coating on the breadsticks.
Frequently Asked Questions
Can I make the dough ahead of time?
Yes, you can prepare the dough ahead of time. Refrigerate it after kneading. Let it come back to room temperature before rolling and shaping.
What can I do with leftover breadsticks?
Leftovers can be reheated in the oven for a few minutes. They are perfect with soups and salads!
Are these breadsticks suitable for vegans?
Unfortunately, the egg wash is not vegan. You can omit the egg wash or use a plant-based substitute like almond milk for a similar effect.
How can I adjust the garlic flavor?
You can reduce or increase the amount of garlic powder based on your preference, or even omit it entirely.
Can I add color to the dough?
Absolutely! Use natural food coloring if you want to make your breadsticks look eerier for Halloween.
Conclusion
Witch’s Fingers Breadsticks are a delicious, creative addition to any Halloween party or themed gathering. Their unique shape, combined with the alluring garlic flavor and crunchy almond “nails,” makes them irresistible. Not only are they fun to make, but they also invite creativity in the kitchen, encouraging everyone to join in. No matter which variation you choose, these breadsticks will surely be a highlight of your meal!
Witch’s Fingers Breadsticks: An Amazing Ultimate Recipe
- Total Time: 8 minute
Ingredients
– 2 cups all-purpose flour
– 1 packet (2 ¼ teaspoons) active dry yeast
– 1 teaspoon sugar
– ¾ teaspoon salt
– 2 tablespoons olive oil
– ¾ cup warm water (about 110°F)
– 1 tablespoon garlic powder
– 1 teaspoon dried rosemary (optional)
– 1 egg (for egg wash)
– 20-30 whole almonds (for nails)
Instructions
Creating Witch’s Fingers Breadsticks can be a delightful adventure. Follow these simple steps to craft your spooky treats:
1. Activate the Yeast: In a small bowl, combine warm water, sugar, and yeast. Let it sit for about 5-10 minutes until frothy.
2. Mix Dry Ingredients: In a large mixing bowl, whisk together the flour, salt, garlic powder, and dried rosemary.
3. Combine Mixtures: Add the activated yeast mixture and olive oil to the dry ingredients. Stir until a dough begins to form.
4. Knead the Dough: Transfer the dough onto a floured surface. Knead for about 5 minutes until smooth and elastic.
5. Let It Rise: Place the dough in a greased bowl, cover it with a damp cloth, and let it rise in a warm spot for about 30 minutes until it doubles in size.
6. Preheat Oven: During the last 10 minutes of rising, preheat your oven to 375°F (190°C).
7. Shape the Fingers: Once risen, punch down the dough. Divide it into 10 equal portions. Roll each piece into a finger shape, tapering one end for the “finger tip.”
8. Add Almonds: Press a whole almond into the tapered end of each finger to resemble a nail.
9. Prepare for Baking: Place the shaped breadsticks on a lined baking sheet. In a small bowl, beat the egg and brush it over each finger to give them a glossy finish.
10. Bake: Bake in the preheated oven for 25-30 minutes or until golden brown.
11. Cool: Allow the Witch’s Fingers Breadsticks to cool slightly on a wire rack before serving.
Following these steps will ensure you create an extraordinary and spooky treat effortlessly!
- Prep Time: 15 minutes
- Cook Time: 25-30 minutes
Nutrition
- Serving Size: 10 breadsticks
- Calories: 150 kcal
- Fat: 3g
- Protein: 4g