
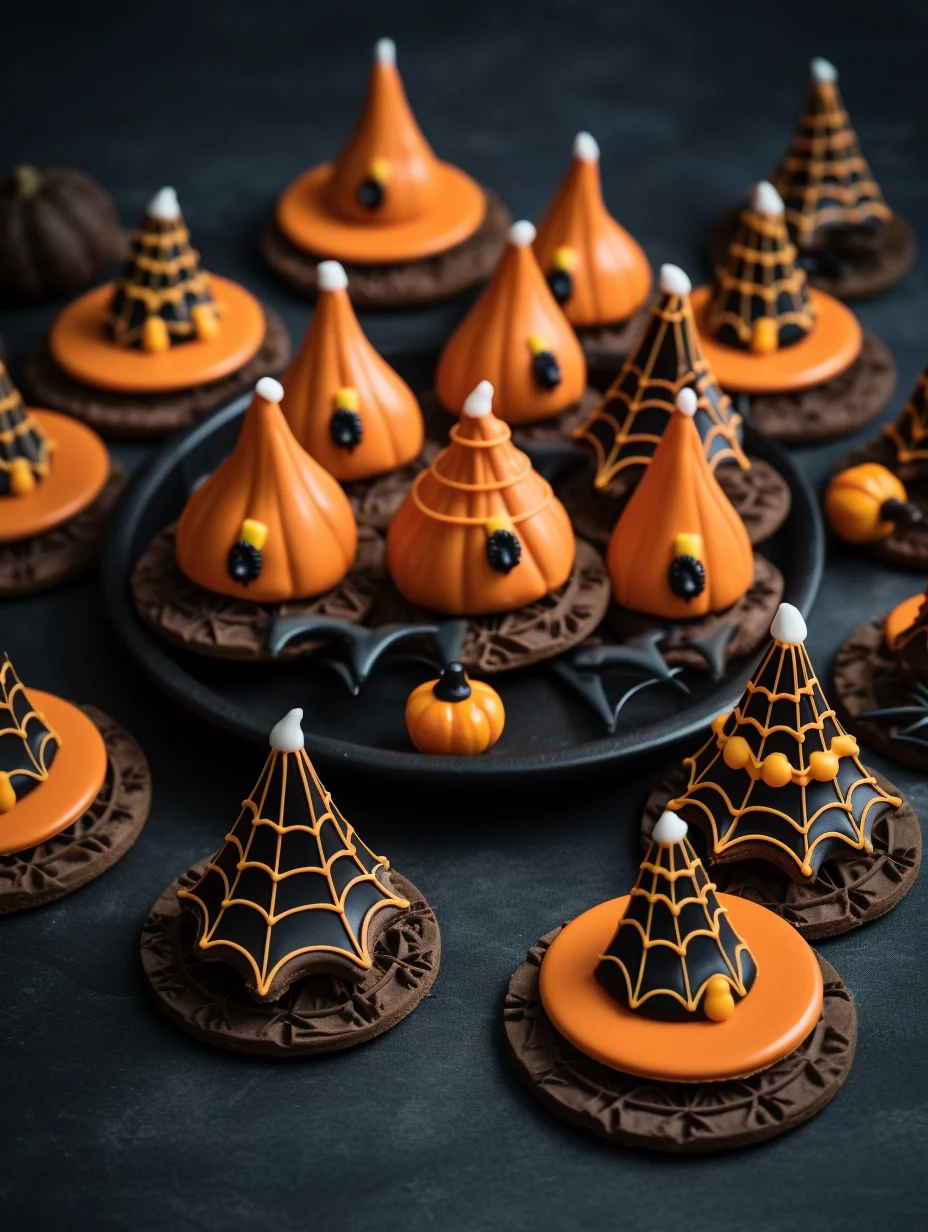
Witch Hat Cookies are a delightful treat that adds a dash of spookiness to any gathering, especially during Halloween. Picture a whimsical cookie shaped like a classic witch’s hat, adorned with vibrant colors and an irresistible flavor. The wonderful combination of sweet and savory elements creates a magical experience that will leave your guests enchanted. Whether you’re hosting a Halloween party or looking for creative treats to share with family and friends, these cookies are the ultimate choice for a festive and fun addition to your dessert table.
If you’ve ever seen or tasted Witch Hat Cookies, you know they’re not just ordinary sweets. They are a celebration of creativity and flavor, making them a show-stopping dessert that will surely bring smiles and spark joy in everyone. In this guide, you will discover why this recipe is so special, how to create these enchanting treats, and some fun ideas for serving them. Perfect for bakers of all skill levels, these amazing Witch Hat Cookies will charm anyone who lays eyes on them.
So, let’s uncover the magic behind Witch Hat Cookies, delve into the reasons you’ll love making them, and prepare for the scrumptious steps to bake your own!
Why You’ll Love This Recipe
Witch Hat Cookies are more than just a festive treat — they offer an array of delightful features that will captivate your heart and satisfy your taste buds. Here are the top reasons to love this recipe:
1. Creative Design: Shaped like classic witch hats, these cookies are visually appealing, invoking fun and whimsy.
2. Easy to Make: With simple steps and easy-to-find ingredients, this recipe is accessible for bakers of all levels.
3. Customizable: You can personalize them with different colors or toppings, making each batch unique.
4. Perfect for Any Occasion: Beyond Halloween, these cookies are great for themed parties, school events, or family gatherings.
5. Family-Friendly Fun: It’s a fantastic activity to do with kids, promoting creativity and togetherness.
6. Delicious Flavor: The blend of chocolate cookies with tasty toppings creates a delightful flavor profile that appeals to all.
With all these attributes, it’s clear that Witch Hat Cookies are the perfect choice for delivering joy and sweetness to any event. Each cookie becomes a little work of art!
Preparation and Cooking Time
Baking Witch Hat Cookies is a fun adventure that won’t take too long, making it perfect for a last-minute treat. Here’s how your time will break down:
– Preparation Time: 20 minutes
– Cooking Time: 10-12 minutes
– Cooling Time: 15 minutes
Overall, you can whip up these enchanting cookies in approximately 45 minutes. This time can fluctuate slightly based on your baking experience and the efficiency of your kitchen tools.
Ingredients
– 1 cup unsalted butter, softened
– 1 cup granulated sugar
– 1 cup brown sugar, packed
– 2 large eggs
– 2 teaspoons vanilla extract
– 3 cups all-purpose flour
– 1 cup unsweetened cocoa powder
– 1 teaspoon baking soda
– ½ teaspoon salt
– 1 cup chocolate chips (for decoration)
– 1 cup Halloween-themed candy corn or other candy (for witches’ hats)
– Green icing or colored chocolate (optional, for extra decoration)
Step-by-Step Instructions
Creating delicious Witch Hat Cookies is a straightforward process that consists of just a few simple steps. Follow this guide to make your magical cookies:
1. Preheat the Oven: Set your oven to 350°F (175°C) and prepare baking sheets with parchment paper.
2. Cream the Butter and Sugars: In a large mixing bowl, cream together the softened butter, granulated sugar, and brown sugar until the mixture is light and fluffy.
3. Add Eggs and Vanilla: Beat in the eggs one at a time, followed by the vanilla extract until well combined.
4. Combine Dry Ingredients: In another bowl, whisk together the flour, cocoa powder, baking soda, and salt.
5. Mix the Dough: Gradually add the dry ingredient mixture to the wet ingredients. Stir until a dough forms, making sure there are no dry spots.
6. Shape the Cookies: Use a tablespoon to scoop dough onto the prepared baking sheets, spacing them about 2 inches apart. You can shape them into small circles if you prefer.
7. Bake: Place in the preheated oven and bake for 10-12 minutes, or until the edges are firm, and the cookies look set.
8. Cool the Cookies: Once done, remove them from the oven, allowing them to cool on the baking sheets for about 5 minutes before transferring them to wire racks to cool completely.
9. Decorate the Cookies: Once cooled, take the chocolate chips and press them onto the cookies’ center. Secure a piece of candy corn on top of the chocolate chip to form the point of the witch hat.
10. Add Final Touches: If desired, use green icing or colored chocolate to add additional decorations to the cookies.
Follow these simple steps, and you’ll have your whimsical Witch Hat Cookies ready to impress!
How to Serve
When it’s time to unveil your Witch Hat Cookies, consider these fun serving ideas to enchant your guests:
1. Creative Presentation: Arrange cookies on a platter, and add spooky decorations like fake spiders or mini pumpkins around them for added effect.
2. Pair with Beverages: Serve alongside warm apple cider or milkshakes to complement the sweet flavors.
3. Include a Decorative Touch: Use themed napkins and plates to enhance the overall visual appeal and ambiance of your dessert table.
4. Mini Treat Bags: For parties or events, package the cookies in clear bags tied with ribbons. These make for fun take-home treats.
5. Interactive Setup: Set up a decorating station where guests can create their version of Witch Hat Cookies with various toppings and icings.
By paying attention to how you serve these delightful cookies, you create an engaging experience that is sure to leave a lasting impression on your guests.
Additional Tips
– Experiment with Sprinkles: For extra festivity, consider adding Halloween-themed sprinkles or edible glitter to the decorating process. It adds flair and whimsy to the presentation.
– Use Cookie Cutters: If you want to get creative, use cookie cutters to form different shapes for the cookies before decorating, providing a variety of designs.
– Incorporate Flavored Extracts: Enhance the flavor by adding different extracts, such as almond or peppermint, to the cookie dough.
Recipe Variation
Get creative with these variations to make your Witch Hat Cookies even more special:
1. Gluten-Free Option: Substitute regular flour with a gluten-free all-purpose blend to make the cookies suitable for those with gluten sensitivities.
2. Flavor Infusion: Incorporate a few tablespoons of peppermint extract for a minty twist that pairs beautifully with chocolate.
3. Stuffed Cookies: Add a small piece of chocolate or Nutella in the center of each cookie before baking for a gooey surprise.
Freezing and Storage
– Storage: Keep your Witch Hat Cookies in an airtight container at room temperature for up to one week. They will stay fresh, soft, and delicious.
– Freezing: You can freeze the cookies for up to three months. Wrap each cookie in plastic wrap and place them in a freezer-safe bag. Thaw at room temperature when ready to enjoy.
Special Equipment
Having the right tools can make the process smoother and more enjoyable:
– Mixing bowls: A large bowl for combining ingredients and a smaller bowl for whisking dry ingredients.
– Cookie scoop or tablespoon: Helpful for uniform cookie sizes.
– Baking sheets: Use multiple for preparing larger batches.
– Parchment paper: This is essential for preventing cookies from sticking and ensuring easy cleanup.
Frequently Asked Questions
Can I use different candies for the hats?
Absolutely! Feel free to experiment with various candies that can fit on the cookie. Chocolate-covered candies or other festive shapes can work wonderfully.
How do I know when the cookies are done baking?
Look for the edges to be firm and slightly crispy while the center remains soft. They will continue to set as they cool.
Can I use store-bought cookies instead of making my own?
While homemade cookies provide a delightful texture and taste, using store-bought chocolate cookies can save time for a quick treat.
What if I don’t have cocoa powder?
If cocoa powder is unavailable, consider substituting with carob powder, although the flavor will differ slightly, it creates a unique cookie.
Can I decorate the cookies ahead of time?
Yes! Feel free to bake and decorate the cookies a few days in advance. Just store them in a cool, dry place until you’re ready to serve.
Conclusion
Witch Hat Cookies are a whimsical and tasty treat perfect for Halloween and other festive occasions. Their delightful flavors and creative presentation make them a showstopper at any gathering. With easy steps and plenty of room for creativity, these cookies promise joy for both bakers and eaters alike. So gather your ingredients, put on your apron, and let the magic of Witch Hat Cookies enchant your kitchen and your celebration!
Witch Hat Cookies: An Amazing Ultimate Recipe You Must Try
- Total Time: 0 minute
Ingredients
– 1 cup unsalted butter, softened
– 1 cup granulated sugar
– 1 cup brown sugar, packed
– 2 large eggs
– 2 teaspoons vanilla extract
– 3 cups all-purpose flour
– 1 cup unsweetened cocoa powder
– 1 teaspoon baking soda
– ½ teaspoon salt
– 1 cup chocolate chips (for decoration)
– 1 cup Halloween-themed candy corn or other candy (for witches’ hats)
– Green icing or colored chocolate (optional, for extra decoration)
Instructions
Creating delicious Witch Hat Cookies is a straightforward process that consists of just a few simple steps. Follow this guide to make your magical cookies:
1. Preheat the Oven: Set your oven to 350°F (175°C) and prepare baking sheets with parchment paper.
2. Cream the Butter and Sugars: In a large mixing bowl, cream together the softened butter, granulated sugar, and brown sugar until the mixture is light and fluffy.
3. Add Eggs and Vanilla: Beat in the eggs one at a time, followed by the vanilla extract until well combined.
4. Combine Dry Ingredients: In another bowl, whisk together the flour, cocoa powder, baking soda, and salt.
5. Mix the Dough: Gradually add the dry ingredient mixture to the wet ingredients. Stir until a dough forms, making sure there are no dry spots.
6. Shape the Cookies: Use a tablespoon to scoop dough onto the prepared baking sheets, spacing them about 2 inches apart. You can shape them into small circles if you prefer.
7. Bake: Place in the preheated oven and bake for 10-12 minutes, or until the edges are firm, and the cookies look set.
8. Cool the Cookies: Once done, remove them from the oven, allowing them to cool on the baking sheets for about 5 minutes before transferring them to wire racks to cool completely.
9. Decorate the Cookies: Once cooled, take the chocolate chips and press them onto the cookies’ center. Secure a piece of candy corn on top of the chocolate chip to form the point of the witch hat.
10. Add Final Touches: If desired, use green icing or colored chocolate to add additional decorations to the cookies.
Follow these simple steps, and you’ll have your whimsical Witch Hat Cookies ready to impress!
- Prep Time: 20 minutes
- Cook Time: 10-12 minutes
Nutrition
- Serving Size: About 24 cookies
- Calories: 150 kcal (per cookie)
- Fat: 7g
- Protein: 2g