
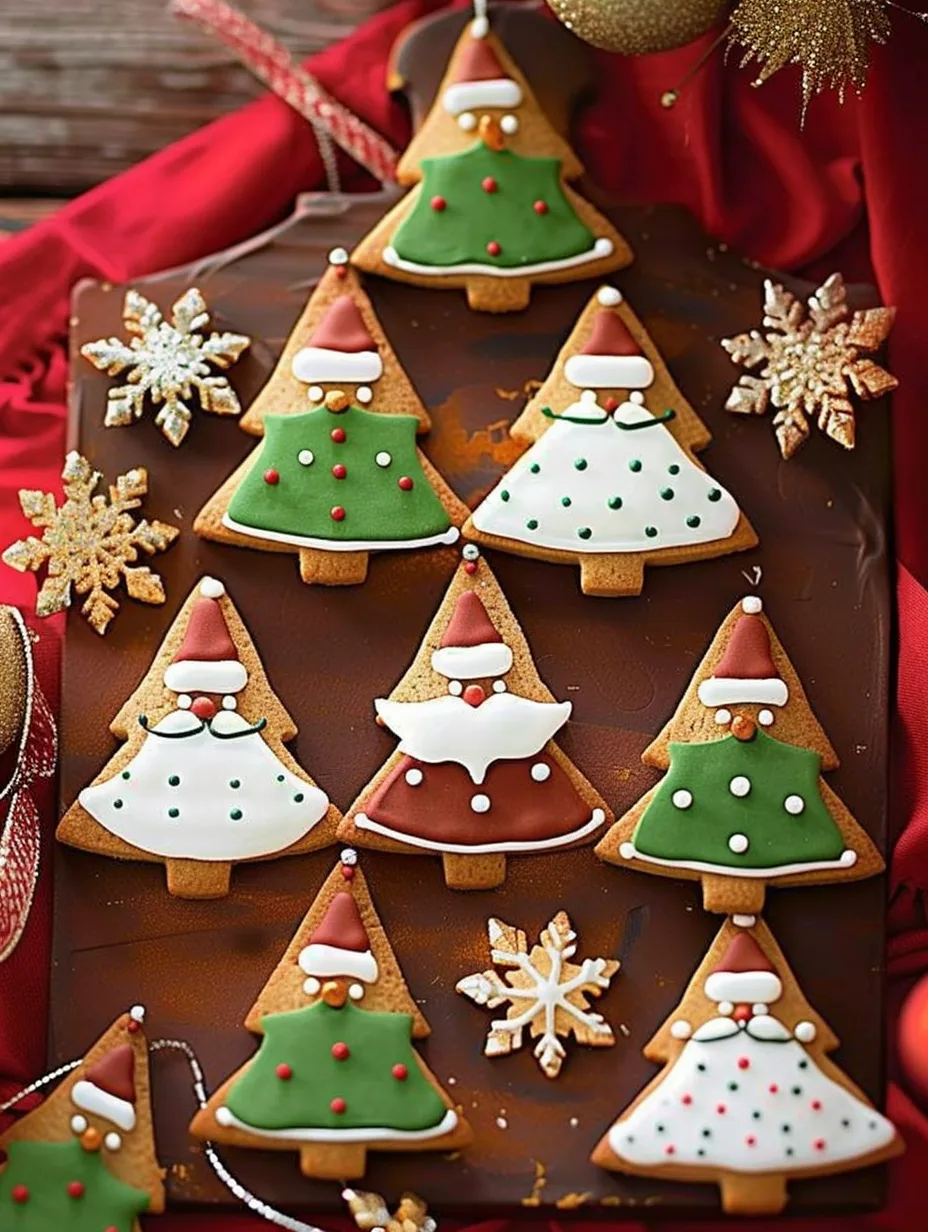
Santa and Elf Cookies are a delightful treat that captures the magic of the holiday season. These festive cookies are not just visually appealing; they’re packed with flavors that will make your taste buds dance with joy. Perfect for holiday gatherings, cookie exchanges, or simply to enjoy with family, these cookies bring the spirit of Christmas to life. The combination of vibrant colors, sweet frosting, and fun shapes will surely create memorable moments during your celebrations.
Imagine the laughter and excitement as children help decorate these cookies. Santa and Elf Cookies are more than just a dessert; they’re a way to create lasting memories with loved ones. The joy of baking together, the aroma wafting through the house, and the final product — a plate full of colorful cookies — all contribute to the warmth of the holiday season. This recipe is perfect for bakers of all skill levels, making it easy for everyone to join in on the fun.
In this guide, you will discover why this recipe is so special, the ingredients you’ll need, and detailed instructions to help you create these amazing cookies. Get ready to spread some holiday cheer with Santa and Elf Cookies that are sure to impress anyone who tastes them!
Why You’ll Love This Recipe
Santa and Elf Cookies are sure to become a beloved holiday tradition in your household. Here are some reasons why you’ll fall in love with this recipe:
1. Fun for All Ages: Kids and adults alike will enjoy decorating these cookies together.
2. Creative Expression: The opportunity to decorate with different colors and designs allows for creativity.
3. Delicious Flavor: The cookies have a delightful buttery flavor that pairs perfectly with sweet icing.
4. Perfect for Gifting: These cookies make great gifts for friends, family, or neighbors during the holidays.
5. Easy to Customize: You can easily adjust the colors and shapes to suit your holiday theme.
6. Memorable Experience: Baking these cookies creates cherished memories and traditions.
With each bite, you’ll experience the joy of the season and the deliciousness of these festive treats!
Preparation and Cooking Time
Creating Santa and Elf Cookies takes about 1 hour and 30 minutes from start to finish, including preparation and baking time. Here’s a breakdown:
– Preparation Time: 30 minutes
– Cooking Time: 10-12 minutes
– Cooling Time: 20 minutes
– Decorating Time: 30 minutes
These times may vary slightly based on your experience and kitchen setup, but this schedule should provide a good estimate.
Ingredients
– 2 ¾ cups all-purpose flour
– 1 teaspoon baking powder
– ½ teaspoon salt
– 1 cup unsalted butter, softened
– 1 ½ cups granulated sugar
– 2 large eggs
– 1 teaspoon vanilla extract
– 1 teaspoon almond extract
– Food coloring (red, green, and any other desired colors)
– Royal icing (for decorating)
– Sprinkles or edible glitter (optional)
Step-by-Step Instructions
Creating Santa and Elf Cookies is a straightforward process if you follow these steps:
1. Preheat Oven: Preheat your oven to 350°F (175°C). Line baking sheets with parchment paper.
2. Mix Dry Ingredients: In a medium bowl, whisk together flour, baking powder, and salt. Set aside.
3. Cream Butter and Sugar: In a large bowl, cream the softened butter and granulated sugar until light and fluffy.
4. Add Eggs and Extracts: Beat in the eggs, vanilla extract, and almond extract until well combined.
5. Combine Mixtures: Gradually add the dry ingredients to the wet mixture, mixing until just combined.
6. Chill Dough: Wrap the dough in plastic wrap and refrigerate for about 30 minutes to make it easier to handle.
7. Roll Out Dough: On a floured surface, roll out the dough to about ¼-inch thickness.
8. Cut Shapes: Use cookie cutters to cut out shapes for Santa and Elf. Place them on the prepared baking sheets.
9. Bake: Bake in the preheated oven for 10-12 minutes, or until the edges are lightly golden.
10. Cool Cookies: Remove from the oven and allow the cookies to cool on the baking sheets for 5 minutes before transferring them to wire racks to cool completely.
11. Prepare Icing: While the cookies are cooling, prepare royal icing and divide it into bowls. Add food coloring to create different colors.
12. Decorate Cookies: Once the cookies are completely cool, use piping bags to decorate them with the royal icing. Get creative with designs and add sprinkles if desired!
How to Serve
To make the most of your Santa and Elf Cookies, consider the following serving suggestions:
1. Presentation: Arrange the cookies on a festive platter or tray to enhance their visual appeal.
2. Accompaniments: Pair the cookies with hot cocoa, milk, or holiday-themed drinks to elevate the experience.
3. Gift Wrapping: Package cookies in clear gift bags tied with bows for thoughtful homemade gifts.
4. Cookie Decorating Station: Set up a cookie decoration station at your holiday gathering so guests can personalize their cookies.
5. Share the Joy: Encourage guests to take some cookies home, spreading holiday cheer beyond your gathering.
By putting thought into how you serve these delightful cookies, you’ll create a memorable experience that everyone will cherish during this magical season. Enjoy the sweetness of Santa and Elf Cookies and the joy they bring to your holiday festivities!
Additional Tips
– Use Quality Ingredients: Opt for high-quality butter and vanilla extract to enhance the flavor of your Santa and Elf Cookies.
– Experiment with Colors: Don’t hesitate to mix and match food coloring to create unique shades for your icing.
– Practice Piping: If you’re new to decorating, practice piping on parchment paper before decorating the cookies to build your skills.
– Use Stencils: For more intricate designs, consider using stencils to guide your icing decorations.
– Stay Organized: Keep your decorating area clean and organized to streamline the decorating process.
Recipe Variation
Feel free to get creative with your Santa and Elf Cookies! Here are some fun variations:
1. Gingerbread Cookies: Substitute the base dough with gingerbread for a spiced holiday flavor.
2. Chocolate Cookies: Add cocoa powder to the dough for a chocolatey twist on your festive cookies.
3. Nutty Addition: Incorporate chopped nuts or toffee bits into the dough for added texture and flavor.
4. Flavored Icing: Try adding different flavor extracts, such as peppermint or lemon, to your royal icing for a unique taste.
5. Holiday Shapes: Use different cookie cutters to create other holiday-themed shapes like stars, snowmen, or Christmas trees.
Freezing and Storage
– Storage: Keep the decorated cookies in an airtight container at room temperature for up to one week. This will help maintain their freshness.
– Freezing: You can freeze the undecorated cookies for up to three months. Place them in a single layer in a freezer-safe container, separated by parchment paper to prevent sticking. Thaw them at room temperature before decorating.
Special Equipment
To successfully make Santa and Elf Cookies, gather the following essential tools:
– Mixing Bowls: For combining your dry and wet ingredients.
– Electric Mixer: To cream butter and sugar efficiently.
– Rolling Pin: For rolling out the dough to the desired thickness.
– Cookie Cutters: To create fun shapes for your cookies.
– Piping Bags and Tips: For decorating the cookies with precision.
– Baking Sheets: To hold the cookies while they bake.
Frequently Asked Questions
Can I use margarine instead of butter?
While margarine can be used, butter provides a richer flavor and better texture for cookies.
What if I don’t have royal icing?
You can use powdered sugar mixed with a little milk or water to create a simple icing for decoration.
Can I make the dough ahead of time?
Yes! You can prepare the dough in advance and store it in the refrigerator for up to 3 days or freeze it for up to 3 months.
What type of food coloring is best to use?
Gel food coloring is recommended for vibrant colors without altering the consistency of the icing.
How do I prevent the cookies from spreading while baking?
Ensure your dough is chilled before rolling it out and keep the baking sheets cool between batches.
Conclusion
Santa and Elf Cookies are not only a delicious treat but also a wonderful way to spread joy during the holiday season. Their delightful flavors, vibrant colors, and festive shapes make them perfect for any celebration. Whether you’re baking them as a family activity, giving them as gifts, or serving them at holiday gatherings, these cookies will surely bring smiles to everyone’s faces. Embrace the holiday spirit and create lasting memories with Santa and Elf Cookies this season!
Santa and Elf Cookies: An Amazing Ultimate Recipe
- Total Time: 47 minute
Ingredients
– 2 ¾ cups all-purpose flour
– 1 teaspoon baking powder
– ½ teaspoon salt
– 1 cup unsalted butter, softened
– 1 ½ cups granulated sugar
– 2 large eggs
– 1 teaspoon vanilla extract
– 1 teaspoon almond extract
– Food coloring (red, green, and any other desired colors)
– Royal icing (for decorating)
– Sprinkles or edible glitter (optional)
Instructions
Creating Santa and Elf Cookies is a straightforward process if you follow these steps:
1. Preheat Oven: Preheat your oven to 350°F (175°C). Line baking sheets with parchment paper.
2. Mix Dry Ingredients: In a medium bowl, whisk together flour, baking powder, and salt. Set aside.
3. Cream Butter and Sugar: In a large bowl, cream the softened butter and granulated sugar until light and fluffy.
4. Add Eggs and Extracts: Beat in the eggs, vanilla extract, and almond extract until well combined.
5. Combine Mixtures: Gradually add the dry ingredients to the wet mixture, mixing until just combined.
6. Chill Dough: Wrap the dough in plastic wrap and refrigerate for about 30 minutes to make it easier to handle.
7. Roll Out Dough: On a floured surface, roll out the dough to about ¼-inch thickness.
8. Cut Shapes: Use cookie cutters to cut out shapes for Santa and Elf. Place them on the prepared baking sheets.
9. Bake: Bake in the preheated oven for 10-12 minutes, or until the edges are lightly golden.
10. Cool Cookies: Remove from the oven and allow the cookies to cool on the baking sheets for 5 minutes before transferring them to wire racks to cool completely.
11. Prepare Icing: While the cookies are cooling, prepare royal icing and divide it into bowls. Add food coloring to create different colors.
12. Decorate Cookies: Once the cookies are completely cool, use piping bags to decorate them with the royal icing. Get creative with designs and add sprinkles if desired!
- Prep Time: 30 minutes
- Cook Time: 10-12 minutes
Nutrition
- Serving Size: 24 cookies
- Calories: 120 kcal
- Fat: 6g
- Protein: 2g