

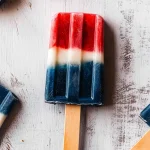
Red White and Blue Popsicle Recipe is an incredible way to celebrate summer holidays like the Fourth of July or Memorial Day. These vibrant popsicles are not only beautiful but also delicious, making them a perfect treat for families and gatherings. The refreshing blend of fruity flavors captures the essence of summer while providing a cooling relief on hot days. With their stunning colors and vibrant flavors, these popsicles are bound to impress both kids and adults alike.
Imagine enjoying these delightful popsicles during a summer picnic or a backyard barbecue. They immediately brighten your table and add a festive touch to any event. Plus, this recipe is simple and allows for endless variations. You can customize the flavors, create different color combinations, and even involve the kids in the preparation!
In this article, we will delve into why this Red White and Blue Popsicle Recipe is a must-try, share preparation times, and list the ingredients for this easy yet delicious treat. Each step will guide you through making the ultimate summer popsicle, making entertaining a breeze. Let’s get started on making these amazing popsicles that will be the highlight of your summer celebrations!
Why You’ll Love This Recipe
There are countless reasons to fall in love with this Red White and Blue Popsicle Recipe. Here are some highlights that make this treat irresistible:
1. Colorful Presentation: The vibrant red, white, and blue layers make these popsicles visually appealing, perfect for festive occasions.
2. Healthy Ingredients: Made primarily from fresh fruits, these popsicles are a healthier alternative to store-bought frozen treats.
3. Customizable Flavors: You can swap fruits or even add different flavors to suit your taste preferences.
4. Easy Preparation: The steps are straightforward, making it perfect for quick preparation with minimal cooking skills.
5. Kid-Friendly: Kids can help layer the ingredients, making it a fun family activity.
6. Frozen Delights: Perfect for cooling off during hot summer days!
With these factors in mind, it’s clear that the Red White and Blue Popsicle Recipe will become a family favorite that you’ll want to recreate year after year.
Preparation and Cooking Time
Creating these Red White and Blue Popsicles will take minimal time. Here’s a general breakdown of the total time needed:
– Preparation Time: 20 minutes
– Freezing Time: 4-6 hours (or overnight for best results)
In total, plan on around 4 hours and 20 minutes to have delicious popsicles ready to serve. This timeframe can vary based on your freezing preferences and equipment.
Ingredients
– For the Red Layer:
– 2 cups strawberries, hulled and chopped
– 2 tablespoons honey or maple syrup
– 1 tablespoon lemon juice
– For the White Layer:
– 1 cup coconut milk or yogurt (dairy or non-dairy)
– 1 tablespoon honey or maple syrup (optional)
– For the Blue Layer:
– 2 cups blueberries, fresh or frozen
– 2 tablespoons honey or maple syrup
– 1 tablespoon lemon juice
Step-by-Step Instructions
Follow these simple steps to create your stunning Red White and Blue Popsicles:
1. Prepare the Red Layer: In a blender, combine the strawberries, honey, and lemon juice. Blend until smooth. Taste for sweetness, and adjust if necessary.
2. Prepare the White Layer: In a bowl, mix the coconut milk or yogurt with honey (if using) until smooth.
3. Prepare the Blue Layer: In the same blender, combine blueberries, honey, and lemon juice. Blend until smooth, ensuring the mixture is vibrant and uniform.
4. Assemble the Popsicles: Start by pouring the red layer into your popsicle molds, filling each about one-third full. Freeze for 1-2 hours or until partially set.
5. Add the White Layer: Once the red layer is partially frozen, carefully pour in the white layer, filling the molds another third of the way. Insert popsicle sticks, if using, before returning the molds to the freezer for another 1-2 hours.
6. Finish with the Blue Layer: Once the white layer is set, add the blue layer to fill the molds completely. Freeze for at least 4 hours or overnight for best results.
7. Remove Popsicles: To release the popsicles, run warm water over the outside of the molds for a few seconds. Gently wiggle the popsicles to release them.
8. Serve and Enjoy: Once removed from the molds, serve immediately, or store in an airtight container in the freezer for later enjoyment.
How to Serve
These Red White and Blue Popsicles can be served on their own for a refreshing snack. However, here are some creative ideas to elevate the experience:
1. Garnish: Top popsicles with mini whipped cream or serve them with a dollop of yogurt for extra flavor.
2. Serving Dish: Use a colorful platter or a rustic wooden board to create a beautiful presentation. Consider adding fresh berries around the popsicles for a vibrant visual appeal.
3. Beverage Pairing: Complement these popsicles with a refreshing lemonade or a fruity punch to enhance the summer vibes.
4. Fun Additions: Introduce sprinkles or edible glitter for a festive touch, particularly if serving at parties.
5. Family Activity: Encourage guests, especially kids, to create their custom popsicles by layering various fruit blends and flavors.
By considering these serving ideas, you ensure that every bite of your Red White and Blue Popsicle recipe is memorable, fun, and delightful for everyone involved. Enjoy this colorful and refreshing treat this summer!
Additional Tips
– Use Fresh Fruits: For the best flavor and texture, select ripe strawberries and blueberries. Fresh fruits enhance the popsicles’ taste and vibrant color.
– Layer Carefully: When pouring each layer, do it slowly to maintain distinct layers. This can create a beautifully segmented popsicle.
– Adjust for Sweetness: Depending on your preference and the sweetness of the fruits, feel free to adjust the amount of honey or maple syrup in each layer.
– Add Zest: For an extra zing, consider adding lemon or lime zest to the fruit layers. This will enhance the flavor profile.
– Double the Recipe: If you’re hosting a large gathering, double the ingredients to ensure you have enough for everyone.
Recipe Variation
Experimenting with different fruits and flavors can make this popsicle recipe even more exciting. Here are a few variations to consider:
1. Tropical Twist: Swap the berries for mango and pineapple for an exotic flavor profile. Use coconut milk as the white layer to amplify the tropical theme.
2. Berry Medley: Combine different berries such as raspberries and blackberries to create a mixed berry layer. This adds complexity to the flavor.
3. Creamy Delight: For a creamier texture, try layering in vanilla yogurt with the white layer instead of coconut milk.
4. Minty Fresh: Add fresh mint leaves to the berry blends for a refreshing mint-infused popsicle.
5. Chocolate Drizzle: After removing the popsicles from the molds, drizzle melted dark chocolate over them for an indulgent finish.
Freezing and Storage
– Storage: Once prepared, store any unused popsicles in an airtight container in the freezer. They can last for up to 2 months while maintaining their flavor and texture.
– Thawing: To enjoy a popsicle, allow it to sit at room temperature for a few minutes before removing it from the mold. This will make it easier to release.
– Avoid Freezer Burn: Wrap popsicles individually in plastic wrap before placing them in an airtight container to prevent freezer burn and enhance their longevity.
Special Equipment
A few kitchen tools can help ensure your Red White and Blue Popsicle Recipe comes out perfectly:
– Popsicle Molds: Choose molds that are sturdy and easy to release. Silicone molds work best for easy removal.
– Blender: A high-powered blender will smoothly combine your fruit layers, ensuring a delightful texture.
– Measuring Cups and Spoons: Accurate measurements will help maintain the right balance of flavors in your popsicles.
– Funnel (optional): A funnel can be useful for pouring the mixtures into molds without making a mess.
Frequently Asked Questions
Can I use frozen fruit in this recipe?
Yes, feel free to use frozen fruit; just let it thaw slightly before blending for easier processing.
How can I tell when each layer is ready for the next?
Each layer should be firm enough to hold the next layer but not completely frozen. This is typically after 1-2 hours in the freezer.
Can I make these popsicles in advance?
Absolutely! You can prepare them a day or two ahead. They freeze well and are perfect for summer gatherings.
How can I make them sugar-free?
You can omit the sweeteners and rely on the natural sweetness of the fruits. Adjust according to taste.
Are these popsicles gluten-free?
Yes, all the ingredients in this recipe are naturally gluten-free, making them a safe treat for those with gluten sensitivities.
Conclusion
The Red White and Blue Popsicle Recipe is a delightful treat that embodies the spirit of summer celebrations. With their colorful layers and fresh fruit flavors, these popsicles make any hot day more enjoyable. Easy to create and customizable, you can have fun experimenting with different fruits and flavors as you cool off. Whether you’re hosting a festive barbecue or simply treating yourself on a sunny afternoon, these popsicles are sure to be a hit!
Red White and Blue Popsicle Recipe: An Amazing Ultimate Treat
- Total Time: 20 minutes
Ingredients
– For the Red Layer:
– 2 cups strawberries, hulled and chopped
– 2 tablespoons honey or maple syrup
– 1 tablespoon lemon juice
– For the White Layer:
– 1 cup coconut milk or yogurt (dairy or non-dairy)
– 1 tablespoon honey or maple syrup (optional)
– For the Blue Layer:
– 2 cups blueberries, fresh or frozen
– 2 tablespoons honey or maple syrup
– 1 tablespoon lemon juice
Instructions
Follow these simple steps to create your stunning Red White and Blue Popsicles:
1. Prepare the Red Layer: In a blender, combine the strawberries, honey, and lemon juice. Blend until smooth. Taste for sweetness, and adjust if necessary.
2. Prepare the White Layer: In a bowl, mix the coconut milk or yogurt with honey (if using) until smooth.
3. Prepare the Blue Layer: In the same blender, combine blueberries, honey, and lemon juice. Blend until smooth, ensuring the mixture is vibrant and uniform.
4. Assemble the Popsicles: Start by pouring the red layer into your popsicle molds, filling each about one-third full. Freeze for 1-2 hours or until partially set.
5. Add the White Layer: Once the red layer is partially frozen, carefully pour in the white layer, filling the molds another third of the way. Insert popsicle sticks, if using, before returning the molds to the freezer for another 1-2 hours.
6. Finish with the Blue Layer: Once the white layer is set, add the blue layer to fill the molds completely. Freeze for at least 4 hours or overnight for best results.
7. Remove Popsicles: To release the popsicles, run warm water over the outside of the molds for a few seconds. Gently wiggle the popsicles to release them.
8. Serve and Enjoy: Once removed from the molds, serve immediately, or store in an airtight container in the freezer for later enjoyment.
- Prep Time: 20 minutes
- Cook Time: 0 minutes
Nutrition
- Serving Size: 10 popsicles
- Calories: 80 kcal per popsicle
- Fat: 2g
- Protein: 1g