
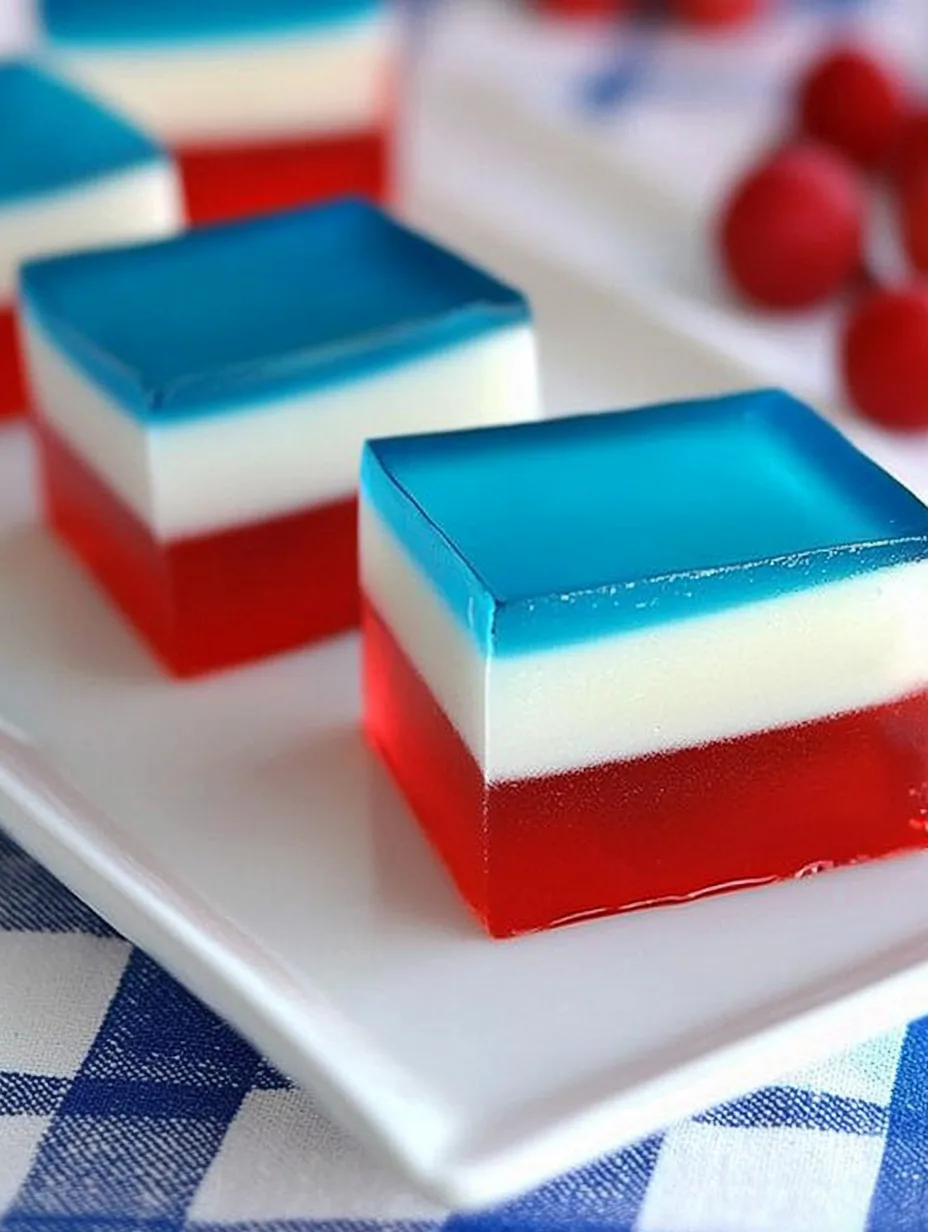
Red White and Blue Finger Jello is an amazing treat that brings a festive touch to any gathering. This colorful dessert captures the essence of celebration, making it a favorite for holidays like the Fourth of July, Memorial Day, or even birthday parties. Every layer of jello not only delights the eyes, but it also excites the palate, combining flavors that are refreshing and fun to eat. If you’ve been searching for a playful and patriotic dessert, look no further. This recipe will inspire your inner chef and bring joy to your family and friends!
Creating Red White and Blue Finger Jello is not just about the taste; it’s about the experience. Each layer can be eaten by hand, making it a fun and interactive dish for gatherings. Imagine serving this dessert with a rainbow of colors, where guests can enjoy scooping their favorite flavors. What’s more exciting than watching the kids dive into a festive treat that screams celebration? Throughout this article, we will explore why this recipe is so special, how to prepare it perfectly, and tips to serve it beautifully. Let’s embark on this delightful culinary journey together!
The best part about making Red White and Blue Finger Jello is that it’s easy to prepare. You don’t need professional culinary skills to wow your guests with this dish. With simple, readily available ingredients and clear steps, anyone can create this stunning dessert. Whether you plan to host a backyard BBQ or a cozy family gathering, the incredible colors of this dessert will make it a centerpiece of joy. Let’s dive deeper into what makes this recipe irresistible!
Why You’ll Love This Recipe
Red White and Blue Finger Jello is not just a visually stunning dish; it’s also packed with advantages that make it a must-try. Here are several reasons why you’ll absolutely fall in love with this incredible recipe:
1. Eye-Catching Presentation – The vibrant colors of red, white, and blue make this dessert stand out and visually appealing.
2. Easy to Make – With minimal preparation and cooking skills, it’s accessible for everyone.
3. Fun to Eat – The finger jello format brings playfulness to the table and gets everyone involved.
4. Customizable Flavor Options – You can experiment with various flavored jello to suit your preferences or the season.
5. Perfect for Any Celebration – This jello treat is perfect for patriotic holidays, summer parties, or children’s birthdays.
6. Refreshing Treat – The coolness of the jello provides a refreshing taste that is especially enjoyable in warm weather.
These factors make this Red White and Blue Finger Jello an unforgettable treat that transforms any gathering into a festive occasion filled with joy and laughter!
Preparation and Cooking Time
Successfully making Red White and Blue Finger Jello requires a little planning, as the layers need time to set properly. Below is a guide to the time needed to prepare this delightful dessert:
– Preparation Time: 30 minutes (excluding layer setting time)
– Setting Time for Each Layer: About 1-2 hours
– Total Time (including all layers): Approximately 4-6 hours (or overnight for best results)
Be sure to allow ample time for each layer to set before adding the next to achieve the perfect texture and presentation!
Ingredients
– 1 (3 oz.) package of red gelatin (e.g., strawberry, cherry)
– 1 (3 oz.) package of blue gelatin (e.g., berry blue, raspberry)
– 1 (3 oz.) package of unflavored gelatin
– 2 cups boiling water
– 1 cup cold water (divided)
– 2 cups sweetened condensed milk
– 1 teaspoon vanilla extract
– Whipped cream (for serving, optional)
– Fresh berries, such as strawberries and blueberries (for garnish, optional)
Step-by-Step Instructions
Creating Red White and Blue Finger Jello is straightforward if you follow these simple steps:
1. Prepare the Red Layer:
– In a bowl, dissolve the red gelatin in 1 cup of boiling water. Stir well until completely dissolved.
– Pour the red gelatin mixture into a 9×13 inch glass dish and refrigerate for 1-2 hours or until fully set.
2. Make the White Layer:
– In another bowl, sprinkle the unflavored gelatin over 1 cup of boiling water. Stir until dissolved.
– Mix in the sweetened condensed milk and vanilla extract. Stir until fully incorporated.
– Pour the white gelatin mix over the set red layer. Refrigerate for another 1-2 hours to set.
3. Prepare the Blue Layer:
– Repeat the process for the blue gelatin: dissolve the blue gelatin in 1 cup of boiling water.
– Once dissolved, pour the blue layer over the white layer. Refrigerate for an additional 1-2 hours to set.
4. Slice and Serve:
– After all layers have set, remove the dish from the refrigerator.
– Cut the jello into squares or rectangles. Use a spatula or your hands to scoop out pieces for serving.
5. Garnish (optional):
– Serve with whipped cream and garnish with fresh berries for an elegant touch.
These steps ensure that your Red White and Blue Finger Jello comes out perfectly every time, delighting both the eyes and the palate!
How to Serve
Serving Red White and Blue Finger Jello can elevate the festive feel of your gathering. Here are some ideas to enhance your presentation and serving:
1. Use Colorful Plates: Serve the jello on vibrant plates to complement the patriotic theme.
2. Add Decorative Toothpicks: If you choose to serve finger jello pieces, consider adding decorative toothpicks for easy handling and additional flair.
3. Create a Jello Station: Set up a self-serve jello station with whipped cream and fresh berries, allowing guests to personalize their servings.
4. Pair with Beverages: Serve alongside refreshing lemonade, iced tea, or even a themed cocktail to enhance the experience.
5. Include a Festive Table Setting: Consider adding themed table decorations to complete the festive atmosphere, such as flags or star-shaped confetti.
With these serving tips, your Red White and Blue Finger Jello will not only taste amazing but also serve as a beautiful centerpiece at your gathering. Enjoy the smiles and excitement it brings to your table!
Additional Tips
– Use Clear Gelatin: For a more transparent look, consider using clear gelatin brands. This enhances the visual appeal of the layers.
– Chill Your Bowls: Before preparing the gelatin, chill your mixing bowls. This helps maintain the temperature of the mixture, ensuring it sets well.
– Experiment with Colors: Don’t limit yourself to just red and blue. You can incorporate other colors for different holidays or themes.
– Add a Layer of Fruit: Layer in fresh fruits like strawberries or blueberries between the jello to add a refreshing surprise.
– Serve in Individual Cups: For a personalized touch, consider serving the finger jello in individual cups or glasses for easy handling.
Recipe Variation
Feel free to get creative with your Red White and Blue Finger Jello! Here are some delicious variations:
1. Flavor Changes: Try different flavors for the jello layers. For instance, use lemon, orange, or grape for a unique taste.
2. Alcohol-Infused Delight: For an adult twist, you can infuse the gelatin with a splash of vodka or rum. Adjust the setting time accordingly.
3. Pudding Layers: Instead of using sweetened condensed milk for the white layer, consider using vanilla pudding for a creamier texture.
4. Layered Fruit Jello: Combine fruit juices into your layers for an added burst of flavor that pairs nicely with each layer.
Freezing and Storage
– Storage: Keep your Red White and Blue Finger Jello covered in the refrigerator for up to 5 days. This helps to maintain its freshness and prevent it from drying out.
– Freezing: While it’s best enjoyed fresh, it can be frozen. Cut the jello into squares and layer between parchment paper in an airtight container. It can last for about 2 months in the freezer. Allow it to thaw in the fridge before serving.
Special Equipment
You will need some essential tools for making this delightful dessert:
– 9×13 inch glass baking dish
– Mixing bowls
– Whisk or spoon for stirring
– Measuring cups
– Refrigerator to set each layer
– A sharp knife or spatula for cutting and serving the jello
Frequently Asked Questions
Can I use sugar-free gelatin for this recipe?
Yes, you can substitute with sugar-free gelatin. The texture may vary slightly, but it will still be delicious!
How can I tell if each layer is set?
Each layer should feel firm to the touch. If it’s still slightly jiggly, it needs a little more time to set.
Is this recipe suitable for kids?
Absolutely! This fun and colorful treat is perfect for kids, making it a popular choice for birthday parties and family gatherings.
Can I make this ahead of time?
Yes, you can prepare it a day in advance! Just ensure you cover it well in the refrigerator to avoid drying.
What if I don’t have sweetened condensed milk?
You can substitute with a mixture of regular milk and sugar, using about 2 cups of milk and 1/2 cup of sugar. Adjust to taste.
Conclusion
Red White and Blue Finger Jello is not just a fun, colorful dessert; it’s an interactive treat that embodies celebration and joy. This recipe brings delightful flavors and playful presentation to any gathering. With simple steps and lots of ways to customize it, this dessert can easily become a favorite among families and friends. Whether for holidays, birthdays, or just for fun, making Red White and Blue Finger Jello is a guaranteed way to light up the occasion!
Red White and Blue Finger Jello: An Incredible Ultimate Recipe
- Total Time: 30 minutes
Ingredients
– 1 (3 oz.) package of red gelatin (e.g., strawberry, cherry)
– 1 (3 oz.) package of blue gelatin (e.g., berry blue, raspberry)
– 1 (3 oz.) package of unflavored gelatin
– 2 cups boiling water
– 1 cup cold water (divided)
– 2 cups sweetened condensed milk
– 1 teaspoon vanilla extract
– Whipped cream (for serving, optional)
– Fresh berries, such as strawberries and blueberries (for garnish, optional)
Instructions
Creating Red White and Blue Finger Jello is straightforward if you follow these simple steps:
1. Prepare the Red Layer:
– In a bowl, dissolve the red gelatin in 1 cup of boiling water. Stir well until completely dissolved.
– Pour the red gelatin mixture into a 9×13 inch glass dish and refrigerate for 1-2 hours or until fully set.
2. Make the White Layer:
– In another bowl, sprinkle the unflavored gelatin over 1 cup of boiling water. Stir until dissolved.
– Mix in the sweetened condensed milk and vanilla extract. Stir until fully incorporated.
– Pour the white gelatin mix over the set red layer. Refrigerate for another 1-2 hours to set.
3. Prepare the Blue Layer:
– Repeat the process for the blue gelatin: dissolve the blue gelatin in 1 cup of boiling water.
– Once dissolved, pour the blue layer over the white layer. Refrigerate for an additional 1-2 hours to set.
4. Slice and Serve:
– After all layers have set, remove the dish from the refrigerator.
– Cut the jello into squares or rectangles. Use a spatula or your hands to scoop out pieces for serving.
5. Garnish (optional):
– Serve with whipped cream and garnish with fresh berries for an elegant touch.
These steps ensure that your Red White and Blue Finger Jello comes out perfectly every time, delighting both the eyes and the palate!
- Prep Time: 30 minutes
- Cook Time: 0 minutes
Nutrition
- Serving Size: 15 servings
- Calories: 150 kcal
- Fat: 5g
- Protein: 2g