
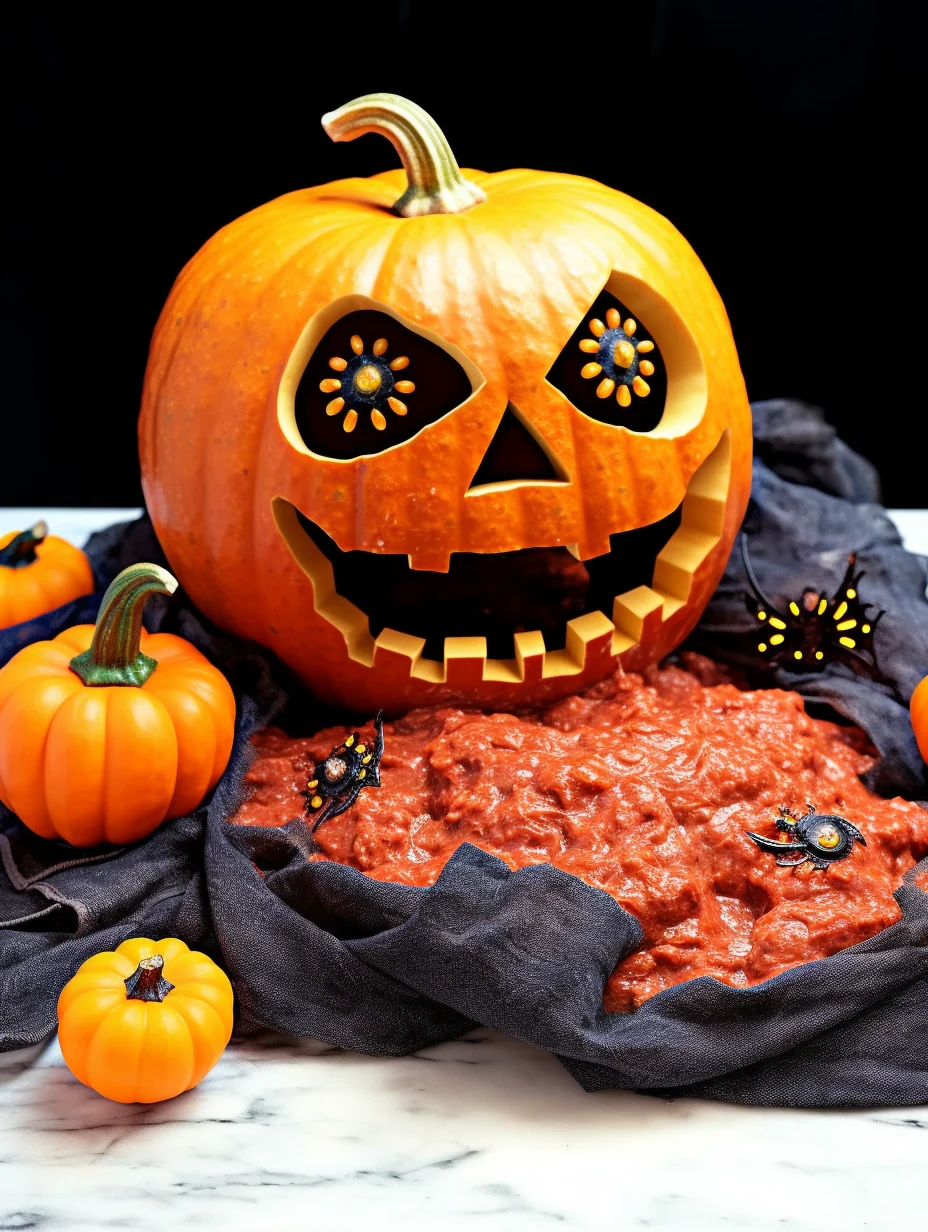
Puking Pumpkin is a thrilling addition to your Halloween festivities. This whimsical treat combines creativity with delightful flavors, perfect for entertaining guests. Imagine a carved pumpkin overflowing with a vibrant punch or a creamy dip, representing all that’s fun and festive about autumn celebrations. This eye-catching centerpiece will not only spark conversations but also tantalize your taste buds, offering a wonderful blend of savory and sweet.
Creating a Puking Pumpkin is more than just a recipe; it’s an experience that captures the essence of Halloween spirit. The first time you set this eerie delight on your table, you’ll feel an incredible sense of accomplishment. The contrast between the fun, spooky appearance and the delicious flavors inside will leave everyone eagerly waiting for a taste. This guide will help you understand why this recipe is so special and how to create your very own Puking Pumpkin.
With its unforgettable presentation and mouthwateringly good taste, there’s no doubt that Puking Pumpkin is a fantastic choice for Halloween parties, family gatherings, or just a fun evening at home. This unique dish not only serves as a conversation starter but also brings joy and excitement to your celebrations as the “puke” mysteriously pours out. Let’s explore why this recipe will quickly become a Halloween favorite!
Why You’ll Love This Recipe
Puking Pumpkin is an immersive culinary adventure that will win the hearts of all who see and taste it. Here are some amazing reasons why this recipe is a must-try:
1. Interactive Fun: Guests will love diving in to grab their share of the delicious “puke.”
2. Visual Appeal: The dramatic effect of a pumpkin “puking” adds an element of excitement to any Halloween table.
3. Versatile Ingredients: You can fill the pumpkin with a variety of dips or drinks, catering to all preferences.
4. Simple Preparation: The steps are straightforward, making it easy for anyone to successfully create this treat.
5. Crowd-Pleaser: The combination of flavors and presentation makes it a hit among kids and adults alike.
6. Perfect for Gatherings: This recipe is ideal for large parties, as it serves multiple guests at once.
With each delightful scoop from your Puking Pumpkin, you’ll understand the thrill and joy that comes from this unique and festive dish. It’s bound to create lasting memories at your Halloween celebrations!
Preparation and Cooking Time
Creating your Puking Pumpkin will take around 1 hour and 20 minutes, which includes preparation and assembly. Here’s how the time breaks down:
– Preparation Time: 30 minutes
– Assembly Time: 15 minutes
– Chilling Time: 30 minutes
These times may vary slightly depending on your kitchen setup and experience. However, this guide provides a reliable framework for planning your cooking schedule.
Ingredients
– 1 medium-sized pumpkin
– 2 cups of your favorite dip (e.g., guacamole, spinach artichoke dip)
– 1 cup sour cream (for topping)
– 1 cup of shredded cheese (e.g., cheddar, mozzarella)
– 1 cup mixed diced vegetables (e.g., bell peppers, cucumbers, carrots)
– 1 flavored drink (e.g., orange soda, green punch)
– Fresh herbs (e.g., cilantro, parsley) for garnish
– Optional: Tortilla chips or veggies for dipping
Step-by-Step Instructions
Creating your Puking Pumpkin is an exciting process. Follow these simple steps to bring this delightful centerpiece to life:
1. Select Your Pumpkin: Choose a medium-sized pumpkin that has a stable bottom to prevent tipping.
2. Prepare the Pumpkin: Cut the top off the pumpkin to create a lid. Carefully scoop out the seeds and pulp until the inside is clean.
3. Make the Dip: In a bowl, mix your chosen dip ingredients together. Allow it to chill in the refrigerator for 30 minutes for the best flavor.
4. Fill with Dip: Once fully prepared, spoon the dip into the hollow pumpkin, filling it generously.
5. Add Sour Cream: Top the dip with sour cream, creating a “puke” effect at the top of the pumpkin.
6. Sprinkle Cheese: Evenly distribute the shredded cheese on top of the sour cream for an added flavor layer.
7. Prepare Serve Station: Arrange tortilla chips or sliced veggies around the pumpkin for dipping purposes.
8. Creative Liquid Overflow: Finish by pouring your flavored drink strategically from the center of the pumpkin, creating a “puking” effect.
9. Garnish: Add fresh herbs around the base for a touch of color and decoration.
10. Display: Set the Puking Pumpkin in the center of your gathering table for maximum impact.
By following these steps, you’ll create a show-stopping centerpiece that will enhance any Halloween gathering.
How to Serve
To truly impress your guests with your Puking Pumpkin presentation, consider the following serving suggestions:
1. Presentation: Use a festive platter or tablecloth underneath to highlight the colorful contrasts of the pumpkin and dip.
2. Dipping Options: Encourage guests to use tortilla chips, breadsticks, or sliced veggies to enjoy the delicious dip.
3. Keep it Chilled: If using a creamy dip, ensure it stays cold by placing the pumpkin on a bed of ice for longer-lasting freshness.
4. Themed Props: Enhance the Halloween vibe with decorative elements, such as cobwebs, spooky skeletons, or LED candles around the setup.
5. Interactive Experience: Make it a fun activity by inviting guests to create their own combinations of dips and drinks right from the pumpkin.
By focusing on these serving suggestions, you’ll create an unforgettable experience for your guests that’s as enjoyable to eat as it is to admire!
Let the fun and deliciousness of your Puking Pumpkin captivate your Halloween gathering!
Additional Tips
– Opt for Fresh Ingredients: Use fresh herbs and high-quality vegetables for the best flavor in your Puking Pumpkin. Fresh ingredients enhance the overall taste and presentation of the dish.
– Customize the Fillings: Don’t hesitate to mix and match dips or drinks to cater to your guests’ preferences. Consider spicy, sweet, or tangy options for varied flavor profiles.
– Carve with Care: When carving your pumpkin, ensure you create a clean edge to give it a polished look. This will make the “puke” effect even more appealing.
– Experiment with Colors: Utilize food coloring in your dips to create a more dramatic visual impact. For instance, use vibrant hues of purple or green for a spooky look.
– Serve with Style: Use creative serving utensils to enhance the presentation. Consider Halloween-themed dishes or glasses to align with the spooky atmosphere.
Recipe Variation
Get creative with your Puking Pumpkin by trying these variations:
1. Spicy Kick: Add jalapeños or hot sauce to your dip mix for a spicy twist that will surprise your guests.
2. Sweet Delight: Fill the pumpkin with a sweet dessert dip like cheesecake dip or chocolate ganache accompanied by fruit or graham crackers.
3. Savory Specialty: Instead of a dip, fill the pumpkin with a warm soup, such as butternut squash or pumpkin soup, for a unique twist to the classic recipe.
4. Layered Approach: Create layers in the pumpkin with different dips, like a layer of guacamole, followed by spinach dip, and topped with salsa for a colorful and textured presentation.
Freezing and Storage
– Storage: If you have leftover dip, store it in an airtight container in the fridge. It should remain fresh for up to 3 days.
– Freezing: Most dips can be frozen, but freezing the pumpkin itself isn’t recommended. When ready to use the dip again, simply thaw it in the refrigerator overnight before serving.
Special Equipment
To make your Puking Pumpkin, you’ll need some essential tools:
– Pumpkin carving knife or serrated knife
– Mixing bowls for combining dips
– Spoon for filling the pumpkin
– Cutting board
– Festive serving platter or tablecloth
– Ice pack or tray to keep dips chilled (if needed)
Frequently Asked Questions
How do I choose the right pumpkin?
When selecting a pumpkin, look for one that is firm, has a stable base, and a smooth, unblemished skin.
Can I prepare the dip in advance?
Absolutely! You can make the dip a day ahead and store it in the fridge until you’re ready to assemble your Puking Pumpkin.
What if my pumpkin tips over?
Ensure your pumpkin has a flat base and is stable. You can also use a small cutting board or decorative plate as a base for added support.
Is Puking Pumpkin suitable for kids?
Yes, this dish is a great hit among children! Use kid-friendly dips and drinks and supervise them while enjoying their spooky treat.
Can I make the Puking Pumpkin without a real pumpkin?
Yes, if you prefer a hassle-free option, consider using a hollowed-out bowl or other container that fits the theme while still giving the same appeal.
Conclusion
The Puking Pumpkin is a fantastic creation for your Halloween celebrations, blending fun and flavor in an unforgettable way. With its vibrant presentation and interactive nature, this dish is sure to please everyone at your gathering. By incorporating your own twists and variations, you can personalize this festive treat to make it truly unique. Enjoy the spirit of Halloween and let your creativity shine with this delightful centerpiece!
Puking Pumpkin: An Amazing Ultimate Recipe You Must Try
- Total Time: 45 minutes
Ingredients
– 1 medium-sized pumpkin
– 2 cups of your favorite dip (e.g., guacamole, spinach artichoke dip)
– 1 cup sour cream (for topping)
– 1 cup of shredded cheese (e.g., cheddar, mozzarella)
– 1 cup mixed diced vegetables (e.g., bell peppers, cucumbers, carrots)
– 1 flavored drink (e.g., orange soda, green punch)
– Fresh herbs (e.g., cilantro, parsley) for garnish
– Optional: Tortilla chips or veggies for dipping
Instructions
Creating your Puking Pumpkin is an exciting process. Follow these simple steps to bring this delightful centerpiece to life:
1. Select Your Pumpkin: Choose a medium-sized pumpkin that has a stable bottom to prevent tipping.
2. Prepare the Pumpkin: Cut the top off the pumpkin to create a lid. Carefully scoop out the seeds and pulp until the inside is clean.
3. Make the Dip: In a bowl, mix your chosen dip ingredients together. Allow it to chill in the refrigerator for 30 minutes for the best flavor.
4. Fill with Dip: Once fully prepared, spoon the dip into the hollow pumpkin, filling it generously.
5. Add Sour Cream: Top the dip with sour cream, creating a “puke” effect at the top of the pumpkin.
6. Sprinkle Cheese: Evenly distribute the shredded cheese on top of the sour cream for an added flavor layer.
7. Prepare Serve Station: Arrange tortilla chips or sliced veggies around the pumpkin for dipping purposes.
8. Creative Liquid Overflow: Finish by pouring your flavored drink strategically from the center of the pumpkin, creating a “puking” effect.
9. Garnish: Add fresh herbs around the base for a touch of color and decoration.
10. Display: Set the Puking Pumpkin in the center of your gathering table for maximum impact.
By following these steps, you’ll create a show-stopping centerpiece that will enhance any Halloween gathering.
- Prep Time: 15 minutes
- Cook Time: 30 minutes
Nutrition
- Serving Size: 10 servings
- Calories: 150 kcal
- Fat: 8g
- Protein: 5g