
Oreo Icebox Cake is a delicious dessert that has captured the hearts of many dessert lovers. This no-bake treat is perfect for any occasion, from simple family gatherings to extravagant celebrations. With its creamy filling and delightful layers of Oreo cookies, every bite feels like a decadent experience. The combination of sweet vanilla and rich chocolate creates a flavor that is simply irresistible, making it a go-to dessert for those warm summer days or whenever you’re in need of a quick, satisfying treat.
If you’ve never had the pleasure of indulging in an Oreo Icebox Cake, you’re in for a treat. This cake is incredibly easy to prepare, requiring minimal effort while delivering maximum taste. It’s a show-stopper, with layers of cookies combining harmoniously to create an unforgettable dessert. In this article, you will discover why this recipe is so amazing, how to make it step-by-step, and tips on serving it for the best presentation. So, get ready to learn how to make this ultimate dessert that will surely impress your family and friends!
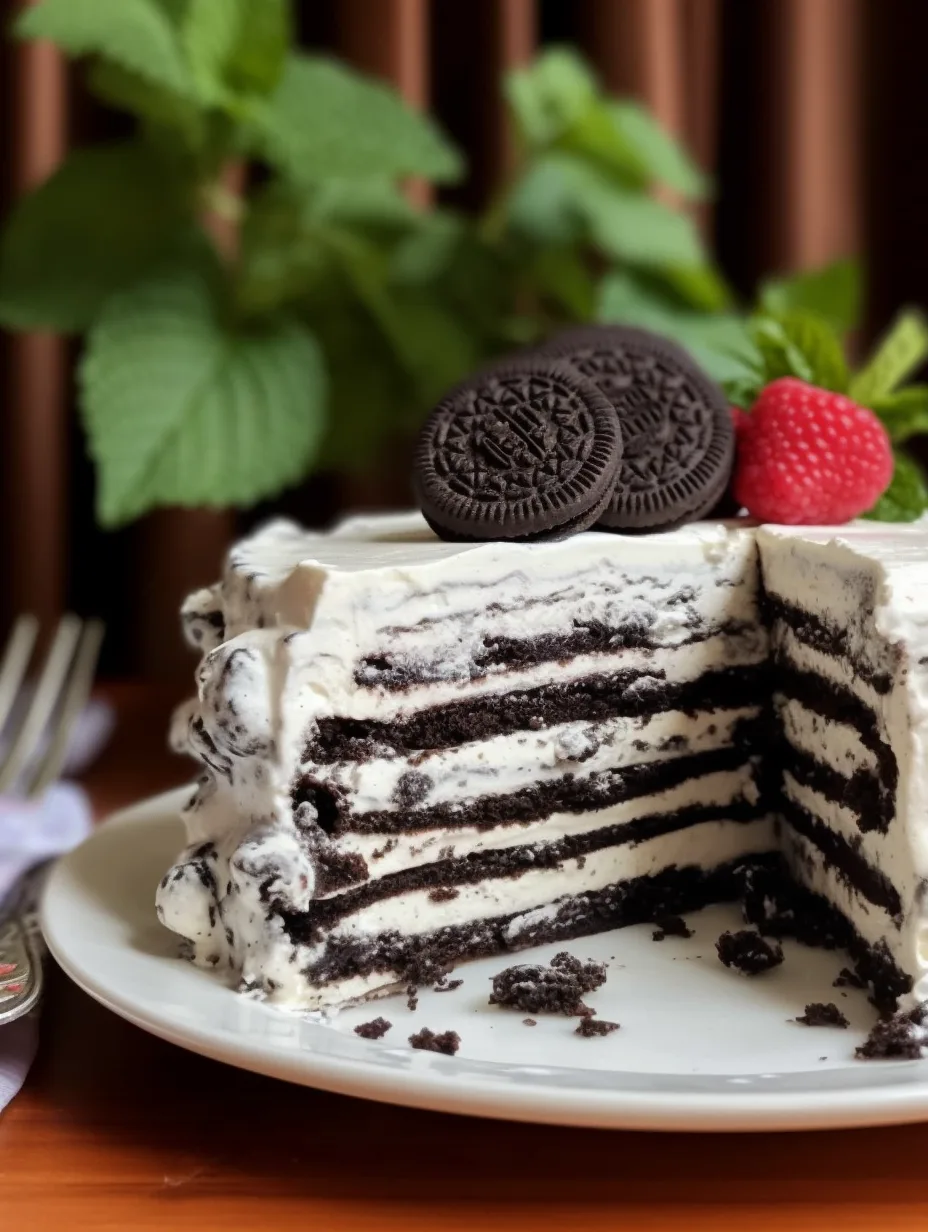
What makes Oreo Icebox Cake truly special is its simplicity combined with stunning flavors. The cookies soak up the moisture from the whipped cream, becoming soft and cake-like in texture. This unique characteristic makes it a delightful surprise that keeps everyone coming back for seconds. Let’s explore what sets this recipe apart and how you can whip one up in no time!
Why You’ll Love This Recipe
There are countless reasons to adore Oreo Icebox Cake, but here are a few highlights that make it a must-try:
1. No Baking Required: This cake is a perfect solution for those who may not have baking skills or time to bake. It requires no oven and minimal cooking.
2. Quick Preparation: Making this cake takes just a little over an hour, allowing you to spend more time enjoying with your guests rather than stuck in the kitchen.
3. Crowd-Pleasing Dessert: With its cookie and cream layers, this dessert appeals to almost everyone. It’s a family favorite that will never go out of style.
4. Customizable Options: You can easily modify the recipe by using different types of cookies or adding layers of fruit. The possibilities are endless!
5. Beautiful Presentation: Despite being simple to prepare, the visual appeal of the layered cookies and cream is sure to impress.
6. Perfect for Any Occasion: Whether it’s a birthday, holiday, or just a family dinner, Oreo Icebox Cake is versatile and fits into any gathering seamlessly.
With these fantastic aspects, it’s easy to see why Oreo Icebox Cake is cherished by many. Every layer is filled with flavor and nostalgia, inviting everyone to dig in and enjoy!
Preparation and Cooking Time
Preparing an Oreo Icebox Cake is a breeze. Here’s a breakdown of the time involved:
– Preparation Time: 20 minutes
– Chilling Time: At least 4 hours (overnight is best)
– Total Time: Approximately 4 hours and 20 minutes
While the preparation itself takes very little time, allowing the cake to chill is crucial for achieving the right texture. This refreshing dessert requires patience, but the wait is well worth it!
Ingredients
– 3 cups heavy whipping cream
– 1 cup powdered sugar
– 1 teaspoon vanilla extract
– 36 Oreo cookies (approx.)
– 1 cup chocolate syrup (optional for drizzling)
Step-by-Step Instructions
Making Oreo Icebox Cake involves just a few straightforward steps. Follow these easy instructions for a delicious result:
1. Prep Your Pan: Choose a 9×13-inch baking dish. Lightly grease the bottom with cooking spray or oil.
2. Whip the Cream: In a large bowl, combine the heavy whipping cream, powdered sugar, and vanilla extract. Use an electric mixer to whip until stiff peaks form.
3. Layer the Cookies: Take an Oreo cookie and quickly dip it into milk (don’t soak too long!). Lay it in the bottom of the greased pan. Repeat this until the bottom is fully covered with cookies.
4. Spread the Cream: Once the bottom layer of cookies is set, spread a generous layer of the whipped cream mixture over the cookies, smoothing it out as needed.
5. Continue Layering: Repeat the process, layering dipped Oreos followed by whipped cream, until you reach the top. Aim for at least three layers of cookies and cream, finishing with whipped cream on top.
6. Chill: Once layered, cover the dish with plastic wrap. Refrigerate for at least 4 hours, or overnight for the best result.
7. Serve: After chilling, you can garnish the top with chocolate syrup, crushed Oreos, or even whipped cream for a decorative touch.
8. Slice and Enjoy: Cut into squares and serve to your guests, watching their faces light up in delight!
By following these steps, you’ll create an incredible Oreo Icebox Cake that defines simplicity and satisfaction.
How to Serve
When it’s time to serve your Oreo Icebox Cake, keep these tips in mind:
1. Presentation Matters: Use a clear glass dish to showcase the beautiful layers of cookies and cream. A decorative serving platter can also enhance the visual appeal.
2. Serving Size: Opt for generous portions, but not too overwhelming. Slices should be enough to satisfy cravings without leaving guests too full.
3. Accompany with Extras: Fresh berries, a drizzle of chocolate or caramel syrup, and a dollop of whipped cream can elevate the dessert experience further.
4. Beverage Pairings: Offer coffee on the side or chilled milk to complement the sweetness of the cake, enhancing guest satisfaction.
Following these serving suggestions will help your Oreo Icebox Cake shine, ensuring that everyone remembers this delectable dessert long after the last slice is gone. Enjoy the rave reviews as your recipe becomes a staple at family gatherings and parties!
Additional Tips
– Use Fresh Ingredients: Ensure your whipping cream is fresh for optimal flavor and texture. Stale cookies can affect the overall taste.
– Adjust the Sweetness: You can modify the amount of powdered sugar in the cream to suit your taste. This flexibility allows you to tailor the sweetness.
– Let It Chill Longer: For the best results, let your Oreo Icebox Cake chill overnight. This will enhance the flavors and texture of the dessert, making it even more delicious.
– Experiment with Flavors: Consider adding a hint of peppermint extract or other flavoring to the whipped cream. This unique twist can create a refreshing variation.
Recipe Variation
There are many fun ways to personalize your Oreo Icebox Cake! Here are a few unique variations to try:
1. Peanut Butter Lovers: Incorporate peanut butter into the whipped cream or drizzle it over the top. Peanut butter and chocolate are a classic combination.
2. Minty Fresh: Use Mint Oreo cookies instead of regular ones to give your cake a refreshing mint flavor.
3. Layer in Fruits: Add layers of fruit such as sliced strawberries or banana between the layers of cookies for a fruity twist.
4. Chocolate Lovers Delight: Add a layer of chocolate pudding between the cookie and cream layers for an even richer chocolate experience.
Freezing and Storage
– Refrigerator Storage: Keep your prepped Oreo Icebox Cake in the refrigerator. It should remain fresh for 4-5 days, tightly covered to prevent drying out.
– Freezing the Cake: If you want to store it longer, you can freeze the cake. Wrap it in plastic wrap and then foil to prevent freezer burn. It can last in the freezer for up to 3 months.
– Thawing: When ready to enjoy, thaw overnight in the refrigerator before serving to maintain the best texture.
Special Equipment
To make your Oreo Icebox Cake, gather the following essential tools:
– Mixing bowls for combining ingredients.
– Electric mixer for whipping the cream to the right texture.
– A 9×13 inch baking pan for layer construction.
– Plastic wrap to cover the dish while chilling.
– Measuring cups and spoons for accurate ingredient amounts.
Frequently Asked Questions
Can I use whipped topping instead of heavy cream?
Yes, you can substitute whipped topping for heavy cream. However, homemade whipped cream often provides a richer flavor and texture.
How long should I let it chill?
It’s best to chill the cake for at least 4 hours, but overnight is preferable for the best flavor and texture.
Can I use gluten-free Oreos?
Absolutely! Gluten-free Oreos can be used to make this dessert suitable for those with gluten sensitivities.
What if I don’t have powdered sugar?
You can make a substitute by blending granulated sugar in a blender or processor until it becomes a fine powder.
Is this dessert suitable for a crowd?
Yes! The Oreo Icebox Cake is easily customizable and serves a larger group, making it perfect for parties or gatherings.
Conclusion
The Oreo Icebox Cake is an extraordinary dessert that blends simplicity with indulgence. Its creamy filling, delightful layers, and soft cookie texture make it a favorite among dessert lovers. Whether you’re hosting a gathering or simply satisfying a sweet craving, this cake is sure to impress. With endless variations and easy preparation, there’s no reason not to make this dessert your next go-to treat!

Oreo Icebox Cake: An Incredible Ultimate Recipe You Must Try
- Total Time: 42 minute
Ingredients
– 3 cups heavy whipping cream
– 1 cup powdered sugar
– 1 teaspoon vanilla extract
– 36 Oreo cookies (approx.)
– 1 cup chocolate syrup (optional for drizzling)
Instructions
Making Oreo Icebox Cake involves just a few straightforward steps. Follow these easy instructions for a delicious result:
1. Prep Your Pan: Choose a 9×13-inch baking dish. Lightly grease the bottom with cooking spray or oil.
2. Whip the Cream: In a large bowl, combine the heavy whipping cream, powdered sugar, and vanilla extract. Use an electric mixer to whip until stiff peaks form.
3. Layer the Cookies: Take an Oreo cookie and quickly dip it into milk (don’t soak too long!). Lay it in the bottom of the greased pan. Repeat this until the bottom is fully covered with cookies.
4. Spread the Cream: Once the bottom layer of cookies is set, spread a generous layer of the whipped cream mixture over the cookies, smoothing it out as needed.
5. Continue Layering: Repeat the process, layering dipped Oreos followed by whipped cream, until you reach the top. Aim for at least three layers of cookies and cream, finishing with whipped cream on top.
6. Chill: Once layered, cover the dish with plastic wrap. Refrigerate for at least 4 hours, or overnight for the best result.
7. Serve: After chilling, you can garnish the top with chocolate syrup, crushed Oreos, or even whipped cream for a decorative touch.
8. Slice and Enjoy: Cut into squares and serve to your guests, watching their faces light up in delight!
By following these steps, you’ll create an incredible Oreo Icebox Cake that defines simplicity and satisfaction.
- Prep Time: 15 minutes
- Cook Time: –
Nutrition
- Serving Size: 12
- Calories: 320 kcal
- Fat: 19g
- Protein: 4g