
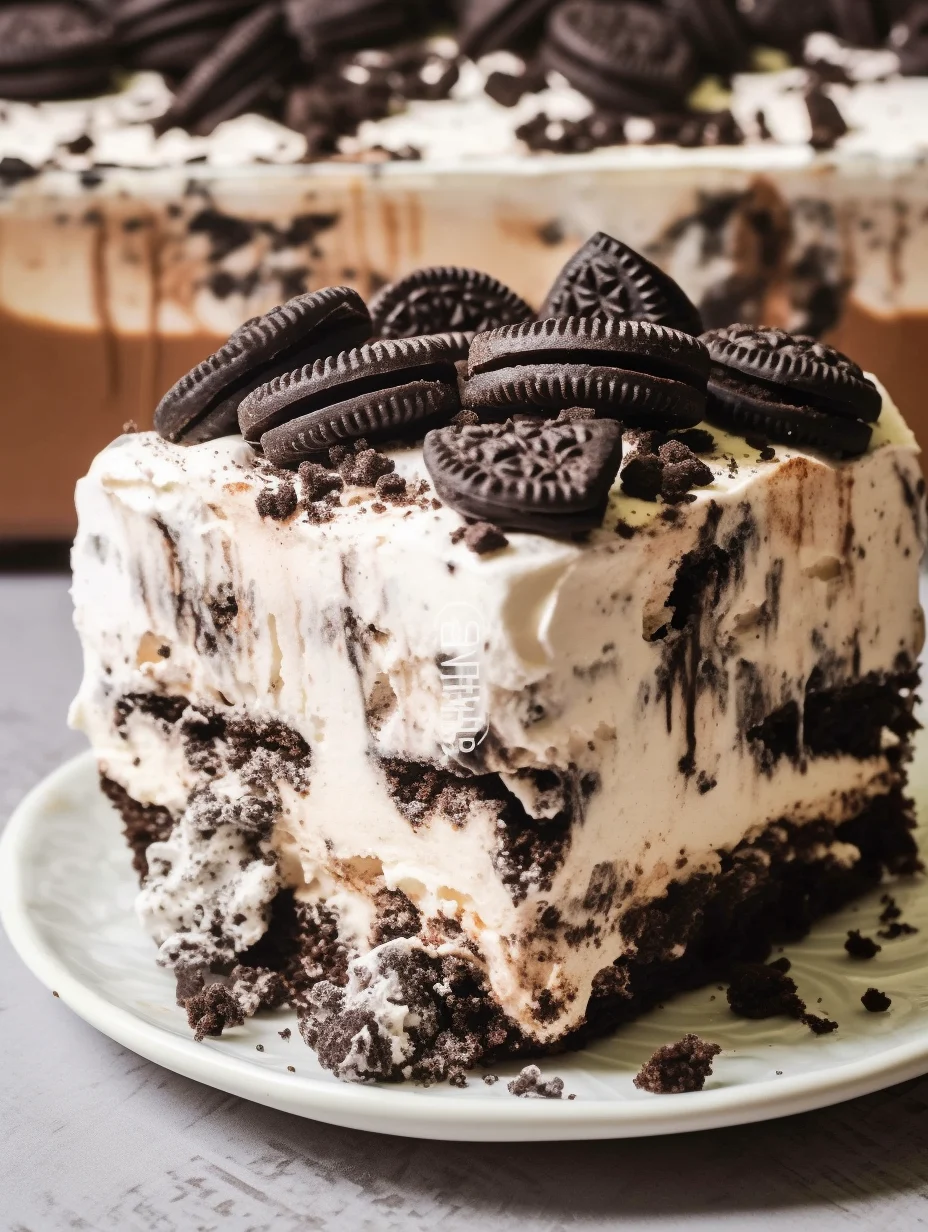
Oreo Ice Cream Cake is a dessert that combines the delightful crunch of Oreos with creamy, decadent ice cream. This amazing treat is not just a cake; it’s a celebration on a plate, perfect for birthdays, barbecues, or any occasion that calls for a distinctive dessert. The combination of flavors and textures makes it a favorite among both kids and adults alike. If you’ve ever enjoyed the classic combination of cookies and cream, then you’re in for a delectable surprise with this easy-to-follow recipe.
Imagine digging into a slice of Oreo Ice Cream Cake, where the smooth ice cream melds with the crunch of the Oreo crust. Every bite is a blissful mix that shows just how much joy a simple dessert can bring to a gathering. This cake isn’t merely a dessert; it’s an experience, bringing back nostalgic childhood memories associated with ice cream and cookies. In this guide, we’ll explore why this recipe is a hit, how its components work together, and tips for serving it beautifully.
The Oreo Ice Cream Cake is the ultimate indulgence for any dessert lover. You’ll appreciate how straightforward it is to prepare, requiring minimal ingredients and effort. In addition, the variation in flavor—from chocolate to vanilla offers something for everyone, ensuring it holds a special place at your next celebration.
So, let’s get started and discover why the Oreo Ice Cream Cake is an incredible choice for your dessert table!
Why You’ll Love This Recipe
Oreo Ice Cream Cake brings together delightful ingredients that play well with each other. Here are some reasons why you’ll fall in love with this recipe:
1. Simple Ingredients – Most of the ingredients are likely in your home already.
2. No-Bake Delight – This recipe requires no baking, making it a quick option for last-minute gatherings.
3. Versatile Flavors – You can change the ice cream flavor to suit your preference, from mint chocolate chip to strawberry.
4. Impressive Presentation – Layering the cake and topping it with whipped cream creates a visually stunning dessert.
5. Kid-Friendly – Its cookie and ice cream base make it a hit among children, ensuring smiles all around.
6. Easy to Customize – Add your favorite toppings or variations to make this cake uniquely yours.
These factors highlight why Oreo Ice Cream Cake is beloved by so many. Each layer reveals bursts of flavor, making every slice a celebration of happiness!
Preparation and Cooking Time
Creating the Oreo Ice Cream Cake is a simple endeavor and can be done in just a few hours. Here’s a breakdown of the time required:
– Preparation Time: 20 minutes
– Freezing Time: 4-6 hours (or overnight for best results)
– Total Time: Approximately 4-6 hours or overnight
This timeframe may vary slightly depending on how quickly you work, but this estimate is a good guideline to follow for making this delicious dessert.
Ingredients
– 24 Oreo cookies (crushed)
– ½ cup unsalted butter (melted)
– 1.5 quarts vanilla ice cream (softened)
– 1 cup whipped cream (for topping)
– Additional crushed Oreos (for garnish)
– Chocolate syrup (optional, for drizzling)
Step-by-Step Instructions
Making Oreo Ice Cream Cake is straightforward, and by following these steps, you’ll create a delicious dessert everyone will love:
1. Prepare the Pan: Start by greasing a 9-inch springform pan lightly.
2. Crush the Oreos: In a large bowl, crush 24 Oreo cookies into fine crumbs.
3. Make the Crust: Pour the melted butter over the cookie crumbs and mix until combined.
4. Press the Crust: Press the mixture evenly into the bottom of the prepared springform pan to form a crust.
5. Add Ice Cream: Spoon the softened vanilla ice cream over the Oreo crust, smoothing it evenly with a spatula.
6. Layer More Oreos: Sprinkle additional crushed Oreos over the ice cream layer for added texture and flavor.
7. Freeze the Cake: Cover the pan and freeze the cake for 4-6 hours, or until firm. Overnight is recommended for the best texture.
8. Prepare for Serving: Once frozen, remove the cake from the springform pan and place it on a serving platter.
9. Top with Whipped Cream: Spread the whipped cream evenly over the top of the cake.
10. Garnish: Decorate with more crushed Oreos and drizzle chocolate syrup if desired.
By following these steps, you create an impressive and delicious Oreo Ice Cream Cake that is sure to be a hit!
How to Serve
To make the most of your Oreo Ice Cream Cake, consider the following serving tips:
1. Presentation: Elevate the cake with a decorative cake stand to make it visually appealing.
2. Slice Size: Cut generous but not overwhelming slices to encourage guests to go back for seconds.
3. Warmth and Contrast: Serve with warm chocolate sauce or fresh fruit compote for an exciting flavor contrast.
4. Beverage Pairing: A scoop of vanilla ice cream or a glass of milk pairs perfectly for a classic touch.
5. Garnish on Plates: Consider placing some crushed Oreos or berries on the serving plates for an added touch.
By thoughtfully serving your Oreo Ice Cream Cake, you create an unforgettable dessert experience for your family and friends, leaving them asking for the recipe!
Additional Tips
– Use High-Quality Ice Cream: The flavor of the ice cream is essential. Choose a premium brand for the best taste.
– Let Ice Cream Soften: Before spreading it over the crust, let the ice cream sit out for a few minutes to soften. This makes spreading easier.
– Use a Hot Knife for Slicing: For cleaner slices, dip your knife in hot water before cutting the cake. Wipe it dry between cuts to prevent melting mess.
– Experiment with Toppings: Consider adding chocolate chips or sprinkles on top for extra flavor and color.
Recipe Variation
Feel free to experiment! Here are some delicious variations of the Oreo Ice Cream Cake:
1. Mint Oreo Twist: Substitute regular Oreos with mint-flavored ones, and use mint chocolate chip ice cream for a refreshing take.
2. Peanut Butter Lovers: Incorporate a layer of peanut butter between the ice cream and crushed Oreos. This adds a rich, savory flavor.
3. Fruity Oreo Delight: Use flavors like strawberry or cookies and cream ice cream, combining it with crushed strawberries for a fruity surprise within the cake.
4. Coffee Infusion: Use coffee ice cream along with crushed espresso-flavored Oreos for an energizing dessert.
Freezing and Storage
– Storage: Store any leftover Oreo Ice Cream Cake in the freezer, covered tightly to prevent ice crystals from forming. It can stay fresh for up to 2 weeks.
– Portion Control: If desired, cut the cake into slices before freezing. This way, you can easily grab a piece whenever you crave something sweet.
– Avoid Repeated Thawing: It’s best to take out only the portions you plan to serve, as repeated thawing and refreezing can affect the texture and flavor.
Special Equipment
To prepare the Oreo Ice Cream Cake, gather the following equipment:
– Springform Pan: This allows for easy removal of the cake once it has set.
– Mixing Bowls: You will need a couple of sizes for mixing the crust and ice cream.
– Spatula: Ideal for spreading the ice cream smoothly over the crust.
– Rolling Pin or Food Processor: Use this for crushing the Oreos into fine crumbs.
Frequently Asked Questions
Can I use gluten-free Oreos?
Yes, regular Oreos are naturally gluten-free, making them suitable for those with gluten intolerance.
How long can I keep the cake in the freezer?
The Oreo Ice Cream Cake can be stored in the freezer for up to 2 weeks, ensuring that it retains its flavor and texture.
Is there a dairy-free option for this recipe?
Absolutely! Substitute regular ice cream with dairy-free alternatives. There are plenty of delicious coconut or almond milk-based ice creams available.
What if I don’t have a springform pan?
You can use any similar-sized pan lined with parchment paper. Just ensure to press the crust firmly to keep it together when removing.
Can I serve this cake right after making it?
It’s best to let the cake set in the freezer for at least a few hours to achieve the desired firmness.
Conclusion
Oreo Ice Cream Cake is a show-stopping dessert that blends nostalgia with modern indulgence. It’s the perfect dish for any celebration. With its layers of creaminess and crunch, this cake brings joy to both young and old alike. Create it for birthday parties, family gatherings, or just to satisfy a sweet tooth. Enjoy every moment as you share this delightful treat with friends and family!

Oreo Ice Cream Cake: An Incredible Ultimate Recipe
- Total Time: 33 minute
Ingredients
– 24 Oreo cookies (crushed)
– ½ cup unsalted butter (melted)
– 1.5 quarts vanilla ice cream (softened)
– 1 cup whipped cream (for topping)
– Additional crushed Oreos (for garnish)
– Chocolate syrup (optional, for drizzling)
Instructions
Making Oreo Ice Cream Cake is straightforward, and by following these steps, you’ll create a delicious dessert everyone will love:
1. Prepare the Pan: Start by greasing a 9-inch springform pan lightly.
2. Crush the Oreos: In a large bowl, crush 24 Oreo cookies into fine crumbs.
3. Make the Crust: Pour the melted butter over the cookie crumbs and mix until combined.
4. Press the Crust: Press the mixture evenly into the bottom of the prepared springform pan to form a crust.
5. Add Ice Cream: Spoon the softened vanilla ice cream over the Oreo crust, smoothing it evenly with a spatula.
6. Layer More Oreos: Sprinkle additional crushed Oreos over the ice cream layer for added texture and flavor.
7. Freeze the Cake: Cover the pan and freeze the cake for 4-6 hours, or until firm. Overnight is recommended for the best texture.
8. Prepare for Serving: Once frozen, remove the cake from the springform pan and place it on a serving platter.
9. Top with Whipped Cream: Spread the whipped cream evenly over the top of the cake.
10. Garnish: Decorate with more crushed Oreos and drizzle chocolate syrup if desired.
By following these steps, you create an impressive and delicious Oreo Ice Cream Cake that is sure to be a hit!
- Prep Time: 15 minutes
- Cook Time: N/A
Nutrition
- Serving Size: 12
- Calories: 350 kcal
- Fat: 18g
- Protein: 4g