
There are desserts that you bake with love, precision, and a bit of elbow grease—and then there are desserts like this No-Bake Snickers Pie that somehow deliver all the same comfort, indulgence, and wow-factor with barely any effort. If you’re someone who appreciates a creamy, candy-loaded dessert that comes together in minutes, this one’s going to be your new go-to. From the moment I first made this pie, it instantly earned a spot in my favorite easy dessert lineup.
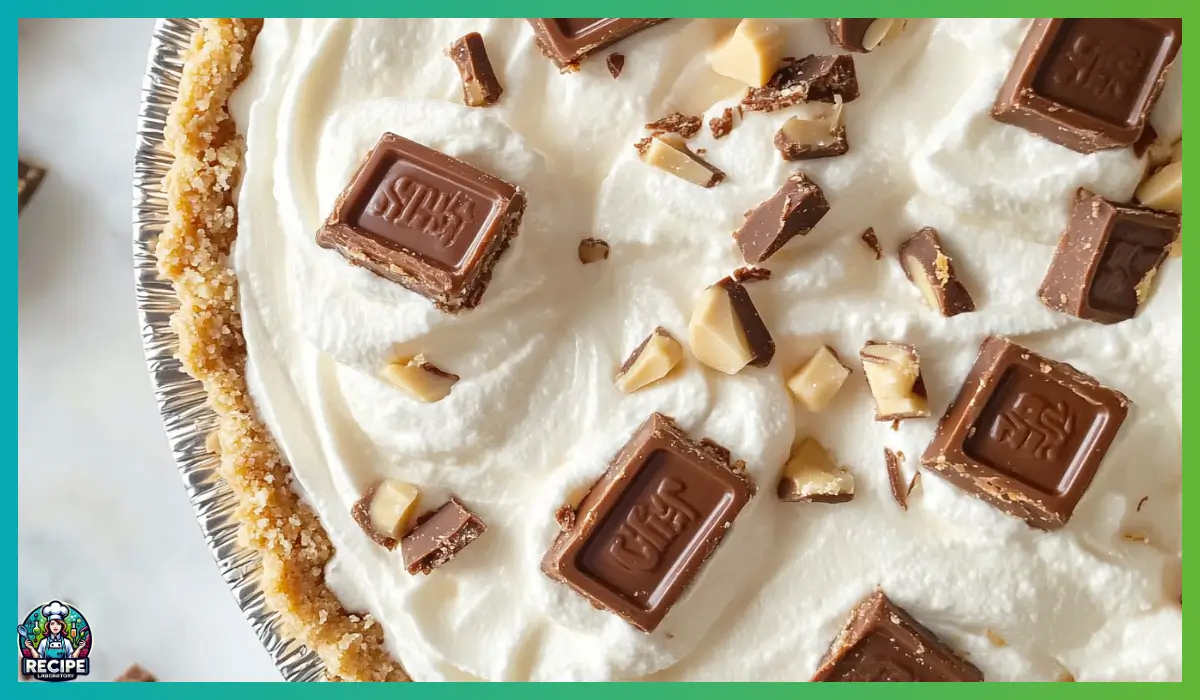
This recipe combines all the best things about no-bake desserts: minimal prep, no oven, and universally loved ingredients. We’re talking about a rich and fluffy filling made from cream cheese and Cool Whip, sweetened with just a touch of sugar and vanilla, then loaded with chopped Snickers bars. That sweet and salty combination of caramel, chocolate, nougat, and peanuts gets folded into a silky filling that sits in a ready-made Oreo crust. The result is creamy, crunchy, chocolatey, and impossible to resist.
I first brought this pie to a family barbecue on a hot summer day when nobody wanted to turn on the oven. It was gone within ten minutes. Since then, it’s been requested at nearly every birthday, potluck, and holiday gathering. The best part? It’s so easy that I usually have the ingredients on hand, ready for whenever that sweet craving hits.
This dessert is not only foolproof, but it’s also an absolute crowd-pleaser. Whether you’re an experienced baker or someone just starting out in the kitchen, you’ll find this recipe approachable and totally stress-free. So if you’re looking for something easy, impressive, and completely decadent, stick with me—because this no-bake Snickers pie is about to become your new favorite dessert.
Why You’ll Love This No-Bake Snickers Pie Recipe
This recipe is the definition of effortless indulgence. One of the main reasons it’s such a hit in my household is that it delivers bakery-quality flavor without the complexity or time commitment. In fact, I’d argue it’s almost too easy, which makes it dangerously tempting to whip up whenever the mood strikes.
First, let’s talk texture. The filling is incredibly creamy, thanks to the combination of cream cheese and Cool Whip. The cream cheese adds a slight tang that balances out the sweetness, while the Cool Whip gives the filling that light, airy finish. Every bite feels like a soft cloud of candy-infused goodness.
Then, you get to the Snickers. Chopped into generous chunks and folded right into the filling, they bring that irresistible mix of chewy caramel, crunchy peanuts, and rich chocolate. The texture contrast is so satisfying—you’ve got soft and smooth, chewy and crunchy, all in one bite. If you’re a fan of candy bar desserts, you’ll love how this one takes a nostalgic treat and transforms it into a luxurious pie.
The Oreo crust? It adds the perfect chocolate base without any baking involved. The cookie crumb crust pairs beautifully with the candy bar filling, offering a little bit of crunch and a lot of chocolate flavor. And if you’re in a pinch, the store-bought version works perfectly. Of course, you can make your own, but this recipe is all about keeping things easy.
Lastly, this pie is versatile and highly customizable. You can make it as over-the-top as you want with whipped cream, chocolate syrup, caramel drizzle, or more chopped Snickers on top. Or, keep it simple and let the creamy filling speak for itself. Either way, it’s always a hit, and it never fails to impress guests—even though it only took you 10 minutes to make.
Health Benefits of this No-Bake Snickers Pie
Okay, let’s be real—this isn’t a kale salad. But believe it or not, this pie does come with a few surprising upsides. While it’s clearly meant to be a treat, there are still some ingredients in the mix that offer more than just sweet satisfaction.
Let’s start with the peanuts inside the Snickers bars. Peanuts are actually a pretty great source of plant-based protein and healthy fats. They contain heart-healthy monounsaturated fats, along with a good dose of fiber, which can help with digestion and keep you feeling full. And while we wouldn’t recommend eating an entire pie in one sitting, having a slice as an occasional indulgence won’t throw off a balanced lifestyle.
Cream cheese, another star in this recipe, is a source of calcium and provides a bit of protein, too. Of course, it’s on the richer side of dairy, but when enjoyed in moderation, it can absolutely have a place in a well-rounded diet.
The Cool Whip component keeps things lighter than traditional whipped cream and adds volume without a ton of added calories. It also means you don’t have to go through the process of whipping cream from scratch, which saves time and effort. Some versions of Cool Whip are lower in fat, and you can even find sugar-free varieties if you’re looking to reduce sugar content.
And let’s not forget the mental health aspect here. Sometimes, sharing a delicious homemade dessert with your family or treating yourself to something comforting after a long day is exactly what you need. There’s something to be said for the joy of dessert—the comfort, the nostalgia, the moment of sweetness. Those benefits, though not measurable in grams or calories, are just as important.
So while no one’s saying this is a “superfood pie,” it’s definitely a feel-good dessert that, when enjoyed mindfully, fits into a happy, balanced lifestyle.
Preparation Time, Servings, and Nutritional Information
One of the biggest selling points of this No-Bake Snickers Pie is just how quickly and easily it comes together. Whether you’re hosting a party or just need a dessert on short notice, this one’s ready to go with minimal effort.
Total Preparation Time: 10 minutes
Chill Time: 6 to 8 hours (or overnight)
Total Time: About 8 hours including chilling
Servings: 8 slices
Estimated Nutritional Information (per serving):
- Calories: 420
- Total Fat: 24g
- Saturated Fat: 12g
- Cholesterol: 35mg
- Sodium: 270mg
- Carbohydrates: 45g
- Sugar: 30g
- Protein: 5g
These numbers will vary slightly depending on the brand of ingredients you use, but this gives you a ballpark idea. It’s rich, yes, but remember—dessert is about enjoyment. And this one is totally worth it.
Ingredients List of this No-Bake Snickers Pie
Here’s what you’ll need to make your No-Bake Snickers Pie. The list is short, sweet, and made up of easy-to-find ingredients, many of which you might already have in your kitchen.
-
1 prepared Oreo pie crust (store-bought or homemade)
This forms the base of your pie. It adds that chocolaty crunch and holds up well against the creamy filling. If you’d prefer to make your own, simply crush about 25 Oreo cookies and mix with 5 tablespoons melted butter, then press into a pie dish and chill until firm. -
1 package (8 oz) cream cheese, softened
Let it sit out for 30 minutes before using so it blends easily. This adds a rich, tangy base to the pie that balances all the sweetness. -
1 tub (8 oz) Cool Whip, thawed
This gives the pie its airy, whipped texture. You can use the original version or choose a light or sugar-free version if preferred. -
½ cup granulated sugar
Just enough to sweeten the cream cheese base. If you like things on the less sweet side, you can reduce this slightly. -
½ teaspoon vanilla extract
A little vanilla goes a long way in adding depth to the creamy filling. -
1½ cups chopped Snickers bars (plus more for topping)
This is where the magic happens. Chop them into small bite-sized pieces so they distribute evenly in the filling. -
Optional Toppings:
Additional chopped Snickers
Chocolate syrup
Caramel sauce
Whipped cream
These take the presentation up a notch and make the pie even more indulgent. You can add a little or a lot, depending on how decadent you want to go.
Step-By-Step Cooking Instructions
Step 1: Prepare Your Ingredients
Before you get started, make sure your cream cheese is softened and your Cool Whip is fully thawed. This ensures that everything blends together smoothly. You’ll also want to chop your Snickers bars into small pieces—aim for a rough chop that leaves some chunks for texture but not so large that they overwhelm each bite.
Step 2: Mix the Cream Cheese
In a large mixing bowl, add the softened cream cheese. Using a hand mixer or stand mixer on medium speed, beat the cream cheese until it’s completely smooth and fluffy. This should take about 2 to 3 minutes. Scrape down the sides of the bowl as needed to make sure no lumps remain.
Step 3: Add Sugar and Vanilla
Once the cream cheese is smooth, add in the granulated sugar and vanilla extract. Continue mixing for another minute or so, until everything is well incorporated. At this point, the mixture should be silky and sweet, with a light vanilla aroma.
Step 4: Fold in the Cool Whip
Switch to a rubber spatula or large spoon and gently fold in the thawed Cool Whip. Be careful not to stir too aggressively—you want to preserve the light, airy texture. Continue folding until the mixture is completely uniform and fluffy.
Step 5: Fold in the Chopped Snickers
Next, add 1½ cups of the chopped Snickers bars to the filling. Fold them in gently, making sure they’re evenly distributed throughout the mixture. The chunks of chocolate, caramel, and peanuts add both flavor and texture, so you want a little in every bite.
Step 6: Fill the Crust
Spoon the creamy filling into your prepared Oreo crust. Use a spatula to smooth out the top, spreading the mixture evenly all the way to the edges. It should fill the crust completely and have a nice, even surface on top.
Step 7: Chill
Place the pie in the refrigerator for at least 6 to 8 hours, or overnight if possible. This gives the filling time to set and develop its full flavor. If you’re in a rush, you can place it in the freezer for about 3 hours, but be sure to let it thaw a bit before serving so it’s not too firm.
Step 8: Garnish and Serve
Just before serving, decorate the top of the pie with extra chopped Snickers, a drizzle of chocolate syrup or caramel sauce, and dollops of whipped cream if you like. These extras not only add to the visual appeal but make each bite even more indulgent.
Step 9: Slice and Enjoy
Use a sharp knife dipped in hot water to slice cleanly through the pie. Serve chilled and enjoy every creamy, candy-filled bite.

How to Serve this No-Bake Snickers Pie
When it comes to serving this No-Bake Snickers Pie, the goal is to let its natural wow-factor shine while making sure every slice is as satisfying as the next. The beauty of this dessert is that it’s already a showstopper, so you really don’t have to do much to impress your guests. Still, a few simple touches can take your presentation to the next level and elevate the whole dessert experience.
Start by chilling the pie for at least 6 to 8 hours, or ideally overnight. This is crucial because it ensures the filling firms up enough to hold its shape when sliced. Once it’s fully chilled and ready to serve, take it out of the fridge about 5–10 minutes before slicing. This allows the filling to soften just slightly, making it easier to get a clean slice without losing the pie’s structure.
To slice it cleanly, use a sharp knife that you’ve dipped in warm water. Wipe the knife clean between slices for best results. This trick really helps you get those neat, bakery-style wedges that show off the layered Oreo crust and fluffy candy-studded filling.
Now for the fun part—toppings. While the pie is absolutely delicious as-is, you can make it extra special by adding a little garnish. Here are some serving ideas that always get rave reviews:
- Add a few extra chopped Snickers pieces right before serving. They add crunch and make the pie look irresistible.
- Drizzle chocolate syrup or caramel sauce over the top for a decadent finish.
- Pipe or spoon dollops of whipped cream around the edges of the pie for an elegant touch.
- For a little texture and contrast, sprinkle on some chopped peanuts or a dusting of crushed Oreos.
And don’t forget to serve it chilled! This pie is best cold, which keeps the filling firm and creamy. Whether you’re enjoying it with family after dinner, serving it up at a potluck, or treating yourself to a late-night slice, this no-bake dessert always delivers comfort and joy in every bite.
Pairing Suggestions for this No-Bake Snickers Pie
Pairing this rich, candy-filled pie with the right sides or drinks can really enhance the whole dessert experience. Since the pie is sweet, creamy, and packed with caramel, chocolate, and peanut flavors, it’s a great idea to pair it with lighter, more refreshing options to balance the richness.
Let’s start with beverages. One of my favorite pairings for this pie is a cold glass of milk. It’s simple, yes, but the coolness and slight creaminess of the milk cut through the sweetness of the pie and refresh your palate between bites. For a more grown-up option, a cup of strong black coffee or espresso works beautifully too. The bitterness of the coffee contrasts nicely with the sugary filling and complements the chocolate and caramel notes in the Snickers.
If you’re serving this dessert at a party or holiday gathering, consider offering a selection of drinks like:
- Chilled almond or oat milk for a dairy-free option
- Hot cocoa for an extra dose of chocolate indulgence
- Iced lattes or cold brew for summer gatherings
For side pairings, keep it light and simple. A fresh fruit salad with berries, grapes, or citrus segments provides a refreshing contrast to the dense, creamy pie. The acidity and natural sweetness of the fruit balance the dessert beautifully.
If you’re making a whole dessert spread, this pie pairs well with lighter options like lemon bars, vanilla panna cotta, or even small shortbread cookies. This gives your guests variety without overwhelming them with too many heavy sweets.
And finally, if you want to go all-out, consider serving mini versions of this pie in cups or jars for a dessert bar setup. Pair them with bowls of toppings like chopped candy bars, sauces, and sprinkles so guests can customize their own slice. It’s fun, interactive, and perfect for celebrations.
Storage, Freezing & Reheating Instructions
One of the best things about this No-Bake Snickers Pie is how well it stores and freezes. It’s the kind of dessert you can make ahead of time, stash in the fridge or freezer, and pull out when you need an easy, impressive treat. Here’s everything you need to know about keeping it fresh and delicious.
Refrigerating Leftovers
Once you’ve served the pie, any leftovers should be stored in the refrigerator. Cover the pie tightly with plastic wrap or aluminum foil, or transfer slices to an airtight container. It will stay fresh in the fridge for up to 5 days, though the texture is best within the first 3 days.
If you’ve added toppings like whipped cream or syrup before storing, those may soften over time, so it’s best to wait and add them fresh before serving again if possible.
Freezing the Whole Pie
Yes, you can absolutely freeze this pie. In fact, freezing it gives you a firmer texture that some people actually prefer. If you’re freezing the entire pie:
- Chill it in the refrigerator until fully set.
- Wrap the whole pie (in its dish) tightly in two layers of plastic wrap, then one layer of aluminum foil.
- Label with the date and freeze for up to 2 months.
When you’re ready to enjoy it, thaw the pie in the refrigerator for at least 6 hours or overnight before serving. Add any toppings after thawing to keep them fresh and visually appealing.
Freezing Individual Slices
To freeze slices individually, place them on a parchment-lined baking sheet and freeze until solid (about 1–2 hours). Once frozen, wrap each slice in plastic wrap and place in a freezer-safe bag or container. This makes it super easy to grab a slice whenever a craving hits.
Reheating
Technically, this dessert doesn’t require any reheating since it’s meant to be served chilled. However, if you do freeze it and want a softer texture, you can let it sit at room temperature for about 15–20 minutes before eating. Just be careful not to leave it out too long, especially in warm weather, as the filling can start to soften and lose its shape.
Overall, this pie is an excellent make-ahead dessert, and with proper storage, you’ll always have a crowd-pleasing treat ready to go.
Common Mistakes to Avoid in this No-Bake Snickers Pie
Even though this recipe is super simple, there are still a few common pitfalls that can trip you up if you’re not paying attention. Let’s go through the top mistakes and how to avoid them so your pie turns out perfect every time.
1. Not Softening the Cream Cheese Enough
If your cream cheese is too cold, it won’t blend smoothly, and you’ll end up with a lumpy filling. Make sure to let the cream cheese sit at room temperature for at least 30 minutes before mixing. This step is key to achieving that silky, smooth texture that makes the pie so dreamy.
2. Overmixing the Filling
When folding in the Cool Whip and Snickers, it’s important to mix gently. Overmixing can deflate the filling and make it dense instead of light and fluffy. Use a gentle hand and stop mixing as soon as everything is evenly combined.
3. Not Chilling Long Enough
This pie needs time to set, and if you try to slice it too soon, you’ll end up with a runny mess. Make sure to refrigerate it for at least 6 to 8 hours, and overnight is even better. This allows the filling to firm up and makes slicing so much easier.
4. Using Low-Quality Ingredients
Since this recipe only uses a few main components, the quality of each one really matters. Choose a good-quality cream cheese (not whipped or low-fat), fresh Cool Whip, and a decent Oreo crust. It’ll make a noticeable difference in flavor and texture.
5. Adding Toppings Too Early
If you add whipped cream or syrups too early and then refrigerate the pie, they can break down or soak into the filling. Always wait until just before serving to add your toppings for the freshest presentation.
Avoiding these small mistakes can make a big difference in the final result. With a little care and attention, your Snickers pie will come out looking and tasting like a professional dessert every single time.
Pro Tips
Even with a recipe as easy as this one, there are always a few little tricks that can take it from great to absolutely incredible. Over time, I’ve made this No-Bake Snickers Pie for just about every occasion you can think of, and along the way, I’ve gathered a few pro tips that I always come back to. These small details can make a huge difference in how your pie looks, tastes, and holds up when serving. So, before you dive in, keep these expert-level tips in your back pocket.
1. Chill the Bowl and Utensils Before Mixing
If you’re working in a warm kitchen or making this dessert on a hot day, try chilling your mixing bowl and utensils in the fridge for about 10–15 minutes before starting. This helps keep the Cool Whip fluffy and prevents the filling from getting too soft while you mix. Cold tools can make a real difference in maintaining that airy texture.
2. Use Full-Fat Cream Cheese for Best Results
Low-fat or whipped cream cheese might be tempting if you’re watching calories, but they often don’t hold up as well in no-bake recipes. Full-fat cream cheese has the right richness and structure to give your filling that smooth, velvety texture and help it set properly in the fridge.
3. Crush Your Own Oreo Crust for Added Texture
If you want to add a bit more depth and crunch to your crust, consider making your own by crushing whole Oreo cookies (cream and all) and mixing them with a few tablespoons of melted butter. This homemade crust tends to be more flavorful and holds its shape better when sliced.
4. Add a Pinch of Salt to the Filling
This might sound odd, but just a small pinch of salt can really balance out the sweetness of the pie. It enhances the caramel and chocolate flavors and gives the filling a more rounded, complex taste. Trust me—it makes a noticeable difference.
5. Freeze the Pie Slightly Before Slicing for Clean Cuts
If you’re looking for picture-perfect slices, pop the fully chilled pie into the freezer for 15–20 minutes just before serving. This firms everything up a bit more and allows you to get those sharp, clean cuts that make your pie look like it came from a professional bakery.
6. Customize with Other Candy Bars
While Snickers is the star of this recipe, don’t be afraid to experiment with other candy bars. Milky Way, Twix, or even peanut butter cups can add a whole new twist. You can even mix and match for a candy-lover’s dream pie.
7. Make Mini Pies for Parties
This recipe works beautifully when portioned into mini graham cracker or Oreo tart shells. It’s a fun and festive option for parties, baby showers, or birthday celebrations, and you won’t need to worry about slicing and serving.
8. Serve with a Drizzle for Added Drama
Right before serving, warm up a little caramel or chocolate sauce and drizzle it over each slice. Not only does this look amazing, but it also adds a rich, gooey touch that pairs perfectly with the creamy filling.
By keeping these pro tips in mind, you’ll take an already incredible dessert and elevate it into something truly unforgettable. These small tweaks and techniques really are what separate a good pie from a great one—and they’ll make you feel like a total dessert rockstar in the process.
Frequently Asked Questions (FAQs)
When I first started making this No-Bake Snickers Pie, I had a few questions myself—and since sharing the recipe, I’ve heard many of the same ones from friends and readers. So here’s a list of the most commonly asked questions, along with answers that will hopefully help you feel even more confident before you start.
Can I make this pie ahead of time?
Yes, absolutely. In fact, it’s even better when made ahead. I recommend making it the night before you plan to serve it so it has plenty of time to chill and set. Just store it in the fridge, covered with plastic wrap or foil, until you’re ready to garnish and slice.
Can I freeze the pie instead of refrigerating it?
You sure can. If you want a firmer texture or need to store the pie for longer than a few days, freezing is a great option. Just be sure to wrap it tightly and let it thaw in the fridge for a few hours before serving. You can also serve it slightly frozen for a firmer, ice cream-like dessert.
What if I don’t have Cool Whip?
If you prefer not to use Cool Whip, you can substitute it with homemade whipped cream. Just whip about 1 cup of heavy cream with 2 tablespoons of powdered sugar until soft peaks form. Use it in place of the Cool Whip in the recipe. Keep in mind, though, that homemade whipped cream isn’t as stable as Cool Whip, so the pie may not hold its shape as long.
Can I use a different crust?
Yes! While the Oreo crust is amazing with this recipe, you can definitely experiment with others. A graham cracker crust, chocolate cookie crust, or even a pretzel crust for a salty-sweet twist all work beautifully. Just make sure it’s fully set before adding the filling.
Can I make this pie without Snickers?
Technically yes, though it would no longer be a Snickers pie. That said, you can absolutely swap in your favorite candy bars. Milky Way, Twix, Reese’s, or even chopped brownies work well here. Get creative and make it your own.
How long will leftovers last?
Leftovers will keep in the fridge for up to 5 days. Just make sure they’re stored in an airtight container or covered tightly with foil or wrap. If you’re not going to eat them within that time frame, freezing individual slices is a great option.
Can I make this dessert gluten-free?
Yes, with a few modifications. Use a gluten-free Oreo-style crust (there are some great store-bought options), and double-check that your Cool Whip and candy bars are gluten-free as well. Snickers bars are typically gluten-free, but it’s always best to read the label just to be safe.
Do I need a stand mixer?
Nope! A handheld electric mixer will work just fine, and in a pinch, you can even mix the filling by hand with a sturdy whisk and a little elbow grease. The key is making sure the cream cheese is soft enough to mix smoothly.
Can I use low-fat cream cheese?
You can, but be aware that the texture and flavor might be slightly different. Full-fat cream cheese gives the best results in terms of richness and stability. If you do use low-fat, make sure it’s a block-style variety and not a spreadable one from a tub.
What toppings work best?
Extra chopped Snickers, caramel drizzle, chocolate syrup, whipped cream, and even chopped peanuts are all great options. You can also try mini chocolate chips, crushed cookies, or a sprinkle of sea salt for something different.
Conclusion & Call to Action
There’s something so satisfying about a dessert that feels luxurious but takes hardly any time to make. This No-Bake Snickers Pie hits all the right notes—it’s creamy, crunchy, sweet, and packed with all the flavors you love in a candy bar, wrapped up in a chocolatey Oreo crust. It’s the kind of dessert that makes people’s eyes light up when you bring it to the table, and it’s guaranteed to become a favorite in your household, just like it has in mine.
Whether you’re making it for a birthday, a potluck, a holiday gathering, or simply to treat yourself after a long week, this pie is always a good idea. It’s proof that you don’t need to spend hours in the kitchen or use complicated techniques to create something truly amazing. And because it’s so easy to customize, you can make it a little different every time and never get bored.
If you try this recipe, I’d love to hear how it turned out for you. Did you stick with the classic Snickers version, or did you mix it up with a different candy bar? Did you serve it at a party or enjoy it all to yourself over a few days? Either way, I want to know! Feel free to drop a comment, share your thoughts, or even tag me if you post a photo of your finished pie online. It seriously makes my day to see your creations.
Now go ahead—grab those ingredients, whip up your pie, and get ready to wow your family, friends, and most importantly, yourself. You’ve totally got this.
Print
No-Bake Snickers Pie Recipe – Easy & Creamy Dessert
- Total Time: 8 hours (includes chilling)
- Yield: 4-6 servings 1x
- Diet: Vegetarian
Description
A rich, creamy no-bake pie made with a fluffy cream cheese and Cool Whip filling, chopped Snickers bars, and an Oreo crust. Perfect for parties or sweet cravings.
Ingredients
-
1 prepared Oreo pie crust (store-bought or homemade)
-
1 package (8 oz) cream cheese, softened
-
1 tub (8 oz) Cool Whip, thawed
-
½ cup granulated sugar
-
½ teaspoon vanilla extract
-
1½ cups chopped Snickers bars (plus more for topping)
-
Optional toppings: chopped Snickers, chocolate syrup, caramel sauce, whipped cream
Instructions
-
Beat softened cream cheese until smooth.
-
Mix in sugar and vanilla until fully combined.
-
Fold in Cool Whip until mixture is fluffy.
-
Fold in chopped Snickers.
-
Spoon filling into Oreo crust and smooth top.
-
Chill for 6–8 hours or overnight.
-
Garnish with extra Snickers and toppings before serving.
Notes
-
Chill thoroughly to ensure the pie sets properly.
-
Homemade crust can be substituted for extra texture.
-
Add a pinch of salt to the filling for flavor balance.
-
Freeze slightly before slicing for clean cuts.
- Prep Time: 10 minutes
- Cook Time: 0 minutes
- Category: Dessert
- Method: No-Bake
- Cuisine: American