
There’s something uniquely satisfying about no-bake desserts. Maybe it’s the simplicity, or the instant gratification, or just the magic of pulling together a few everyday ingredients and ending up with something utterly irresistible. For me, it was this No-Bake Snickers Peanut Butter Pie that sparked my deep appreciation for easy, crowd-pleasing recipes. It’s creamy, rich, nutty, and loaded with chunks of real Snickers bars. In short, it’s everything you want in a dessert—with none of the stress.
This pie has saved me on more occasions than I can count. Whether I was short on time, avoiding turning on the oven in the summer heat, or just craving something sweet and satisfying, it always came through. The recipe requires zero baking and just a handful of ingredients. It all comes together with a pre-made crust, some cream cheese, peanut butter, whipped topping, and, of course, chopped Snickers bars. You don’t even need fancy equipment—just a mixing bowl, a spatula, and a little patience while it chills.
The very first time I made this pie was for a last-minute get-together with friends. I didn’t have time for a layered cake or anything too complicated, so I whipped this up in the afternoon, popped it in the fridge, and brought it out after dinner. The entire pie was gone within minutes. People were scraping the pie dish and asking for the recipe. And since then, I’ve made it countless times, always with the same result—happy faces and empty plates.
It’s the perfect blend of salty and sweet, smooth and crunchy, rich and light. Plus, it’s adaptable. You can add a caramel drizzle, a sprinkle of sea salt, or even swap out the candy bars depending on what you have on hand. But honestly, it’s pretty flawless as-is.
Why You’ll Love This Snickers Peanut Butter Pie Recipe
If you’re still wondering whether this pie is worth making, let me reassure you—this recipe is an absolute gem. It ticks every box when it comes to what we want from an easy dessert. First, let’s talk about flavor. The peanut butter and cream cheese create a silky, luscious base that’s both sweet and tangy. Then you fold in Cool Whip for that cloud-like fluffiness. And the chopped Snickers bars? They bring in that amazing combo of chewy caramel, crunchy peanuts, and sweet milk chocolate. Every bite is a layered surprise of texture and taste.
The beauty of this recipe is also in its simplicity. There’s no stove, no oven, and no water baths or candy thermometers involved. Just mix, fold, pour, chill, and enjoy. You don’t have to be a seasoned baker—or even someone who bakes at all—to pull this off. It’s practically foolproof.
In addition, it’s incredibly versatile. Hosting a dinner party? This pie is elegant enough to serve in slices on a platter with a drizzle of sauce and a sprinkle of chopped nuts. Looking for a family-friendly treat? The kids will love the Snickers chunks and creamy texture, and you’ll love how easy it is to whip up on a weeknight. Need something you can make ahead? This pie needs to chill anyway, so it’s ideal for prepping in advance.
And let’s not forget the presentation. It’s a stunner. The fluffy peanut butter filling with chopped candy, nestled in a cookie crust and topped with caramel and chocolate sauce? It looks as good as it tastes. Whether you’re new to no-bake desserts or a seasoned home cook looking for a new favorite, this pie will quickly find its way into your rotation.
Health Benefits of this Snickers Peanut Butter Pie
Now, let’s be honest—this pie is a dessert, so it’s not exactly a health food. However, that doesn’t mean it can’t be enjoyed as part of a balanced lifestyle. It’s all about moderation and mindful indulgence. And believe it or not, there are a few redeeming qualities in this decadent treat.
First, let’s start with the peanut butter. Natural peanut butter is rich in protein and healthy fats, which help keep you full and satisfied. It also contains magnesium, which supports muscle function and bone health. If you opt for a variety that doesn’t have added sugars or hydrogenated oils, you’re giving your body a small nutritional boost with every bite.
Next, the cream cheese contributes calcium, which is essential for strong bones and teeth. It also contains vitamin A, which plays a key role in immune function. Of course, this is best enjoyed in moderation due to its saturated fat content, but again—it’s a dessert, not a main course.
The Snickers bars add that irresistible flavor, and yes, they’re indulgent. But they also provide small amounts of protein and fiber thanks to the peanuts. While they’re not exactly a superfood, the key here is to enjoy them in reasonable portions as part of a celebratory treat.
Finally, the fact that this is a no-bake dessert means you’re not dealing with the added oils and fats that often come with baked goods. Plus, because the pie is rich and satisfying, a small slice goes a long way.
In a world where we’re constantly balancing cravings and nutrition, this pie is a great example of how you can treat yourself without going overboard. And if you want to make it a bit lighter, there are easy swaps—use reduced-fat cream cheese, a lighter whipped topping, or even mini Snickers to control portion sizes.
Preparation Time, Servings, and Nutritional Information
One of the best things about this pie is how quickly it comes together. From start to finish, you’re looking at just about 15 minutes of active prep time. After that, it simply needs to chill in the fridge for a few hours to firm up.
Preparation Time
Prep Time: 15 minutes
Chill Time: 4 hours (or overnight, if prepping ahead)
Total Time: Approximately 4 hours and 15 minutes
Servings
This pie serves about 8 generous slices, though you can easily cut smaller pieces if you’re serving a larger group or want to stretch it a bit further.
Nutritional Information (per serving, based on 8 servings)
Calories: 450
Protein: 6g
Fat: 28g
Saturated Fat: 13g
Carbohydrates: 42g
Sugar: 30g
Fiber: 1g
Calcium: 6% DV
Iron: 4% DV
Please keep in mind that these values are approximate and may vary slightly based on the specific brands of ingredients used.
For those who want to reduce the calorie content, consider using light cream cheese, reduced-fat Cool Whip, and fewer Snickers pieces. You can also opt for a homemade crust using almond flour and coconut oil for a slightly lower-carb alternative.
Overall, this is a great dessert for sharing—rich enough to satisfy your sweet tooth with just one slice and simple enough to make any day of the week.
Ingredients List of this Snickers Peanut Butter Pie
To make this no-bake Snickers peanut butter pie, you only need a few pantry staples and some chilled ingredients. Here’s what you’ll need to create this decadent, creamy dessert:
1 pre-made chocolate or graham cracker pie crust
You can usually find these in the baking aisle. The chocolate crust adds a rich, cocoa flavor that pairs beautifully with the peanut butter and candy, while the graham cracker version gives a subtle sweetness and crunch. Either one works—go with your preference.
1 package (8 oz) cream cheese, softened
Make sure it’s softened to room temperature so it blends smoothly. Cream cheese is the base of the filling, giving it a tangy richness that balances the sweetness of the other ingredients.
1/3 cup creamy peanut butter
Choose a smooth peanut butter that isn’t too oily. You can go with natural or classic, depending on your taste. The peanut butter adds a nutty depth and creaminess that anchors the pie’s flavor.
1/2 cup powdered sugar
Powdered sugar, also known as confectioners’ sugar, dissolves easily and sweetens the filling without any graininess. Don’t substitute with granulated sugar here—it won’t give the same silky texture.
1 container (8 oz) Cool Whip, thawed
Cool Whip makes the filling fluffy and light. If it’s frozen, just let it thaw in the refrigerator before using. You can also use a whipped topping alternative or homemade whipped cream if preferred.
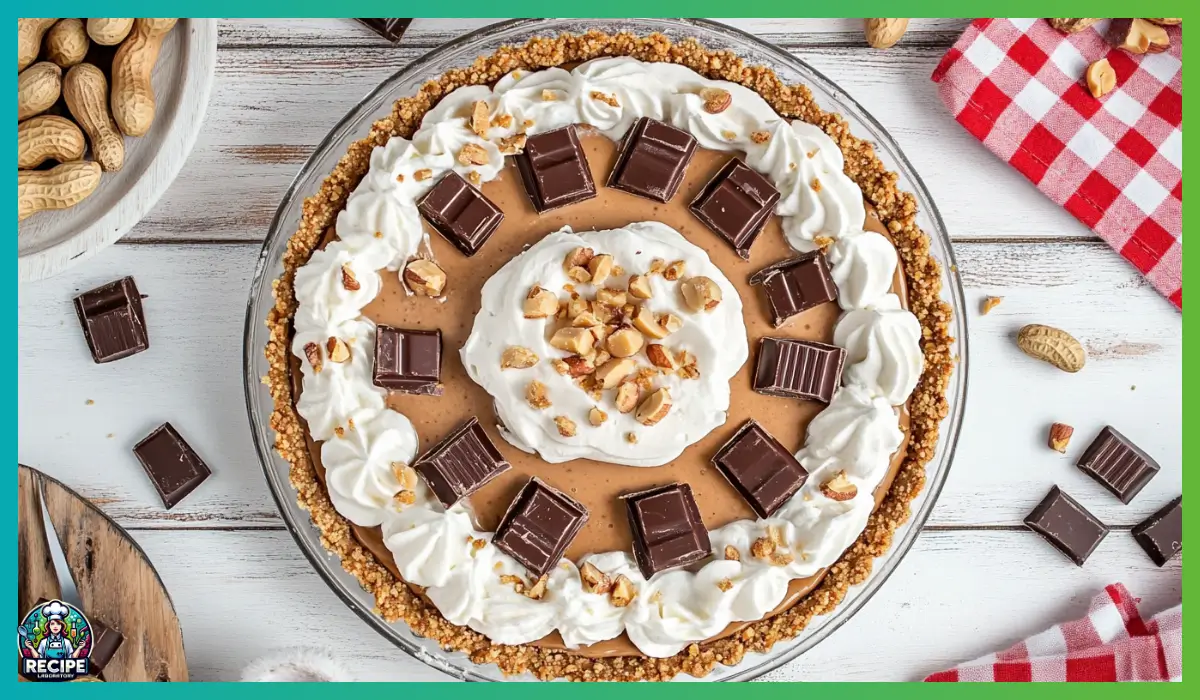
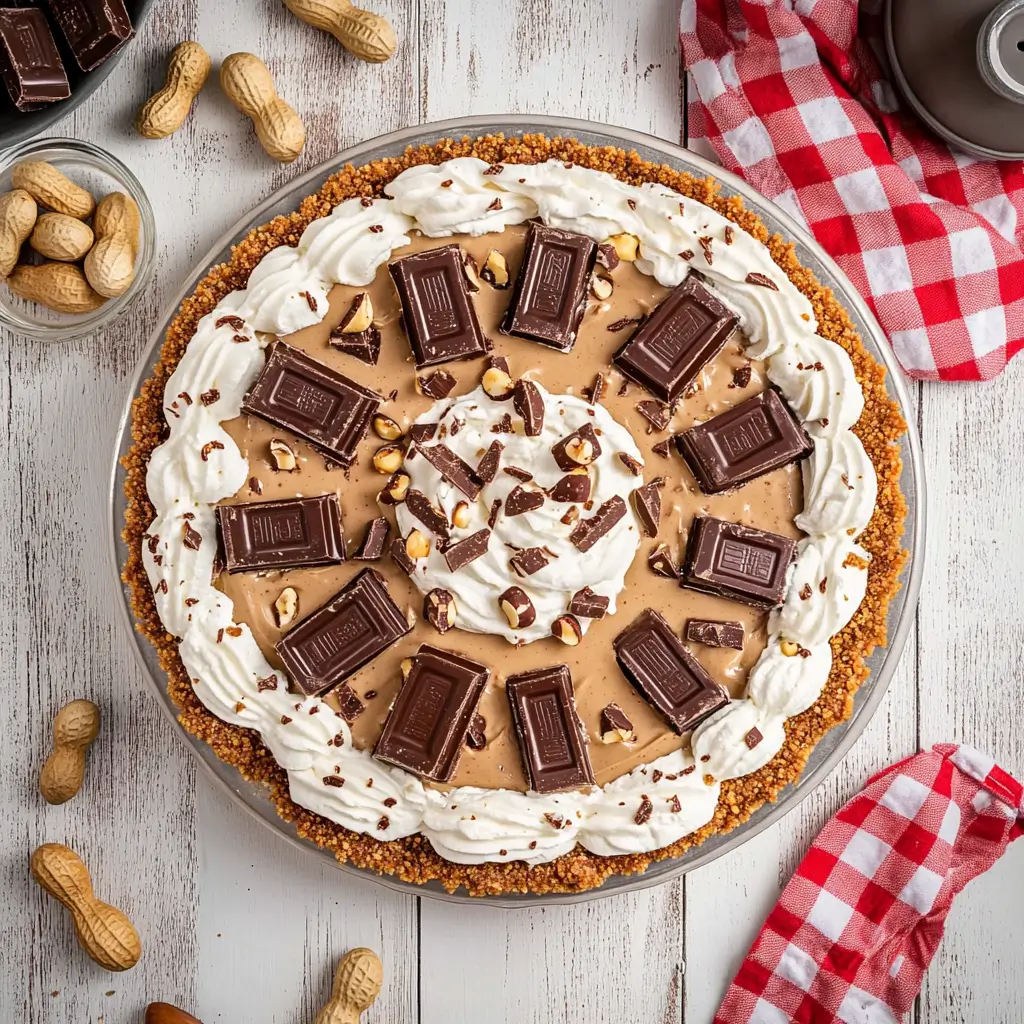
4 full-size Snickers bars, chopped (plus extra for garnish)
Roughly chop the Snickers into bite-sized pieces. You’ll fold these into the filling and save a little for decorating the top. The candy bars bring in caramel, peanuts, and chocolate for that signature Snickers flavor.
Optional: Caramel sauce and chocolate sauce for drizzling
These are completely optional but highly recommended. A drizzle over the top before serving adds an extra layer of indulgence and makes the pie look bakery-worthy.
Step-By-Step Cooking Instructions
Let’s break this down step-by-step so you can make the perfect no-bake Snickers peanut butter pie on your very first try. Follow each step closely, and you’ll have a gorgeous, creamy dessert ready to impress.
Step 1: Soften the Cream Cheese
Take the cream cheese out of the fridge and let it sit at room temperature for at least 30 minutes. This is a key step because softened cream cheese is much easier to blend, which helps create a smooth and lump-free filling. If you’re in a hurry, you can microwave it in 10-second bursts—but be careful not to melt it.
Step 2: Beat the Cream Cheese, Peanut Butter, and Sugar
In a large mixing bowl, combine the softened cream cheese, peanut butter, and powdered sugar. Use a hand mixer or stand mixer on medium speed to beat the ingredients together until the mixture is smooth, creamy, and uniform. Scrape down the sides of the bowl as needed to make sure everything is evenly incorporated.
Step 3: Fold in the Cool Whip
Once the peanut butter and cream cheese mixture is smooth, it’s time to lighten things up with Cool Whip. Add the thawed whipped topping to the bowl, and gently fold it in using a spatula. The goal here is to keep the mixture airy and fluffy, so avoid overmixing. Fold until no streaks remain and the filling is a pale tan color throughout.
Step 4: Add the Chopped Snickers Bars
Now comes the fun part—adding in those chopped candy bars. Take your Snickers pieces and fold them into the filling, distributing them evenly. The caramel and peanuts from the bars will give the pie an incredible texture and added flavor in every bite. You can chop them as fine or chunky as you like, depending on your preference.
Step 5: Fill the Pie Crust
Grab your pre-made pie crust and set it on a flat surface. Carefully spoon the filling into the crust, using a spatula to spread it out evenly. Smooth the top with the back of a spoon or offset spatula for a clean finish. If you want a decorative swirl on top, gently twist your spatula in circles before chilling.
Step 6: Chill the Pie
Cover the pie with plastic wrap or aluminum foil and refrigerate for at least 4 hours. Overnight is even better if you have the time. This allows the filling to set properly so you can slice it cleanly without the pie falling apart. During this time, the flavors also meld together, making each bite more delicious.
Step 7: Garnish Before Serving
Right before serving, garnish the pie with extra chopped Snickers, caramel drizzle, and chocolate sauce if desired. Not only does this look gorgeous, but it also adds extra bursts of flavor and texture. You can drizzle in a zigzag pattern or create a more dramatic look with swirls. Be creative!
Step 8: Slice and Serve
Using a sharp knife, slice the pie into 8 even wedges. For the cleanest slices, wipe the knife with a warm, damp cloth between cuts. Serve on plates and watch as everyone digs in with big smiles.
Step 9: Store Leftovers Properly
If you have any leftovers (which is rare, let’s be honest), you can easily store them in the refrigerator. Simply cover the pie with plastic wrap or transfer individual slices to airtight containers. The texture holds up beautifully for up to three days, making it a great make-ahead dessert or next-day indulgence.
Step 10: Make it Your Own
Want to mix things up? There are plenty of easy ways to customize this recipe. Swap the Snickers bars for a different type of candy—think chopped Reese’s, Milky Way, or even Twix. You can also add a little vanilla extract to the filling for a subtle depth of flavor, or mix in mini chocolate chips or crushed cookies for extra crunch. This pie is endlessly adaptable, so don’t be afraid to experiment and make it your own.
How to Serve this Snickers Peanut Butter Pie
Serving this Snickers peanut butter pie is one of the most satisfying parts of the process because it looks just as indulgent and mouthwatering as it tastes. You’ve already done the hard work of preparing it, so now it’s all about presentation and enjoyment.
To serve, remove the pie from the refrigerator just before you’re ready to eat. Since it’s a chilled dessert, you want it to be firm enough to slice cleanly. Use a sharp knife and dip it in warm water before slicing. This helps cut through the creamy filling and candy chunks without sticking, giving you those picture-perfect pie wedges.
If you’re serving this at a dinner party or holiday gathering, you can elevate each slice by plating it with a drizzle of extra caramel and chocolate sauce. A small dollop of whipped cream on the side adds a nice finishing touch. And if you’re really going for a wow factor, sprinkle a few extra chopped peanuts or Snickers pieces over the top.
This pie also makes a fantastic option for potlucks and birthday celebrations. Simply bring it in the pie tin with a plastic lid or store it in a travel-friendly container. Everyone will be asking where you got the recipe, and you’ll get all the credit.
Another fun idea is to turn this pie into mini desserts. Use a muffin tin lined with cupcake wrappers and spoon the filling into each cup. This creates individual portions that are perfect for parties or when you want to control serving sizes. Just don’t forget to top each one with a bit of caramel and a candy chunk.
No matter how you serve it, this pie is guaranteed to disappear quickly. It’s rich, creamy, and absolutely unforgettable.
Pairing Suggestions
While this Snickers peanut butter pie can easily stand alone as a show-stopping dessert, pairing it with the right drinks or sides can take your dessert course to the next level. Whether you’re serving it as part of a dinner party or a casual weekend treat, here are some delicious pairing ideas to consider.
Let’s start with beverages. For a warm and cozy combo, pair a slice of this pie with a steaming cup of coffee or a frothy cappuccino. The slightly bitter notes of the coffee balance out the sweetness of the pie perfectly. If you prefer tea, go for a mild black tea like Darjeeling or English Breakfast. These teas are strong enough to hold their own against the pie’s richness without overpowering the flavor.
For a cooler, more refreshing option, a tall glass of cold milk is a classic choice. The milk cuts through the sweetness and makes each bite feel lighter. If you’re feeling adventurous, try a milkshake made with chocolate or vanilla ice cream—dessert on dessert, and totally worth it. For a dairy-free option, almond or oat milk work beautifully too.
Now, if you’re thinking about creating a full dessert platter or offering some variety to your guests, consider pairing the pie with simple fresh fruit. Sliced strawberries or bananas offer a lovely contrast with their natural tartness and clean flavor. You could even arrange them around the pie slices on each plate for a pop of color and freshness.
For special occasions or celebratory dinners, non-alcoholic sparkling beverages or mocktails can make the presentation feel a little fancier. A fizzy apple cider or a berry spritzer adds a refreshing burst that pairs nicely with the rich, creamy filling.
Whether you keep it simple or go all out, pairing this pie with the right sides or drinks creates a memorable dessert experience from start to finish.
Storage, Freezing & Reheating Instructions
One of the many reasons this pie is such a winner is how well it stores. You can make it ahead of time, keep leftovers for later, and even freeze it for those moments when you need a ready-to-go dessert. Let’s talk about the best ways to store, freeze, and reheat (well, more like re-serve) this delicious pie.
Storing in the Refrigerator
Once the pie is fully assembled, it needs to chill in the refrigerator for at least four hours. After serving, you can store any leftovers right in the pie tin. Just cover the top tightly with plastic wrap or aluminum foil to prevent the filling from drying out or absorbing other fridge odors. Properly stored, the pie will stay fresh for up to 3 days.
For best texture, slice the pie when it’s cold, and only take out as many servings as you plan to eat. Letting the entire pie sit out at room temperature for too long can cause it to soften too much.
Freezing Instructions
This pie also freezes beautifully. After assembling the pie, wrap it tightly in two layers of plastic wrap and then a layer of aluminum foil. You can also place the entire pie in a large freezer-safe container with a lid for added protection.
To freeze individual slices, place each slice on a piece of parchment paper and freeze for about 1 hour. Once firm, wrap each piece in plastic wrap and place in a zip-top freezer bag. This way, you can grab a single slice whenever the craving strikes.
Frozen, the pie will last up to 2 months. When you’re ready to enjoy it, transfer the whole pie or individual slices to the fridge and let it thaw overnight.
Reheating (or Thawing) Tips
Since this is a chilled dessert, there’s no need to “reheat” it in the traditional sense. However, proper thawing is key to maintaining its creamy texture. Avoid microwaving frozen pie—this can make the filling separate and ruin the texture. Instead, let it thaw gently in the fridge until fully defrosted and firm.
Once thawed, garnish with extra Snickers and sauces just before serving to refresh its appearance and flavor.
Common Mistakes to Avoid
While this no-bake pie is super simple, there are a few common pitfalls to watch out for that can affect the final result. Let’s walk through them so you can avoid any mishaps and enjoy a flawless pie every time.
Using Cold Cream Cheese
This is one of the most common issues. Cold cream cheese doesn’t blend smoothly, which can lead to lumps in your filling. Make sure to let it sit at room temperature for at least 30 minutes before mixing. If you’re short on time, microwave it in short bursts, but don’t overheat it.
Overmixing the Filling
When folding in the Cool Whip, be gentle. Overmixing can deflate the whipped topping, resulting in a dense or overly soft texture. Fold it in slowly with a spatula until just combined.
Adding Warm Snickers Pieces
If you’ve chopped the Snickers right after they’ve been sitting in a warm kitchen or near the stove, they can melt slightly when folded into the filling. This can affect the texture and color of your pie. To prevent this, chill the candy bars in the fridge for a few minutes before chopping and adding them to the mix.
Not Letting It Chill Long Enough
The pie needs time to set in the fridge—at least four hours, but preferably overnight. Cutting into it too soon will result in a gooey mess that doesn’t hold its shape. Plan ahead to give it plenty of chill time.
Forgetting the Garnish
The finishing touches really make a difference in both flavor and presentation. Don’t skip the extra Snickers on top or the drizzle of caramel and chocolate sauce. They take the pie from “tasty” to “show-stopping.”
Avoiding these simple mistakes will help ensure your Snickers peanut butter pie turns out smooth, creamy, and picture-perfect every single time.
Pro Tips
Even though this pie is incredibly easy to make, there are a few professional-level tips that can take your dessert from great to absolutely unforgettable. Whether you’re a beginner or a seasoned home cook, these insights will help you master every part of the process and impress anyone who takes a bite.
1. Chill Your Mixing Bowl and Spatula
Before you fold in the whipped topping, pop your mixing bowl and spatula into the fridge for 10–15 minutes. Working with chilled tools helps maintain the fluffiness of the whipped topping and keeps your filling light and airy. This step is especially helpful if your kitchen is warm or you’re baking in the summer.
2. Use Full-Fat Ingredients for Best Flavor
While lighter versions of cream cheese and whipped topping can be used, using the full-fat versions creates a richer, more decadent filling. The texture is creamier, and the flavor is more pronounced. If you’re serving this for a special occasion, it’s worth going all in.
3. Make Your Own Whipped Cream for a Homemade Touch
If you prefer to skip Cool Whip, you can make your own whipped cream by beating 1 cup of heavy cream with 2 tablespoons of powdered sugar until stiff peaks form. Gently fold it into the cream cheese and peanut butter mixture just like you would with the Cool Whip. It adds a fresh, natural flavor that really elevates the pie.
4. Decorate with a Zip-Top Bag for a Bakery Look
To make your caramel and chocolate drizzle look extra fancy, spoon the sauces into small zip-top bags and snip off a tiny corner. Then drizzle in a crisscross pattern over the top of the pie. It creates a polished, professional finish with very little effort.
5. Use a Hot Knife for Clean Slices
To get those perfect pie wedges, run your knife under hot water and wipe it dry between each slice. This trick cuts through the candy bars and creamy filling cleanly, so your slices look just as good as they taste.
6. Add a Sprinkle of Sea Salt
Right before serving, consider sprinkling a tiny bit of flaky sea salt over the top of the pie. It adds a beautiful contrast to the sweetness and enhances the flavors, especially the peanut butter and caramel.
7. Let the Pie Rest at Room Temperature for 10 Minutes Before Slicing
While the pie should stay refrigerated until you’re ready to serve, letting it sit at room temperature for about 10 minutes makes it easier to slice and brings out the full flavor of the filling.
8. Use Candy Chunks, Not Crumbs
When chopping your Snickers, aim for medium-sized chunks instead of tiny bits. The variety in texture—some chewy caramel here, a bite of chocolate there—makes each slice more interesting and satisfying.
These small details can really elevate your pie, and once you try them, you’ll wonder how you ever made it without them.
Frequently Asked Questions (FAQs)
Can I use a homemade crust instead of store-bought?
Absolutely! If you want to go the extra mile, you can make your own crust with crushed chocolate cookies or graham crackers. Just combine 1 1/2 cups of cookie crumbs with 1/4 cup melted butter, press it into a pie pan, and chill it for 30 minutes before adding the filling.
Can I use a different candy bar?
Yes! This pie is very adaptable. You can substitute Snickers with other favorites like Twix, Reese’s, or Milky Way. Just make sure to chop the candy into small, bite-sized pieces so it blends well into the filling.
Is there a dairy-free version of this pie?
While this recipe relies heavily on dairy, you can experiment with dairy-free cream cheese and whipped topping. Brands like Kite Hill and So Delicious offer great alternatives. Use a dairy-free chocolate crust and check that your candy bars are dairy-free too.
Can I make this ahead of time?
Definitely. In fact, this pie is best made ahead so it has time to chill and set. You can make it up to 2 days in advance and store it in the fridge, covered tightly.
What if I don’t have Cool Whip?
No problem. You can substitute it with homemade whipped cream. Just beat 1 cup of heavy whipping cream with 2 tablespoons powdered sugar until stiff peaks form, and fold it in gently.
Can I freeze this pie?
Yes, it freezes well. Wrap it tightly and freeze for up to 2 months. Let it thaw in the fridge overnight before serving.
How do I keep the pie from becoming too soft?
Be sure to chill it for at least 4 hours before serving, and store it in the refrigerator when not being served. Avoid leaving it out at room temperature for more than 30 minutes, especially on hot days.
Can I make this pie gluten-free?
Yes, just use a certified gluten-free pie crust and make sure your candy bars are gluten-free. Many brands now offer gluten-free graham or chocolate crusts.
Can I double the recipe?
If you’re serving a large group, you can easily double the filling and divide it between two pie crusts. Just be sure you have enough fridge space for both!
What can I use if I don’t have powdered sugar?
Powdered sugar helps keep the filling smooth, but if you’re in a pinch, you can make your own by blending granulated sugar in a high-speed blender until fine. It won’t be quite the same, but it works in a pinch.
These FAQs cover most of the common questions and will help ensure your pie turns out perfect every time.
Conclusion & Call to Action
There’s a reason this No-Bake Snickers Peanut Butter Pie has become one of my go-to dessert recipes. It’s rich, creamy, packed with texture, and absolutely bursting with flavor. But beyond that, it’s just so easy to make. No oven. No complicated techniques. Just a few simple ingredients and a little bit of mixing—and you’ve got a dessert that’s guaranteed to impress.
Whether you’re making it for a birthday, a holiday, or just because you’re craving something sweet, this pie delivers every single time. It’s one of those recipes that makes people pause mid-bite and say, “Wow, what is this?” And the best part is, you don’t have to tell them it only took you 15 minutes to make.
I hope this recipe becomes a favorite in your home the way it has in mine. It’s the kind of dessert you’ll find yourself coming back to again and again. And once you’ve made it, don’t be surprised if your friends and family start requesting it for every get-together.
If you give this recipe a try, I’d love to hear how it turned out! Leave a comment below and let me know what you thought. Did you make any fun swaps? Did your guests rave about it? Share your photos and tag me—I can’t wait to see your creations.
This pie is proof that great desserts don’t have to be complicated. With a few ingredients, a little chill time, and some Snickers magic, you’ve got yourself a showstopper. So go ahead, gather your ingredients, and treat yourself—you deserve it.
Ready to whip it up? Let’s make some pie magic happen.
Print
Snickers Peanut Butter Pie – Easy & Irresistible No-Bake Dessert
- Total Time: 4 hours 15 minutes (includes chilling)
- Yield: 8 slices 1x
- Diet: Halal
Description
This no-bake Snickers peanut butter pie is creamy, sweet, salty, and packed with chunks of Snickers. A rich, crowd-pleasing dessert made in minutes with zero baking required.
Ingredients
-
1 pre-made chocolate or graham cracker pie crust
-
1 package (8 oz) cream cheese, softened
-
1/3 cup creamy peanut butter
-
1/2 cup powdered sugar
-
1 container (8 oz) Cool Whip, thawed
-
4 full-size Snickers bars, chopped (plus extra for garnish)
-
Optional: caramel sauce and chocolate sauce for drizzling
Instructions
-
In a bowl, beat cream cheese, peanut butter, and powdered sugar until smooth.
-
Gently fold in Cool Whip until fully combined.
-
Fold in chopped Snickers bars.
-
Spoon mixture into the pie crust and smooth the top.
-
Chill in the fridge for at least 4 hours.
-
Before serving, drizzle with sauces and garnish with extra chopped Snickers.
Notes
-
For a firmer texture, chill overnight.
-
Use a hot knife for cleaner slices.
-
Swap Snickers for other candy bars to customize.
-
Homemade whipped cream can replace Cool Whip.
- Prep Time: 15 minutes
- Cook Time: 0 minutes
- Category: Dessert
- Method: No-Bake
- Cuisine: American