
No-Bake Orange Creamsicle Cheesecake is an amazing treat that combines creamy cheesecake with the vibrant flavors of orange. This delightful dessert is perfect for anyone looking to cool off with something refreshing yet indulgent. Imagine this: a creamy, orange-infused filling resting on a crumbly crust that can be whipped up without ever turning on the oven. It’s a dessert that transports you to sun-soaked days, making each bite a celebration of summertime. Whether you’re hosting a gathering, celebrating a special occasion, or simply in the mood for something sweet, this cheesecake will undoubtedly impress.
Creating a No-Bake Orange Creamsicle Cheesecake is not just about its delicious flavor; it’s about the experience of making it. The simplicity of the preparation allows anyone, regardless of skill level, to enjoy the process and the delicious outcome. You’ll soon discover that the vibrant orange taste paired with a hint of vanilla is not only satisfying but also incredibly easy to make.
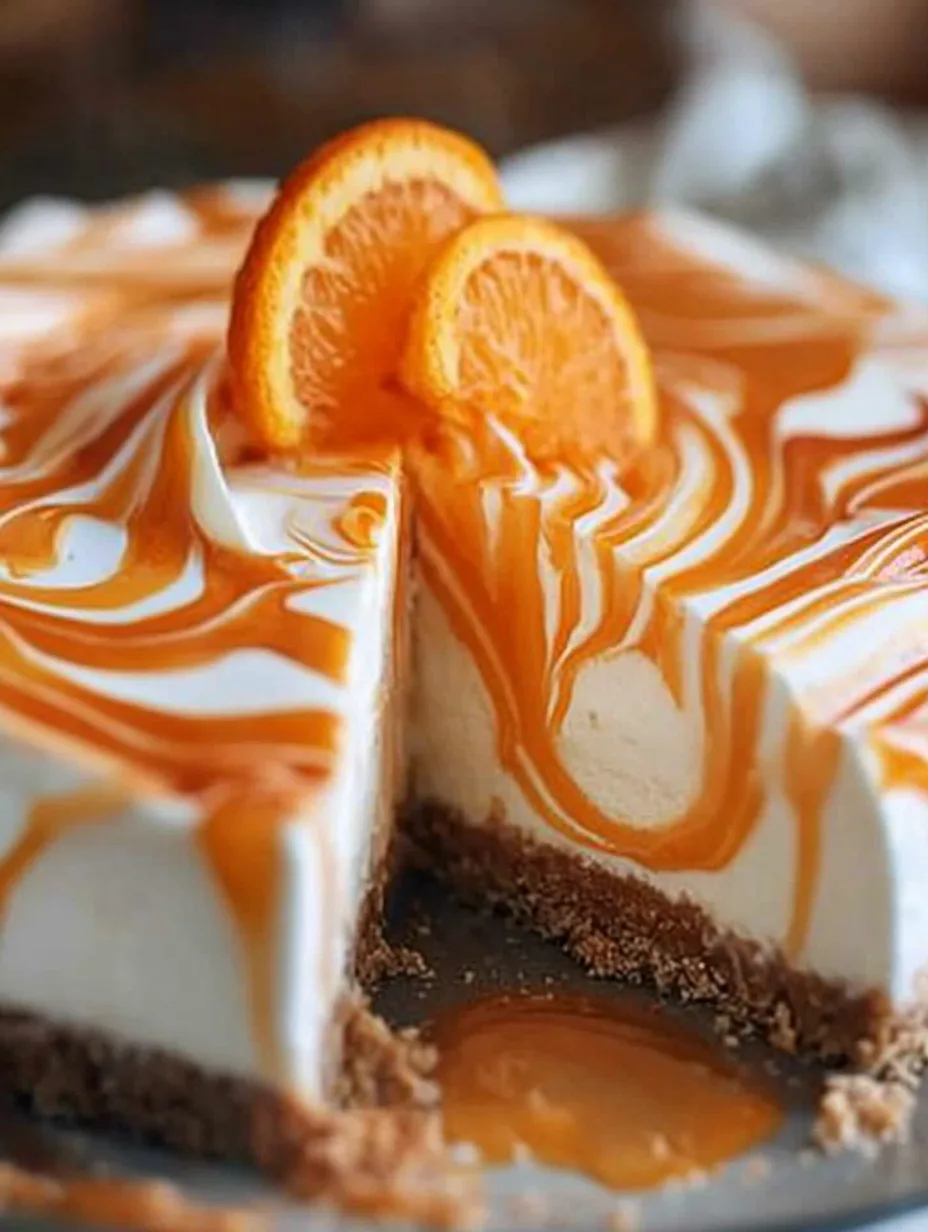
Imagine slicing into a vibrant cheesecake that resembles your favorite childhood ice cream treat. Each slice offers a perfect balance of sweetness and tang, capturing the delightful essence of an orange creamsicle. This dessert is destined to become a staple in your recipe collection, evoking memories of summers gone by while enticing you to make more delicious creations. Let’s dive deeper into this incredible recipe and discover why it’s bound to become a favorite!
Why You’ll Love This Recipe
No-Bake Orange Creamsicle Cheesecake has several fantastic qualities that make it a must-try. Highlighted below are some compelling reasons to whip up this delightful dessert:
1. Effortless Preparation: No baking is required, making it an ideal choice for novice cooks and busy individuals. Just mix, pour, and chill!
2. Refreshing Flavor: The combination of orange and cream evokes feelings of nostalgia, reminiscent of warm summer days and childhood treats.
3. Flexible Serving Size: This cheesecake can be made in various sizes to suit any occasion, from a small gathering to a big celebration.
4. Eye-Catching Presentation: The vibrant orange color is not only inviting but also adds a beautiful touch to any dessert table.
5. Perfect for Any Occasion: Whether it’s a birthday, holiday gathering, or casual get-together, this cheesecake fits the bill perfectly.
6. Simple Ingredients: Many ingredients are pantry staples, making it easy to prepare without a last-minute grocery run.
7. Customizable: Feel free to add your twist by incorporating different toppings like whipped cream, fruit, or chocolate shavings.
With all these reasons combined, it’s no wonder that this cheesecake has earned a place in the hearts of dessert lovers everywhere.
Preparation and Cooking Time
Creating a No-Bake Orange Creamsicle Cheesecake is not only easy but also quick! Here’s a general estimate of the time involved in making this delightful dessert:
– Preparation Time: 20 minutes
– Chill Time: 4-6 hours (or overnight for best results)
The total time from start to finish will be approximately 4 to 6.5 hours, predominantly waiting for the cheesecake to set in the refrigerator.
Ingredients
– 1 ½ cups graham cracker crumbs
– ½ cup unsalted butter, melted
– 2 cups cream cheese, softened
– 1 cup powdered sugar
– 1 tsp vanilla extract
– 1 cup heavy whipping cream
– 1 cup orange juice (freshly squeezed for best flavor)
– Zest of 1 large orange
– 1 tbsp unflavored gelatin (optional, for thicker cheesecake)
Step-by-Step Instructions
Making the No-Bake Orange Creamsicle Cheesecake is a breeze. Follow these simple steps for a delectable outcome:
1. Prepare the Crust: In a mixing bowl, combine the graham cracker crumbs and melted butter. Mix until well combined. Press the mixture firmly into the bottom of a 9-inch springform pan to create a crust.
2. Make the Filling: In a large mixing bowl, beat softened cream cheese and powdered sugar until smooth and creamy.
3. Add Flavor: Mix in the vanilla extract, orange juice, and orange zest. Continue to blend until all ingredients are well incorporated.
4. Whip the Cream: In a separate bowl, whip the heavy whipping cream until stiff peaks form. Gently fold this into the cheesecake mixture until combined.
5. Add Gelatin (Optional): If you prefer a firmer setting, sprinkle unflavored gelatin over 2 tablespoons of cold water in a small bowl. Let it bloom for a few minutes, then heat gently until dissolved. Mix it into the filling, ensuring not to overwork it.
6. Assemble the Cheesecake: Pour the filling into the prepared crust. Smooth the top with a spatula for an even surface.
7. Chill: Cover the cheesecake with plastic wrap. Place it in the refrigerator for a minimum of 4 hours, or overnight for the best consistency.
8. Serve: Once fully set, remove from the springform pan. Slice and serve with additional whipped cream or candied orange peel for garnish, if desired.
With these steps, you’ll have a stunning cheesecake that tastes as good as it looks!
How to Serve
Serving your No-Bake Orange Creamsicle Cheesecake can elevate the overall experience. Here are some tips to make it even more delightful:
1. Presentation Matters: Use a cake stand to elevate the look of the cheesecake. A simple garnish of orange slices or fresh mint can greatly enhance its visual appeal.
2. Pairing Suggestions: Serve alongside fresh fruit or a scoop of vanilla ice cream to complement the citrusy flavors.
3. Slice Selection: Offer generous slices to encourage guests to indulge while ensuring you have enough for everyone to enjoy at least a second helping.
4. Beverage Pairing: This dessert pairs wonderfully with a glass of iced tea, lemonade, or sparkling wine, making it refreshing for warm weather.
Following these serving suggestions will help create a memorable experience for your guests, leaving a lasting impression long after dessert has been served. Enjoy your delightful No-Bake Orange Creamsicle Cheesecake!
Additional Tips
– Use Fresh Ingredients: For the best flavor in your No-Bake Orange Creamsicle Cheesecake, use fresh oranges for juice and zest. This will enhance the vibrancy of the orange flavor.
– Chill Properly: Make sure to allow ample chilling time. While 4 hours may work, an overnight chill allows the flavors to meld beautifully.
– Avoid Overmixing: When incorporating the whipped cream into the cheesecake mixture, be gentle. Overmixing can deflate the whipped cream, leading to a less airy and fluffy texture.
– Garnish Creatively: Consider garnishing with additional orange zest or candied orange peel to elevate both the look and flavor of your dessert.
Recipe Variation
Feel free to make this No-Bake Orange Creamsicle Cheesecake your own! Here are a couple of fun variations:
1. Chocolate Swirl Version: Before chilling, swirl in some melted chocolate or Nutella into the cheesecake filling for a decadent twist.
2. Berry Layer: Create layers by adding a layer of mixed berries between the crust and cheesecake filling for an added fruity dimension.
3. Citrus Fusion: Mix different citrus juices, like lemon or grapefruit, with the orange juice for a unique flavor profile.
Freezing and Storage
– Storage: Cover the cheesecake tightly with plastic wrap or aluminum foil and store it in the refrigerator. It should last up to 5 days.
– Freezing: For longer storage, you can freeze slices of the cheesecake. Wrap each slice in plastic wrap followed by aluminum foil. They can last for up to 3 months in the freezer. Thaw in the refrigerator before serving.
Special Equipment
To create your No-Bake Orange Creamsicle Cheesecake, gather the following essential tools:
– Mixing bowls for combining ingredients.
– A hand or stand mixer for whipping cream and mixing cheesecake filling.
– A 9-inch springform pan for easy removal and presentation.
– A spatula for smoothing the cheesecake filling.
Frequently Asked Questions
Can I use a different crust?
Yes! If you prefer, you can use crushed cookies like Nilla wafers or chocolate cookies instead of graham crackers for a different flavor.
How do I ensure my cheesecake is firm enough?
Using unflavored gelatin in the filling helps achieve a firmer texture. If you skip this, make sure to chill it for a longer time.
Can I substitute the cream cheese?
If you’re looking for a lighter version, consider using Greek yogurt or a soft mascarpone cheese, but the texture and taste may vary slightly.
What if I don’t have a springform pan?
You can use a regular pie dish, but it might be trickier to remove the cheesecake without damaging it. A springform pan is recommended for easy release.
Conclusion
The No-Bake Orange Creamsicle Cheesecake is a divine dessert that combines effortless preparation with refreshing flavors. This recipe is perfect for every occasion, offering a nostalgic taste of summer with every bite. With vibrant orange flavors and a creamy texture, it’s bound to impress your friends and family. Enjoy the delightful experience of making and sharing this marvelous no-bake treat!

No-Bake Orange Creamsicle Cheesecake: An Incredible Ultimate Recipe
- Total Time: 15 minutes
Ingredients
– 1 ½ cups graham cracker crumbs
– ½ cup unsalted butter, melted
– 2 cups cream cheese, softened
– 1 cup powdered sugar
– 1 tsp vanilla extract
– 1 cup heavy whipping cream
– 1 cup orange juice (freshly squeezed for best flavor)
– Zest of 1 large orange
– 1 tbsp unflavored gelatin (optional, for thicker cheesecake)
Instructions
Making the No-Bake Orange Creamsicle Cheesecake is a breeze. Follow these simple steps for a delectable outcome:
1. Prepare the Crust: In a mixing bowl, combine the graham cracker crumbs and melted butter. Mix until well combined. Press the mixture firmly into the bottom of a 9-inch springform pan to create a crust.
2. Make the Filling: In a large mixing bowl, beat softened cream cheese and powdered sugar until smooth and creamy.
3. Add Flavor: Mix in the vanilla extract, orange juice, and orange zest. Continue to blend until all ingredients are well incorporated.
4. Whip the Cream: In a separate bowl, whip the heavy whipping cream until stiff peaks form. Gently fold this into the cheesecake mixture until combined.
5. Add Gelatin (Optional): If you prefer a firmer setting, sprinkle unflavored gelatin over 2 tablespoons of cold water in a small bowl. Let it bloom for a few minutes, then heat gently until dissolved. Mix it into the filling, ensuring not to overwork it.
6. Assemble the Cheesecake: Pour the filling into the prepared crust. Smooth the top with a spatula for an even surface.
7. Chill: Cover the cheesecake with plastic wrap. Place it in the refrigerator for a minimum of 4 hours, or overnight for the best consistency.
8. Serve: Once fully set, remove from the springform pan. Slice and serve with additional whipped cream or candied orange peel for garnish, if desired.
With these steps, you’ll have a stunning cheesecake that tastes as good as it looks!
- Prep Time: 15 minutes
- Cook Time: 0 minutes
Nutrition
- Serving Size: 12 slices
- Calories: 320 kcal
- Fat: 22g
- Protein: 4g