
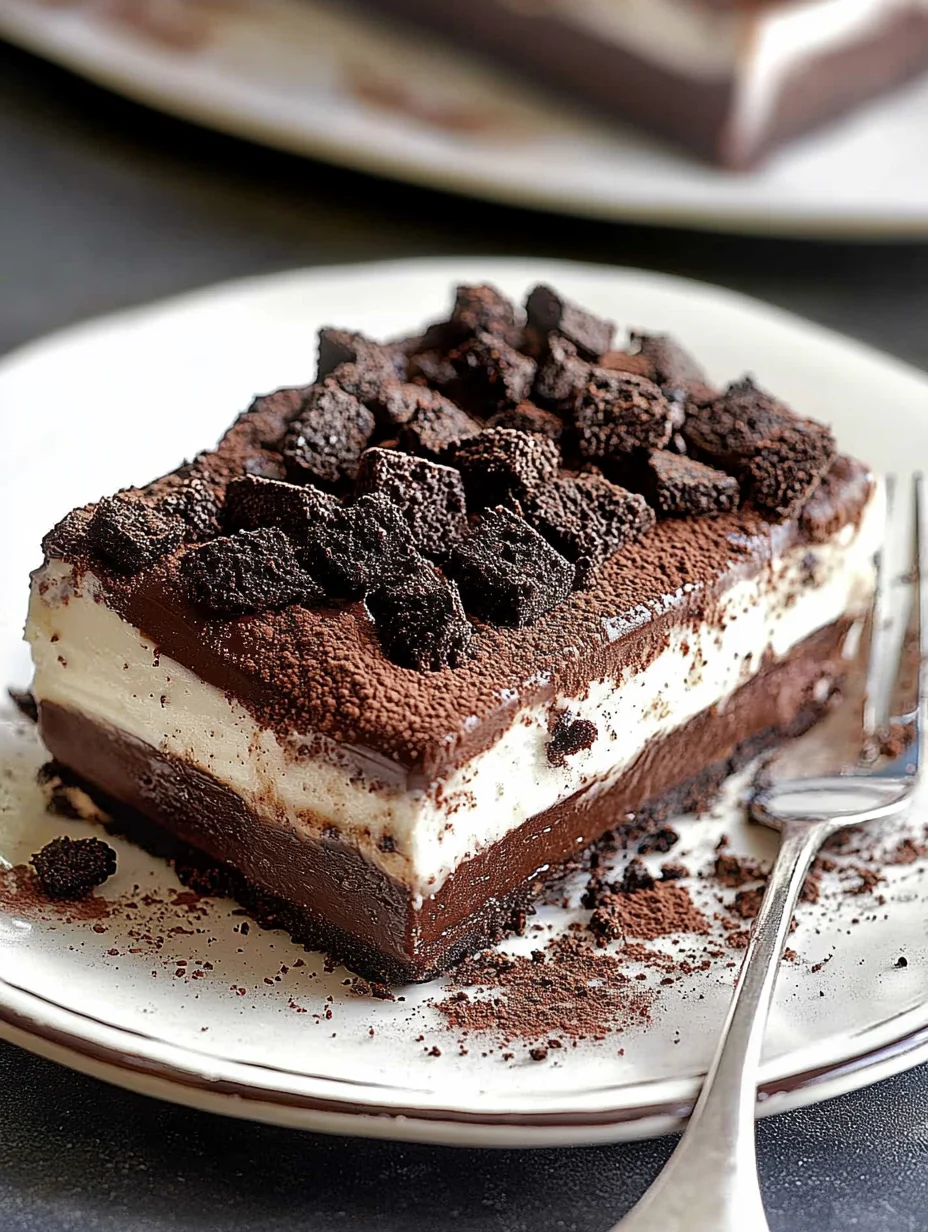
No Bake Chocolate Oreo Lasagna is a dessert that will leave you and your guests in awe. This delightful treat combines layers of creamy chocolate, cookies, and whipped toppings to create an indulgent masterpiece. It captures the essence of comfort food while being wonderfully easy to prepare. With no baking required, this recipe is perfect for anyone who loves chocolate but wants to skip the oven.
Imagine sliding that first spoonful of this incredible dessert, revealing the beautiful layers of goodness beneath. The combination of the crispy Oreo crust, the luscious cream filling, and the rich chocolate flavor makes every bite a celebration. Whether it’s a family gathering, a birthday party, or just a sweet treat for yourself, No Bake Chocolate Oreo Lasagna fits perfectly into any occasion. In this article, you’ll discover why this recipe is a crowd-pleaser, how to prepare it, and tips on making it even more enjoyable.
By following this guide, you’ll understand how each component contributes to the overall experience. With that in mind, let’s explore the benefits of making No Bake Chocolate Oreo Lasagna and why you’ll fall in love with it!
Why You’ll Love This Recipe
No Bake Chocolate Oreo Lasagna brings together a symphony of flavors and textures that create an indulgent experience. Here are some reasons why you’ll adore this recipe:
1. Elevated Flavors: The combination of cream cheese, whipped topping, and chocolate pudding results in an irresistible flavor profile.
2. Simply Delicious: Using Oreos as the base adds a crunchy texture, perfect against the creaminess of the filling.
3. No Oven Required: Perfect for warm days or busy schedules, this recipe requires no baking, making it simple and hassle-free.
4. Customizable: You can easily switch out ingredients to suit your taste, such as using different flavors of pudding or adding fruit layers.
5. Visually Stunning: The elegant layers and contrasting colors create a beautiful dessert that impresses guests at any gathering.
6. Easy Preparation: With straightforward steps and minimal effort, even beginner cooks can achieve a stunning dessert.
These compelling features make No Bake Chocolate Oreo Lasagna a top choice for desserts. Each bite not only brings joy but also creates lasting memories.
Preparation and Cooking Time
Preparing No Bake Chocolate Oreo Lasagna takes approximately 25 minutes, making it a quick dessert option. Here’s a detailed breakdown of the time you’ll need:
– Preparation Time: 25 minutes
– Chilling Time: 4-6 hours (or overnight for best results)
This allows the layers to set properly and ensures that each slice is perfectly formed when served.
Ingredients
– 36 Oreo cookies (plus extra for garnish)
– ½ cup unsalted butter, melted
– 8 oz cream cheese, softened
– 1 cup powdered sugar
– 2 cups whipped topping (like Cool Whip)
– 2 (3.4 oz) packages of chocolate instant pudding
– 3 cups milk
– Chocolate syrup (for drizzling on top)
Step-by-Step Instructions
Creating No Bake Chocolate Oreo Lasagna is a piece of cake—without any baking required! Follow these easy steps:
1. Prepare the Oreo Crust: Crush 24 Oreo cookies in a food processor until fine crumbs form. Mix the crumbs with melted butter until combined.
2. Form the Crust: Press the mixture firmly into the bottom of a 9×13-inch baking dish to create a solid layer. Set aside.
3. Mix the Cream Cheese Filling: In a bowl, beat the cream cheese until smooth. Gradually add powdered sugar, mixing until well-blended. Fold in 1 cup of whipped topping until just combined.
4. Layer the Cream Cheese Mixture: Spread the cream cheese mixture evenly over the Oreo crust.
5. Prepare the Pudding Mixture: In another bowl, whisk together the chocolate pudding mix and milk for about 2 minutes until thickened.
6. Layer the Chocolate Pudding: Pour the chocolate pudding mixture over the cream cheese layer, spreading it out evenly with a spatula.
7. Add More Whipped Topping: Spread the remaining whipped topping over the pudding layer, smoothing it out to cover.
8. Chill: Refrigerate the dessert for at least 4 hours or overnight for the best results to ensure it sets properly.
9. Garnish: Before serving, crush additional Oreo cookies and sprinkle on top. Drizzle with chocolate syrup for an added touch.
10. Serve and Enjoy: Cut into squares and serve chilled. Enjoy the creamy, chocolatey goodness!
How to Serve
Serving No Bake Chocolate Oreo Lasagna can elevate the experience for you and your guests. Here are some tips to consider:
1. Presentation: Use a fancy serving platter to display your lasagna attractively. Layered desserts like this look delightful when served in glass dishes, showcasing the different layers.
2. Add Toppings: Enhance the dessert by garnishing with additional crushed Oreos, chocolate shavings, or whipped cream.
3. Accompaniments: Pair the lasagna with fresh berries or a scoop of vanilla ice cream for a refreshing contrast.
4. Serving Size: Cut the portions to be generous but manageable, encouraging guests to go back for seconds without feeling overwhelmed.
5. Beverage Pairing: This dessert pairs beautifully with coffee, milk, or dessert wine. Choose a beverage that complements the rich flavors of the lasagna.
By thoughtfully presenting and serving No Bake Chocolate Oreo Lasagna, you create a memorable experience for you and your guests. Let the deliciousness unfold in every layer when you share this incredible dessert!
Additional Tips
– Use High-Quality Ingredients: The flavor of your No Bake Chocolate Oreo Lasagna will greatly benefit from using fresh, high-quality ingredients. This includes Oreo cookies, cream cheese, and chocolate pudding.
– Chill Longer for Best Results: While the minimum chilling time is 4 hours, leaving it in the refrigerator overnight allows the flavors to meld beautifully, enhancing the dessert’s richness.
– Layer Creatively: Feel free to get creative with the layers. Alternate between pudding and cream layers or add crushed candy bars or nuts for added texture and flavor.
– Serve at Perfect Temperature: Allow it to sit out of the refrigerator for about 10 minutes before serving to soften slightly, making it easier to slice while maintaining its structure.
Recipe Variation
There are endless possibilities to customize your No Bake Chocolate Oreo Lasagna to suit different preferences:
1. Mocha Version: Add a teaspoon of instant coffee granules to the chocolate pudding mixture for a delightful coffee flavor.
2. Mini Versions: Create individual servings in mason jars for personal desserts. Layer the ingredients similarly to the 9×13 dish for a charming presentation.
3. Peanut Butter Swirl: Mix in peanut butter into the cream cheese mixture for a rich, creamy flavor that pairs beautifully with chocolate.
4. Fruit Layer: Add a layer of fresh sliced strawberries or bananas between the cream cheese and pudding layers for a refreshing twist.
Freezing and Storage
– Storing: Keep the No Bake Chocolate Oreo Lasagna covered in the refrigerator. It can last up to 5 days, allowing guests to enjoy it at their leisure.
– Freezing: You can freeze slices of the lasagna for up to 3 months. Wrap individual pieces tightly in plastic wrap followed by aluminum foil to prevent freezer burn. When you’re ready to enjoy, let it thaw in the refrigerator overnight.
Special Equipment
To make No Bake Chocolate Oreo Lasagna, you’ll need a few basic kitchen tools:
– 9×13-inch baking dish: This size is perfect for layering the dessert.
– Mixing bowls: Use multiple bowls for mixing different layers.
– Electric mixer: For beating the cream cheese until smooth and fluffy.
– Spatula: Perfect for smoothing out layers and spreading ingredients evenly.
Frequently Asked Questions
Can I make this dessert gluten-free?
Yes, use gluten-free Oreo cookies to make the recipe suitable for those with gluten sensitivities.
How can I make a dairy-free version?
Substitute cream cheese and whipped topping with dairy-free alternatives and use non-dairy milk for the pudding.
Is there a way to reduce the sugar content?
You can opt for sugar-free pudding mix and adjust the amount of powdered sugar in the cream layer to reduce overall sweetness.
How long will it keep in the fridge?
When stored properly, No Bake Chocolate Oreo Lasagna lasts about 5 days in the refrigerator.
Can I add a different flavor of pudding?
Absolutely! Vanilla, butterscotch, or caramel pudding can work well as alternatives to chocolate for a different flavor profile.
Conclusion
No Bake Chocolate Oreo Lasagna is the perfect indulgent dessert for any occasion. With its combination of creamy layers, crunchy crust, and rich chocolate flavor, it’s hard to resist. Whether serving at a party or enjoying a quiet night at home, this dessert is bound to become a favorite. Easy to make and delightful to savor, it promises to impress every guest. Whip up this no-bake wonder, and watch as it disappears in no time!
No Bake Chocolate Oreo Lasagna: An Incredible Amazing Recipe
- Total Time: 15 minutes
Ingredients
– 36 Oreo cookies (plus extra for garnish)
– ½ cup unsalted butter, melted
– 8 oz cream cheese, softened
– 1 cup powdered sugar
– 2 cups whipped topping (like Cool Whip)
– 2 (3.4 oz) packages of chocolate instant pudding
– 3 cups milk
– Chocolate syrup (for drizzling on top)
Instructions
Creating No Bake Chocolate Oreo Lasagna is a piece of cake—without any baking required! Follow these easy steps:
1. Prepare the Oreo Crust: Crush 24 Oreo cookies in a food processor until fine crumbs form. Mix the crumbs with melted butter until combined.
2. Form the Crust: Press the mixture firmly into the bottom of a 9×13-inch baking dish to create a solid layer. Set aside.
3. Mix the Cream Cheese Filling: In a bowl, beat the cream cheese until smooth. Gradually add powdered sugar, mixing until well-blended. Fold in 1 cup of whipped topping until just combined.
4. Layer the Cream Cheese Mixture: Spread the cream cheese mixture evenly over the Oreo crust.
5. Prepare the Pudding Mixture: In another bowl, whisk together the chocolate pudding mix and milk for about 2 minutes until thickened.
6. Layer the Chocolate Pudding: Pour the chocolate pudding mixture over the cream cheese layer, spreading it out evenly with a spatula.
7. Add More Whipped Topping: Spread the remaining whipped topping over the pudding layer, smoothing it out to cover.
8. Chill: Refrigerate the dessert for at least 4 hours or overnight for the best results to ensure it sets properly.
9. Garnish: Before serving, crush additional Oreo cookies and sprinkle on top. Drizzle with chocolate syrup for an added touch.
10. Serve and Enjoy: Cut into squares and serve chilled. Enjoy the creamy, chocolatey goodness!
- Prep Time: 15 minutes
- Cook Time: 0 minutes
Nutrition
- Serving Size: 12
- Calories: 350 kcal
- Fat: 22g
- Protein: 6g