
Monster Ball is a delightful dish that brings fun and whimsy to any gathering. This recipe is not just about food; it’s about creating an experience filled with laughter, creativity, and shared moments. It’s perfect for parties, special celebrations, or simply a fun weekend cooking project with family and friends.
Imagine crafting a colorful, delicious treat that resembles a playful monster—one that excites kids and adults alike! The Monster Ball captivates with its vibrant flavors and charming appearance. This dish is more than just a meal; it’s a fantastic way to engage with those around you and create lasting memories. Whether you’re hosting a themed party, a kids’ gathering, or just looking for a fun cooking activity, the Monster Ball is sure to be a hit.
In this guide, you’ll learn not only how to prepare this amazing dish but also explore valuable tips to make the experience enjoyable for everyone involved. With easy-to-follow steps, you’ll master the art of creating Monster Balls that will have your guests raving about their unique flavors and fun presentation. Let’s dive in and discover what makes this recipe so special!
Why You’ll Love This Recipe
Monster Ball is an amazing dish that surprises with its vibrant colors and flavors. Here are several reasons why you’ll adore making this recipe:
1. Interactive Experience: Assembling the Monster Ball can be a fun activity for families, allowing everyone to contribute their creativity.
2. Visually Appealing: The colorful presentation makes it an eye-catching centerpiece at any gathering.
3. Customizable Ingredients: You can tailor the flavors and decorations to suit everyone’s tastes, making it versatile.
4. Perfect for Any Occasion: This dish is suitable for birthdays, Halloween parties, or just a casual get-together.
5. Easy to Follow: The clear instructions make it accessible for both novice and experienced cooks.
6. Unexpected Flavor Combinations: The mixture of flavors and textures creates an incredible taste experience.
These factors make the Monster Ball a fantastic dish to share with friends and family. Each bite is filled with flavors that will leave everyone wanting more!
Preparation and Cooking Time
Creating the delightful Monster Ball takes about 1 hour and 15 minutes from start to finish. Here’s a breakdown of the time you’ll need:
– Preparation Time: 30 minutes
– Cooking Time: 30-35 minutes
– Cooling Time: 15-20 minutes
These time estimates may vary depending on your skill level and kitchen equipment, but they provide a solid guideline to help you plan your cooking session effectively.
Ingredients
– 2 cups all-purpose flour
– 1 cup granulated sugar
– ½ cup unsweetened cocoa powder
– ½ cup butter, softened
– 1 large egg
– 1 tablespoon vanilla extract
– 1 cup buttermilk
– 1 teaspoon baking powder
– 1 teaspoon baking soda
– ¼ teaspoon salt
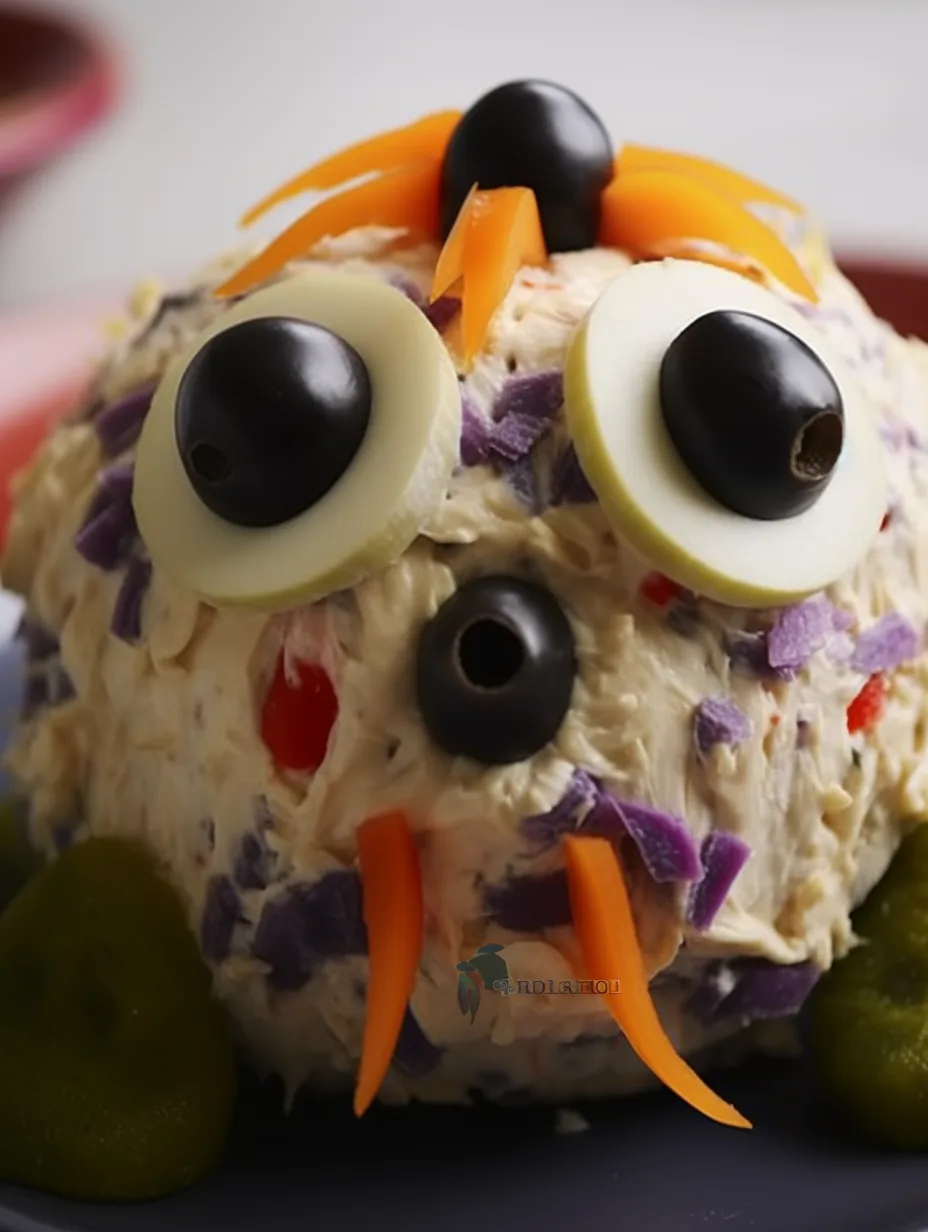
– Food coloring (various shades)
– Sprinkles or edible glitter (for decoration)
– Chocolate frosting (for filling and topping)
– Candy eyes (for decoration)
Step-by-Step Instructions
Creating your own Monster Ball is straightforward if you follow these steps:
1. Preheat the Oven: Set your oven to 350°F (175°C) and grease a baking sheet.
2. Mix Dry Ingredients: In a large bowl, combine the flour, cocoa powder, baking powder, baking soda, and salt. Whisk together until blended.
3. Cream the Butter and Sugar: In another bowl, beat the softened butter and granulated sugar until light and fluffy.
4. Add Egg and Vanilla: Mix in the egg and vanilla extract, blending until well incorporated.
5. Combine Wet Ingredients: Gradually add the buttermilk to the butter mixture, blending thoroughly.
6. Combine Mixtures: Slowly add the dry mixture to the wet ingredients, stirring just until the batter comes together.
7. Divide the Batter: Separate the batter into four bowls. Add different food colors to each bowl, mixing until you achieve the desired shades.
8. Scoop the Batter: Use a cookie scoop to create small balls of each colored batter and place them on the baking sheet.
9. Bake: Place the filled baking sheet in the oven and bake for 30-35 minutes or until golden brown and a toothpick inserted comes out clean.
10. Cool the Balls: Remove from the oven and allow the Monster Balls to cool on a wire rack for 15-20 minutes.
11. Cut and Fill: Once cooled, slice each Monster Ball in half. Fill with chocolate frosting before placing the top half back on.
12. Decorate: Use the remaining frosting to coat the outside of the Monster Balls. Sprinkle with edible glitter and add candy eyes to create a fun monster face.
These simple steps will guide you in preparing the incredible Monster Ball, bringing fun and flavor to your next event!
How to Serve
When serving your amazing Monster Balls, consider the following tips to impress your guests:
1. Unique Presentation: Arrange the Monster Balls on a colorful platter for a vibrant display.
2. Themed Decor: Enhance the presentation with fun decorations aligned with the theme of your gathering.
3. Accompaniment Options: Serve with whipped cream, fruit, or additional sweets like lollipops for a whimsical touch.
4. Slice Size: Offer smaller portions for guests who might want to try multiple flavors.
5. Pairing Beverages: Consider serving with colorful drinks like fruit punch or themed cocktails, adding to the festive atmosphere.
By incorporating these serving suggestions, you’ll create a memorable dining experience that highlights the delightful nature of the Monster Ball.
Additional Tips
– Use Quality Ingredients: For the best flavor, opt for high-quality cocoa powder, as it significantly impacts the taste of your Monster Balls.
– Let the Batter Rest: Allowing the batter to rest for a few minutes can improve the texture of the Monster Balls. This gives the baking powder time to activate fully.
– Experiment with Fillings: Aside from chocolate frosting, consider using flavored creams or fruit preserves for a unique taste in every bite.
– Create Different Shapes: While they’re called Monster Balls, feel free to shape them into different monster-like figures for added fun and creativity.
Recipe Variation
Get creative with your Monster Ball recipe! Here are a few exciting variations to explore:
1. Chocolate Chip Monster Balls: Mix in your favorite chocolate chips or chunks into the batter before baking for added texture and sweetness.
2. Seasonal Flavors: Incorporate seasonal flavors such as pumpkin spice for fall or peppermint extract for a festive twist during the winter holidays.
3. Nutty Delight: Add crushed nuts like walnuts or pecans into the batter for a delightful crunch that pairs well with the soft texture.
Freezing and Storage
– Storage: Keep the Monster Balls in an airtight container at room temperature for up to three days or refrigerate them for a longer shelf life of about five days.
– Freezing: You can freeze the unfilled Monster Balls. Wrap them securely and store them in the freezer for up to three months. When ready to serve, thaw them at room temperature and fill them as desired.
Special Equipment
To successfully make Monster Balls, consider having the following tools on hand:
– Mixing bowls
– Electric mixer or hand whisk
– Cookie scoop for portioning the batter
– Baking sheet
– Wire rack for cooling
– Knife for slicing
Frequently Asked Questions
How can I tell when the Monster Balls are fully baked?
Insert a toothpick into the center. If it comes out clean, they are done.
Can I make these ahead of time?
Yes! You can prepare them a day in advance. Just frost them right before serving for the best presentation.
Are Monster Balls safe for those with allergies?
Safety depends on the ingredients used. You can customize the recipe to accommodate different dietary needs, such as using gluten-free flour.
Can I alter the color scheme?
Absolutely! Feel free to use any color combination your guests will enjoy. The fun lies in the creativity!
What should I do if the Monster Balls are too dry?
If they turn out dry, consider adjusting baking times slightly or adding flavored syrups into the filling for moisture.
Conclusion
The Monster Ball is not only a feast for the eyes, but it also provides a delightful taste experience. With its bright colors, amazing flavors, and interactive assembly, this dish is sure to be a hit at your next gathering. Whether enjoyed at birthday parties or casual get-togethers, the Monster Ball is crafted to create memories and laughter among friends and family.
Monster Ball: An Incredible Ultimate Recipe for Fun
- Total Time: 47 minute
Ingredients
– 2 cups all-purpose flour
– 1 cup granulated sugar
– ½ cup unsweetened cocoa powder
– ½ cup butter, softened
– 1 large egg
– 1 tablespoon vanilla extract
– 1 cup buttermilk
– 1 teaspoon baking powder
– 1 teaspoon baking soda
– ¼ teaspoon salt
– Food coloring (various shades)
– Sprinkles or edible glitter (for decoration)
– Chocolate frosting (for filling and topping)
– Candy eyes (for decoration)
Instructions
Creating your own Monster Ball is straightforward if you follow these steps:
1. Preheat the Oven: Set your oven to 350°F (175°C) and grease a baking sheet.
2. Mix Dry Ingredients: In a large bowl, combine the flour, cocoa powder, baking powder, baking soda, and salt. Whisk together until blended.
3. Cream the Butter and Sugar: In another bowl, beat the softened butter and granulated sugar until light and fluffy.
4. Add Egg and Vanilla: Mix in the egg and vanilla extract, blending until well incorporated.
5. Combine Wet Ingredients: Gradually add the buttermilk to the butter mixture, blending thoroughly.
6. Combine Mixtures: Slowly add the dry mixture to the wet ingredients, stirring just until the batter comes together.
7. Divide the Batter: Separate the batter into four bowls. Add different food colors to each bowl, mixing until you achieve the desired shades.
8. Scoop the Batter: Use a cookie scoop to create small balls of each colored batter and place them on the baking sheet.
9. Bake: Place the filled baking sheet in the oven and bake for 30-35 minutes or until golden brown and a toothpick inserted comes out clean.
10. Cool the Balls: Remove from the oven and allow the Monster Balls to cool on a wire rack for 15-20 minutes.
11. Cut and Fill: Once cooled, slice each Monster Ball in half. Fill with chocolate frosting before placing the top half back on.
12. Decorate: Use the remaining frosting to coat the outside of the Monster Balls. Sprinkle with edible glitter and add candy eyes to create a fun monster face.
These simple steps will guide you in preparing the incredible Monster Ball, bringing fun and flavor to your next event!
- Prep Time: 30 minutes
- Cook Time: 30-35 minutes
Nutrition
- Serving Size: 12
- Calories: 200 kcal
- Fat: 8g
- Protein: 3g