

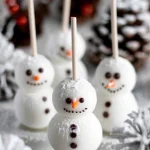
Mickey Snowman Cake Pops are a delightful treat that brings joy during the holiday season. These cake pops not only capture the spirit of winter but also embody the charm of Disney’s beloved character, Mickey Mouse. Imagine a delicious cake pop, perfectly shaped like a snowman, adorned with Mickey’s iconic ears and cheerful decorations. With each bite, you’ll experience the moist cake and rich chocolate coating, making it a favorite for kids and adults alike.
This whimsical dessert is perfect for holiday parties, family gatherings, or simply as a fun activity with the kids. The playful design and delicious flavors will leave everyone smiling. Whether you’re a seasoned baker or a novice in the kitchen, this recipe is straightforward and fun. You’ll find that creating these adorable Mickey Snowman Cake Pops is an enjoyable experience that can also become a cherished holiday tradition.
Not only are these cake pops visually appealing, but they are also incredibly versatile. You can customize them with different colors, decorations, and flavors to suit your preferences. In this article, you’ll discover why this recipe is so special and how to create these amazing cake pops step-by-step. Get ready to impress your friends and family with this ultimate holiday treat!
Why You’ll Love This Recipe
Mickey Snowman Cake Pops are not just a feast for the eyes; they are a delightful treat that everyone will adore. Here are some reasons why you’ll fall in love with this recipe:
1. Fun and Creative: The process of decorating these cake pops is a fantastic way to express your creativity.
2. Perfect for All Ages: Kids will love helping out in the kitchen, making it a fun family activity.
3. Customizable: You can adjust flavors and decorations to fit any occasion or personal preference.
4. Unique Presentation: These cake pops stand out on any dessert table, making them a showstopper.
5. Deliciously Moist: The cake inside is rich and moist, perfectly complemented by the chocolate coating.
6. Easy to Store: Cake pops can be made ahead of time and stored for later enjoyment, making them a convenient option.
With these factors in mind, you’ll understand why Mickey Snowman Cake Pops are a must-try recipe for the holiday season. They are not just treats; they are a way to spread joy and creativity!
Preparation and Cooking Time
Creating Mickey Snowman Cake Pops is a fun and engaging process. Here’s a breakdown of the time required for this recipe:
– Preparation Time: 30 minutes
– Cooking Time: 25-30 minutes
– Cooling Time: 1 hour
– Decorating Time: 30 minutes
In total, you can expect to spend about 2-2.5 hours to create these delightful cake pops, depending on your decorating skills and experience.
Ingredients
– 1 box of chocolate cake mix (plus ingredients required on the box)
– 1 can of chocolate frosting
– 1 pound of white candy melts
– Black candy melts or chocolate chips (for eyes)
– Orange candy melts (for the nose)
– Lollipop sticks
– Sprinkles or edible glitter (for decoration)
– Styrofoam block or cake pop stand (for drying)
Step-by-Step Instructions
Creating Mickey Snowman Cake Pops is a straightforward process. Follow these steps to make your own:
1. Bake the Cake: Prepare the chocolate cake mix according to the package instructions. Bake in a 9×13 inch pan. Allow it to cool completely.
2. Crumble the Cake: Once cooled, crumble the cake into a large mixing bowl until it resembles fine crumbs.
3. Mix with Frosting: Add the chocolate frosting to the cake crumbs. Mix until fully combined, creating a dough-like consistency.
4. Shape the Cake Pops: Using your hands, scoop out portions of the mixture and roll them into balls about 1 inch in diameter. For the snowman shape, make one larger ball (the body) and one smaller ball (the head).
5. Chill the Cake Pops: Place the shaped cake pops on a baking sheet lined with parchment paper. Refrigerate for about 30 minutes to firm up.
6. Melt the Candy Coating: In a microwave-safe bowl, melt the white candy melts according to package instructions until smooth.
7. Insert Lollipop Sticks: Dip the end of each lollipop stick into the melted candy, then insert it into the larger cake pop ball. This helps secure the stick.
8. Coat the Cake Pops: Dip each cake pop into the melted white candy melts, ensuring it is fully coated. Allow excess coating to drip off.
9. Add the Snowman Head: While the coating is still wet, attach the smaller cake pop ball (the head) on top of the larger ball (the body). Let it set for a few minutes.
10. Decorate the Snowman: Use melted black candy melts or chocolate chips for the eyes, and pipe a small orange nose using melted orange candy melts. Add sprinkles or edible glitter for extra decoration.
11. Dry the Cake Pops: Place the finished cake pops upright in a styrofoam block or cake pop stand to dry completely.
12. Serve: Once fully set, your Mickey Snowman Cake Pops are ready to be enjoyed!
How to Serve
Serving Mickey Snowman Cake Pops can enhance the overall experience for your guests. Here are some tips to make your presentation special:
1. Display Creatively: Arrange the cake pops in a festive container or a decorative cake pop stand for an eye-catching display.
2. Pair with Hot Cocoa: Serve these treats alongside cups of hot cocoa for a cozy winter treat.
3. Personalized Tags: Consider adding little tags to the cake pops with cheerful messages or names to make them more personal.
4. Holiday Treat Bags: Package them in clear bags tied with ribbons as delightful gifts for friends and family.
5. Themed Dessert Table: Include other holiday-themed treats to create a festive dessert table, making the cake pops a part of a larger celebration.
With these serving ideas, your Mickey Snowman Cake Pops will not only be a treat for the taste buds but also a feast for the eyes, making your gatherings even more memorable!
Additional Tips
– Use Quality Ingredients: For the best flavor, opt for high-quality chocolate cake mix and frosting. This will enhance the overall taste of your Mickey Snowman Cake Pops.
– Chill Thoroughly: Ensure the cake pops are well-chilled before dipping in candy melts. This prevents them from falling apart during the coating process.
– Experiment with Flavors: Don’t hesitate to try different cake flavors! Vanilla or red velvet can also work wonderfully for these festive treats.
– Be Creative with Decorations: Use various sprinkles, edible glitter, or even fondant for unique designs. Each cake pop can have its own personality!
Recipe Variation
Feel free to switch things up! Here are some fun variations to try:
1. Nut-Free Version: Replace chocolate chips with mini marshmallows for a fun twist without nuts.
2. Snowman Accessories: Add colorful scarves made from fondant or candy strips to give your snowmen more character.
3. Different Cake Mix: Experiment with lemon or funfetti cake mixes for a burst of flavor and color.
4. Add Flavor Extracts: Mix in vanilla or peppermint extract into the cake batter for an extra layer of flavor.
Freezing and Storage
– Storage: Store your cake pops in an airtight container in the refrigerator. They’ll stay fresh for up to a week.
– Freezing: You can freeze the uncoated cake balls for up to 3 months. Ensure they’re in a single layer in a freezer-safe container to avoid sticking.
Special Equipment
You will need a few essential tools to prepare these cake pops successfully:
– Mixing bowls
– Electric mixer or fork for mixing
– Baking sheet lined with parchment paper
– Styrofoam block or cake pop stand for drying
– Microwave-safe bowl for melting candy melts
Frequently Asked Questions
How long can I store the cake pops?
You can store them in the refrigerator for up to a week. If frozen, they can last up to 3 months.
Can I use other types of chocolate for coating?
Yes, feel free to use milk or dark chocolate instead of white candy melts for a different flavor profile.
What if my cake pops are falling off the sticks?
Make sure your cake mixture is well-chilled before inserting the sticks. If they’re still falling off, try using thicker candy melts for coating.
Can I make these cake pops gluten-free?
Absolutely! Just use a gluten-free chocolate cake mix and ensure all other ingredients are gluten-free.
Is it necessary to use a stand for drying?
While not mandatory, a stand helps keep the pops upright, allowing for even coating and decoration.
Conclusion
Mickey Snowman Cake Pops are not just a delightful treat; they are a celebration of creativity and joy during the holiday season. Whether you’re making them for a festive gathering or as a fun family project, these cake pops are sure to bring smiles to everyone’s faces. With their charming design and delicious taste, they are the perfect addition to any holiday spread. Enjoy the process of making these adorable treats and create lasting memories with loved ones!
Mickey Snowman Cake Pops: An Amazing Ultimate Recipe
- Total Time: 34 minute
Ingredients
– 1 box of chocolate cake mix (plus ingredients required on the box)
– 1 can of chocolate frosting
– 1 pound of white candy melts
– Black candy melts or chocolate chips (for eyes)
– Orange candy melts (for the nose)
– Lollipop sticks
– Sprinkles or edible glitter (for decoration)
– Styrofoam block or cake pop stand (for drying)
Instructions
Creating Mickey Snowman Cake Pops is a straightforward process. Follow these steps to make your own:
1. Bake the Cake: Prepare the chocolate cake mix according to the package instructions. Bake in a 9×13 inch pan. Allow it to cool completely.
2. Crumble the Cake: Once cooled, crumble the cake into a large mixing bowl until it resembles fine crumbs.
3. Mix with Frosting: Add the chocolate frosting to the cake crumbs. Mix until fully combined, creating a dough-like consistency.
4. Shape the Cake Pops: Using your hands, scoop out portions of the mixture and roll them into balls about 1 inch in diameter. For the snowman shape, make one larger ball (the body) and one smaller ball (the head).
5. Chill the Cake Pops: Place the shaped cake pops on a baking sheet lined with parchment paper. Refrigerate for about 30 minutes to firm up.
6. Melt the Candy Coating: In a microwave-safe bowl, melt the white candy melts according to package instructions until smooth.
7. Insert Lollipop Sticks: Dip the end of each lollipop stick into the melted candy, then insert it into the larger cake pop ball. This helps secure the stick.
8. Coat the Cake Pops: Dip each cake pop into the melted white candy melts, ensuring it is fully coated. Allow excess coating to drip off.
9. Add the Snowman Head: While the coating is still wet, attach the smaller cake pop ball (the head) on top of the larger ball (the body). Let it set for a few minutes.
10. Decorate the Snowman: Use melted black candy melts or chocolate chips for the eyes, and pipe a small orange nose using melted orange candy melts. Add sprinkles or edible glitter for extra decoration.
11. Dry the Cake Pops: Place the finished cake pops upright in a styrofoam block or cake pop stand to dry completely.
12. Serve: Once fully set, your Mickey Snowman Cake Pops are ready to be enjoyed!
- Prep Time: 30 minutes
- Cook Time: 25-30 minutes
Nutrition
- Serving Size: 24 cake pops
- Calories: 150 kcal
- Fat: 7g
- Protein: 2g