
Individual Layered Dips are an amazing way to elevate your gatherings and impress your guests. These delightful appetizers not only look stunning but also pack a punch of flavor with every layer. Perfect for parties, game days, or casual family get-togethers, these dips are as versatile as they are delicious. Each layer brings a unique taste and texture, making them a hit among all age groups.
Imagine a beautiful array of colors and flavors, each layer beckoning you to dig in. Individual Layered Dips provide an interactive dining experience, allowing guests to customize their servings. Whether you’re a fan of spicy, creamy, or crunchy textures, there’s something for everyone in these layered delights. This guide will walk you through why these dips are a must-try, how to prepare them quickly, and tips for serving them beautifully.
Gathering friends and family around a spread of Individual Layered Dips creates an inviting atmosphere. They’re not just food; they’re conversation starters. The layers of flavors come together to create a delightful medley that will have everyone coming back for more. So let’s dive into what makes Individual Layered Dips an essential addition to your next event!
Why You’ll Love This Recipe
Individual Layered Dips are not just tasty; they’re also incredibly fun to make and serve. Here are some reasons why this recipe stands out:
1. Visual Appeal: The vibrant layers create a stunning presentation that will wow your guests.
2. Customizable: You can easily substitute ingredients to cater to various dietary needs or preferences.
3. Easy to Prepare: With straightforward steps, even novice cooks can whip these up without stress.
4. Perfect for Sharing: Individual servings mean that everyone can enjoy their own portion, making it more hygienic and convenient.
5. Flavor Explosion: Each layer brings a distinct flavor, ensuring that every bite is a new experience.
6. Make Ahead: These dips can be prepared in advance, saving you time on the day of your event.
With such a delightful combination of flavors, textures, and colors, it’s no wonder Individual Layered Dips are a crowd favorite. You’ll want to make them for every occasion!
Preparation and Cooking Time
Preparing Individual Layered Dips is a quick and easy process. Here’s a breakdown of the time involved:
– Preparation Time: 20 minutes
– Chilling Time: 1 hour (for best results)
– Total Time: 1 hour and 20 minutes
This efficient timeline allows you to enjoy the process without feeling rushed, making it perfect for both seasoned chefs and beginners alike.
Ingredients
– 1 cup refried beans
– 1 cup guacamole
– 1 cup sour cream
– 1 cup salsa
– 1 cup shredded cheese (cheddar or Mexican blend)
– ½ cup sliced black olives (optional)
– ½ cup chopped green onions
– Tortilla chips or vegetable sticks for serving
Step-by-Step Instructions
Creating Individual Layered Dips is straightforward. Follow these simple steps:
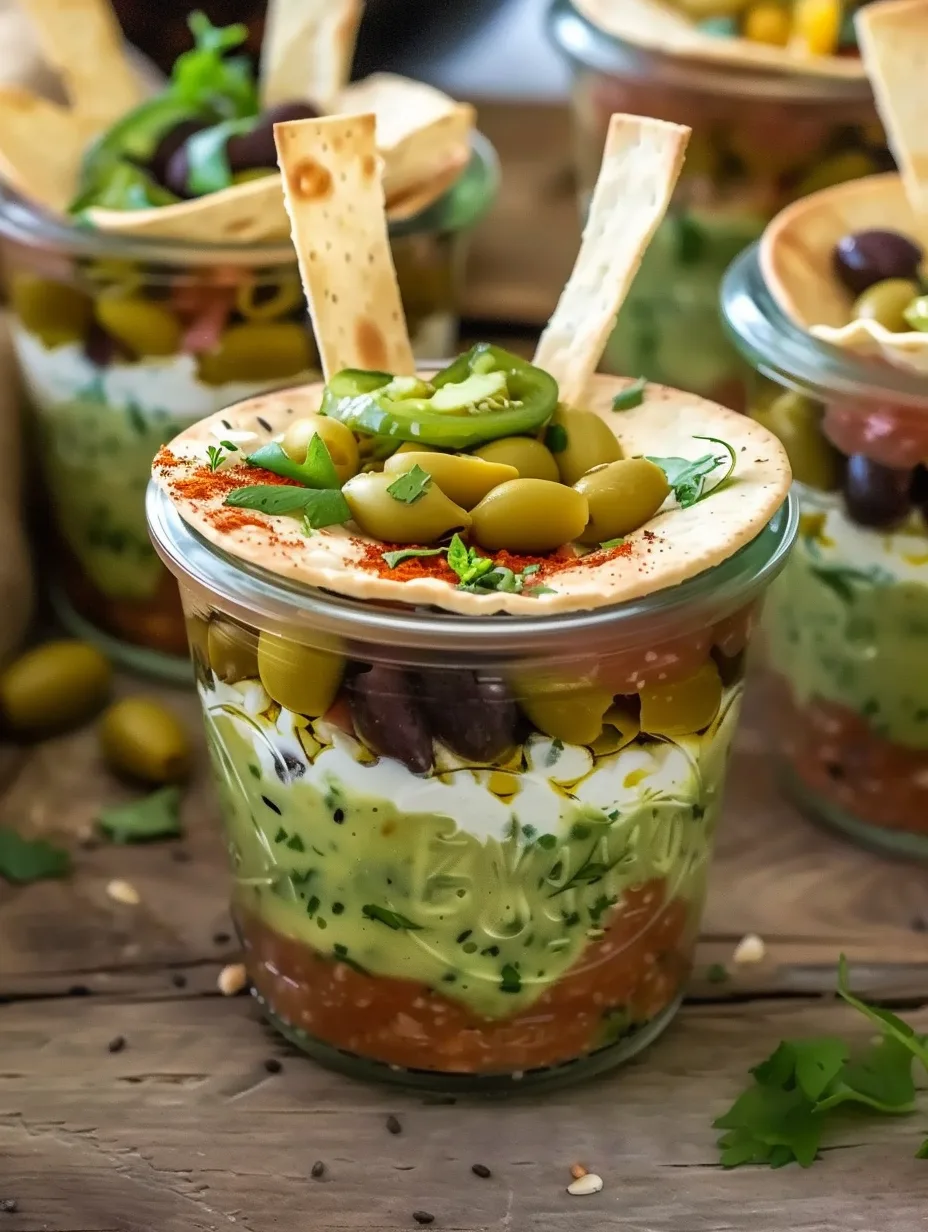
1. Prepare Containers: Gather small cups or jars for individual servings.
2. Layer Refried Beans: Start by adding a layer of refried beans (about 2 tablespoons) to the bottom of each cup.
3. Add Guacamole: Next, spoon in a layer of guacamole, filling to about halfway up the cup.
4. Sour Cream Layer: Add a layer of sour cream on top of the guacamole, smoothing it out evenly.
5. Salsa Layer: Spoon salsa over the sour cream layer, filling the cups to about ¾ full.
6. Cheese Layer: Sprinkle shredded cheese generously on top of the salsa layer.
7. Garnish: Finish with a sprinkle of sliced black olives and chopped green onions for added flavor and color.
8. Chill: Cover the cups and place them in the refrigerator for at least 1 hour before serving to allow the flavors to meld.
9. Serve: Set out tortilla chips or vegetable sticks for dipping alongside the individual cups.
These steps will guide you in creating delicious Individual Layered Dips that are sure to impress!
How to Serve
When it comes to serving Individual Layered Dips, presentation is key. Here are some tips to enhance the experience:
1. Display: Arrange the cups on a large platter or tiered serving tray for an eye-catching display.
2. Accompaniments: Provide a variety of dipping options, such as tortilla chips, pita bread, or fresh vegetables.
3. Labeling: Consider labeling each layer for guests who may have dietary restrictions or preferences.
4. Garnish: Add extra toppings like fresh cilantro or lime wedges around the serving area for a pop of color.
5. Interactive Station: Set up a DIY dipping station where guests can mix and match layers according to their preferences.
By focusing on presentation and variety, you can create a memorable experience that everyone will enjoy. The vibrant colors and flavors of Individual Layered Dips will make your gathering unforgettable!
Additional Tips
– Use Fresh Ingredients: Fresh guacamole and homemade salsa enhance the flavors significantly. Opt for ripe avocados and fresh tomatoes for the best results.
– Layer Strategically: For a beautiful presentation, layer each ingredient carefully. This ensures that the distinct colors and textures are visible.
– Serve with a Variety of Dippers: Offer options like pita chips, crisp vegetables, or even toasted baguette slices to complement the dips.
– Chill Before Serving: Allow the Individual Layered Dips to chill for at least an hour. This helps the flavors meld together and improves the overall taste.
– Experiment with Textures: Add some crushed tortilla chips between layers for extra crunch, or incorporate different types of cheese for added flavor depth.
Recipe Variation
Feel free to get creative with these Individual Layered Dips! Here are some variations to consider:
1. Spicy Kick: Add a layer of jalapeños or a spicy salsa for those who enjoy a bit of heat.
2. Mediterranean Twist: Replace guacamole with hummus and add layers of diced cucumbers, bell peppers, and feta cheese for a Mediterranean flair.
3. Healthy Version: Substitute sour cream with Greek yogurt and use a homemade salsa to minimize preservatives and enhance freshness.
4. Vegan Option: Use vegan cream cheese in place of sour cream and ensure the cheese is plant-based for a fully vegan dip.
Freezing and Storage
– Storage: Keep the Individual Layered Dips covered in the refrigerator for up to 3 days. This ensures they remain fresh and flavorful.
– Freezing: While it’s best to serve these dips fresh, you can freeze the individual components separately. Layer them right before serving if you prefer to make them ahead of time.
Special Equipment
To make your preparation process smoother, consider using these essential tools:
– Small cups or jars for layering the dips.
– A mixing bowl for preparing the guacamole and salsa if making them from scratch.
– A spatula for smooth layering of the sour cream and guacamole.
– A cutting board and knife for chopping toppings like green onions and olives.
Frequently Asked Questions
Can I prepare these dips the night before?
Yes, you can prepare the layers and assemble the dips the night before. Just make sure to cover them well and refrigerate.
What can I substitute for refried beans?
If you’re not a fan of refried beans, consider using black bean dip or even a layer of hummus for a different flavor profile.
Are there any gluten-free options available?
Yes, all the ingredients listed are naturally gluten-free. Just ensure that your tortilla chips are also gluten-free if serving with them.
Can I adjust the spice levels?
Absolutely! You can use mild salsa and omit jalapeños for a milder flavor. Alternatively, add more spice according to your preference.
How do I prevent the guacamole from browning?
To prevent browning, cover the guacamole with plastic wrap directly on the surface before layering it in the cup. This minimizes air exposure.
Conclusion
Individual Layered Dips are a fantastic way to impress your guests with their vibrant colors and delightful flavors. They are not only simple to prepare but also provide endless opportunities for creativity. Whether you stick to the classic recipe or try out various twists, these dips are sure to be a hit at any gathering. So gather your ingredients and get ready to create a stunning appetizer that will have everyone coming back for seconds!
Individual Layered Dips: An Incredible Ultimate Recipe with 5 Layers
- Total Time: 15 minutes
Ingredients
– 1 cup refried beans
– 1 cup guacamole
– 1 cup sour cream
– 1 cup salsa
– 1 cup shredded cheese (cheddar or Mexican blend)
– ½ cup sliced black olives (optional)
– ½ cup chopped green onions
– Tortilla chips or vegetable sticks for serving
Instructions
Creating Individual Layered Dips is straightforward. Follow these simple steps:
1. Prepare Containers: Gather small cups or jars for individual servings.
2. Layer Refried Beans: Start by adding a layer of refried beans (about 2 tablespoons) to the bottom of each cup.
3. Add Guacamole: Next, spoon in a layer of guacamole, filling to about halfway up the cup.
4. Sour Cream Layer: Add a layer of sour cream on top of the guacamole, smoothing it out evenly.
5. Salsa Layer: Spoon salsa over the sour cream layer, filling the cups to about ¾ full.
6. Cheese Layer: Sprinkle shredded cheese generously on top of the salsa layer.
7. Garnish: Finish with a sprinkle of sliced black olives and chopped green onions for added flavor and color.
8. Chill: Cover the cups and place them in the refrigerator for at least 1 hour before serving to allow the flavors to meld.
9. Serve: Set out tortilla chips or vegetable sticks for dipping alongside the individual cups.
These steps will guide you in creating delicious Individual Layered Dips that are sure to impress!
- Prep Time: 15 minutes
- Cook Time: 0 minutes
Nutrition
- Serving Size: 8 servings
- Calories: 250 kcal
- Fat: 15g
- Protein: 5g