
Individual Layered Dips are an amazing way to impress your guests at any gathering. These delectable creations offer a delightful combination of flavors and textures, and they are perfect for parties, picnics, or cozy nights in. Each layer adds a unique taste, making these dips not only appetizing but also visually stunning. Imagine serving these colorful, individual portions that are not just a treat for the taste buds but also for the eyes.
Whether you’re hosting a game night, a birthday party, or simply enjoying a family movie night, Individual Layered Dips will be the star of the show. These dips are easy to prepare and can be customized to suit various dietary preferences, ensuring that everyone at your table finds something they love.
In this guide, you will discover why these dips are so special, how to make them, and the best ways to serve them. With their vibrant layers and irresistible flavors, you’ll understand why these Individual Layered Dips are a must-try for any occasion.
Why You’ll Love This Recipe
Individual Layered Dips are a crowd-pleaser for many reasons. Here are just a few that will make you absolutely love this recipe:
1. Visual Appeal: The colorful layers create a stunning presentation that is sure to impress your guests.
2. Customizable Ingredients: You can easily modify the layers to suit dietary restrictions, such as gluten-free or vegetarian options.
3. Easy to Prepare: The steps are straightforward, making this recipe perfect for both novice cooks and experienced chefs.
4. Perfect for Sharing: Individual servings make it easy for guests to enjoy without the need for serving utensils.
5. Versatile Flavor Combinations: You can mix and match your favorite ingredients to create unique flavor profiles.
6. Great for Any Occasion: Whether it’s a casual get-together or a formal event, these dips fit right in.
7. Fun to Make: Layering the ingredients can be a fun activity to do with friends or family.
With these appealing aspects, it’s no wonder that Individual Layered Dips have become a favorite for many!
Preparation and Cooking Time
Creating Individual Layered Dips doesn’t take much time, allowing you to focus on enjoying the moment with your guests. Here’s a breakdown of the time required:
– Preparation Time: 20 minutes
– Chilling Time: 30 minutes
– Total Time: 50 minutes
These times may vary based on your experience in the kitchen, but this guide provides a solid estimate for you to follow.
Ingredients
– 1 cup refried beans
– 1 cup sour cream
– 1 cup guacamole
– 1 cup salsa
– 1 cup shredded cheddar cheese
– 1 cup chopped tomatoes
– 1 cup sliced black olives
– ¼ cup chopped green onions
– Tortilla chips for serving
Step-by-Step Instructions
Making Individual Layered Dips is a fun and simple process if you follow these easy steps:
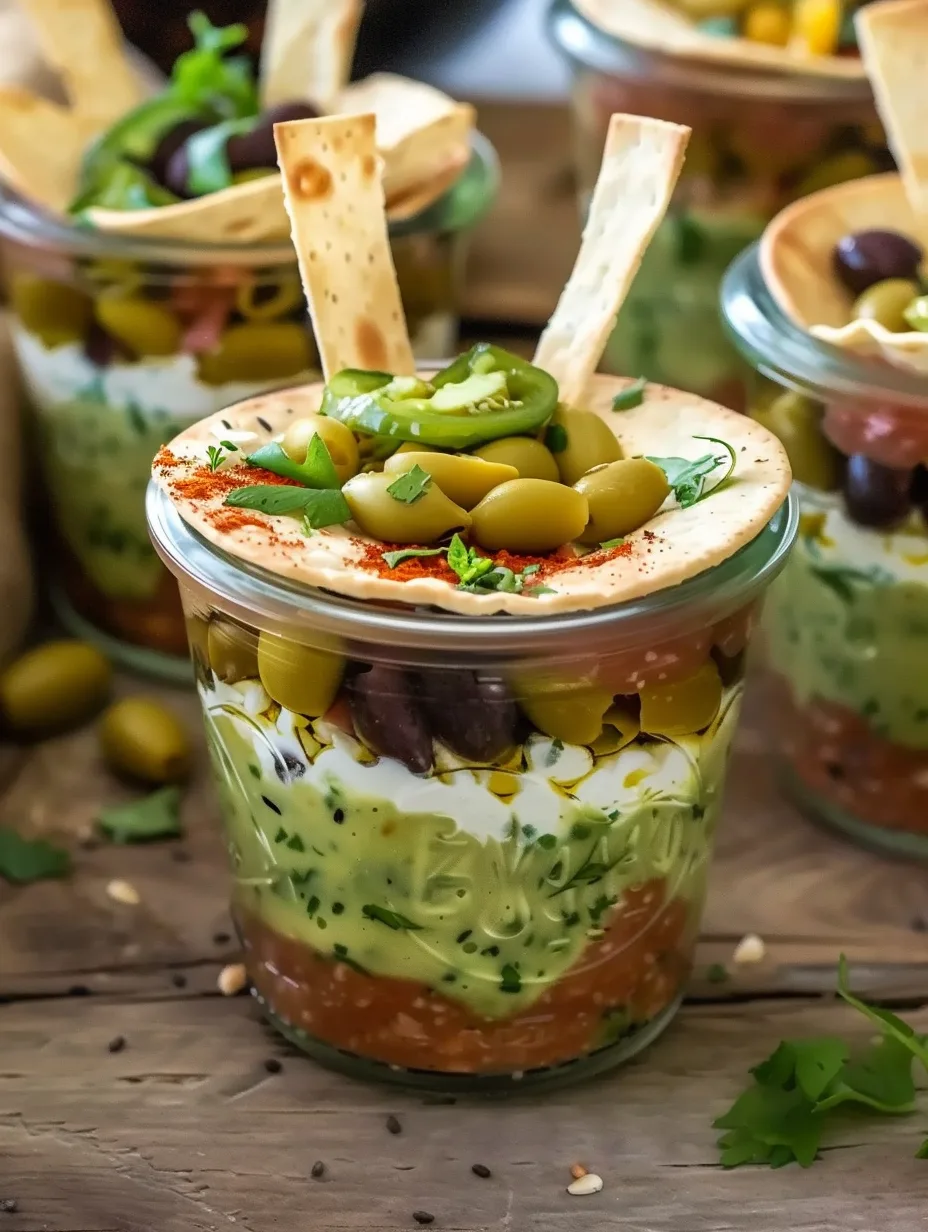
1. Prepare Containers: Gather small, clear cups or glasses for serving. Clear containers will showcase the beautiful layers.
2. Layer Refried Beans: Start by placing about 2 tablespoons of refried beans at the bottom of each cup.
3. Add Sour Cream: Next, carefully add a layer of sour cream on top of the beans, approximately 2 tablespoons.
4. Add Guacamole: Spoon in 2 tablespoons of guacamole over the sour cream layer, spreading it gently.
5. Layer Salsa: Pour about 2 tablespoons of salsa on top of the guacamole, ensuring a nice even layer.
6. Sprinkle Cheese: Add a layer of shredded cheddar cheese, around 2 tablespoons, on top of the salsa.
7. Add Tomatoes: Place about 2 tablespoons of chopped tomatoes over the cheese layer.
8. Top with Olives: Sprinkle sliced black olives on top of the tomatoes, approximately 1 tablespoon per cup.
9. Garnish with Green Onions: Finally, add a sprinkle of chopped green onions for freshness and flavor.
10. Chill: Place the prepared cups in the refrigerator for at least 30 minutes to allow the flavors to meld together.
How to Serve
Serving Individual Layered Dips can elevate your gathering and make the experience even more enjoyable. Here are some tips for serving these delicious dips:
1. Presentation: Arrange the cups on a decorative platter to create an attractive display. You can even use a tiered stand for added flair.
2. Accompaniments: Provide a bowl of tortilla chips for dipping. You might also consider adding fresh veggies like cucumber sticks or bell pepper slices for a healthier option.
3. Garnishes: Consider adding extra garnishes like cilantro leaves or lime wedges on the platter for a vibrant touch.
4. Flavor Enhancements: Offer additional toppings like jalapeños, hot sauce, or extra cheese for guests to customize their dips.
5. Serve Chilled: Make sure the dips are served cold for the best flavor and texture.
By following these serving tips, you’ll ensure that your Individual Layered Dips are not only delicious but also visually stunning, making your event a memorable one!
Additional Tips
– Use Fresh Ingredients: Opt for fresh vegetables and herbs to enhance the flavor of your Individual Layered Dips.
– Layer with Care: Take your time while layering to ensure each ingredient is evenly distributed for a balanced taste in every bite.
– Experiment with Spices: Consider adding spices like cumin or chili powder to the refried beans for an extra kick.
– Serve with Variety: Include an assortment of dipping options, such as pita chips or sliced baguette, to cater to different tastes.
– Keep it Cool: Make sure to serve the dips chilled for optimal flavor and freshness.
Recipe Variations
Get creative with your Individual Layered Dips! Here are a few variations to consider:
1. Mediterranean Layered Dip: Substitute hummus for refried beans and add layers of feta cheese, diced cucumbers, and roasted red peppers.
2. Spicy Layered Dip: Incorporate a layer of spicy black bean dip and top it with jalapeños for those who enjoy heat.
3. Sweet Layered Dip: Create a dessert version using layers of cream cheese, chocolate pudding, whipped cream, and crushed cookies for a sweet treat.
4. Vegan Layered Dip: Replace sour cream with cashew cream and use a plant-based cheese alternative to make it vegan-friendly.
Freezing and Storage
– Storage: Individual Layered Dips are best enjoyed fresh. However, you can store them in the refrigerator for up to 2 days.
– Freezing: It’s not recommended to freeze these dips due to the ingredients’ texture changes. However, you can freeze the components separately, like guacamole and refried beans, for later use.
Special Equipment
To make your preparation easier, gather the following tools:
– Small clear cups or glasses for layering
– Mixing bowls for preparing the ingredients
– A spatula for spreading the layers evenly
– A refrigerator for chilling the dips before serving
Frequently Asked Questions
Can I make Individual Layered Dips ahead of time?
Yes, you can prepare them a few hours in advance and chill them in the refrigerator until serving.
What if I have dietary restrictions?
You can easily customize the ingredients to accommodate gluten-free, vegan, or other dietary needs.
How do I prevent the avocado from browning?
To keep guacamole fresh, add a layer of plastic wrap directly on the surface before covering the cups. This minimizes air exposure.
Can I use store-bought ingredients?
Absolutely! Store-bought guacamole, salsa, or even refried beans can save time and make preparation quicker.
What types of chips should I serve with the dips?
Tortilla chips are classic, but feel free to offer pita chips or fresh vegetable sticks for a healthier option.
Conclusion
Individual Layered Dips are a versatile and visually appealing dish that can elevate any gathering. With the ability to customize ingredients and flavors, these dips cater to a range of tastes and dietary preferences. They are not only fun to make but also a delight to share. Whether you’re hosting a party or enjoying a quiet night in, these dips will undoubtedly steal the spotlight and leave your guests craving more.

Individual Layered Dips: An Incredible Ultimate Recipe for 7 Layers
- Total Time: 15 minutes
Ingredients
– 1 cup refried beans
– 1 cup sour cream
– 1 cup guacamole
– 1 cup salsa
– 1 cup shredded cheddar cheese
– 1 cup chopped tomatoes
– 1 cup sliced black olives
– ¼ cup chopped green onions
– Tortilla chips for serving
Instructions
Making Individual Layered Dips is a fun and simple process if you follow these easy steps:
1. Prepare Containers: Gather small, clear cups or glasses for serving. Clear containers will showcase the beautiful layers.
2. Layer Refried Beans: Start by placing about 2 tablespoons of refried beans at the bottom of each cup.
3. Add Sour Cream: Next, carefully add a layer of sour cream on top of the beans, approximately 2 tablespoons.
4. Add Guacamole: Spoon in 2 tablespoons of guacamole over the sour cream layer, spreading it gently.
5. Layer Salsa: Pour about 2 tablespoons of salsa on top of the guacamole, ensuring a nice even layer.
6. Sprinkle Cheese: Add a layer of shredded cheddar cheese, around 2 tablespoons, on top of the salsa.
7. Add Tomatoes: Place about 2 tablespoons of chopped tomatoes over the cheese layer.
8. Top with Olives: Sprinkle sliced black olives on top of the tomatoes, approximately 1 tablespoon per cup.
9. Garnish with Green Onions: Finally, add a sprinkle of chopped green onions for freshness and flavor.
10. Chill: Place the prepared cups in the refrigerator for at least 30 minutes to allow the flavors to meld together.
- Prep Time: 15 minutes
- Cook Time: 0 minutes
Nutrition
- Serving Size: 8
- Calories: 250 kcal
- Fat: 18g
- Protein: 6g