
Icebox Cake is a delicious and refreshing dessert perfect for warm weather gatherings. This simple, no-bake treat is a favorite for many, as it combines creamy layers with an irresistible touch. Whether you’re hosting a summer party or simply craving something sweet, this Icebox Cake is bound to become your go-to recipe. As you dive into its layers of flavor, you’ll quickly realize it’s not just an ordinary dessert but a fantastic culmination of textures and tastes.
The charm of Icebox Cake lies not only in its ease of preparation but also in its ability to impress. Each bite reveals the delightful combination of whipped cream, graham crackers, and optional fillings, resulting in a dessert that’s both nostalgic and satisfying. This recipe promises to elevate your dessert game and leave your guests asking for more. In this article, we will explore why you’ll love this recipe, the preparation and cooking times, the ingredients you’ll need, step-by-step instructions, and finally, how to serve this delightful dessert.
Why You’ll Love This Recipe
Icebox Cake is a dessert that’s bound to win your heart. Here are some reasons why this recipe is a must-try:
1. Easy to Make – With no baking involved, even beginner cooks can whip up this cake effortlessly.
2. Versatile – You can modify the recipe to include your favorite flavors or ingredients, making it suitable for various palates.
3. No Oven Needed – Perfect for hot summer days when you want a sweet treat without heating up the kitchen.
4. Great for Gatherings – This cake can serve a crowd and is a true crowd-pleaser.
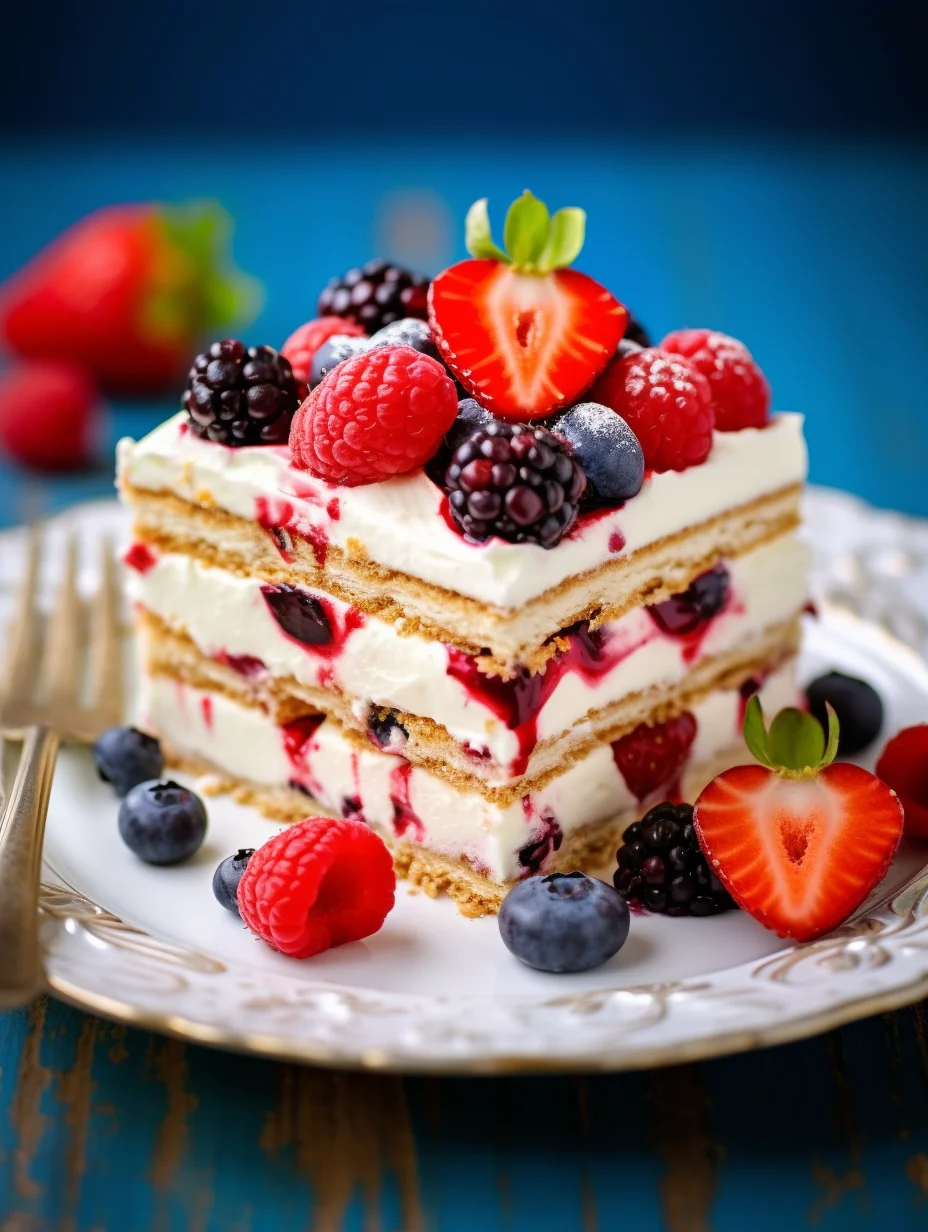
5. Delightful Presentation – The layered structure of the cake makes it visually appealing, exciting your guests before they even take a bite.
6. Make Ahead – Icebox Cake can be made a day in advance, allowing flavors to meld and making party planning easier.
7. Unique Texture – The combination of soft, creamy layers with crunchy graham crackers creates a delightful texture.
These factors make Icebox Cake not only a delicious choice but also a practical one, ensuring that it will become a staple in your dessert repertoire.
Preparation and Cooking Time
The preparation of Icebox Cake is straightforward, allowing you to enjoy more time with family and friends. Here’s a breakdown of the timing involved:
– Preparation Time: 20 minutes
– Chilling Time: 4–6 hours (or overnight for best results)
– Total Time: Approximately 4 hours and 20 minutes
The chilling time is essential for achieving the ideal texture as the graham crackers absorb moisture and soften, creating that signature layer.
Ingredients
– 2 cups heavy whipping cream
– 1 cup powdered sugar
– 1 teaspoon vanilla extract
– 1 box (14.4 oz) graham crackers
– 1 cup chocolate pudding (instant or homemade)
– 1 cup crushed strawberries (or any desired fruit)
– Optional toppings: chocolate shavings, crushed nuts, or fresh berries
Step-by-Step Instructions
Creating your Icebox Cake involves a few simple steps. Follow these directions to ensure your cake turns out perfectly:
1. Prepare Cream Mixture: In a large mixing bowl, whip the heavy cream, powdered sugar, and vanilla extract until soft peaks form.
2. Prepare the Pudding: If using instant pudding, follow package instructions to prepare 1 cup of chocolate pudding. Let it set for 5 minutes.
3. Lay the Base: Line a rectangular (or square) baking dish with a layer of graham crackers, covering the bottom completely.
4. Add Whipped Cream: Spread half of the whipped cream mixture over the layer of graham crackers.
5. Spread the Pudding: Gently spoon half of the pudding over the whipped cream layer.
6. Add Fruit: Sprinkle half of the crushed strawberries over the pudding layer.
7. Repeat Layers: Repeat the process by layering more graham crackers, followed by the remaining whipped cream, pudding, and crushed strawberries until you run out of ingredients or reach the top of the dish.
8. Final Layer: Finish with a final layer of whipped cream on top. Smooth it out and decorate with any additional toppings, if desired.
9. Chill: Cover the dish with plastic wrap and place it in the refrigerator. Chill for at least 4 to 6 hours, or overnight for best results.
10. Slice and Serve: When ready to serve, cut into squares and enjoy!
These straightforward steps will guide you in crafting an incredible Icebox Cake that will delight everyone who tries it.
How to Serve
Serving your Icebox Cake can elevate the entire experience. Here are some tips on how to present this delightful dessert:
1. Slice Presentation: Use a sharp knife and a clean cutting board to create clean, precise slices for an elegant presentation.
2. Garnish: Consider topping each slice with a dollop of whipped cream, a sprinkle of chocolate shavings, or a few fresh berries to enhance visual appeal.
3. Serve Chilled: Always serve Icebox Cake chilled to maintain its texture and flavors. Serve immediately after slicing for the best experience.
4. Pairing Suggestions: This cake is delightful with a cup of coffee, iced tea, or even a fruity dessert wine for those who prefer a sophisticated pairing.
5. Storing Leftovers: If there are any leftovers, store them covered in the fridge for up to 3 days for the best flavor.
By considering these serving tips, you will create not just a dessert but a delightful experience that will be remembered long after the last slice has been enjoyed.
Additional Tips
– Experiment with Flavors: Icebox Cake provides a canvas for creativity. Try different puddings or flavored whipped creams for variety.
– Use Fresh Ingredients: Fresh fruits not only enhance flavor but also add color and appeal to your cake. Consider seasonal choices for the best taste.
– Avoid Overmixing: Be gentle when mixing your whipped cream. Overmixing can lead to butter rather than a smooth whipped topping.
– Keep It Chilled: To maintain its structure and texture, always keep the cake refrigerated until serving.
– Layer Wisely: Distribute ingredients evenly across layers for a balanced bite every time.
Recipe Variation
Diverse flavors make Icebox Cake fun to experiment with. Here are a few variations:
1. Mint Chocolate: Substitute chocolate pudding with mint-flavored pudding and top with crushed mint candies.
2. S’mores Delight: Use graham cracker crumbs combined with chocolate and marshmallow fluff for a s’mores version.
3. Tropical Twist: Replace strawberries with crushed pineapple and add coconut flakes for a tropical vibe.
4. Peanut Butter Chocolate: Layer in peanut butter between the whipped cream and pudding for a rich peanut butter cup-inspired cake.
Freezing and Storage
– Storage: Store leftover Icebox Cake in the refrigerator, where it can last up to five days. Ensure it stays covered to prevent drying out.
– Freezing: Icebox Cake slices can be frozen. Wrap them tightly in plastic wrap and then place in an airtight container. They can be enjoyed for up to three months.
Special Equipment
To prepare your Icebox Cake effectively, gather these essential tools:
– Mixing bowls
– Electric mixer or hand whisk
– 9×13 inch baking dish or similar-sized container
– Plastic wrap or a lid for chilling
– Spatula for layering
Frequently Asked Questions
Can I use different types of fruit?
Absolutely! Feel free to experiment with different fruits like blueberries, raspberries, or peaches. Each adds its unique flavor.
How far in advance can I prepare Icebox Cake?
You can make the cake a day ahead of time, which allows the flavors to develop and the ingredients to meld beautifully.
Is it possible to make a gluten-free version?
Yes, substitute regular graham crackers with gluten-free alternatives to create a delicious gluten-free Icebox Cake.
What happens if I forget to chill the cake?
Chilling is essential as it allows the layers to set. Without it, the texture may not hold up, and flavors will not meld as intended.
Can I use whipped topping instead of whipped cream?
Yes, store-bought whipped topping is a viable alternative if you’re looking for a quicker option.
Conclusion
Icebox Cake is a delightful dessert that combines simplicity with elegance. Its 7-layer structure not only looks impressive but also delivers a burst of flavors in every bite. With the ability to customize flavors and combinations to suit your taste, it serves as a versatile addition to any gathering. Whether you choose classic ingredients or put your own twist on this beloved recipe, Icebox Cake is sure to become a cherished dessert in your repertoire.

Icebox Cake: An Incredible Ultimate Recipe with 7 Layers
- Total Time: 20 minutes
Ingredients
– 2 cups heavy whipping cream
– 1 cup powdered sugar
– 1 teaspoon vanilla extract
– 1 box (14.4 oz) graham crackers
– 1 cup chocolate pudding (instant or homemade)
– 1 cup crushed strawberries (or any desired fruit)
– Optional toppings: chocolate shavings, crushed nuts, or fresh berries
Instructions
Creating your Icebox Cake involves a few simple steps. Follow these directions to ensure your cake turns out perfectly:
1. Prepare Cream Mixture: In a large mixing bowl, whip the heavy cream, powdered sugar, and vanilla extract until soft peaks form.
2. Prepare the Pudding: If using instant pudding, follow package instructions to prepare 1 cup of chocolate pudding. Let it set for 5 minutes.
3. Lay the Base: Line a rectangular (or square) baking dish with a layer of graham crackers, covering the bottom completely.
4. Add Whipped Cream: Spread half of the whipped cream mixture over the layer of graham crackers.
5. Spread the Pudding: Gently spoon half of the pudding over the whipped cream layer.
6. Add Fruit: Sprinkle half of the crushed strawberries over the pudding layer.
7. Repeat Layers: Repeat the process by layering more graham crackers, followed by the remaining whipped cream, pudding, and crushed strawberries until you run out of ingredients or reach the top of the dish.
8. Final Layer: Finish with a final layer of whipped cream on top. Smooth it out and decorate with any additional toppings, if desired.
9. Chill: Cover the dish with plastic wrap and place it in the refrigerator. Chill for at least 4 to 6 hours, or overnight for best results.
10. Slice and Serve: When ready to serve, cut into squares and enjoy!
These straightforward steps will guide you in crafting an incredible Icebox Cake that will delight everyone who tries it.
- Prep Time: 20 minutes
- Cook Time: 0 minutes
Nutrition
- Serving Size: 12
- Calories: 300 kcal
- Fat: 17g
- Protein: 3g