

Ice Cream Sandwich Cake is a delightful treat that combines layers of creamy ice cream and crispy cookies. This dessert is not just decadent; it’s a wonderful way to celebrate warm weather and special occasions alike. With rich flavors and a unique texture, this cake is sure to impress your family and friends. It’s easy to prepare and even more fun to serve, making it a standout choice for gatherings.
If you’ve never indulged in an Ice Cream Sandwich Cake, you’re in for a treat! The first slice reveals a new world of flavor and satisfaction. Each layer provides a burst of creaminess and crunch, creating a delightful contrast that dances on your taste buds. In this article, we’ll delve into why this recipe is so beloved, how it’s prepared, and tips for serving it perfectly. Whether you’re a novice baker or a seasoned pro, the amazing flavors of Ice Cream Sandwich Cake will surely leave a lasting impression!
The joy of Ice Cream Sandwich Cake is evident in its simplicity and versatility. You can customize it with different flavors and toppings, ensuring that it suits all personal tastes. As an easy no-bake dessert, it brings friends and family together for a fun, interactive dessert-making experience. Let’s discover why Ice Cream Sandwich Cake deserves a spot in your dessert repertoire!
Why You’ll Love This Recipe
Ice Cream Sandwich Cake is a delicious and easy dessert that can be made in just a few simple steps. Here are some reasons why you’ll absolutely love this recipe:
1. No Baking Required: Unlike traditional cakes, this dessert requires no oven. Just assemble the ingredients for a hassle-free experience.
2. Endless Customization: You can personalize your Ice Cream Sandwich Cake with different flavors of ice cream, cookies, and toppings.
3. Perfect for All Occasions: Whether it’s a birthday, summer party, or family gathering, this cake is perfect for various events.
4. Kid-Friendly Fun: Involve the kids in making it! They will love choosing their favorite ice cream flavors and toppings.
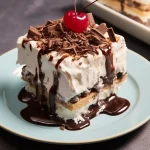
5. Impressive Presentation: The layered look of the cake makes it visually appealing, ensuring it will be the center of attention at any gathering.
6. A Unique Dessert: The combination of ice cream and cookie layers offers a new take on traditional cake, making it a memorable choice for your guests.
These compelling factors make it clear why Ice Cream Sandwich Cake is a favorite among dessert enthusiasts. It’s not just a cake; it’s an experience filled with joy and flavors!
Preparation and Cooking Time
The total time needed to prepare Ice Cream Sandwich Cake is approximately 30 minutes, followed by some chilling time. Here’s how the timing breaks down:
– Preparation Time: 30 minutes
– Chilling Time: 4-6 hours (or overnight for best results)
These time frames may vary depending on your kitchen equipment and experience, but having a solid estimate will help you plan your dessert-making session.
Ingredients
– 12 ice cream sandwiches (any flavor)
– 1/2 cup fudge sauce (for layering)
– 1/2 cup caramel sauce (for layering)
– 1 1/2 cups whipped topping (like Cool Whip)
– 1/2 cup crushed cookies (like Oreos or chocolate chip)
– 1/2 cup mini chocolate chips or toppings of your choice
– Optional: Sprinkles or nuts for decoration
Step-by-Step Instructions
Creating an Ice Cream Sandwich Cake is simple and fun! Follow these steps for a perfect result:
1. Prepare the Base: Start by laying 6 ice cream sandwiches in a single layer on the bottom of a 9×13 inch dish or any baking dish you prefer.
2. Add Fudge Sauce: Drizzle 1/4 cup of fudge sauce evenly over the first layer of ice cream sandwiches.
3. Spread Whipped Topping: Carefully spread 1 cup of whipped topping over the fudge layer, ensuring even coverage.
4. Repeat Layers: Place another 6 ice cream sandwiches on top of the whipped topping. Drizzle 1/4 cup of caramel sauce over this second layer.
5. Top with Whipped Topping: Add a second cup of whipped topping over the caramel layer, smoothing it out.
6. Add Cookie Crumbles: Sprinkle the crushed cookies and mini chocolate chips on top of the last whipped layer for added texture and flavor.
7. Chill: Cover the dish with plastic wrap and place it in the freezer. Chill for at least 4-6 hours or overnight for best results.
8. Slice and Serve: Remove from the freezer and let it sit for about 10-15 minutes to soften slightly before slicing into squares.
These steps will guide you in creating this incredible Ice Cream Sandwich Cake effortlessly!
How to Serve
When it comes to serving your Ice Cream Sandwich Cake, consider these tips to enhance the experience:
1. Presentation: Serve directly from the baking dish or transfer slices to individual dessert plates for an elegant touch.
2. Garnishes: Top each slice with additional fudge or caramel sauce for an extra layer of indulgence.
3. Accompaniments: Serve with fresh fruit, such as strawberries or bananas, for a fruity contrast.
4. Beverage Pairing: Consider pairing with milk, iced coffee, or a light dessert wine for a delightful combination.
5. Personal Touch: Allow guests to customize their slices with extra toppings like sprinkles, nuts, or additional whipped cream.
By giving thought to how you serve the cake, you will enhance the entire dessert experience, ensuring it’s unforgettable for both you and your guests!
Additional Tips
– Use Quality Ingredients: Opt for high-quality ice cream sandwiches and sauces to elevate the overall flavor of your Ice Cream Sandwich Cake.
– Layering Integrity: Make sure to spread the toppings evenly to maintain structure and ensure you get all the flavors in each slice.
– Add Fresh Fruits: Layer in some sliced strawberries or bananas between sections for a refreshing twist.
– Make it Ahead: Preparing your cake the night before allows the flavors to meld and makes it easier to serve on the day of your event.
– Perfect Portion Sizes: Cut your cake into small squares to facilitate serving and allow guests to enjoy other desserts.
Recipe Variation
Experiment with these fun variations to customize your Ice Cream Sandwich Cake:
1. Chocolate Lovers: Use chocolate ice cream between layers and add crushed chocolate cookies as a garnish.
2. Fruit Lovers: Incorporate fruit-flavored ice cream alongside layers of berry compote for a fruity fiesta.
3. Nutty Delight: Add chopped nuts like almonds or walnuts between the layers for added crunch and flavor.
4. Flavor Twist: Use coffee ice cream instead of traditional vanilla for a caffeine-inspired dessert.
5. Healthier Option: Opt for low-calorie ice cream sandwiches and sugar-free toppings for a lighter indulgence.
Freezing and Storage
– Storage: Keep the Ice Cream Sandwich Cake tightly wrapped in plastic wrap or in an airtight container in the freezer. It can last up to 2 weeks if stored properly.
– Thawing: When you’re ready to enjoy your cake, remove it from the freezer and let it sit at room temperature for about 10–15 minutes for easier slicing.
– Dividing Slices: For longer storage, consider slicing the cake before freezing. Wrap individual pieces in plastic wrap and foil for convenience.
Special Equipment
To make your Ice Cream Sandwich Cake, you’ll need some common kitchen tools:
– 9×13 baking dish: This size offers ample space for layering.
– Spatula: For spreading the whipped topping evenly across the layers.
– Plastic wrap: To cover the dish while chilling in the freezer.
– Knife: To slice your cake easily after it has set.
Frequently Asked Questions
Can I make this dessert gluten-free?
Yes, simply ensure you purchase gluten-free ice cream sandwiches and toppings.
How can I prevent freezer burn?
Wrap your cake tightly in plastic wrap or aluminum foil, or use airtight containers before placing it in the freezer.
Can I replicate this recipe using other types of cookies?
Absolutely! Experiment with your favorite cookies, like snickerdoodles or peanut butter cookies, for varied flavors.
Is there a need to thaw before serving?
It’s best to let the cake sit for about 10–15 minutes at room temperature for easier slicing.
What should I do if the cake is too hard to cut?
Simply allow it to thaw a bit longer at room temperature or run your knife under warm water before slicing.
Conclusion
Ice Cream Sandwich Cake is not just a treat; it’s a delightful dessert experience that resonates with both kids and adults. Its layered structure offers a satisfying mix of creaminess and crunch that keeps everyone coming back for more. Whether for a special occasion or a simple family gathering, this dessert is a crowd-pleaser. With the tips and variations provided, you can make this cake uniquely yours, adapting it to every taste and event.
Ice Cream Sandwich Cake: An Amazing Ultimate Recipe You’ll Love
- Total Time: 15 minutes
Ingredients
– 12 ice cream sandwiches (any flavor)
– 1/2 cup fudge sauce (for layering)
– 1/2 cup caramel sauce (for layering)
– 1 1/2 cups whipped topping (like Cool Whip)
– 1/2 cup crushed cookies (like Oreos or chocolate chip)
– 1/2 cup mini chocolate chips or toppings of your choice
– Optional: Sprinkles or nuts for decoration
Instructions
Creating an Ice Cream Sandwich Cake is simple and fun! Follow these steps for a perfect result:
1. Prepare the Base: Start by laying 6 ice cream sandwiches in a single layer on the bottom of a 9×13 inch dish or any baking dish you prefer.
2. Add Fudge Sauce: Drizzle 1/4 cup of fudge sauce evenly over the first layer of ice cream sandwiches.
3. Spread Whipped Topping: Carefully spread 1 cup of whipped topping over the fudge layer, ensuring even coverage.
4. Repeat Layers: Place another 6 ice cream sandwiches on top of the whipped topping. Drizzle 1/4 cup of caramel sauce over this second layer.
5. Top with Whipped Topping: Add a second cup of whipped topping over the caramel layer, smoothing it out.
6. Add Cookie Crumbles: Sprinkle the crushed cookies and mini chocolate chips on top of the last whipped layer for added texture and flavor.
7. Chill: Cover the dish with plastic wrap and place it in the freezer. Chill for at least 4-6 hours or overnight for best results.
8. Slice and Serve: Remove from the freezer and let it sit for about 10-15 minutes to soften slightly before slicing into squares.
These steps will guide you in creating this incredible Ice Cream Sandwich Cake effortlessly!
- Prep Time: 15 minutes
- Cook Time: 0 minutes
Nutrition
- Serving Size: 12
- Calories: 250 kcal
- Fat: 12g
- Protein: 3g