
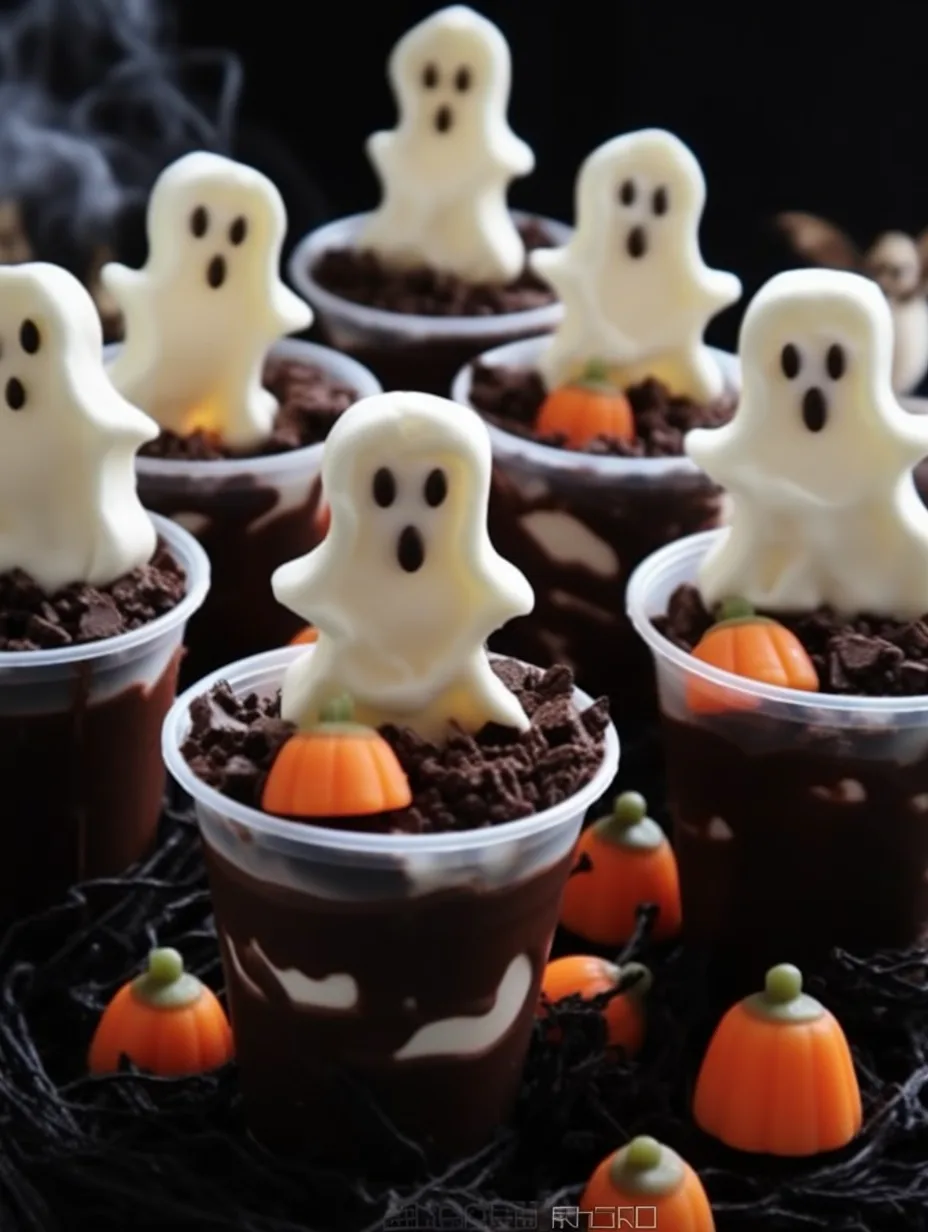
Graveyard Pudding Cups are a delightful way to celebrate Halloween with friends and family. These eerie yet delicious treats bring together a mix of flavors and textures that will undoubtedly put a smile on everyone’s face. Perfect for parties, school events, or just a spooky night at home, these pudding cups are not only easy to make but also fun to decorate. Kids and adults alike will love digging into these delightful desserts, which look as enchanting as they taste.
Imagine a rich chocolate pudding layered beautifully with crunchy cookie crumbs, topped off with spooky decorations like gummy worms and edible tombstones. Each bite combines softness and crunch, creating a unique experience that is truly memorable. Not only will you impress your guests, but you’ll also create lasting memories making and serving these Graveyard Pudding Cups.
This guide will delve into why you’ll love this recipe, provide preparation details, and give you a list of ingredients, step-by-step instructions, and serving suggestions. Whether you’re a novice or have some experience in the kitchen, making these Graveyard Pudding Cups will be fun! Let’s dig into the wonderful world of Halloween desserts!
Why You’ll Love This Recipe
Graveyard Pudding Cups are not just a dessert; they are an experience. Here are several reasons why this recipe stands out:
1. Easy to Create: The steps are straightforward, making it accessible for cooks of all skill levels.
2. Customizable: You can personalize each cup with various toppings to cater to individual tastes.
3. Kid-Friendly: Kids love to help create these spooky treats, making it a fun family project.
4. Visually Appealing: The graveyard theme is perfect for Halloween, and the presentation is sure to wow your guests.
5. Delicious Layering: The combination of smooth pudding and crunchy cookie crumbs is irresistible.
6. Quick Preparation: You can whip these up in a short amount of time, leaving you with more time to enjoy the festivities.
These factors make Graveyard Pudding Cups a hit for any Halloween gathering. The blend of flavors and textures invites fun and creativity in the kitchen.
Preparation and Cooking Time
Getting your Graveyard Pudding Cups ready will be a breeze! Here’s a breakdown of the time you’ll need:
– Preparation Time: 20 minutes
– Chilling Time: 1-2 hours (optional, for best texture)
– Total Time: Approximately 1 hour and 20 minutes (including chilling)
Most of this time is simply waiting, making it easy to fit into your schedule.
Ingredients
– 2 cups chocolate pudding (store-bought or homemade)
– 1 cup crushed chocolate sandwich cookies
– 1 cup whipped topping (Cool Whip or homemade)
– Gummy worms
– Candy tombstones (or gravestones made from chocolate)
– Optional: Sprinkles or candy eyes for decoration
Step-by-Step Instructions
Creating your Graveyard Pudding Cups is straightforward. Just follow these steps:
1. Prepare Pudding: If using store-bought pudding, ensure it is chilled as per package instructions. If making homemade pudding, prepare it and let it cool completely.
2. Crush Cookies: Place the chocolate sandwich cookies in a resealable bag. Crush them into fine crumbs using a rolling pin or your hands.
3. Layer Pudding: In a clear cup or glass, add a layer of chocolate pudding at the bottom.
4. Add Whipped Topping: Spoon a layer of whipped topping over the pudding.
5. Sprinkle Cookies: Add a layer of crushed cookies on top of the whipped topping to resemble dirt.
6. Repeat Layers: Repeat the layering process until you reach the top of the cup, finishing with crushed cookies for a “graveyard” effect.
7. Decorate: Carefully insert gummy worms and candy tombstones into the top layer. You can also add extra embellishments like sprinkles or candy eyes for an eerie touch.
8. Chill: To enhance the flavors and texture, chill the pudding cups in the refrigerator for at least one hour before serving.
9. Serve: Remove from the refrigerator just before serving for an impressive visual presentation.
How to Serve
Serving your Graveyard Pudding Cups is as fun as making them. Consider these tips to make your dessert stand out:
1. Use Clear Cups: The transparency showcases the delightful layers, enhancing the spooky aesthetic.
2. Garnish Creatively: Add extra gummy worms or a sprinkle of edible glitter for added drama.
3. Festive Table Setting: Decorate your serving area with Halloween-themed décor like mini pumpkins and cobwebs for an immersive experience.
4. Serving Size: Offer small cups for sampling, allowing everyone to enjoy without overindulging.
5. Pair with Drinks: Serve alongside themed drinks like “witches’ brew” for a complete Halloween experience.
By keeping these tips in mind, you can elevate the entire experience of enjoying Graveyard Pudding Cups, captivating your guests and ensuring your treats are the highlight of the gathering!
Additional Tips
– Use Fresh Ingredients: For the best flavors, opt for fresh whipped cream and use good-quality chocolate pudding.
– Layer Creatively: Experiment with different layering techniques—try crisscross patterns with the cookie crumbs for a fun effect.
– Get Creative with Toppings: Beyond gummy worms and tombstones, consider using edible glitter, candy eyeballs, or even spooky sprinkles to enhance the graveyard theme.
– Make it Ahead: If you’re short on time, you can prepare the pudding cups a day ahead. Just keep them covered in the refrigerator.
– Have Fun with the Kids: Let kids decorate their own cups for an engaging Halloween activity they’ll love.
Recipe Variation
There are endless possibilities for variations on your Graveyard Pudding Cups. Here are some creative ideas:
1. Pumpkin Spice Version: Swap out chocolate pudding for pumpkin spice pudding. Layer with crushed ginger snap cookies for a unique fall flavor.
2. Vegan Option: Use dairy-free pudding and whipped topping. Nut-based cookies can create a tasty alternative to chocolate cookies.
3. Gummy Fun: Incorporate different gummy candies like creepy spiders or eyeballs for a more varied experience.
4. Fruit Layers: Add a layer of pureed fruits, such as strawberries or blueberries, for an extra layer of flavor and color.
5. Themed Containers: Use mini Halloween cauldrons or jars instead of cups for a creative presentation.
Freezing and Storage
– Storage: Store your Graveyard Pudding Cups in the refrigerator for up to 3 days. Make sure they are covered to prevent them from drying out or absorbing other flavors in the fridge.
– Freezing: While it’s not recommended to freeze the complete cups due to the texture of the whipped topping, you can freeze leftover pudding and cookie crumbs separately. Just thaw before using again.
Special Equipment
You don’t need much special equipment to create these festive treats; however, these items can make your process easier:
– Clear Cups or Glasses: Use clear containers to showcase the beautiful layers.
– Resealable Bags: Great for crushing cookies without making a mess.
– Mixing Bowls: For combining your ingredients.
– Spoons: For layering and serving the pudding cups.
Frequently Asked Questions
Can I make these pudding cups gluten-free?
Yes! Just ensure that you use gluten-free chocolate cookies and pudding.
How long can these be stored?
Graveyard Pudding Cups can be stored in the refrigerator for around 3 days.
Can I use homemade pudding?
Absolutely! Homemade pudding will add a richer flavor to your dessert.
Is it necessary to chill before serving?
Chilling enhances the flavors and textures, but if you’re short on time, you can serve them immediately.
What if I can’t find gummy worms?
You can substitute them with other gummy candies or even chocolate-covered pretzels to keep with the theme.
Conclusion
Graveyard Pudding Cups are the perfect Halloween treat, offering a delightful blend of flavors and an engaging decorating experience. This recipe invites creativity, allowing you to impress friends and family with these spooky yet delicious desserts. Whether you’re serving them at a Halloween party or creating them as a fun family activity, these cups deliver both fun and flavor. Make sure to enjoy the process and let your creativity flourish!
Graveyard Pudding Cups: An Amazing Ultimate Recipe for Halloween Fun
- Total Time: 15 minutes
Ingredients
– 2 cups chocolate pudding (store-bought or homemade)
– 1 cup crushed chocolate sandwich cookies
– 1 cup whipped topping (Cool Whip or homemade)
– Gummy worms
– Candy tombstones (or gravestones made from chocolate)
– Optional: Sprinkles or candy eyes for decoration
Instructions
Creating your Graveyard Pudding Cups is straightforward. Just follow these steps:
1. Prepare Pudding: If using store-bought pudding, ensure it is chilled as per package instructions. If making homemade pudding, prepare it and let it cool completely.
2. Crush Cookies: Place the chocolate sandwich cookies in a resealable bag. Crush them into fine crumbs using a rolling pin or your hands.
3. Layer Pudding: In a clear cup or glass, add a layer of chocolate pudding at the bottom.
4. Add Whipped Topping: Spoon a layer of whipped topping over the pudding.
5. Sprinkle Cookies: Add a layer of crushed cookies on top of the whipped topping to resemble dirt.
6. Repeat Layers: Repeat the layering process until you reach the top of the cup, finishing with crushed cookies for a “graveyard” effect.
7. Decorate: Carefully insert gummy worms and candy tombstones into the top layer. You can also add extra embellishments like sprinkles or candy eyes for an eerie touch.
8. Chill: To enhance the flavors and texture, chill the pudding cups in the refrigerator for at least one hour before serving.
9. Serve: Remove from the refrigerator just before serving for an impressive visual presentation.
- Prep Time: 15 minutes
- Cook Time: 0 minutes
Nutrition
- Serving Size: 6
- Calories: 210 kcal
- Fat: 10g
- Protein: 3g