
There’s something incredibly satisfying about a dessert that’s both easy to make and outrageously delicious. These Frozen Yogurt Peanut Butter Chocolate Bars check every box. They’re creamy, nutty, chocolaty, and cold enough to cool you off on a warm day—or just satisfy that late-night sweet tooth. This recipe isn’t just another quick fix; it’s the kind of dessert that makes you pause after a bite, close your eyes, and say, “Wow, I made that?”
If you’ve ever had one of those freezer aisle chocolate-dipped yogurt bars, then you already know the vibe. But here’s the thing—those store-bought versions are often packed with preservatives, added sugars, and ingredients you can’t even pronounce. This homemade version gives you full control over what goes in, and the result is even better. You get creamy peanut butter swirled into thick Greek yogurt, just a touch of sweetness, and a rich chocolate shell that adds the perfect snap when you bite into it.
I first stumbled upon this combo during a summer heatwave when turning on the oven wasn’t an option. I had a half tub of Greek yogurt, a jar of peanut butter that was begging to be used, and some chocolate chips tucked away in the pantry. What started as an experimental freezer snack quickly became a go-to favorite in my house. The first time I made them, my family thought they came from a fancy dessert shop.
These bars are surprisingly customizable, which makes them even more fun to whip up. You can add chopped nuts for crunch, swirl in a little jam for a PB&J twist, or even use flavored yogurt for a fruity variation. They’re simple enough to make with kids but elegant enough to serve to guests. And the best part? You don’t need an ice cream maker, a candy thermometer, or any fancy gadgets.
Whether you’re meal-prepping snacks for the week, looking for a healthier dessert option, or just want something cold and creamy with a little chocolate on top, these frozen bars are for you. Once you try them, you’ll find yourself keeping a stash in the freezer at all times. They’re that good.
Why You’ll Love This Frozen yogurt bars Recipe
There are so many reasons to love these Frozen Yogurt Peanut Butter Chocolate Bars, but let’s start with the most important: they’re incredibly easy to make. With just a handful of ingredients and a few simple steps, you can create a dessert that feels indulgent but doesn’t require hours in the kitchen.
First and foremost, these bars are no-bake. That means no preheating the oven, no worrying about overcooking or burning anything, and no cleanup stress. You’ll just need a mixing bowl, a spatula, and a baking sheet. And of course, your freezer will do most of the work for you.
Another reason these bars are so appealing is the flavor. The combination of Greek yogurt and peanut butter creates a creamy, rich base with a hint of tanginess that balances perfectly with the sweetness of maple syrup or honey. Then there’s the vanilla extract, which adds that warm, comforting depth that ties everything together.
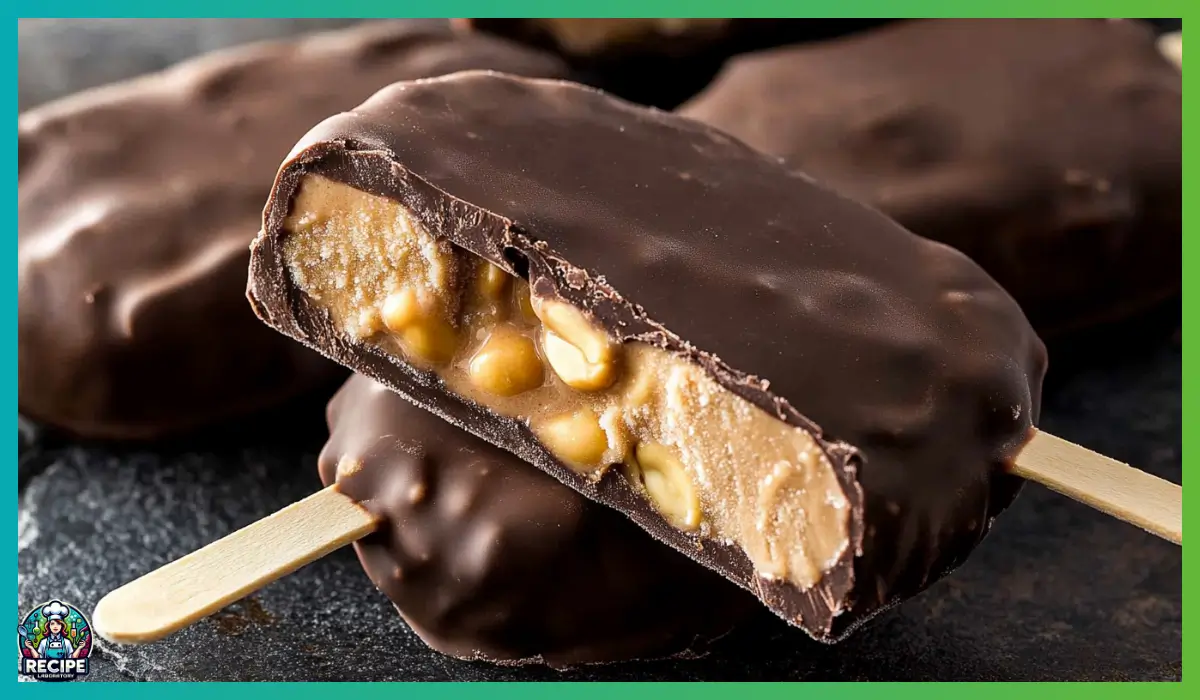
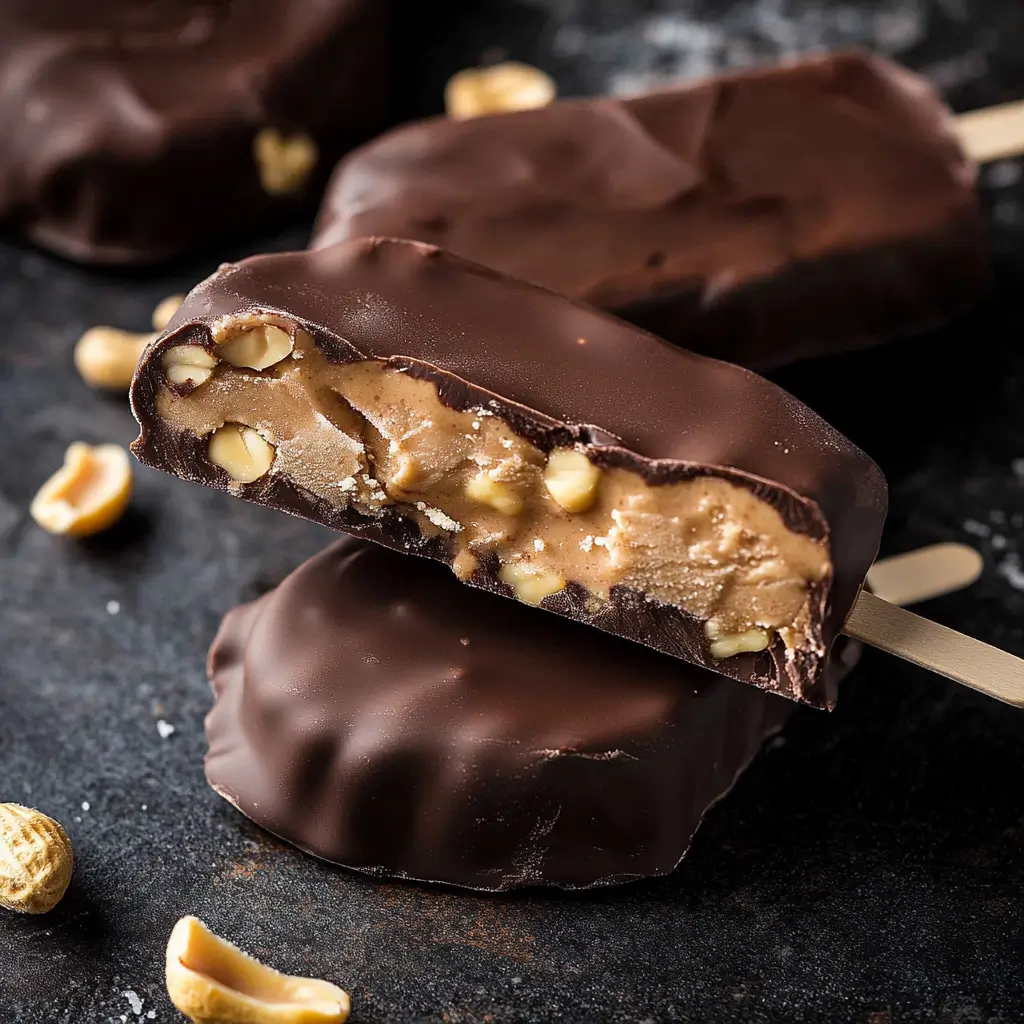
And let’s not forget the chocolate coating. It’s glossy, rich, and has just the right amount of snap when you bite into it. The addition of coconut oil gives it that perfect texture while also making it easier to coat the bars evenly. Once that chocolate shell hardens around the frozen yogurt filling, it creates a contrast of textures that’s genuinely crave-worthy.
Texture-wise, these bars hit all the right notes. The inside is smooth and creamy, the chocolate coating is firm and slightly crunchy, and the optional chopped peanuts on top add just a little extra bite. Every mouthful gives you a different experience, but they all work in harmony.
These bars also have that magic quality of being a treat you can feel good about. They’re made with wholesome ingredients, and there are easy swaps if you want to make them even healthier. For example, you can use low-fat yogurt, skip the added sweetener, or use dark chocolate for a less sugary shell.
Finally, these bars are family-friendly and freezer-friendly. They’re a fun weekend project with the kids, a great addition to your weekly meal prep, and a smart way to satisfy dessert cravings without reaching for something overly processed. Whether you’re making them for yourself or sharing with others, these bars are a guaranteed crowd-pleaser.
Health Benefits of these Frozen yogurt bars
When you think of dessert, the word “healthy” doesn’t always come to mind. But these Frozen Yogurt Peanut Butter Chocolate Bars break the mold. Not only do they taste indulgent, but they also offer several surprising health benefits thanks to the thoughtful combination of ingredients.
To start, the base of this recipe is Greek yogurt, which is a nutritional powerhouse. Greek yogurt is packed with protein, making these bars a great post-workout snack or mid-afternoon pick-me-up. It also contains probiotics, which support a healthy gut and improve digestion. And because it’s made from whole milk, it includes healthy fats that help keep you full and satisfied.
Peanut butter is another ingredient that offers more than just flavor. It’s rich in monounsaturated fats, which are heart-healthy and can help reduce bad cholesterol levels. Peanut butter is also a good source of plant-based protein and provides essential vitamins and minerals like vitamin E, magnesium, and potassium. Just make sure to use natural peanut butter without added sugars or hydrogenated oils for the best health benefits.
The small amount of maple syrup or honey used in this recipe adds just enough sweetness without overloading the bars with sugar. Both natural sweeteners contain antioxidants and trace minerals that refined white sugar lacks. If you’re watching your sugar intake, you can reduce the amount or skip it altogether—the peanut butter and vanilla add plenty of flavor on their own.
Even the chocolate coating has something to offer. If you use dark chocolate or semi-sweet chocolate with a high cocoa content, you’ll be adding flavonoids to your diet. These compounds have been shown to improve heart health and provide anti-inflammatory benefits. Coconut oil, which helps melt and smooth out the chocolate, also contains medium-chain triglycerides (MCTs), which may support energy production and fat metabolism.
Finally, if you choose to add chopped peanuts on top, you’ll be getting an extra dose of protein and crunch, as well as healthy fats and fiber. These help stabilize blood sugar levels and keep cravings at bay.
So while these bars definitely feel like a treat, they’re also a smarter choice compared to most traditional frozen desserts. You get protein, healthy fats, and beneficial nutrients, all wrapped up in a delicious, satisfying package. Dessert that’s good for you? That’s a win in every sense.
Preparation Time, Servings, and Nutritional Information
This recipe is designed to be quick and stress-free, which is perfect whether you’re making a weekday snack or prepping a batch for the weekend. You won’t need to spend hours in the kitchen or clean up a sink full of dishes afterward. It’s about as low-maintenance as dessert gets, and that’s one of the many reasons it’s become a favorite.
Preparation Time:
- Mixing and assembling: 15 minutes
- Freezing time: 2 hours minimum
- Chocolate coating and final freeze: 10 minutes
- Total time: About 2 hours and 30 minutes (mostly hands-off)
Servings:
- Makes 4 to 6 bars, depending on how large you make each one
- Perfect for a small family or as a meal-prep snack for the week
Nutritional Information (per bar, assuming 6 bars):
- Calories: 290
- Protein: 9 grams
- Carbohydrates: 20 grams
- Sugars: 10 grams (from natural sweeteners and chocolate)
- Fat: 20 grams (includes healthy fats from yogurt, peanut butter, and coconut oil)
- Fiber: 2 grams
These nutrition stats can vary based on your ingredients. If you use dark chocolate instead of milk chocolate, skip the peanuts, or go with low-fat yogurt, the numbers will shift. But overall, these bars offer a balanced mix of macronutrients that make them more than just a sweet treat—they’re actually nourishing.
Because they’re stored in the freezer, you can make a batch ahead of time and enjoy them over the course of a week or even a month. They hold up beautifully and taste just as good days later as they do fresh from the freezer. That kind of flexibility makes them perfect for busy schedules and helps reduce food waste, too.
In short, this recipe is convenient, portion-friendly, and nutritionally balanced—three things that make it an ideal addition to any kitchen lineup.
Ingredients List of these Frozen yogurt bars
Before we dive into the steps, let’s talk about what you’ll need to make these bars. Every ingredient in this list serves a purpose—nothing fancy or complicated here, just real, straightforward components that come together to make something magical.
For the Yogurt Filling:
- 1 cup plain Greek yogurt (preferably whole milk): This is your creamy base. Whole milk yogurt gives you a richer texture and fuller flavor, but you can use low-fat or even non-dairy if you prefer.
- ½ cup creamy peanut butter: Choose a natural, no-stir peanut butter for best results. The creaminess blends perfectly with the yogurt, and the nutty flavor is what makes these bars so addictive.
- 1 tablespoon maple syrup or honey: A little goes a long way. This adds a touch of sweetness without making the bars too sugary. Feel free to adjust to taste.
- 1 teaspoon vanilla extract: Adds depth and warmth to the filling. You’ll notice the difference.
Optional Add-ins:
- 2 tablespoons roasted & salted peanuts: These give the bars a fun crunchy topping and bring out the flavor of the peanut butter. Totally optional, but highly recommended if you love texture.
For the Chocolate Coating:
- 1 cup chocolate chips or chopped chocolate (about 6 oz): Go with semi-sweet or dark chocolate for the best contrast against the creamy center. Milk chocolate will be sweeter and softer.
- 2 tablespoons coconut oil: This helps the chocolate melt more smoothly and gives it that glossy, crisp shell once it hardens.
These ingredients are easy to find and probably already hanging out in your pantry or fridge. And the best part is, you can tweak them however you like. Prefer almond butter? Swap it in. Want a fruity note? Add a swirl of raspberry jam into the filling. The recipe is endlessly customizable, which means you’ll never get bored.
Step-By-Step Cooking Instructions of these Frozen yogurt bars
Now that we’ve got all the ingredients laid out, let’s walk through the process together. Even if you’re brand new to the kitchen, don’t worry—this recipe is seriously foolproof. I’ll break it down in simple steps and include helpful tips along the way so you feel confident from start to finish. The only hard part? Waiting for the bars to freeze.
Step 1: Prep Your Equipment
Start by lining a baking sheet with either wax paper or a silicone baking mat. This will prevent the bars from sticking and make cleanup a breeze. If you’re using wax paper, make sure it lays flat on the baking sheet. A small dab of water under each corner of the paper can help hold it in place.
If you have popsicle sticks or wooden coffee stirrers, keep them close by. You’ll be inserting one into each bar before freezing. No sticks? No problem. These bars can also be eaten with a fork or just picked up by hand if you don’t mind a little chocolatey finger action.
Step 2: Make the Yogurt-Peanut Butter Filling
In a medium-sized mixing bowl, combine your 1 cup of plain Greek yogurt and ½ cup of creamy peanut butter. Stir them together until smooth. The mixture might seem thick at first, but keep going—it’ll blend beautifully into a silky, creamy base.
Next, add your tablespoon of maple syrup or honey and your teaspoon of vanilla extract. Stir again until everything is well combined. You’re aiming for a smooth, uniform mixture with a slightly fluffy texture.
Tip: If your peanut butter is very thick or straight from the fridge, microwave it for 10-15 seconds before mixing. It’ll make the blending process much easier.
Step 3: Shape the Bars
Using a large spoon or a cookie scoop, place 4 to 6 mounds of the yogurt-peanut butter mixture onto your prepared baking sheet. Try to space them evenly so you’ll have enough room to dip each one in chocolate later.
Gently press a popsicle stick into the center of each mound. If you’re not using sticks, shape the mounds into rectangular or oval bar shapes using the back of a spoon or a small spatula. Then, scoop a bit more yogurt mixture on top to cover the stick and press it down lightly, smoothing the top and sides into a neat shape.
Tip: Don’t worry if they’re not perfect—once the chocolate goes on, no one will notice a slightly lopsided edge.
Step 4: Add Optional Crunch
If you’re using chopped roasted and salted peanuts, sprinkle them over the tops of your bars now. The peanuts will add both flavor and texture, creating that crave-worthy combo of creamy and crunchy. Gently press the nuts into the surface so they stick.
At this point, your bars are ready for their first freeze. Place the baking sheet into the freezer and let the bars freeze solid for at least 2 hours. This is important because if they’re too soft, they’ll fall apart when dipped in chocolate.
Tip: If you’re in a rush, you can transfer them to the coldest part of your freezer and check after 90 minutes—but make sure they feel completely solid to the touch.
Step 5: Prepare the Chocolate Coating
Once the bars are frozen, it’s time to make the chocolate shell. In a microwave-safe bowl, add 1 cup of chocolate chips or chopped chocolate and 2 tablespoons of coconut oil.
Microwave the chocolate mixture at 50% power in 15 to 20-second intervals. Stir well after each interval to avoid burning the chocolate. Keep going until the mixture is fully melted and smooth.
Tip: You can also use a double boiler if you prefer a stovetop method. Just be sure no water gets into the chocolate—it will cause it to seize up.
Let the chocolate cool slightly for 2 to 3 minutes. This step is crucial. If the chocolate is too hot, it may melt the yogurt bars slightly when you dip them.
Step 6: Dip the Bars in Chocolate
Take the bars out of the freezer. Working quickly, pick up each bar by the stick and dip it into the melted chocolate. You can either submerge the entire bar or just coat the top and sides for a more rustic look. Let any excess chocolate drip off, then place the bar back onto the lined baking sheet.
If you’d like, you can sprinkle a few extra chopped peanuts on top while the chocolate is still wet.
Repeat with the remaining bars, then return them to the freezer for another 10 to 15 minutes, just until the chocolate shell has hardened.
Tip: If your chocolate begins to thicken or set while dipping, microwave it for another 10–15 seconds to loosen it up.
Step 7: Let Them Set and Serve
Once the chocolate is fully set, your bars are ready to enjoy. However, they will be quite hard straight from the freezer. For the best texture and flavor, let them sit at room temperature for 5 to 10 minutes before eating. This allows the yogurt to soften slightly, making them creamier and easier to bite into.
Optional Garnish: You can drizzle a little extra melted chocolate over the top or sprinkle a pinch of flaky sea salt for that sweet-salty contrast.
There you have it—delicious, creamy, chocolate-dipped yogurt peanut butter bars made with just a few wholesome ingredients and a whole lot of love.
How to Serve these Frozen yogurt bars
Once these Frozen Yogurt Peanut Butter Chocolate Bars are set and ready to eat, there are so many fun ways to serve them. Whether you’re hosting friends, feeding hungry kids after school, or just treating yourself after a long day, these bars fit every occasion.
One of the easiest and most popular ways to serve them is straight from the freezer with a little thaw time. Pull out a bar, let it sit at room temperature for 5 to 10 minutes, and enjoy it as-is. The chocolate softens just enough to bite through easily, while the inside stays creamy and cool.
For a more elevated presentation, serve the bars on a small plate with a drizzle of melted chocolate or peanut butter on top. A sprinkle of sea salt or crushed peanuts adds a finishing touch that looks as good as it tastes.
If you’re feeling playful, cut the bars into smaller bite-sized squares and serve them on skewers or toothpicks at a party. They make fantastic finger food, especially when you want a dessert that’s easy to grab and go.
You can even turn these bars into a plated dessert by pairing them with fresh berries, a dollop of whipped cream, or a scoop of banana ice cream. The combination of textures and flavors makes every bite special.
Another idea is to crumble the bars over a bowl of oatmeal, yogurt, or smoothie bowl for a cold and crunchy topping. It’s a great way to repurpose any leftovers—or to pretend you’re eating dessert for breakfast without the guilt.
No matter how you choose to serve them, these bars are sure to be a hit.
Pairing Suggestions
Pairing your dessert with the right sides, snacks, or drinks can make the experience even more enjoyable. These frozen yogurt bars may be simple, but with the right combinations, you can turn them into an elegant treat or a balanced snack.
Let’s start with some drink pairings. A tall glass of cold almond milk or oat milk is a refreshing match, especially on a warm day. If you’re serving the bars in the afternoon, a cup of iced coffee or a creamy latte on the side is a perfect complement. The bitterness of the coffee balances the sweetness of the chocolate and highlights the nuttiness of the peanut butter.
If you prefer tea, try pairing these bars with a lightly sweetened chai or a cold brew hibiscus tea. Both options offer a bit of spice or tartness that contrasts nicely with the richness of the bars.
Looking for something a bit more indulgent? A scoop of homemade banana or strawberry “nice cream” (blended frozen fruit with a splash of milk) is a fun and healthy way to turn this into a full dessert plate.
You can also serve the bars alongside fresh fruit like strawberries, raspberries, or apple slices. The fruit adds color and natural sweetness while also providing a lighter contrast to the creamy bars.
For a kid-friendly version, serve the bars with mini pretzels or graham crackers for dipping. The salty-sweet combo is always a winner, and it makes snack time interactive and fun.
And if you’re hosting, consider offering a DIY frozen bar platter. Set out the frozen bars with bowls of toppings like chopped nuts, shredded coconut, crushed cereal, or mini chocolate chips. Let guests customize their bars for a personalized treat.
Whether you’re enjoying these bars solo or as part of a dessert spread, there’s no shortage of ways to pair them deliciously.
Storage, Freezing & Reheating Instructions
One of the biggest perks of these Frozen Yogurt Peanut Butter Chocolate Bars is how well they store. They’re designed to live in your freezer, ready whenever a craving hits. With just a few smart storage tips, you can make sure they stay fresh, flavorful, and easy to grab at any time.
Freezing the Bars
Once your bars are fully assembled and dipped in chocolate, they should be returned to the freezer to set. Let them freeze on the baking sheet for at least 15 minutes after dipping so the chocolate hardens completely. Once they’re firm, transfer the bars to an airtight container or a freezer-safe zip-top bag.
Pro Tip: Place a piece of wax paper or parchment between each layer if you’re stacking them. This prevents them from sticking together or smearing the chocolate coating.
Stored this way, your bars will last for up to 3 months in the freezer. And the best part? They don’t need to thaw completely to be enjoyed. Just pull one out, let it sit for 5–10 minutes, and you’re good to go.
Storing in the Fridge
Although these are meant to be frozen, you can keep them in the refrigerator for a softer texture. If you prefer more of a mousse-like consistency in the center, the fridge option is perfect. They’ll stay good in the fridge for up to 4 days, but keep in mind that the longer they sit out of the freezer, the softer they’ll become.
Reheating or Thawing
You don’t need to reheat these bars in the traditional sense, but you do want to allow them to thaw slightly before eating. Straight out of the freezer, the chocolate coating will be very hard, and the inside might be a bit icy.
To enjoy the best texture:
- Remove a bar from the freezer.
- Let it sit at room temperature for 5–10 minutes.
- Enjoy when the center is soft but not melted.
Avoid microwaving the bars to speed up the thawing process. The chocolate could melt unevenly, and the yogurt mixture may become too soft or runny. Patience here truly pays off.
Reviving Bars After Extended Storage
If your bars have been in the freezer a while and start to develop a little frost on the outside, don’t worry. Simply brush off the ice crystals and let the bar thaw slightly before eating. If the chocolate looks dull after long-term freezing, dipping or drizzling them with a little fresh melted chocolate can bring back their glossy appearance.
Having a stash of these bars in your freezer means you’re always ready for guests, dessert emergencies, or even just a mid-afternoon pick-me-up. They store beautifully and come out tasting just as good as the day you made them.
Common Mistakes to Avoid in these Frozen yogurt bars
Even though this recipe is quite forgiving, there are a few things to watch out for to ensure your bars come out perfect every single time. Here are the most common mistakes and how to avoid them.
1. Not Freezing Long Enough Before Dipping
It might be tempting to rush the process, but dipping bars that aren’t fully frozen is a recipe for disaster. If the yogurt filling is too soft, it can slide off the stick or fall apart when dipped into the warm chocolate. Make sure to freeze the bars for at least 2 hours, or until they are completely solid to the touch.
2. Using Hot Chocolate for Dipping
Melted chocolate straight from the microwave can be too hot and will cause the yogurt mixture to melt on contact. Always let your melted chocolate cool for a few minutes before dipping. The chocolate should still be smooth and pourable, but not steaming.
3. Skipping the Coconut Oil
Coconut oil isn’t just an optional ingredient here. It helps thin out the chocolate for easier coating and gives it that snappy texture once it sets. Without it, your chocolate may be too thick, making it harder to coat the bars evenly.
4. Overmixing the Filling
It’s important to mix the yogurt and peanut butter until smooth, but don’t go overboard. Overmixing can sometimes make the mixture too loose, which makes it harder to shape. Stir just until combined and creamy.
5. Not Using Parchment or Wax Paper
Trying to freeze these bars directly on a baking sheet without lining it can lead to major sticking issues. Always use wax paper or a silicone baking mat to ensure the bars lift off cleanly after freezing.
6. Forgetting to Let Them Sit Before Eating
Right out of the freezer, these bars will be rock solid. If you try to bite into one too quickly, the chocolate might crack unevenly or hurt your teeth. Just a few minutes at room temperature will bring the bars to the perfect texture.
7. Using Runny Yogurt
Greek yogurt is thicker and creamier than regular yogurt, which is why it works so well in this recipe. If you use a thinner yogurt, your mixture may not hold its shape and could become icy when frozen. Stick with whole milk Greek yogurt for the best results.
8. Not Storing Properly
Leaving the bars uncovered in the freezer can lead to freezer burn, which affects both texture and flavor. Always use a well-sealed container or bag, and consider wrapping each bar individually if you’re planning to store them long-term.
By avoiding these common pitfalls, you’ll ensure every batch of bars comes out just right—smooth, creamy, and dipped in perfectly snappy chocolate.
Pro Tips of these Frozen yogurt bars
Want to take your frozen yogurt bars to the next level? Here are some insider tricks and helpful tips that will make your bars look and taste like they came from a professional dessert shop.
Use a Cookie Scoop for Uniform Size
If you want each bar to be the same size and shape, use a medium cookie scoop to portion out the yogurt mixture. This ensures even freezing and a consistent look, especially if you’re serving them to guests.
Warm the Peanut Butter First
If your peanut butter is thick or has been refrigerated, microwave it for 10–15 seconds before mixing. It’ll be easier to incorporate into the yogurt, resulting in a creamier filling without lumps.
Customize with Flavors and Mix-ins
This recipe is a perfect base for customization. Stir in:
- A swirl of jam for a PB&J-style bar.
- Mini chocolate chips for extra texture.
- Cinnamon or nutmeg for warm spice.
- A handful of chopped fruit like bananas or strawberries.
Dip the Bars Using a Fork
If you’re not using popsicle sticks, you can use a fork to hold the bars while dipping. Place the frozen bar on the fork, dip in chocolate, then let the excess drip off before transferring it back to the lined tray.
Let the Chocolate Cool Slightly Before Dipping
As mentioned earlier, this is crucial. Hot chocolate will melt the yogurt. Cool it for a few minutes after melting to help the coating go on smoothly without compromising the frozen core.
Make a Double Batch
These bars go fast, especially if you’re sharing. Save time by doubling the recipe and freezing extras. You’ll thank yourself later when the sweet cravings hit.
Add a Pinch of Sea Salt
For a gourmet finish, sprinkle flaky sea salt on top of the chocolate before it sets. It enhances the chocolate and peanut flavors while adding that satisfying salty crunch.
Keep a Small Tray in the Freezer
If you plan to make these often, keep a baking tray in your freezer so it’s already cold when you place the bars on it. This helps them freeze faster and keeps their shape firm.
Use High-Quality Chocolate
Since chocolate is a key flavor here, go for the best quality you can find. A good semi-sweet or dark chocolate bar, chopped into pieces, can elevate the flavor much more than basic chocolate chips.
Label Your Containers
If you’re making different variations—like some with nuts, some with jam—it helps to label your storage containers. That way, you can grab exactly the kind of bar you’re in the mood for.
These pro tips are easy to follow and can help make your bars even more polished, delicious, and versatile.
Frequently Asked Questions (FAQs)
When trying a new recipe, it’s totally normal to have a few questions—especially when it involves freezing, dipping, and working with chocolate. Below, I’ve answered the most common questions about these Frozen Yogurt Peanut Butter Chocolate Bars so you can go into your kitchen feeling fully prepped and confident.
Can I use regular yogurt instead of Greek yogurt?
While you can use regular yogurt, I highly recommend sticking with Greek yogurt—especially whole milk Greek yogurt—because of its thick and creamy texture. Regular yogurt has a higher water content, which can lead to icier bars that don’t hold their shape as well when frozen. If regular yogurt is your only option, try straining it through a cheesecloth or coffee filter for a few hours to remove excess liquid.
Can I make these bars dairy-free?
Absolutely. To make them dairy-free, use a thick plant-based yogurt like coconut or almond yogurt. Just make sure it’s unsweetened and has a texture similar to Greek yogurt. You’ll also want to use dairy-free chocolate chips or bars—there are plenty of great vegan options out there that melt beautifully.
What type of peanut butter should I use?
Use a creamy, natural peanut butter with no added sugar or hydrogenated oils. Look for one with just peanuts and maybe a touch of salt in the ingredient list. Natural peanut butter blends more smoothly with the yogurt and delivers a pure, nutty flavor. If you’re using a no-stir variety, make sure it’s still soft and spreadable for easy mixing.
Can I replace the peanut butter with another nut butter?
Definitely. These bars work beautifully with almond butter, cashew butter, sunflower seed butter, or even tahini for a different twist. Just keep in mind that each nut butter has a unique flavor and consistency, so your results may vary slightly in texture and taste.
What’s the best chocolate to use for the coating?
You can use chocolate chips or chopped chocolate bars, depending on what you have. Semi-sweet and dark chocolate are both great choices, as they provide a nice contrast to the sweet and creamy filling. If you prefer milk chocolate, go for it—but know that it will be sweeter and a little softer once set.
Do I have to use coconut oil in the chocolate?
Coconut oil helps thin the chocolate and gives it that smooth, glossy finish. If you don’t have coconut oil, you can use another neutral oil like avocado or grapeseed oil, but coconut oil gives the best texture. Avoid butter or margarine, as they can change the way the chocolate sets.
Can I make these bars in silicone molds?
Yes, silicone molds are actually a fantastic option for shaping these bars. They’ll give your bars a uniform look, and the flexible silicone makes it easy to pop them out once frozen. Just spoon the yogurt mixture into the molds, insert the sticks, and follow the same freezing and dipping process.
How can I make the bars sweeter?
If you like a sweeter treat, you can add an extra teaspoon of maple syrup or honey to the yogurt mixture. Alternatively, choose a sweeter chocolate or sprinkle a few mini chocolate chips into the filling. Just be careful not to overdo it—the beauty of these bars is their balance between sweet and creamy.
How do I prevent the chocolate from cracking?
Chocolate cracking a bit when you bite into it is totally normal and part of the charm. But if it’s splitting too much or falling off, it might be too thick or too cold. Make sure to:
- Let the bars thaw slightly before biting.
- Add enough coconut oil to thin the chocolate.
- Allow the chocolate to cool before dipping.
Can I serve these bars at a party?
Yes, and they make a fabulous party dessert. You can make them ahead of time, keep them frozen, and set them out on a tray just before serving. If you’re worried about them melting, serve them over a chilled tray or platter, and keep extras in the freezer to swap in as needed.
These FAQs cover the most common concerns, but if you’re still unsure about something, don’t hesitate to experiment. This recipe is flexible and forgiving—perfect for making it your own.
Conclusion & Call to Action
There’s something truly magical about a dessert that feels indulgent but is made from real, wholesome ingredients. These Frozen Yogurt Peanut Butter Chocolate Bars are just that kind of recipe. They’re creamy, satisfying, and surprisingly good for you—all without needing an oven, a special pan, or hours of your time.
The creamy Greek yogurt, nutty peanut butter, and smooth chocolate shell create a dessert that’s not only beautiful but also perfectly balanced. Whether you keep them simple or customize them with add-ins like chopped nuts or a swirl of jam, these bars are guaranteed to please a crowd—or just keep you coming back for more.
They’re ideal for anyone looking for a quick snack, a healthy dessert, or something cold and comforting during the warmer months. Plus, they store beautifully, making them a fantastic addition to your weekly meal prep or freezer stash.
And perhaps the best part? You probably already have most of the ingredients on hand. No fancy tools, no complicated instructions—just a little stirring, freezing, and dipping, and you’ve got something truly special.
So, if you haven’t already, it’s time to head to the kitchen and try these bars for yourself. Mix up the creamy filling, dip them in that dreamy chocolate shell, and take that first bite. Trust me—you won’t want to stop at one.
And if you do give this recipe a try, I’d love to hear how it turns out. Share your results in the comments, tag me on social media, or snap a photo of your delicious creation. Whether you made the classic version or put your own spin on it, I’m always thrilled to see what you come up with.
Keep this recipe in your back pocket—it’s one of those simple yet satisfying treats that never gets old. Happy freezing, dipping, and snacking!
Print
Frozen Butter Bars: Easy No-Bake Chocolate Dessert
- Total Time: 2 hours 30 minutes (including freezing)
- Yield: 4–6 bars 1x
- Diet: Vegetarian
Description
A creamy, chocolate-covered frozen treat made with Greek yogurt and peanut butter. These no-bake bars are healthy, high-protein, and easy to prep ahead. Perfect for a guilt-free dessert or afternoon snack!
Ingredients
-
1 cup plain Greek yogurt (preferably whole milk)
-
½ cup creamy peanut butter
-
1 tablespoon maple syrup or honey
-
1 teaspoon vanilla extract
-
2 tablespoons roasted & salted peanuts (optional)
-
1 cup chocolate chips or chopped chocolate (6 oz)
-
2 tablespoons coconut oil
Instructions
-
Line a baking sheet with wax paper or a silicone mat.
-
In a bowl, stir yogurt, peanut butter, maple syrup/honey, and vanilla until smooth.
-
Scoop 4–6 mounds onto the pan and insert a popsicle stick into each.
-
Cover with more yogurt mixture and flatten. Sprinkle with peanuts (optional).
-
Freeze for at least 2 hours or until solid.
-
Melt chocolate and coconut oil in the microwave, stirring every 15–20 seconds until smooth.
-
Dip frozen bars in chocolate and return to the tray. Freeze again until set.
-
Let sit at room temp for 5–10 minutes before enjoying.
Notes
-
For vegan: Use dairy-free yogurt and vegan chocolate.
-
For nut-free: Substitute peanut butter with sunflower seed butter.
-
Let bars sit briefly before eating for best texture.
- Prep Time: 15 minutes
- Cook Time: 0 minutes
- Category: Dessert, Snack
- Method: No-Bake, Freezer
- Cuisine: American