
There’s something about a layered dessert that just feels extra special. Maybe it’s the way the textures play off each other, or how every bite brings a new flavor experience. These French Silk Brownie Bars are one of those unforgettable treats that make people pause mid-bite, close their eyes, and simply say “wow.” It’s not just dessert—it’s a full-on chocolate moment.
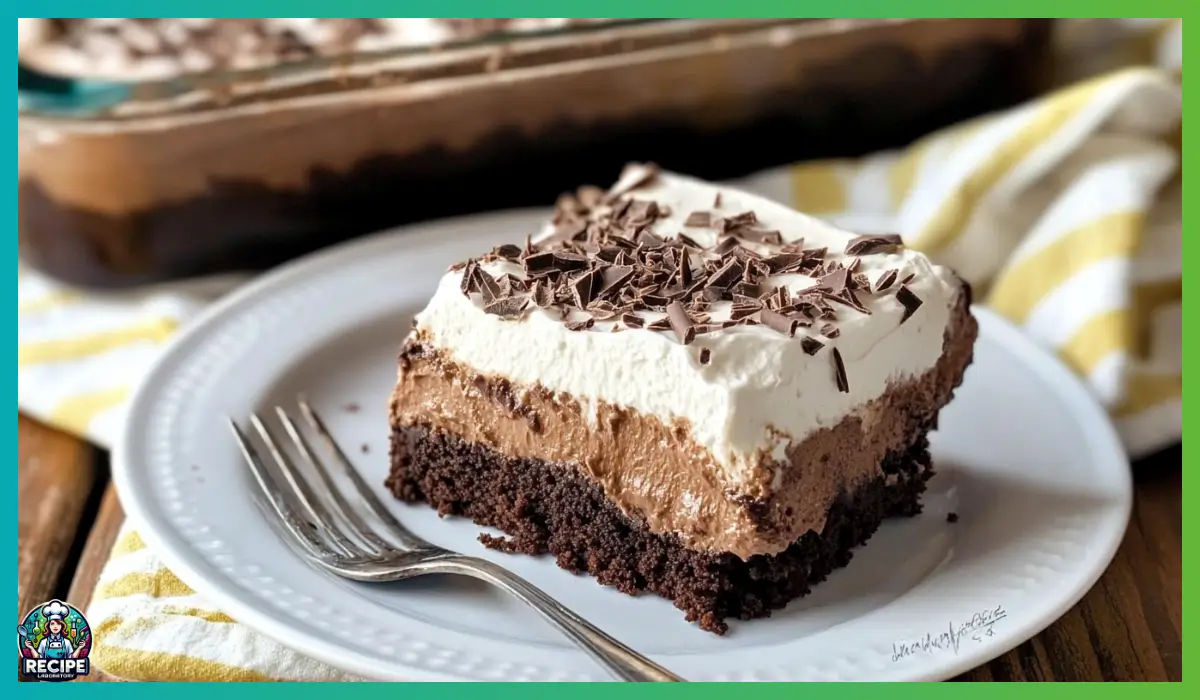
I still remember the first time I made these for a family dinner. My cousin, who is famously picky about sweets, took one bite and asked me if I had bought them from a bakery. That’s how good they are. The base is a dense, chewy brownie with those signature crisp edges and a fudgy center. Then comes the French silk layer: velvety, airy, and rich with melted semi-sweet chocolate. And finally, the fluffy whipped topping makes it light enough that you’ll want seconds. Or thirds. No judgment here.
What makes this recipe even better is how simple it is. With just a few ingredients—many of which you probably already have in your pantry or fridge—you can whip up a dessert that tastes like something you’d get at a fancy café. You don’t need a culinary degree, a stand mixer, or any advanced techniques. Just a little patience, some love for chocolate, and a solid spatula.
These bars are also a hit for gatherings. I’ve made them for everything from holiday dinners to potlucks to casual Sunday brunches, and they always disappear within minutes. They’re easy to make ahead, transport well, and most importantly, they make people happy.
If you’re looking for a dessert that’s simple to make but feels like a little slice of luxury, this is it. French Silk Brownie Bars are creamy, chocolatey, and guaranteed to impress.
Why You’ll Love This Recipe
There are so many reasons to fall in love with these French Silk Brownie Bars. Whether you’re a seasoned baker or just dipping your toes into homemade desserts, this recipe offers the perfect combination of simplicity and showstopper results.
First of all, let’s talk about texture. These bars are a perfect harmony of chewy and airy, rich and light. The brownie base brings that deep chocolate flavor and dense, satisfying bite, while the French silk layer adds a creamy contrast that practically melts in your mouth. It’s like eating a brownie and mousse at the same time, but better.
Second, this recipe is incredibly approachable. Even if you’ve never baked a layered dessert before, you’ll find that the instructions are straightforward and beginner-friendly. No complicated steps, no water baths, and no intimidating pastry techniques. If you can stir, melt, and layer, you’re more than qualified.
You’ll also appreciate how versatile these bars are. You can serve them as a casual weeknight treat or dress them up for a dinner party with a sprinkle of chocolate shavings or a drizzle of melted chocolate. And because they need to chill before serving, they’re an ideal make-ahead dessert—no last-minute stress in the kitchen.
Another bonus? They’re family-friendly. Kids love the chocolate-on-chocolate situation, and adults appreciate the nod to the classic French silk pie. Plus, because we’re not using any raw eggs in the filling, you don’t have to worry about food safety concerns that sometimes come with traditional silk pie recipes.
Finally, these bars are completely adaptable. Want to add a crunchy twist? Sprinkle crushed nuts or cookie crumbs between the layers. Prefer a darker chocolate profile? Use bittersweet chocolate instead of semi-sweet. You can even make them gluten-free with the right brownie mix.
No matter how you make them, one thing is certain: these bars deliver comfort, joy, and a serious chocolate fix in every bite.
Health Benefits
Now, while French Silk Brownie Bars are definitely a dessert—and yes, an indulgent one—they can still have a place in a balanced lifestyle. It’s all about mindful enjoyment and understanding what each ingredient brings to the table.
To begin with, the main hero in this recipe is chocolate. We’re using semi-sweet chocolate, which contains flavonoids—plant compounds that have antioxidant effects. Flavonoids may help lower inflammation and improve heart health when consumed in moderation. Chocolate also contains magnesium and iron, both of which are essential minerals that support overall health.
The cream cheese in the French silk layer adds more than just rich flavor and a smooth texture. It provides protein and calcium, which are essential for muscle and bone health. Cream cheese also contains vitamin A, which supports your immune system and vision.
Cool Whip, used in both the filling and the topping, creates that airy, mousse-like texture while keeping the fat content relatively low compared to homemade whipped cream. While it’s a processed ingredient, it contributes a creamy lightness that keeps this dessert from feeling overly dense or heavy.
And let’s not forget the importance of portion control. Because these bars are so rich and satisfying, a small square can go a long way. You get all the indulgent flavors without needing to eat a large serving to feel satisfied.
Lastly, from a mental health perspective, there’s something incredibly comforting about making and sharing a homemade dessert. Baking can be therapeutic, and offering something delicious you’ve made with your own hands is a beautiful act of connection and care. Enjoying a treat mindfully, especially one you’ve prepared yourself, can be nourishing for the soul.
So while this dessert isn’t a superfood smoothie, it certainly has its own kind of nourishment to offer—flavor, joy, and a whole lot of chocolate love.
Preparation Time, Servings, and Nutritional Information
Understanding how much time and effort a recipe takes is essential when planning any meal or gathering. Thankfully, French Silk Brownie Bars are as convenient as they are delicious.
Total Preparation Time:
Approximately 45 minutes (including baking and assembly time)
Cooling & Chilling Time:
Minimum 2 hours (preferably overnight for best texture)
Total Time (including chill):
2 hours 45 minutes
Servings:
This recipe makes 12 generous squares, perfect for a small crowd or several days of treats. If you’re serving a larger group, consider doubling the recipe and using a larger pan.
Estimated Nutritional Information per serving (1 square):
Calories: 380
Total Fat: 23g
Saturated Fat: 13g
Cholesterol: 60mg
Sodium: 220mg
Carbohydrates: 40g
Sugar: 30g
Protein: 4g
Please note that the nutritional values are approximate and may vary depending on the specific ingredients used, such as the brand of brownie mix or type of Cool Whip.
Ingredients List
Brownie Layer
- 1 box brownie mix (unprepared)
- 1 egg
- 5½ tablespoons unsalted butter, melted
- ¼ cup milk
The boxed brownie mix serves as the base of this dessert, making things simple while delivering a chewy, chocolaty foundation. The addition of butter and milk ensures a rich, fudgy texture.
French Silk Layer
- 8 oz cream cheese, softened
- 1 teaspoon vanilla extract
- 2 cups powdered sugar
- 4 oz semi-sweet chocolate
- ¼ cup unsalted butter, cubed
- 8 oz Cool Whip
Cream cheese provides structure and tang, while vanilla enhances the overall flavor. Melted semi-sweet chocolate brings that iconic silkiness, and the Cool Whip creates volume and lightness.
Topping
- 8 oz Cool Whip
- Optional: chocolate shavings or mini chocolate chips
The final layer adds a whipped cream finish. Chocolate shavings or mini chips give a decorative touch and an added pop of texture.
Make sure all ingredients, especially dairy products like cream cheese and butter, are at room temperature for easier mixing and a smoother filling.
Step-By-Step Cooking Instructions
Step 1: Preheat the Oven
Begin by preheating your oven to 350°F (175°C).
Grease an 11×7-inch baking dish with nonstick spray or line it with parchment paper for easy removal later. Setting this up first will make the process smoother as you go.
Step 2: Prepare the Brownie Base
In a medium bowl, combine the brownie mix, egg, melted butter, and milk.
Mix thoroughly until the batter is thick and smooth. It may look slightly different from traditional boxed brownie instructions since we’re adding less liquid for a denser base.
Spread the batter evenly into the prepared baking dish using a spatula. Smooth the top so it bakes evenly.
Bake in the preheated oven for 25–28 minutes, or until a toothpick inserted in the center comes out mostly clean with a few moist crumbs.
Remove from the oven and allow it to cool completely in the pan. This step is important—the base must be cool before adding the French silk layer.
Step 3: Make the French Silk Filling
While the brownie layer cools, start working on the filling. In a large mixing bowl, beat the softened cream cheese and vanilla extract together until smooth and creamy. Use an electric mixer if you have one, but a sturdy whisk works too.
Gradually add the powdered sugar, mixing on low speed at first to avoid a sugar cloud, then increase to medium until fully incorporated. The mixture should be thick and creamy.
Step 4: Melt the Chocolate
Place the semi-sweet chocolate and cubed butter in a microwave-safe bowl. Heat in 30-second intervals, stirring between each round, until completely melted and smooth. This usually takes about 1–1½ minutes total.
Let the chocolate mixture cool slightly before proceeding. You don’t want it to melt the cream cheese mixture or the Cool Whip.
Step 5: Combine the Chocolate and Cream Cheese Mixtures
Stir the melted chocolate mixture into the cream cheese base. Mix until fully blended. The texture will become more luscious and mousse-like.
Step 6: Fold in the Cool Whip
Gently fold 8 oz of Cool Whip into the chocolate-cream cheese mixture using a spatula. This step adds air and lightness, so go slowly to keep it fluffy.
Once it’s fully incorporated and smooth, you’re ready to layer.
Step 7: Assemble the Layers
Spread the French silk filling over the cooled brownie base. Use an offset spatula or the back of a spoon to smooth it evenly across the surface.
Then, add the remaining 8 oz of Cool Whip as the final topping. Smooth it out or create decorative swoops for a pretty finish.
If desired, sprinkle with chocolate shavings or mini chocolate chips.
Step 8: Chill
Cover the dish loosely with plastic wrap and refrigerate for at least 2 hours, preferably overnight. This helps the layers firm up and the flavors meld beautifully.
Step 9: Slice and Serve
When ready to serve, slice the bars into 12 squares using a sharp knife. For cleaner edges, run the knife under hot water and wipe between cuts.
Serve chilled and enjoy every creamy, chocolatey bite.

How to Serve
Serving French Silk Brownie Bars can be as straightforward or as elegant as you like. Whether you’re plating these for a special gathering or slicing them up for a casual dessert night at home, they adapt beautifully to every setting.
To begin with, these bars are best served chilled. After they’ve set in the fridge, they hold their shape beautifully and offer that perfect contrast between the firm brownie layer and the airy French silk top. When serving, use a sharp knife dipped in hot water and wiped clean between slices—this helps get those neat, bakery-style edges that everyone loves.
For a more elevated presentation, place each square on a small dessert plate and garnish with a few extras. A light dusting of cocoa powder, a few curls of shaved chocolate, or even a tiny mint leaf can give it that “restaurant dessert” vibe. If you want to lean into decadence, a small drizzle of melted chocolate or a spoonful of chocolate sauce on the plate underneath the bar makes a beautiful (and tasty) impression.
If you’re entertaining, consider placing the bars on a tiered dessert stand or a wooden board surrounded by berries, nuts, and cookies for a dessert grazing table. The contrast between the silky bar and some fresh raspberries or strawberries really makes the chocolate pop and gives a refreshing balance to the richness.
For a cozy night in with family or friends, these bars are perfect with a warm cup of tea, hot cocoa, or a decaf latte. They’re also a great after-dinner treat following a simple home-cooked meal—just enough to satisfy that sweet tooth without being overly heavy.
No matter how you serve them, be ready for requests for seconds—and the recipe.
Pairing Suggestions
Pairing your French Silk Brownie Bars with the right side treats or beverages can take your dessert experience to the next level. Because this dessert is rich and chocolate-forward, it benefits from pairings that either complement or contrast the intensity of the chocolate.
Beverage Pairings:
A hot drink works beautifully here. A smooth decaffeinated latte or a spiced chai tea adds warmth and spice that balances the cool, creamy texture of the bars. Herbal teas like peppermint or chamomile also make refreshing partners, especially if you’re enjoying this dessert in the evening.
If you’re looking for a fancier option for adult gatherings and prefer to stay halal, try a mocktail made with pomegranate juice, sparkling water, and fresh mint. The tartness of pomegranate pairs nicely with chocolate and adds a burst of fruity contrast.
Cold milk is, of course, a classic and family-friendly choice. Whether you choose dairy or a creamy plant-based alternative like oat or almond milk, it helps cut through the richness of the bars and makes every bite even more satisfying.
Side Dessert Options:
While French Silk Brownie Bars can absolutely stand on their own, pairing them with a few small sides can turn dessert into an event. Consider serving them with a small scoop of vanilla bean or coconut ice cream for a hot-and-cold contrast. You can also pair with a simple fruit salad—think strawberries, kiwi, and orange slices—to add a fresh and juicy element to your dessert spread.
Snack Pairings for Casual Settings:
If you’re hosting a dessert night or movie marathon, add bowls of salty snacks like pretzels or roasted nuts. The sweet-and-salty combination is always a hit, and it gives your guests something crunchy to enjoy between bites of that silky chocolate.
From cozy evenings to elegant events, these pairings ensure your French Silk Brownie Bars are always the star, with a strong supporting cast.
Storage, Freezing & Reheating Instructions
When it comes to storing French Silk Brownie Bars, the good news is that they keep beautifully. This means you can make them in advance, store the leftovers, or even freeze them for later.
Refrigerator Storage:
After assembling the bars and allowing them to chill and set, cover the dish tightly with plastic wrap or transfer the bars to an airtight container. They will stay fresh in the refrigerator for up to 4 days. Because of the whipped topping and cream cheese layer, it’s essential to keep them chilled to maintain the texture and safety of the ingredients.
Freezing Instructions:
To freeze these bars, make sure they are fully set and chilled first. Then, slice them into individual squares. Wrap each piece tightly in plastic wrap and then place them in a freezer-safe zip-top bag or container. Label with the date for easy tracking.
They can be frozen for up to 2 months. When you’re ready to enjoy them, transfer them from the freezer to the refrigerator and let them thaw overnight. Avoid thawing at room temperature, as this can make the layers weep or become too soft.
Reheating:
These bars are meant to be served cold, so there’s no need to reheat them. However, if they’ve been stored in the refrigerator for several days and the texture feels a bit too firm, you can let them sit at room temperature for about 10–15 minutes before serving to bring back that silky softness in the middle layer.
With proper storage and a bit of planning, you can always have a luxurious dessert ready to go whenever the craving strikes—or when unexpected guests drop by.
Common Mistakes to Avoid
While this recipe is pretty forgiving, there are a few key mistakes that can affect the final outcome. Here’s what to watch out for to make sure your bars come out perfectly every time.
1. Not Cooling the Brownie Layer Before Adding the French Silk Layer:
This is one of the most important steps. If your brownie base is still warm when you add the silk layer, the filling can melt or become runny. Be patient and allow the base to cool completely before moving on.
2. Overmixing the Cool Whip:
When folding the Cool Whip into the chocolate cream cheese mixture, do it gently. Overmixing can deflate the air and result in a dense filling rather than the light, mousse-like texture you’re aiming for.
3. Skipping the Chill Time:
Even though the bars may look set after an hour or two, giving them the full chill time—preferably overnight—ensures clean slices and firm layers. If you try to cut into them too soon, the layers may smear or collapse.
4. Using Hot Chocolate for the Filling:
Sometimes people try to melt the chocolate too quickly or use a hot mixture in the cream cheese base. Let the melted chocolate and butter mixture cool slightly before adding it to avoid curdling or melting the whipped ingredients.
5. Underbaking or Overbaking the Brownie Layer:
Follow the baking time closely and test with a toothpick. You want moist crumbs, not raw batter, on the toothpick. Overbaking will make the base dry, and underbaking can make it too gooey and unstable.
By being aware of these common pitfalls, you can avoid them altogether and guarantee a smooth, delicious result every time.
Pro Tips
A few pro tips can take this already amazing dessert to the next level. These tricks will make your baking process smoother and your final product even more impressive.
1. Line the Pan for Easy Removal:
Lining your baking dish with parchment paper and letting the edges hang over the sides makes it easy to lift out the whole block of bars before slicing. This helps get those clean, café-worthy edges and makes cleanup a breeze.
2. Use High-Quality Chocolate:
The chocolate flavor is front and center in this dessert, so using a good-quality semi-sweet chocolate can make a big difference. Look for brands with a higher cocoa content for deeper flavor.
3. Soften the Cream Cheese Fully:
Cold cream cheese is hard to beat into a smooth mixture. Let it sit out for 30–60 minutes before using to avoid lumps and get that silky consistency in the filling.
4. Use a Hot Knife for Slicing:
Dip your knife in hot water and wipe it clean between each slice. This prevents the layers from smearing and keeps the presentation sharp.
5. Make Ahead for Best Results:
This dessert only improves with time. Making it the night before allows the layers to fully set and the flavors to meld, giving you a better texture and taste.
6. Experiment with Add-Ins:
You can personalize the brownie base by mixing in chopped nuts, a swirl of nut butter, or even a few espresso granules for a mocha twist. Just don’t go too heavy, as you don’t want to disrupt the structure.
These small steps and thoughtful choices make all the difference in creating a dessert that’s as polished as it is delicious.
Frequently Asked Questions (FAQs)
Even though French Silk Brownie Bars are relatively easy to make, it’s completely natural to have a few questions the first time around. Below are some of the most frequently asked questions to help guide you through the process and ensure that your dessert turns out perfectly every time.
Can I use a homemade brownie base instead of a boxed mix?
Absolutely! If you have a favorite homemade brownie recipe that results in a dense and chewy texture, feel free to use it in place of the boxed mix. Just make sure it fits in an 11×7-inch pan and isn’t too cakey—dense is best for supporting the soft upper layers.
What if I don’t have an 11×7-inch baking dish?
No problem. You can use a 9×9-inch square dish instead. The bars will be a little thicker, and you might need to increase the baking time for the brownie layer by a few minutes. Just keep an eye on them and use the toothpick test for doneness.
Is it okay to substitute the Cool Whip with homemade whipped cream?
Yes, you can use homemade whipped cream, but there are a few things to keep in mind. Make sure it’s whipped to stiff peaks so it holds its shape, and stabilize it with a bit of powdered sugar or unflavored gelatin to help it keep in the fridge. Homemade whipped cream has a shorter shelf life, so if you go this route, plan to serve the bars within a day or two.
How long do the bars need to chill?
At least 2 hours, but overnight is best. The longer chill time helps the layers set firmly, making the bars easier to slice and more satisfying to eat.
Can I make the bars ahead of time?
Yes, and in fact, they’re even better that way. You can make the bars up to 2 days in advance and store them in the fridge until you’re ready to serve.
Can I freeze the entire batch instead of individual squares?
Definitely. Just make sure to wrap the whole pan tightly in plastic wrap and then foil. When you’re ready to serve, let the bars thaw in the refrigerator overnight. It’s a convenient option if you’re preparing for a special occasion.
What’s the best way to transport these bars?
Keep them chilled as long as possible. Use a container with a tight-fitting lid, and if you’re traveling a long distance or it’s a hot day, place the container in a cooler bag with ice packs to maintain the temperature.
Can I make this recipe gluten-free?
Yes. Simply use a gluten-free brownie mix and make sure any additional ingredients (such as chocolate chips, flavorings, and toppings) are certified gluten-free. The filling itself does not contain gluten.
Is there a dairy-free version of this recipe?
To make this dairy-free, you’d need to use a plant-based brownie mix, dairy-free cream cheese, vegan butter, and a non-dairy whipped topping. Several brands now make great alternatives, but the texture and flavor may vary slightly from the original recipe.
How do I know if the bars are ready to cut?
Once the top layer is firm to the touch and doesn’t wobble when you shake the pan gently, it’s ready to cut. If you’re unsure, stick the pan back in the fridge for another hour just to be safe.
By having answers to these common questions on hand, you’ll be set up for success and have the confidence to make this dreamy dessert without a hitch.
Conclusion & Call to Action
French Silk Brownie Bars are one of those magical desserts that strike the perfect balance between impressive and approachable. They look stunning with their distinct, creamy layers and rich color, they taste like something you’d get at an upscale bakery, but they’re made with simple ingredients and a few easy steps. That’s the kind of win-win we all need in the kitchen.
Whether you’re baking for a holiday, hosting friends for dinner, or just looking to treat yourself on a regular weekday, this recipe delivers. It’s comforting, elegant, and indulgent without being over-the-top. Even better, it’s a make-ahead dessert that saves you time and stress when entertaining. And let’s not forget—this is the kind of dessert that people will talk about and request again and again.
If you’re nervous about trying something new, I promise you’ve got this. With a little patience and a lot of chocolate love, you’ll end up with a dessert that’s as rewarding to make as it is to eat. And if you find yourself sneaking a square straight from the fridge at midnight? Welcome to the club.
Now it’s your turn. Go ahead and give these French Silk Brownie Bars a try. I’d love to hear how they turned out—what you loved, what tweaks you made, or even what questions you still have. Leave a comment below, share your photos on social media, and don’t forget to tag me so I can see your delicious creations. Your kitchen deserves this kind of joy, and I can’t wait to see what you whip up.
Happy baking!
Print
French Silk Brownie Bars – Easy No-Bake Chocolate Dessert
- Total Time: 2 hours 48 minutes (includes chill time)
- Yield: 12 squares 1x
- Diet: Vegetarian
Description
These French Silk Brownie Bars combine a chewy brownie base with a fluffy, chocolate cream cheese mousse and whipped topping for an irresistible dessert.
Ingredients
Brownie Layer
-
1 box brownie mix (unprepared)
-
1 egg
-
5½ tablespoons unsalted butter, melted
-
¼ cup milk
French Silk Layer
-
8 oz cream cheese, softened
-
1 teaspoon vanilla extract
-
2 cups powdered sugar
-
4 oz semi-sweet chocolate
-
¼ cup unsalted butter, cubed
-
8 oz Cool Whip
Topping
-
8 oz Cool Whip
-
Optional: chocolate shavings or mini chocolate chips
Instructions
-
Preheat oven to 350°F (175°C). Grease an 11×7-inch pan.
-
Mix brownie mix, egg, melted butter, and milk. Spread in pan and bake for 25–28 minutes. Cool completely.
-
Beat cream cheese and vanilla until smooth. Add powdered sugar.
-
Melt chocolate and butter in microwave in 30-second intervals until smooth. Cool slightly.
-
Stir chocolate into cream cheese mixture. Fold in 8 oz Cool Whip.
-
Spread over cooled brownie base. Top with remaining 8 oz Cool Whip. Add chocolate shavings if desired.
-
Chill for at least 2 hours or overnight. Slice into 12 squares and serve cold.
Notes
-
Chill fully before slicing for clean layers.
-
Use parchment paper for easy removal.
-
Can be made up to 2 days in advance.
-
Freezes well for up to 2 months.
- Prep Time: 20 minutes
- Cook Time: 28 minutes
- Category: Dessert
- Method: Baking + No-Bake
- Cuisine: American