
Easy Dessert Board is the perfect way to impress your guests with minimal effort. This delightful arrangement comes packed with sweet treats that cater to various palates. Whether you’re hosting a party, celebrating a birthday, or simply indulging in a cozy night at home, creating an easy dessert board can elevate your dessert game. It’s not just about the flavors; it’s also about the presentation and the joy of sharing a variety of sweets.
Imagine a beautiful spread of colorful desserts laid out on a wooden board or a festive platter. Each bite offers a different experience, ensuring every guest finds something they love. The beauty of an easy dessert board lies in its simplicity and versatility. You can mix and match your favorite sweets, add seasonal fruits, and even include a few savory elements for balance.
In this guide, we’ll explore why you’ll love creating your own easy dessert board, how to prepare it efficiently, and which ingredients to use. You’ll also find step-by-step instructions that will make the process a breeze. Let’s dive into the world of sweet indulgence!
Why You’ll Love This Recipe
Creating an easy dessert board is not just about putting together a few snacks. It’s an experience that brings joy and delight. Here are several reasons why you’ll fall in love with this concept:
1. Endless Variety – You can customize the board to feature your favorite desserts, ensuring there’s something for everyone.
2. No Baking Required – Many items can be store-bought, making it incredibly convenient and quick to assemble.
3. Visually Stunning – The colorful array of desserts creates a beautiful display that impresses guests.
4. Perfect for Sharing – A dessert board encourages communal enjoyment, making it a social event in itself.
5. Easy to Prepare – With minimal prep time, you can focus on enjoying the moment rather than stressing in the kitchen.
6. Seasonal Adaptability – You can change the ingredients according to the season, making it fresh and exciting year-round.
7. Great for Any Occasion – Whether it’s a birthday party, holiday gathering, or casual get-together, it fits right in.
These factors make an easy dessert board an incredible addition to any event. You’ll find that it encourages connection and conversation, as guests share their favorite treats and flavors!
Preparation and Cooking Time
Preparing your easy dessert board is a swift process that can be done in under an hour. Here’s a breakdown of the time you’ll need:
– Preparation Time: 20-30 minutes
– Assembly Time: 15 minutes
Since most items can be store-bought or pre-made, you can focus on arranging them beautifully. This quick assembly is especially beneficial when hosting last-minute gatherings!
Ingredients
– Assorted cookies (e.g., chocolate chip, macarons, or biscotti)
– Mini cupcakes or brownies
– Fresh fruits (e.g., strawberries, grapes, or apple slices)
– Dips (e.g., chocolate sauce, caramel sauce, or whipped cream)
– Nuts (e.g., almonds, walnuts, or pecans)
– Dark chocolate or chocolate-covered pretzels
– Cheese (e.g., brie or cheddar) for a savory balance
– Edible flowers (for decoration, optional)
Step-by-Step Instructions
Creating your easy dessert board is simple and fun. Follow these steps for a delightful presentation:
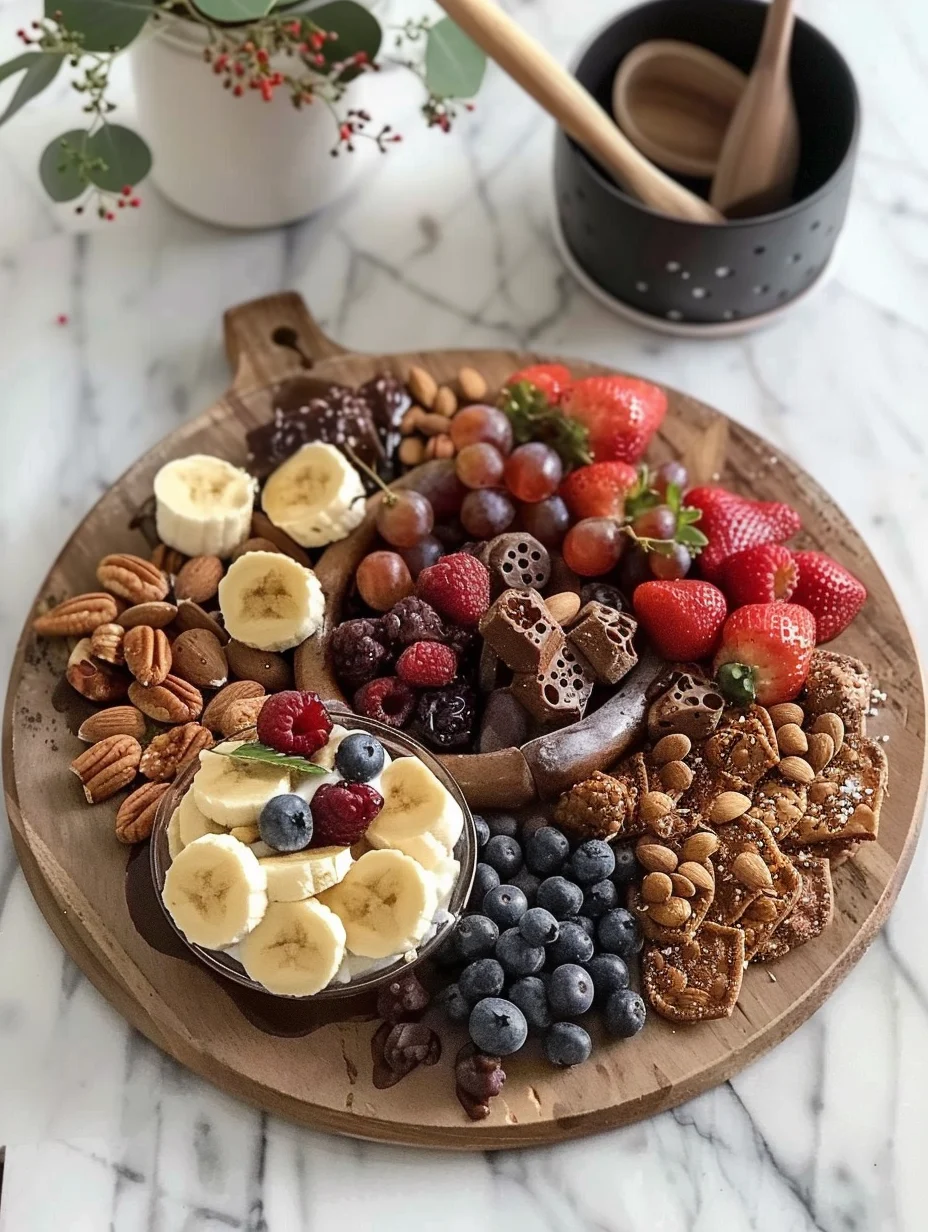
1. Choose Your Board: Select a large wooden board or platter as your base. Ensure it has enough space for all your ingredients.
2. Lay Down the Base: Start by placing larger items, such as cheese and bowls of dips, on the board. This will help anchor your arrangement.
3. Add Cookies: Fill in spaces with assorted cookies. Group similar types together for a cohesive look.
4. Include Fruits: Scatter fresh fruits throughout the board, adding pops of color and freshness.
5. Place Mini Treats: Add mini cupcakes or brownies in clusters to create visual interest.
6. Incorporate Nuts: Use small bowls or scatter nuts directly onto the board for added texture.
7. Drizzle Dips: If you have dips, place them in small bowls on the board. Drizzle chocolate or caramel sauce around for flair.
8. Decorate: Finish with a touch of elegance by placing edible flowers around the board or on top of some treats.
9. Final Touches: Step back and check for balance. Adjust as necessary for aesthetics.
By following these steps, you’ll create an easy dessert board that is both delicious and visually appealing!
How to Serve
Serving your easy dessert board is just as important as creating it. Here are some tips to ensure a memorable experience:
1. Presentation: Place the board at the center of the table, encouraging guests to gather around and serve themselves.
2. Utensils: Provide small plates, napkins, and forks or spoons for easy serving. Consider including toothpicks for bite-sized treats.
3. Beverage Pairing: Offer complementary drinks, such as coffee, tea, or dessert wine, to enhance the experience.
4. Encourage Interaction: Invite guests to share their favorite desserts and flavors, making it a social event.
5. Wrap-Up: Have containers available for guests to take home leftovers, ensuring none of your delicious creations go to waste.
By considering these serving tips, you enhance the experience of enjoying your easy dessert board, making it a delightful addition to any gathering!
Additional Tips
– Use Quality Ingredients: For the best flavor, opt for fresh fruits and high-quality chocolates. They will enhance the overall taste of your dessert board.
– Balance Flavors: Incorporate a mix of sweet and savory elements. This creates a well-rounded experience for your guests.
– Arrange Thoughtfully: Consider color and texture when placing items on the board. A visually appealing arrangement is more inviting.
– Keep It Simple: Don’t overthink your selections. Simple, well-loved treats often make the best impression.
– Include Labeling: If you have guests with dietary restrictions, consider labeling items. This ensures everyone knows what they can enjoy.
Recipe Variation
Feel free to get creative with your easy dessert board! Here are some ideas to try:
1. Chocolate Lover’s Board: Focus on chocolate-based treats, including chocolate-covered strawberries, brownies, and truffles.
2. Fruit-Heavy Board: Make fresh fruits the star by including an array of seasonal fruits alongside yogurt or honey for dipping.
3. Themed Boards: Tailor your dessert board to a holiday or occasion, such as a Halloween board with themed treats or a festive Christmas board with seasonal flavors.
Freezing and Storage
– Storage: Keep leftover treats in airtight containers in the refrigerator. They should stay fresh for up to 3-4 days.
– Freezing: Certain items, like brownies and cookies, can be frozen for longer storage. Wrap them tightly and store in the freezer for up to 3 months.
Special Equipment
While creating your easy dessert board requires minimal equipment, a few items will make the process smoother:
– A large wooden or marble board for presentation.
– Small bowls for dips and nuts.
– Utensils like tongs for easy serving.
– A knife for cutting fruits or cheese.
– Decorative elements like napkins or serving utensils to enhance the display.
Frequently Asked Questions
How do I choose the right board size?
Select a board that fits your table and can accommodate all treats without overcrowding. A larger board allows for a more spacious arrangement.
Can I include gluten-free options?
Absolutely! Many store-bought desserts are gluten-free. Just ensure to read labels and choose gluten-free cookies and treats.
What if I have leftovers?
Store leftovers in an airtight container in the refrigerator. You can enjoy them within a few days, or freezing is an option for longer storage.
How can I make it kid-friendly?
Incorporate colorful candies, mini cupcakes, and fun-shaped cookies. Kids love interactive elements like dipping fruits into chocolate sauce.
Can I prepare items in advance?
Yes! You can prepare dips, cut fruits, and bake desserts a day ahead. Assemble the board just before serving to keep it fresh.
Conclusion
An easy dessert board is a delightful way to indulge in a variety of treats while enjoying the company of friends and family. Its adaptability ensures it can suit any occasion, from casual get-togethers to festive celebrations. With minimal preparation and endless customization options, you can create a stunning display that will impress your guests and satisfy sweet cravings. So gather your favorite sweets, arrange them beautifully, and enjoy the joy of sharing delicious desserts!
Easy Dessert Board: An Amazing Ultimate Guide to 7 Delightful Treats
- Total Time: 15 minutes
Ingredients
– Assorted cookies (e.g., chocolate chip, macarons, or biscotti)
– Mini cupcakes or brownies
– Fresh fruits (e.g., strawberries, grapes, or apple slices)
– Dips (e.g., chocolate sauce, caramel sauce, or whipped cream)
– Nuts (e.g., almonds, walnuts, or pecans)
– Dark chocolate or chocolate-covered pretzels
– Cheese (e.g., brie or cheddar) for a savory balance
– Edible flowers (for decoration, optional)
Instructions
Creating your easy dessert board is simple and fun. Follow these steps for a delightful presentation:
1. Choose Your Board: Select a large wooden board or platter as your base. Ensure it has enough space for all your ingredients.
2. Lay Down the Base: Start by placing larger items, such as cheese and bowls of dips, on the board. This will help anchor your arrangement.
3. Add Cookies: Fill in spaces with assorted cookies. Group similar types together for a cohesive look.
4. Include Fruits: Scatter fresh fruits throughout the board, adding pops of color and freshness.
5. Place Mini Treats: Add mini cupcakes or brownies in clusters to create visual interest.
6. Incorporate Nuts: Use small bowls or scatter nuts directly onto the board for added texture.
7. Drizzle Dips: If you have dips, place them in small bowls on the board. Drizzle chocolate or caramel sauce around for flair.
8. Decorate: Finish with a touch of elegance by placing edible flowers around the board or on top of some treats.
9. Final Touches: Step back and check for balance. Adjust as necessary for aesthetics.
By following these steps, you’ll create an easy dessert board that is both delicious and visually appealing!
- Prep Time: 15 minutes
- Cook Time: 0 minutes
Nutrition
- Serving Size: 8
- Calories: 350 kcal
- Fat: 15g
- Protein: 5g