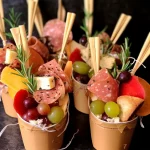
Ingredients
– Cured meats (salami, prosciutto, pepperoni)
– Variety of cheeses (cheddar, gouda, brie)
– Fresh fruits (grapes, apple slices, berries)
– Nuts (almonds, walnuts, pistachios)
– Dried fruits (apricots, cranberries)
– Crackers or breadsticks
– Condiments (honey, mustard, hummus)
– Additionally, cups (disposable or reusable) and toothpicks for serving
Instructions
Creating these DIY charcuterie cups involves simple steps, making it a fun and interactive process. Here’s how to assemble them:
1. Gather Ingredients: Collect all your ingredients and prep them as needed. Slice cheeses, wash fruits, and arrange them for easy access.
2. Choose Your Cup: Pick a cup size that suits your event. Clear plastic cups are great for visibility, while small mason jars add charm.
3. Layer the Ingredients: Start with a base layer of cured meats. You can fold or stack them to maximize space and make them visually appealing.
4. Add Cheese: Cut your cheese into bite-sized chunks and place them next to the meats. Mixing different textures adds interest.
5. Incorporate Fruits: Fill in gaps with fresh fruits for a burst of flavor and color. Use grapes whole or apple slices to create contrast.
6. Sprinkle in Nuts: Add a handful of nuts for crunch. They can either be in the cup or on the side, depending on how you want to arrange it.
7. Dried Fruits and Crackers: Tuck in a few pieces of dried fruit and some crackers or breadsticks to round out the cup and offer variety.
8. Finishing Touches: Include small containers of condiments on top or side, ensuring they are secured if the cups are transported.
9. Garnish (Optional): Add fresh herbs like rosemary or mint for a pop of color and aroma.
How to Serve
To ensure your DIY charcuterie cups shine at your gathering, here are some serving tips:
1. Display Creatively: Arrange the cups on a tiered stand or a wooden board to create a stunning visual effect.
2. Label Options: Use small signs to label different ingredients, especially if they cater to specific dietary needs (e.g., vegetarian, gluten-free).
3. Pair with Beverages: Offer a selection of drinks that complement the flavors in your cups, such as wine, cocktails, or non-alcoholic options.
4. Portions: Keep the portions manageable. Smaller cups encourage guests to try more than one flavor combination.
5. Encourage Mixing: Let guests know they can mix and match ingredients for a unique bite. This interaction makes for a more enjoyable experience.
By following these simple steps for preparation and service, your DIY charcuterie cups are sure to be a hit at your gathering, providing a delightful culinary experience for all guests!
- Prep Time: 15 minutes
- Cook Time: 0 minutes
Nutrition
- Serving Size: 6 cups
- Calories: 320 kcal
- Fat: 20g
- Protein: 15g
