
There’s something about a rich, indulgent Chocolate Oreo Poke Cake that just makes everything better. And when you take that chocolate cake, poke holes all through it, pour hot fudge into every single crevice, and top it with layers of creamy pudding, fluffy Cool Whip, and crunchy crushed Oreos? Well, you’ve got yourself a dessert that’s basically impossible to resist.
This Chocolate Oreo Poke Cake is more than just a treat—it’s a full-blown experience. From the moment you pull it out of the oven and start poking holes into that soft, warm cake to the final sprinkle of crushed cookies on top, this dessert delivers on every level: texture, flavor, simplicity, and presentation. It’s the kind of dessert people will ask for again and again, and you’ll be happy to oblige because it’s just that easy to make.
The best part? You don’t need to be a pro baker to pull this off. Whether you’re whipping it up for a birthday, a potluck, or just because your sweet tooth is calling, this poke cake will have people coming back for seconds (and maybe even thirds). It starts with a humble box of chocolate cake mix and ends with a luscious, multi-layered dessert that tastes like it came straight from a fancy bakery.
I first made this for a family gathering a few years ago. It was one of those last-minute “what can I make with what I already have?” kind of days. I had a box of chocolate cake, some pudding, a half-full tub of Cool Whip, and a stash of Oreos that were honestly meant for snacking. I decided to combine them all and see what happened. That experiment turned into a tradition. Now, it’s a staple at nearly every family event and has earned a permanent place in my dessert rotation.
So, if you’re looking for a ridiculously delicious, crowd-pleasing dessert that’s easy enough for beginners but impressive enough for any special occasion, this Chocolate Oreo Poke Cake is it. Let’s dive in.
Why You’ll Love This Chocolate Oreo Poke Cake Recipe
There are so many reasons why this Chocolate Oreo Poke Cake deserves a spot in your dessert lineup. To begin with, it’s incredibly easy to make, even if baking isn’t usually your thing. Thanks to a handful of simple, store-bought ingredients and straightforward steps, you can whip up something show-stopping without breaking a sweat.
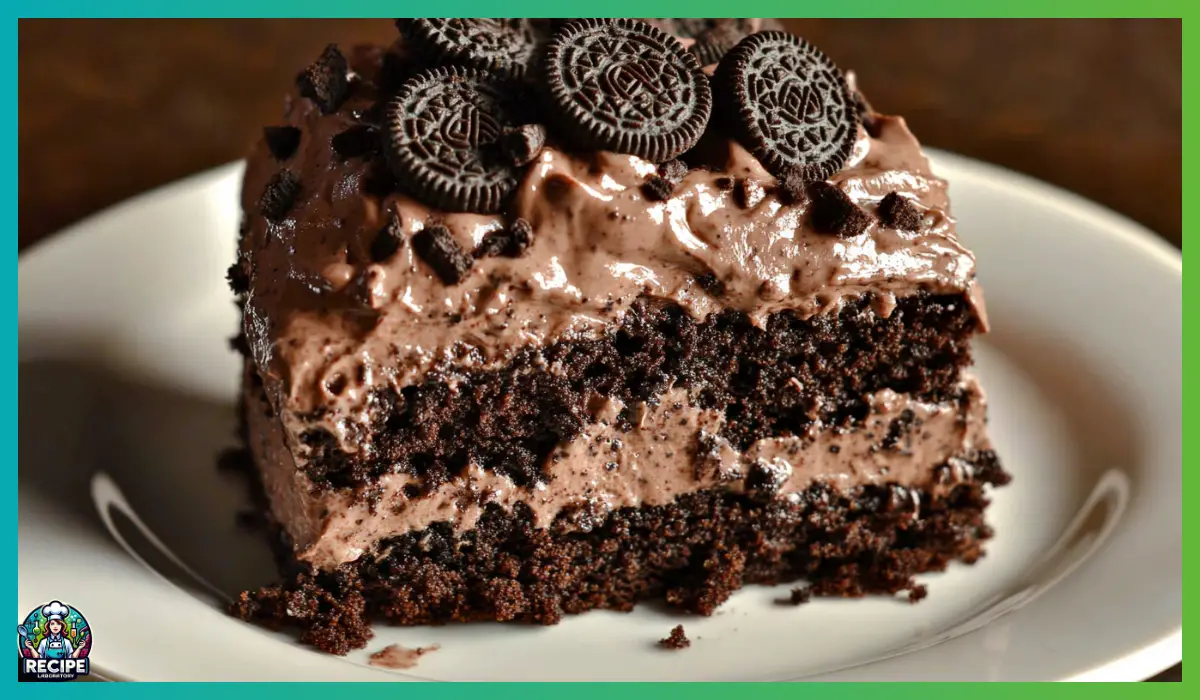
Let’s talk about texture for a second, because that’s one of the things that truly sets this dessert apart. The base is a super soft, moist chocolate cake that’s poked with holes and drenched in warm fudge. This gives the cake a melt-in-your-mouth quality that’s absolutely divine. On top of that, you have a creamy chocolate pudding layer that adds richness without feeling too heavy. Then comes the Cool Whip and Oreo topping, which brings lightness and crunch for the perfect contrast. Every bite is like a chocolate lover’s dream come true.
Flavor-wise, this dessert is rich and decadent, but it’s also perfectly balanced. The pudding adds a silkiness that pairs beautifully with the soft cake and the slight saltiness of the fudge. The crushed Oreos give it a playful twist that keeps things fun and satisfying. It’s got depth, sweetness, and a little crunch in every forkful.
What’s more, this cake is a total crowd-pleaser. Kids love it for the cookies and the whipped topping, while adults appreciate the fudgy layers and the nostalgic feel. It’s just as fitting at a casual weekend barbecue as it is on a holiday dessert table.
Lastly, you’ll love how versatile it is. You can make it ahead of time, keep it in the fridge, and even customize it to suit different preferences. Want to make it extra chocolatey? Add chocolate chips. Craving a hint of coffee flavor? Mix some espresso into the pudding. The options are endless.
In short, this Chocolate Oreo Poke Cake is everything you want in a dessert: quick, foolproof, and utterly delicious.
Health Benefits
Now, let’s be honest: this is not a “health food” by any stretch. It’s rich, indulgent, and designed to be a treat. But that doesn’t mean it’s completely devoid of redeeming qualities. In fact, when enjoyed in moderation and as part of a balanced lifestyle, this dessert can absolutely be part of your happy, healthy life.
First, let’s consider the emotional benefits. Yes, you read that right. Food isn’t just about fuel—it’s about enjoyment, celebration, and connection. Sharing a homemade dessert like this with loved ones can bring joy, strengthen bonds, and create lasting memories. And there’s real value in that. Allowing yourself to enjoy a slice of something sweet now and then can actually support a healthier relationship with food overall.
From a nutritional standpoint, there are a few elements worth noting. The milk used in the pudding layers contributes calcium and protein, which are important for bone health and muscle maintenance. If you use reduced-fat milk, you can lower the saturated fat content a bit while still getting the creaminess that makes this dessert so satisfying.
The Cool Whip topping adds some airiness and helps cut down on calories compared to heavy whipped cream. Plus, using store-bought pudding allows you to control the milk content and adjust it to your dietary needs. For example, you can use almond or oat milk if you prefer a dairy-free option, though this might slightly alter the texture.
Oreos may not be health food per se, but they do offer a satisfying crunch and add to the overall enjoyment. And if you want to lighten things up a bit, you can use fewer cookies or swap in a lower-sugar cookie alternative.
Lastly, portion control goes a long way. This cake is rich enough that a small piece is plenty satisfying. By cutting it into sensible servings and enjoying it slowly, you get all the pleasure with less of the guilt.
In summary, while this isn’t a recipe you’ll make for its health benefits, it can still fit into a mindful eating plan when approached with balance and joy.
Preparation Time, Servings, and Nutritional Information
Understanding the time commitment and nutritional value of a recipe is key when deciding whether it fits into your schedule or your dietary needs. Fortunately, this Chocolate Oreo Poke Cake hits that sweet spot of being both quick to make and satisfying to eat.
Total Preparation Time:
-
Prep Time: 20 minutes
-
Bake Time: 30-35 minutes
-
Cooling and Chilling Time: Approximately 45 minutes to 1 hour
-
Total Time: Roughly 1 hour 30 minutes (mostly hands-off)
Servings:
This recipe makes a generous 9×13-inch cake, which can easily be sliced into 12 to 16 servings, depending on how large you want each piece to be. For parties or potlucks, smaller slices work well and stretch the servings even further.
Nutritional Information (Per Serving, based on 16 servings):
-
Calories: 320
-
Protein: 4g
-
Fat: 15g
-
Carbohydrates: 42g
-
Sugar: 28g
-
Calcium: 8% DV
-
Iron: 10% DV
Of course, these values can vary slightly depending on the specific brands and ingredients used. If you’re trying to be more mindful of your intake, you can always lighten things up with sugar-free pudding, reduced-fat Cool Whip, and fewer cookies on top.
Ingredients List
Here’s everything you’ll need to make this dreamy Chocolate Oreo Poke Cake. Most of these items are pantry staples or easy to find at any grocery store.
For the Cake Layer:
-
1 box chocolate cake mix: Choose your favorite brand. The box will usually call for eggs, oil, and water—have those on hand, too.
-
Ingredients as directed on cake box: Usually includes:
-
3 large eggs
-
1/2 cup vegetable oil
-
1 1/4 cups water
-
The boxed mix makes this recipe incredibly simple while still delivering that homemade flavor when combined with the other layers.
For the Fudge and Pudding Layers:
-
12.8 oz hot fudge sauce, warmed: This adds intense chocolate richness and soaks into the cake for extra moisture and flavor.
-
1 (3.4 oz) box chocolate instant pudding mix
-
1¾ cups milk: Used twice—once for the pudding layer and once for the topping layer. Whole or 2% milk yields the creamiest results.
For the Topping:
-
1 (3.4 oz) box chocolate instant pudding mix: This is the second box used for the topping.
-
1¾ cups milk: Again, whole or 2% preferred for smoothness.
-
8 oz Cool Whip, thawed: Adds a fluffy, light texture to balance out the richness of the cake and pudding.
-
30 Oreo cookies, crushed: Adds crunch, chocolatey flavor, and that iconic cookies-and-cream vibe.
Feel free to reserve some of the Oreos for garnishing the top or even sprinkle them between layers for added texture.
Ready to get started? Let’s walk through each step, so you know exactly how to bring this indulgent dessert to life.
Step-By-Step Cooking Instructions
Let’s dive into the heart of the recipe—making this decadent, chocolatey Oreo poke cake from start to finish. Each layer brings its own magic, so we’re going to take our time with each step to make sure everything turns out beautifully. Don’t worry—these steps are easy, straightforward, and even a little bit fun.
Step 1: Prepare and Bake the Cake
- Preheat your oven according to the instructions on your cake mix box. This is usually 350°F, but it’s always best to double-check the label for the correct temperature based on the type of pan you’re using.
- Grease your baking dish. Use a 9×13-inch glass or metal pan and lightly coat it with nonstick spray or butter to ensure easy release later.
- Mix the cake batter. In a large bowl, combine the cake mix with the eggs, oil, and water as instructed on the box. Use a hand mixer or stand mixer on medium speed, or mix by hand with a whisk until everything is just combined. Be sure not to overmix—just stir until there are no visible lumps.
- Pour the batter into your prepared pan and smooth the top with a spatula.
- Bake the cake according to the package directions. This is usually between 30 to 35 minutes. Insert a toothpick in the center around the 30-minute mark. If it comes out clean or with just a few crumbs, your cake is ready.
- Cool slightly. Once baked, remove the cake from the oven and place it on a wire rack. Let it cool for about 10 minutes, just until it’s warm but not hot.
Step 2: Poke the Cake
This is the fun part and also what gives the poke cake its signature texture and flavor.
- Use the handle of a wooden spoon, a chopstick, or the back of a thick utensil to gently poke holes across the surface of the cake. Aim for holes every inch or so. Don’t go all the way to the bottom—just deep enough that the fudge can seep in.
- Make sure the holes are well-spaced and consistent. This will help the fudge distribute evenly throughout the cake and give every bite a rich, gooey center.
Step 3: Pour on the Hot Fudge
Now it’s time to bring the decadence.
- Warm the hot fudge in the microwave in 15- to 30-second intervals until it’s pourable but not boiling. Stir well between intervals.
- Drizzle the hot fudge evenly over the cake, making sure it gets into all the holes. You can use a spoon to help nudge it into the gaps if needed.
- Once all the fudge is added, let the cake cool completely. This step is important because adding pudding to a warm cake can make it too runny. You can leave it at room temperature or pop it into the fridge to speed things up.
Step 4: Make the Pudding Layer
While your cake is cooling, you can prepare the first chocolate pudding layer.
- In a medium mixing bowl, combine one box of chocolate instant pudding with 1¾ cups of cold milk.
- Whisk vigorously for about 2 minutes until the pudding begins to thicken. Don’t let it set fully—you want it pourable so it spreads nicely over the cake.
- Pour the pudding over the cooled cake, spreading it with a spatula to make sure it’s evenly distributed.
- Place the cake in the refrigerator for about 20 minutes so the pudding can firm up. This also helps the next layer stay distinct and clean.
Step 5: Prepare the Creamy Oreo Topping
This is where things get really exciting. The topping brings all the textures together: creamy, crunchy, and light.
- In another bowl, prepare the second box of chocolate pudding mix with another 1¾ cups of cold milk.
- Whisk just like before and let this pudding fully set in the refrigerator—this takes about 10 minutes.
- Once the pudding is set, fold in the Cool Whip using a spatula. Gently combine until smooth and fluffy. Try not to overmix, as you want to keep that airy texture intact.
- Stir in about ¾ of your crushed Oreos. You can crush them in a zip-top bag using a rolling pin, or give them a few pulses in a food processor if you want smaller pieces. Don’t over-crush—you want some chunks for texture.
Step 6: Assemble and Finish the Cake
- Spread the Oreo pudding topping gently over the chilled pudding layer on the cake. Use a spatula to create a smooth, even surface.
- Sprinkle the remaining crushed Oreos all over the top. You can also press a few whole Oreos in for extra flair if you’re feeling fancy.
- Chill the entire cake for at least one hour before serving. Overnight is even better if you have the time—the flavors meld beautifully and the texture becomes perfectly cohesive.
Step 7: Serve and Enjoy
- When you’re ready to serve, use a sharp knife to cut into squares and use a flat spatula to lift out each piece. Because it’s chilled, the slices hold together well, showing off those beautiful layers.
- If desired, garnish with a drizzle of extra fudge or a dollop of whipped topping for an added touch of decadence.
And that’s it! You’ve now created a showstopping dessert that looks impressive, tastes incredible, and will leave everyone asking for the recipe.

How to Serve this Chocolate Oreo Poke Cake
Serving this Chocolate Oreo Poke Cake is the easiest part—just cut and enjoy. But there are a few ways you can level up your presentation and customize it for different occasions.
- For a casual get-together, serve straight from the pan. This works well for potlucks, family dinners, or picnics. Just keep it chilled and bring along a serving spatula.
- For a fancier vibe, cut the cake into neat squares and place each piece on a small dessert plate. Add a swirl of whipped topping or a light dusting of cocoa powder or shaved chocolate for a gourmet touch.
- Add a scoop of ice cream next to each slice for an extra-indulgent dessert. Vanilla or cookies-and-cream flavors pair beautifully.
- Dress it up with fresh berries like raspberries or strawberries for a pop of color and a refreshing contrast to the richness of the cake.
- Serve mini versions in individual cups or jars for parties or events. Simply layer small portions of the cake and toppings in clear containers. It’s adorable, mess-free, and easy to grab and go.
However you choose to serve it, this dessert always steals the spotlight.
Pairing Suggestions
While this cake is rich and satisfying on its own, pairing it with the right sides or beverages can elevate the entire dessert experience.
Beverage Pairings:
- Milk: A cold glass of milk (dairy or non-dairy) is the classic companion. The creamy texture helps balance the intense chocolate flavor.
- Coffee: A hot cup of coffee or espresso makes a perfect contrast to the sweetness of the cake. You can also try a mocha or latte for a harmonious flavor profile.
- Hot chocolate: For those who truly love chocolate, a mug of creamy hot cocoa makes this a cozy winter treat.
- Chai latte: The warm spices of chai can beautifully complement the chocolate and Oreo notes.
Dessert Pairings:
If you’re serving this cake as part of a dessert spread or want to offer something lighter alongside it, consider:
- Fresh fruit platter: Strawberries, bananas, or even orange slices provide a refreshing counterbalance.
- Mini vanilla pudding cups: These offer a creamy, mellow contrast.
- Mint chocolate chip ice cream: The mint flavor adds a cool, bright note that pairs surprisingly well with Oreos and chocolate.
No matter what you pair it with, this cake holds its own and makes every bite feel like a celebration.
Storage, Freezing & Reheating Instructions
One of the best parts about this Chocolate Oreo Poke Cake—besides how insanely delicious it is—is that it stores beautifully. Whether you want to make it ahead for a gathering, save leftovers for later, or prep individual servings for a sweet treat throughout the week, this cake is incredibly low-maintenance when it comes to storage.
Storing in the Refrigerator
Because of the pudding and whipped topping, this cake should always be stored in the fridge. Leaving it out at room temperature for too long can cause the topping to become soft and unstable, and we definitely don’t want to lose that perfect, creamy texture.
- How to store: Cover the cake pan tightly with plastic wrap or aluminum foil. If you’ve transferred the cake to an airtight container, just make sure it has a secure lid.
- How long it lasts: Stored properly in the refrigerator, your Oreo poke cake will stay fresh for up to 4 to 5 days.
- Serving from the fridge: For the best texture, serve straight from the fridge or let it sit at room temperature for 5–10 minutes if you prefer a slightly softer consistency.
Freezing Instructions
Yes, you absolutely can freeze this poke cake! While freezing might slightly alter the texture of the whipped topping, the overall flavor and enjoyment remain intact.
- Before freezing: If you plan to freeze the entire cake, it’s best to do so before adding the Cool Whip layer. You can freeze the cake after the pudding and fudge layers, then thaw and add the topping just before serving.
- How to freeze: Cover the cake tightly with plastic wrap, then wrap again with aluminum foil or place the entire cake in a freezer-safe container.
- Individual slices: For quick grab-and-go desserts, slice the cake into individual portions and wrap each piece in plastic wrap. Store the wrapped slices in a freezer-safe bag or container.
- How long it lasts in the freezer: This cake can be frozen for up to 2 months.
- Thawing: Thaw overnight in the fridge, then add the whipped topping and Oreos if you haven’t already. Avoid microwaving to defrost, as that can lead to a soggy texture.
Reheating
This cake is best enjoyed cold or at room temperature. Because of the whipped topping and pudding layers, it’s not ideal for reheating. However, if you’re a fan of warm desserts, you can microwave a single serving for about 10–15 seconds—just enough to soften it slightly without melting the topping entirely. This gives the fudge a gooier texture and slightly warms the cake without ruining the structure.
For the most satisfying experience, we recommend enjoying this cake chilled or slightly softened at room temperature.
Common Mistakes to Avoid
Even though this recipe is simple and beginner-friendly, there are a few key missteps that can take your poke cake from amazing to mediocre. Here’s how to steer clear of the most common errors and make sure your cake comes out perfect every time.
1. Not Letting the Cake Cool Before Adding Pudding
It might be tempting to rush ahead, but adding pudding or whipped topping to a warm cake will cause it to melt, slide off, or soak in too much. The result? A soggy, overly soft mess. Always let your cake cool completely before adding the pudding layer.
2. Overmixing the Cake Batter
While it’s important to mix your cake batter thoroughly, overmixing can lead to a dense, chewy cake instead of a soft, fluffy one. Mix just until the ingredients are combined and no dry streaks remain.
3. Not Poking Enough Holes (or Poking Them Too Deep)
The holes in a poke cake are what give it that irresistible, gooey texture. If you don’t poke enough, the fudge won’t distribute evenly. On the other hand, poking all the way to the bottom of the pan can make the cake unstable. Aim for holes every inch or so, and go about two-thirds of the way down into the cake.
4. Using Warm Fudge Without Stirring
Warming the fudge is essential, but you don’t want it boiling hot or too thick. If you forget to stir it after microwaving, it might be uneven or clumpy. Heat it gently and stir until smooth before pouring.
5. Skipping Chill Time Between Layers
Each layer needs time to set before adding the next. Skipping the chill time after the pudding layer can lead to runny, messy layers that don’t hold together. Patience really pays off here.
6. Overloading with Oreos Too Early
It’s best to save some Oreos for the top layer right before serving. If you add them all at once and refrigerate the cake for hours, they’ll soften and lose their crunch. Reserve about a quarter of your crushed Oreos for last-minute sprinkling.
Avoiding these common mistakes ensures that your final result is just as luscious, layered, and perfect as it should be.
Pro Tips
Now that you’ve got the basics down, let’s go over a few expert-level tips that can take your Chocolate Oreo Poke Cake to the next level. These little details make a big difference in flavor, texture, and presentation.
1. Chill Your Mixing Bowls
Before whipping together the pudding and Cool Whip, pop your mixing bowls into the fridge for 10–15 minutes. Cold bowls help the pudding set faster and keep the whipped topping extra fluffy.
2. Use Full-Fat Milk for the Pudding
While you can use any milk you have on hand, full-fat or 2% milk gives the pudding a richer, creamier texture. If you’re using plant-based milk, make sure it’s unsweetened and thick (like oat milk or cashew milk) for best results.
3. Crush Oreos with Texture in Mind
You don’t want fine dust, and you don’t want giant chunks—aim for a mix of medium crumbles with some smaller bits. This gives the topping a great mix of texture and makes every bite interesting.
4. Make It a Day Ahead
This cake is one of those magical desserts that tastes even better the next day. The layers have more time to settle and the flavors really come together. Just wait to add the final Oreo topping until just before serving to preserve the crunch.
5. Add an Extra Drizzle for Drama
Right before serving, heat up a little more hot fudge and drizzle it across the top in a zigzag pattern. It adds visual appeal and an extra touch of indulgence.
6. Try Different Oreo Flavors
Want a twist on the classic? Use Golden Oreos, Mint Oreos, or even Peanut Butter Oreos for a flavor variation that keeps things interesting.
7. Use a Serrated Knife for Clean Cuts
If presentation matters, slice the cake with a serrated knife and wipe it clean between each cut. This helps maintain those beautiful layers and avoids dragging crumbs through the creamy topping.
A few thoughtful tweaks go a long way in making this dessert look and taste like a professional pastry shop creation.
Frequently Asked Questions (FAQs)
If you’re new to poke cakes or have a few questions before getting started, you’re not alone. Here are some of the most frequently asked questions about making this Chocolate Oreo Poke Cake.
Can I use homemade cake instead of a boxed mix?
Absolutely. If you have a favorite chocolate cake recipe, go for it. Just make sure it fits a 9×13-inch pan and yields a similar consistency to what a boxed mix would provide—something soft and moist works best.
What type of hot fudge should I use?
You can use any brand of store-bought hot fudge sauce. Look for one that’s thick and rich, not overly runny. You want it to seep into the holes but not disappear into the cake completely. If you prefer, you can also make your own using chocolate chips, heavy cream, and butter.
Can I make this dessert dairy-free?
Yes, with a few adjustments. Use a dairy-free cake mix and substitute regular milk with a creamy non-dairy alternative like oat milk or almond milk. For the whipped topping, there are dairy-free versions of Cool Whip available at most grocery stores. Just double-check that your pudding mix works with non-dairy milk—some require full-fat milk to set properly.
Can I make this ahead of time?
Definitely. This cake is ideal for making in advance. You can assemble everything (except the final Oreo topping) up to 24 hours ahead. Add the crushed Oreos right before serving to maintain their crunch.
What if I don’t have instant pudding?
Instant pudding is key here because it sets quickly and holds its structure. Cook-and-serve pudding is not recommended for this recipe as it doesn’t give the same firm, creamy layer.
How do I keep the whipped topping fluffy?
Fold the Cool Whip gently into the pudding. Don’t stir aggressively—just slowly incorporate it using a spatula. If possible, keep it cold while working to preserve its light texture.
Can I use less sugar?
Since most of the sweetness comes from store-bought ingredients, reducing sugar isn’t easy without affecting texture. However, you can opt for sugar-free pudding and a light version of Cool Whip to cut down on the overall sugar content.
Will the Oreos get soggy?
Eventually, yes. That’s why it’s best to reserve some of the crushed Oreos and add them right before serving. This keeps that top layer crunchy and fresh.
Can I make this gluten-free?
Yes. Use a gluten-free chocolate cake mix and make sure your pudding and whipped topping are also labeled gluten-free. You’ll also want to substitute regular Oreos with gluten-free alternatives, which are widely available now.
Can I double the recipe?
Absolutely. Just use two 9×13 pans or one large sheet pan. This dessert is a favorite at big gatherings, so doubling it is never a bad idea.
Conclusion & Call to Action
There’s no denying it—this Chocolate Oreo Poke Cake is the kind of dessert that checks all the boxes. It’s simple enough for a weekday craving, impressive enough for a party, and flexible enough to adapt to your preferences or dietary needs. With its fudgy base, luscious pudding layer, and that dreamy Oreo crunch on top, it’s basically guaranteed to become your go-to dessert from here on out.
What makes this recipe truly special is how approachable it is. Whether you’re a seasoned home baker or just dipping your toes into the world of baking, this cake delivers incredible flavor without requiring hours in the kitchen. It’s forgiving, versatile, and always turns out delicious. Plus, it’s one of those rare treats that brings smiles to everyone’s faces—kids, adults, and everyone in between.
If you give this recipe a try, I’d love to hear how it turned out. Did you make any fun variations? Did it steal the show at your family gathering or wow your coworkers at the office potluck? Snap a photo and tag me on social media—I genuinely love seeing your creations come to life.
So, what are you waiting for? Grab a box of chocolate cake mix, dig out that stash of Oreos, and treat yourself to a dessert that’s easy, fun, and downright irresistible. Happy baking!
Print
Chocolate Oreo Poke Cake: Easy, Creamy, and Perfect for Parties
- Total Time: 1 hour 30 minutes (includes chilling)
- Yield: 12–16 servings 1x
- Diet: Vegetarian
Description
A rich and creamy layered dessert made with chocolate cake, warm fudge, chocolate pudding, Cool Whip, and crushed Oreos. It’s super easy to make, no-fail, and perfect for potlucks, holidays, or weeknight treats.
Ingredients
-
1 box chocolate cake mix (plus eggs, water, oil as listed on box)
-
12.8 oz hot fudge sauce, warmed
-
2 (3.4 oz) boxes chocolate instant pudding mix
-
3½ cups milk (used in 2 steps)
-
8 oz Cool Whip, thawed
-
30 Oreos, crushed
Instructions
-
Bake chocolate cake according to package instructions in a 9×13-inch pan. Let cool 10 mins.
-
Poke holes in the cake using a spoon handle or chopstick.
-
Pour warmed fudge over the cake, filling the holes. Let cool fully.
-
Mix 1 pudding box with 1¾ cups milk, pour over cooled cake before fully set. Chill for 20 mins.
-
Mix second pudding box with 1¾ cups milk. Let set 10 mins.
-
Fold Cool Whip into the set pudding. Stir in ¾ of the crushed Oreos.
-
Spread Oreo pudding topping over cake. Sprinkle remaining Oreos on top.
-
Chill 1 hour before serving.
Notes
-
Add Oreos on top just before serving for crunch.
-
Make ahead-friendly: tastes even better the next day.
-
Use full-fat milk for creamier pudding.
- Prep Time: 20 minutes
- Cook Time: 35 minutes
- Category: Dessert
- Method: Baking, No-Bake Layers
- Cuisine: American