
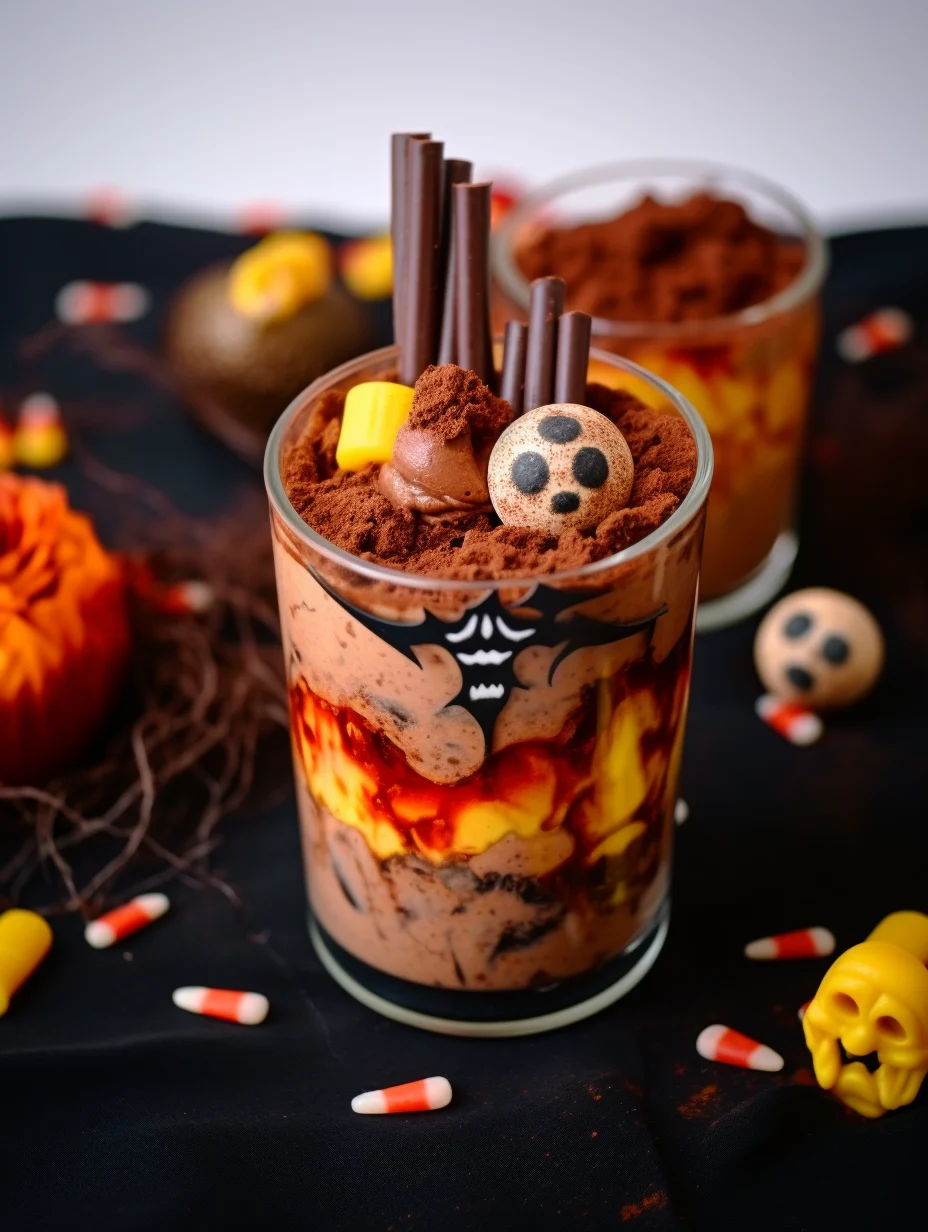
Halloween Graveyard Pudding Cups are a delightful way to celebrate the spooky season. These fun desserts capture the essence of Halloween with their eerie presentation and delicious flavors. They combine creamy pudding with crushed cookies, gummy worms, and a variety of edible decorations, creating a sweet treat that thrills both kids and adults alike. Whether you’re hosting a Halloween party or looking for a fun activity with your children, these pudding cups promise to add a festive touch to your celebration.
Imagine the excitement as guests discover their personal graveyard cups filled with delightful layers of flavors. The crunchy layer of crushed cookies represents dirt, while the sweet pudding serves as the graves. Adding gummy worms and spooky decorations provides the perfect finishing touch, delivering a fun and memorable treat for all. Halloween Graveyard Pudding Cups aren’t just a snack; they’re an interactive experience that encourages everyone to indulge their creativity.
If you’re looking for a wholesome recipe that is easy to make, this dessert has you covered. In this guide, we’ll explore why you’ll love making Halloween Graveyard Pudding Cups, the time needed for preparation, and a complete list of ingredients. Additionally, you’ll find simple step-by-step instructions to help you create these delicious Halloween treats. By the end, you’ll know exactly how to serve and enjoy your Halloween Graveyard Pudding Cups, ensuring your celebration is as incredible as it is spooky!
Why You’ll Love This Recipe
Halloween Graveyard Pudding Cups are the perfect blend of spooky fun and deliciousness. There are several reasons why this recipe stands out:
1. Simple Ingredients – Most ingredients can be found in your pantry or local grocery store, making this an easy recipe to whip up.
2. Interactive Presentation – The layering allows for creativity in decoration, engaging both adults and children in the assembling process.
3. Perfect for Parties – These pudding cups are great for Halloween parties, classroom treats, or family gatherings. They are fun and visually appealing to all ages.
4. Endless Variations – You can customize the toppings and decorations to match your Halloween theme. The possibilities are endless!
5. Quick to Prepare – This dessert can be put together quickly, making it ideal for those busy days during the Halloween season.
6. Deliciously Fun – The combination of flavors—creamy pudding, crunchy cookies, and sweet toppings—provides a delightful contrast that will please any palate.
With these elements, there’s no doubt that your Halloween Graveyard Pudding Cups will be a hit, creating lasting memories and filled with laughter.
Preparation and Cooking Time
Creating Halloween Graveyard Pudding Cups is a breeze! Here’s a clear overview of the time you will need:
– Preparation Time: 20 minutes
– Chilling Time: 2 hours (for optimal results)
– Total Time: 2 hours and 20 minutes
These times can vary slightly based on your skill level and how quickly you can assemble the ingredients, but this gives you a solid framework for planning your Halloween festivities.
Ingredients
– 2 cups of instant chocolate pudding mix
– 4 cups of milk
– 1 package of crushed chocolate sandwich cookies (like Oreos)
– 1 cup of gummy worms
– 1 cup of whipped topping or whipped cream
– Edible decorations (e.g., candy pumpkins, spooky sprinkles, or plastic spiders)
– Optional: Small plastic cups or glass jars for serving
Step-by-Step Instructions
Making Halloween Graveyard Pudding Cups is simple and fun! Follow these easy steps:
1. Prepare Pudding: In a large mixing bowl, whisk together the instant chocolate pudding mix and milk until well combined. Allow it to sit for about 5 minutes to thicken.
2. Layer Pudding: Take your small cups or jars and add a layer of chocolate pudding to each. Use about ¼ cup of pudding for the first layer.
3. Add Whipped Topping: Scoop in a layer of whipped topping (or whipped cream) on top of the pudding, using about ¼ cup for each cup or jar.
4. Crushed Cookies Layer: Gently add a layer of crushed chocolate sandwich cookies on top of the whipped topping to represent “dirt.” Use about 2 tablespoons per cup.
5. Repeat Layers: For a more dramatic effect, you can repeat layers, adding pudding, whipped topping, and cookies until you reach the top of the cup. You might aim for two or three layers, finishing with a layer of crushed cookies.
6. Decorate: Place gummy worms on top of the last cookie layer, letting them hang over the edges for a spooky effect. Add any other edible decorations you desire for that Halloween touch.
7. Chill: Cover the cups with plastic wrap and place them in the refrigerator for at least 2 hours to chill and set.
8. Serve: Once chilled, they’re ready for serving—a spooky and delicious treat for everyone!
Each step is designed to be straightforward, ensuring that your Halloween Graveyard Pudding Cups will come together beautifully.
How to Serve
Serving Halloween Graveyard Pudding Cups can be just as fun as making them. Here are several tips for an impressive presentation:
1. Themed Presentation: Use clear cups or glass jars so the layers are visible, creating a visually appealing display. Consider decorating the serving area with Halloween-themed items like mini pumpkins or cobwebs.
2. Accessory Fun: Provide small plastic shovels or spoons for an added touch of whimsy when serving. This makes the experience interactive and playful!
3. Garnish Ideas: Experiment with additional toppings like mini candy corns, edible eyes, or colorful sprinkles to heighten the Halloween theme.
4. Flavors and Textures: Consider pairing the pudding cups with other desserts, such as ghost-shaped cookies or a spooky cake, for an unforgettable dessert table.
5. Individual Servings: Each guest gets their own cup, making it easy for everyone to enjoy without the need for slicing or serving.
By implementing these serving strategies, your Halloween Graveyard Pudding Cups will not only taste amazing but also look incredible, leaving a lasting impression on everyone at your Halloween gathering!
Now that you’re equipped with everything needed to create these delightful spooky desserts, get ready to impress your friends and family with your Halloween baking skills! Happy Halloween!
Additional Tips
– Use Fresh Ingredients: Ensure that your milk and whipped topping are fresh for the best flavor and texture.
– Decoration Ideas: Get creative with your edible decorations. Use candy eyeballs or Halloween-themed sprinkles to make your pudding cups more festive.
– Layering Technique: To create visually stunning layers, carefully spoon in your pudding and toppings to avoid mixing.
– Fun Themes: Consider creating themes for your cups! For instance, you can decorate them to resemble specific spooky characters or scenes.
Recipe Variation
Halloween Graveyard Pudding Cups can be customized to suit your preference! Here are some fun variations to try:
1. Different Pudding Flavors: Substitute chocolate pudding for vanilla or butterscotch pudding to switch up the taste.
2. Vegan Version: Replace milk with a dairy-free alternative, like almond or coconut milk, and use a plant-based whipped topping.
3. Nutty Addition: Add chopped nuts or crushed candy bars for an extra crunch in the layers.
4. Fruit Layer: Incorporate layers of mashed banana or berry puree for a fruity twist among the chocolate layers.
Freezing and Storage
– Storage: Keep your Halloween Graveyard Pudding Cups covered in the refrigerator. Properly stored, they will last for about 3-5 days.
– Freezing: While not ideal due to the texture, you can freeze the cups for up to 1 month. If freezing, consider leaving off the toppings and adding them later after thawing for the best presentation.
Special Equipment
For making these Halloween goodies, you will need a few basic tools:
– Mixing bowls for the pudding
– Whisk or electric mixer for blending
– Clear plastic cups or jars for layering
– Spoon for serving
– Refrigerator for chilling
Frequently Asked Questions
Can I use a different type of cookie?
Yes! You can experiment with various cookies. Graham crackers or vanilla sandwich cookies will also work.
How long do I need to chill the pudding cups?
Chill the cups for at least 2 hours for the best texture. This allows the pudding to firm up nicely.
Can I make these cups ahead of time?
Absolutely! You can prepare these pudding cups a day in advance, making them a great option for parties.
What if I don’t have small cups?
You can use any container you have on hand. Just ensure they are clear so that the layers are visible for the best visual effect.
Is this recipe safe for kids?
Yes, these desserts are kid-friendly and suitable for all ages. Just monitor the decorations if small children are involved.
Conclusion
Creating Halloween Graveyard Pudding Cups allows you to combine spooky fun with delicious desserts. With easy ingredients and versatile options, these pudding cups can become the highlight of your Halloween festivities. Their interactive nature makes them a great choice for gatherings, and everyone can get involved in making their own personalized graveyard cup. Delight your guests and family with this memorable dessert that captures the spirit of Halloween!
Halloween Graveyard Pudding Cups: An Amazing Ultimate Recipe
- Total Time: 15 minutes
Ingredients
– 2 cups of instant chocolate pudding mix
– 4 cups of milk
– 1 package of crushed chocolate sandwich cookies (like Oreos)
– 1 cup of gummy worms
– 1 cup of whipped topping or whipped cream
– Edible decorations (e.g., candy pumpkins, spooky sprinkles, or plastic spiders)
– Optional: Small plastic cups or glass jars for serving
Instructions
Making Halloween Graveyard Pudding Cups is simple and fun! Follow these easy steps:
1. Prepare Pudding: In a large mixing bowl, whisk together the instant chocolate pudding mix and milk until well combined. Allow it to sit for about 5 minutes to thicken.
2. Layer Pudding: Take your small cups or jars and add a layer of chocolate pudding to each. Use about ¼ cup of pudding for the first layer.
3. Add Whipped Topping: Scoop in a layer of whipped topping (or whipped cream) on top of the pudding, using about ¼ cup for each cup or jar.
4. Crushed Cookies Layer: Gently add a layer of crushed chocolate sandwich cookies on top of the whipped topping to represent “dirt.” Use about 2 tablespoons per cup.
5. Repeat Layers: For a more dramatic effect, you can repeat layers, adding pudding, whipped topping, and cookies until you reach the top of the cup. You might aim for two or three layers, finishing with a layer of crushed cookies.
6. Decorate: Place gummy worms on top of the last cookie layer, letting them hang over the edges for a spooky effect. Add any other edible decorations you desire for that Halloween touch.
7. Chill: Cover the cups with plastic wrap and place them in the refrigerator for at least 2 hours to chill and set.
8. Serve: Once chilled, they’re ready for serving—a spooky and delicious treat for everyone!
Each step is designed to be straightforward, ensuring that your Halloween Graveyard Pudding Cups will come together beautifully.
- Prep Time: 15 minutes
- Cook Time: 0 minutes
Nutrition
- Serving Size: 8
- Calories: 210 kcal
- Fat: 8g
- Protein: 2g