
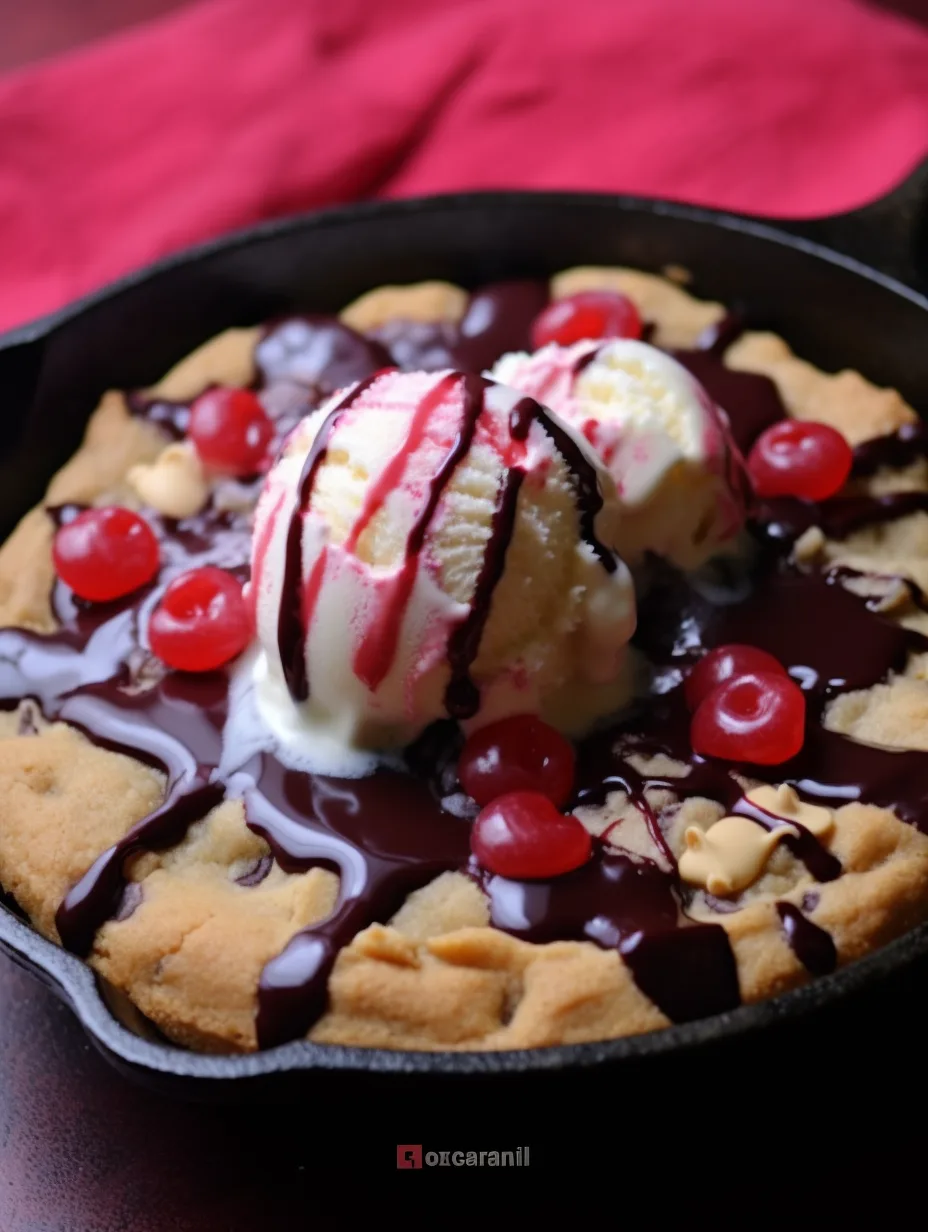
Cherry Chip Pizookie is a decadent dessert that marries the classic chocolate chip cookie with a delightful fruity twist. This warm, gooey treat is baked to perfection, creating a perfect blend of flavors that will leave your taste buds dancing with delight. When served fresh from the oven, topped with vanilla ice cream, the Cherry Chip Pizookie becomes a comforting experience that warms the heart and satisfies the sweet tooth. It’s not just a dessert; it’s an indulgence that evokes feelings of nostalgia, reminiscent of cozy family gatherings and joyous celebrations.
If you’ve never experienced the joy of a Cherry Chip Pizookie, you’re in for a treat! The combination of luscious cherries and rich chocolate chips creates a symphony of flavors that are both simple and extraordinary. This dessert is perfect for sharing with friends or enjoying solo while curled up on your couch. You don’t need to be a seasoned baker to whip up this incredible dish; the straightforward instructions ensure that anyone can nail this recipe. Let’s discover the reasons why the Cherry Chip Pizookie deserves a spot in your dessert repertoire.
Why You’ll Love This Recipe
There are numerous reasons to fall in love with Cherry Chip Pizookie, making it a must-try for dessert enthusiasts. Here are a few of the standout features that make this recipe so tempting:
1. Quick and Easy: With minimal preparation time and simple ingredients, you can create this impressive dessert without the hassle.
2. Irresistible Flavor Combination: The pairing of sweet cherries and chocolate chips is a delightful surprise that elevates this dessert to a new level.
3. Ideal for Any Occasion: Whether it’s a birthday, holiday gathering, or a casual get-together, this pizookie fits right in with any celebration.
4. Warm and Comforting: Served hot from the oven with a scoop of ice cream on top, it provides a cozy experience like no other dessert.
5. Crowd-Pleaser: With its eye-catching presentation and mouthwatering taste, this dessert is sure to impress family and friends.
6. Customizable: You can adjust the recipe to suit your dietary preferences or incorporate different fruits to keep things fresh.
These factors create a delightful incentive to try out this incredible Cherry Chip Pizookie recipe. Each bite promises a blend of sweet and tart, making it a true indulgence.
Preparation and Cooking Time
Getting the Cherry Chip Pizookie ready takes approximately 35-40 minutes in total. Here’s a detailed breakdown of the time you’ll need:
– Preparation Time: 15-20 minutes
– Cooking Time: 20 minutes
– Cooling Time: None needed; serve immediately!
Overall, this efficient timeline makes it easy to enjoy this delectable dessert without waiting too long!
Ingredients
– 1 cup all-purpose flour
– ½ teaspoon baking soda
– ¼ teaspoon salt
– ½ cup unsalted butter, softened
– ½ cup brown sugar, packed
– ¼ cup granulated sugar
– 1 large egg
– 1 teaspoon vanilla extract
– ½ cup chocolate chips
– ¾ cup cherries, pitted and halved (fresh or frozen)
Step-by-Step Instructions
Creating the Cherry Chip Pizookie is straightforward if you follow these easy steps:
1. Preheat the Oven: Set your oven to 350°F (175°C) and lightly grease a round baking dish or a cast-iron skillet.
2. Mix Dry Ingredients: In a bowl, whisk together the flour, baking soda, and salt until well combined.
3. Cream Butter and Sugars: In a separate large bowl, beat the softened butter with the brown sugar and granulated sugar until creamy.
4. Add Egg and Vanilla: Mix in the egg and vanilla extract until fully incorporated into the butter-sugar mixture.
5. Combine Mixtures: Gradually add the dry ingredient mixture to the wet ingredients, stirring until just combined.
6. Fold in Chocolate Chips and Cherries: Gently fold in the chocolate chips and the halved cherries until they are evenly dispersed in the batter.
7. Transfer to Baking Dish: Pour the cookie dough into the prepared baking dish, spreading it evenly.
8. Bake: Place the dish in the preheated oven and bake for about 20 minutes, or until the edges are golden brown and the center looks slightly under-baked.
9. Cool Slightly: Allow the pizookie to cool for about 5 minutes before serving—just long enough for the gooey goodness to settle.
10. Serve Warm: Top with a generous scoop of vanilla ice cream, and enjoy immediately!
These straightforward steps will guide you in creating a delightful Cherry Chip Pizookie that is sure to become a favorite.
How to Serve
Serving your Cherry Chip Pizookie can be as fun as making it! Here’s how to create a memorable experience:
1. Presentation: Serve it directly in the baking dish for a rustic look, or scoop it into individual bowls for a more refined approach.
2. Top With Ice Cream: Place a generous scoop of vanilla ice cream directly on top of the warm pizookie. The melting ice cream creates a delicious contrast with the dessert.
3. Garnish for Added Flair: Drizzle some chocolate or caramel sauce over the top for an extra touch of sweetness. Fresh mint leaves can add a pop of color and freshness.
4. Pair with Beverages: Complement your pizookie with coffee, milk, or even a dessert wine for an indulgent treat.
5. Invite Sharing: Encourage friends and family to dig in together, making it a social and enjoyable experience.
By taking the time to serve your Cherry Chip Pizookie thoughtfully, you heighten the overall enjoyment and create lasting memories for everyone involved!
Additional Tips
– Use Fresh Cherries: For the best flavor and texture, opt for fresh cherries when in season. Frozen cherries can work, but they may release more moisture.
– Don’t Overmix: When combining the wet and dry ingredients, stir until just combined to keep the pizookie soft and chewy.
– Experiment with Extracts: Try adding almond or cherry extract to enhance the cherry flavor for an added depth.
– Serve Immediately: This dessert is best enjoyed right out of the oven. The gooey texture pairs perfectly with cold ice cream.
– Use a Cast-Iron Skillet: If you have one, baking in a cast-iron skillet gives a lovely crispy edge while keeping the center gooey.
Recipe Variation
Get creative with these variations for your Cherry Chip Pizookie:
1. Mixed Berry Pizookie: Substitute cherries with a mix of blueberries, raspberries, and strawberries for a fruity delight.
2. Nutty Addition: Fold in a half cup of chopped walnuts or pecans for added crunch and flavor.
3. S’mores Pizookie: Add a layer of mini marshmallows and crushed graham crackers on top before baking.
4. Brown Butter Pizookie: Brown the butter before creaming it with the sugars to enhance the nutty flavor.
5. Vegan Pizookie: Replace the egg with a flaxseed meal egg (1 tablespoon flaxseed meal + 2.5 tablespoons water) and use vegan butter.
Freezing and Storage
– Storage: Keep your Cherry Chip Pizookie covered at room temperature for 2-3 days. For longer storage, place it in the refrigerator to maintain freshness up to a week.
– Freezing: You can freeze leftovers in an airtight container for up to 3 months. Allow it to cool completely before wrapping tightly. To reheat, simply warm it in the microwave or oven until heated through.
Special Equipment
To make your Cherry Chip Pizookie, you will need:
– Mixing bowls for combining ingredients
– A whisk for mixing dry components
– An electric mixer or hand mixer for creaming the butter and sugars
– A round baking dish or cast-iron skillet for baking
– Measuring cups and spoons for accurate ingredient quantities
– A spatula for folding in the cherries and chocolate chips
Frequently Asked Questions
Can I use other fruits besides cherries?
Yes, you can experiment with various fruits such as blueberries, raspberries, or even peaches for different flavor profiles.
What can I do if my Pizookie is too dry?
Ensure you bake it just until the edges are golden and the center is soft. Overbaking can dry it out. Adding a scoop of ice cream on top can also help!
Is it possible to make this dessert gluten-free?
Certainly! Substitute all-purpose flour with a gluten-free flour blend to make it gluten-free.
How can I make this recipe dairy-free?
Use dairy-free butter and a plant-based ice cream alternative for a delicious dairy-free version.
Can I prepare the dough in advance?
Absolutely! You can prepare the dough and refrigerate it for a day. When you’re ready, just bake it when fresh.
Conclusion
The Cherry Chip Pizookie is not just a dessert; it’s a delicious experience that brings people together. This delightful recipe combines the rich flavors of chocolate and the sweetness of cherries, topped with melting vanilla ice cream. It’s quick to prepare and creates lasting memories with every bite. Whether it’s a special occasion or a cozy night in, this pizookie is sure to impress. With the tips, variations, and storage options provided, you can easily adapt this treat to suit your preferences. Unleash your inner baker and indulge in this decadent dessert!
Cherry Chip Pizookie: An Incredible Essential Recipe for 2023
- Total Time: 35 minutes
Ingredients
– 1 cup all-purpose flour
– ½ teaspoon baking soda
– ¼ teaspoon salt
– ½ cup unsalted butter, softened
– ½ cup brown sugar, packed
– ¼ cup granulated sugar
– 1 large egg
– 1 teaspoon vanilla extract
– ½ cup chocolate chips
– ¾ cup cherries, pitted and halved (fresh or frozen)
Instructions
Creating the Cherry Chip Pizookie is straightforward if you follow these easy steps:
1. Preheat the Oven: Set your oven to 350°F (175°C) and lightly grease a round baking dish or a cast-iron skillet.
2. Mix Dry Ingredients: In a bowl, whisk together the flour, baking soda, and salt until well combined.
3. Cream Butter and Sugars: In a separate large bowl, beat the softened butter with the brown sugar and granulated sugar until creamy.
4. Add Egg and Vanilla: Mix in the egg and vanilla extract until fully incorporated into the butter-sugar mixture.
5. Combine Mixtures: Gradually add the dry ingredient mixture to the wet ingredients, stirring until just combined.
6. Fold in Chocolate Chips and Cherries: Gently fold in the chocolate chips and the halved cherries until they are evenly dispersed in the batter.
7. Transfer to Baking Dish: Pour the cookie dough into the prepared baking dish, spreading it evenly.
8. Bake: Place the dish in the preheated oven and bake for about 20 minutes, or until the edges are golden brown and the center looks slightly under-baked.
9. Cool Slightly: Allow the pizookie to cool for about 5 minutes before serving—just long enough for the gooey goodness to settle.
10. Serve Warm: Top with a generous scoop of vanilla ice cream, and enjoy immediately!
These straightforward steps will guide you in creating a delightful Cherry Chip Pizookie that is sure to become a favorite.
- Prep Time: 15 minutes
- Cook Time: 20 minutes
Nutrition
- Serving Size: 4-6
- Calories: 350 kcal
- Fat: 18g
- Protein: 3g