
DIY Charcuterie Cups are the perfect solution for those who want to impress their guests while minimizing the cleanup. These delightful servings not only cater to various dietary preferences but also allow for individual customization. Whether it’s a festive gathering, a corporate event, or a casual get-together, charcuterie cups are a fun and interactive way to host without the hassle of a traditional charcuterie board.
Imagine offering your guests a personal cup filled with an assortment of meats, cheeses, fruits, and nuts that they can enjoy at their leisure. No sharing required! Plus, decorating these cups can be as creative as your imagination allows, making it an engaging activity for both adults and kids.
In this article, you will discover why DIY Charcuterie Cups are a fantastic choice and how to prepare them step-by-step. It will also cover the essential ingredients you’ll need, along with serving tips that will have everyone talking about your event long after it’s over!
Why You’ll Love This Recipe
DIY Charcuterie Cups are beloved for several reasons that make them an attractive option for any host:
1. Individual Portions – Each guest gets their own cup, minimizing germs and the awkwardness of cutting and sharing from a platter.
2. Customizable Ingredients – Cater to various tastes and dietary restrictions with a wide range of options. This allows for vegetarian, vegan, or gluten-free choices.
3. A Stunning Presentation – The visual appeal of neatly arranged ingredients in a cup makes for an eye-catching centerpiece at any gathering.
4. Easy Clean-Up – Disposable cups make for a tidy cleanup, making this option stress-free for the host.
5. Interactive Experience – Guests can build their charcuterie cup as they please, making it a fun activity.
6. Great for Any Occasion – Whether it’s a wedding, birthday party, or just a night with friends, these cups are versatile and suitable for all events.
7. Affordable – With a bit of creativity, you can use ingredients you already have or purchase economical options to fit your budget.
Creating these amazing charcuterie cups will not only impress your guests but also provide a memorable and delicious experience.
Preparation and Cooking Time
Creating DIY Charcuterie Cups is a speedy process that you can manage well within a couple of hours. Here’s a breakdown of the time required:
– Preparation Time: 30-45 minutes
– Assembly Time: 15-20 minutes
– Total Time: Approximately 1 hour
These times may vary depending on the complexity of your ingredient choices and the number of cups you plan to create.
Ingredients
– Charcuterie Cups (e.g., plastic, bamboo, or glass)
– Assorted cured meats (salami, prosciutto, chorizo)
– A variety of cheeses (cheddar, gouda, brie, goat cheese)
– Fresh fruits (grapes, strawberries, apple slices)
– Pickles and olives
– Nuts (almonds, walnuts, pistachios)
– Dips (hummus, olive tapenade, mustard)
– Crackers or breadsticks
– Fresh herbs for garnish (optional)
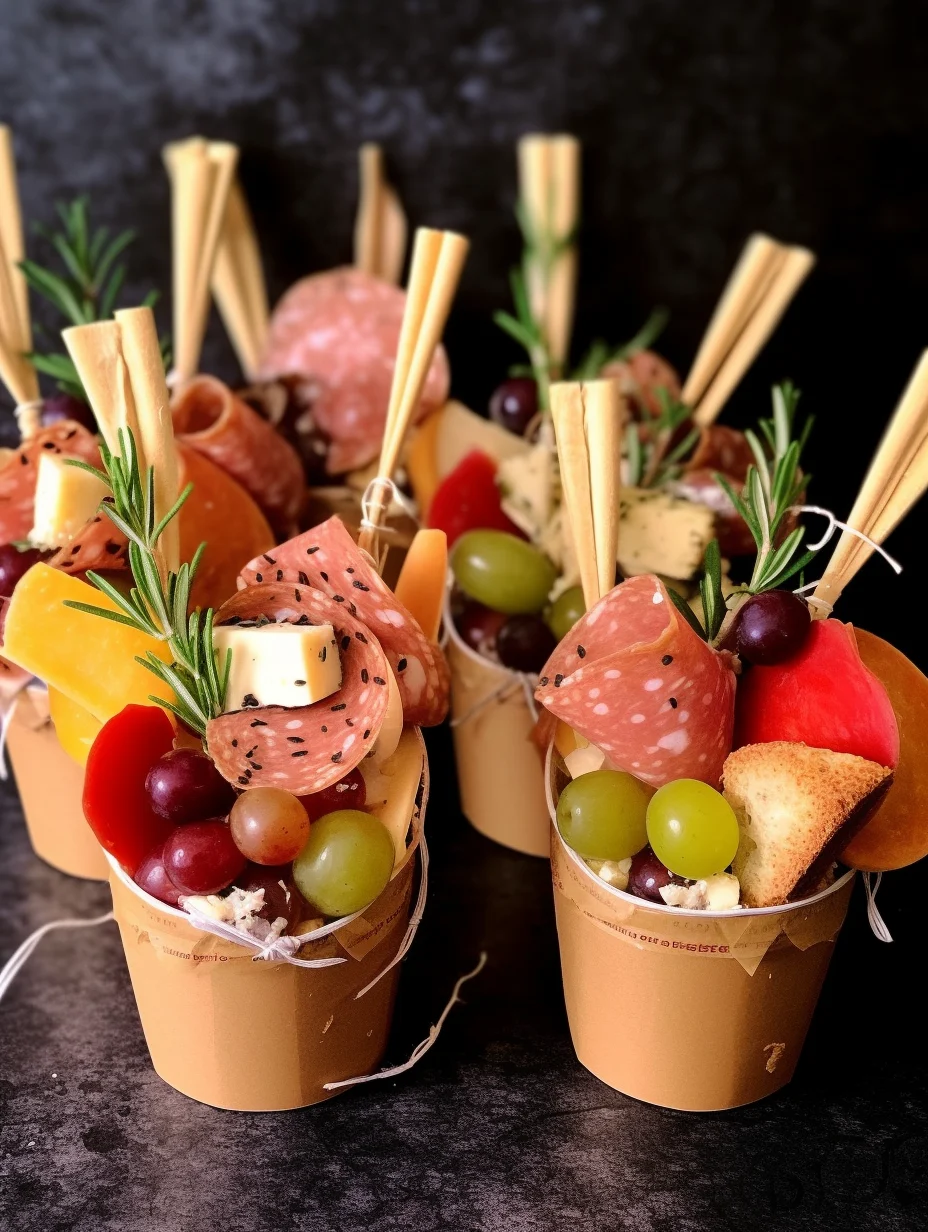
Step-by-Step Instructions
Creating your DIY Charcuterie Cups is a straightforward and enjoyable process. Follow these steps for a fantastic result:
1. Gather Your Materials: Collect all ingredients and your chosen charcuterie cups.
2. Prepare Ingredients: Slice cured meats and cheeses into bite-sized pieces. Cut fruits into manageable portions if necessary.
3. Create a Base: Start by adding a layer of nuts at the bottom of each cup. This helps stabilize the cup and adds a crunchy texture.
4. Add the First Layer: Place a selection of cured meats against one side of the cup.
5. Layer of Cheese: Add a few pieces of cheese next to the meats for a delightful combination.
6. Fruits and Vegetables: Fill in the gaps with fresh fruits such as grapes or sliced apples for a refreshing contrast.
7. Pickles and Olives: Tuck in a couple of pickles or olives for a tangy bite.
8. Include Dips: Place small containers of dip or spread beside the other ingredients, making them easily accessible.
9. Crackers or Breadsticks: Add crackers or breadsticks vertically into the cup for a fun touch.
10. Final Touch: Garnish the cups with fresh herbs, like rosemary or parsley, to enhance the visual appeal.
By following these steps, you’ll create stunning DIY Charcuterie Cups that are both delicious and visually impressive.
How to Serve
To elevate the presentation and enjoyment of your DIY Charcuterie Cups, consider the following serving suggestions:
1. Arrangement: Position the cups on a large serving platter or table to create an inviting display that encourages guests to help themselves.
2. Labels: Consider labeling each cup if they contain different themes or dietary options to guide your guests in making their selections.
3. Accompaniments: Offer extra bites such as antipasto skewers or additional dips on the side for a more complete experience.
4. Beverage Pairing: Match your charcuterie cups with appropriate beverages like wine, craft beers, or flavored sparkling water to complement the flavors.
5. Portion Sizes: Keep portions moderate to allow guests to try multiple cups without feeling overwhelmed, encouraging mingling and tasting.
When you thoughtfully prepare and present your DIY Charcuterie Cups, you’re setting the stage for an enjoyable and memorable gathering that your guests will love!
Additional Tips
– Use Quality Ingredients: Opt for the freshest produce and premium cured meats and cheeses. This will significantly enhance the flavors.
– Mix Textures: Layer crunchy nuts with creamy cheeses and soft fruits to create an enticing array of textures.
– Keep it Colorful: Aim for a colorful presentation. The more vibrant your ingredients, the more visually appealing the cups will be.
– Prepare in Advance: You can prep your ingredients a day prior, slicing meats and cheeses to save time before the event.
– Personalize Each Cup: Tailor each cup to your guests’ preferences. For example, you can have a vegetarian option or create themed cups for special occasions.
– Eco-Friendly Options: If you’re concerned about waste, consider using small reusable containers or even edible cups made of bread.
Recipe Variation
Feel free to explore different flavor profiles with these variations:
1. Mediterranean Style: Use feta, olives, roasted red peppers, and pita chips alongside hummus for a Mediterranean flair.
2. Sweet Treat Cups: Create dessert charcuterie cups with chocolate-covered fruits, mini cookies, and sweet cheeses like mascarpone.
3. Spicy Kick: Add spicy sausage or cheese and include jalapeños or spicy hummus for a kick of heat.
4. Breakfast Option: Incorporate mini bagels, cream cheese, smoked salmon, and capers for a breakfast-themed charcuterie cup.
5. Tropical Twist: Utilize tropical fruits like mango and pineapple, and pair with coconut or light cheeses for a refreshing tropical option.
Freezing and Storage
– Storage: Keep any unused assembled ingredients in airtight containers in the refrigerator. They should last 3-4 days but are best enjoyed fresh.
– Freezing: While it’s not ideal to freeze fully assembled cups, you can freeze separate components like meats or cheeses for up to 2 months.
Special Equipment
While DIY Charcuterie Cups require minimal equipment, having these items can enhance your experience:
– Serving Platter: A large board or platter to display the cups attractively.
– Plastic or Reusable Cups: Choose clear cups to showcase the beautiful ingredients.
– Spoons/Forks: Provide small utensils for guests to easily access dips.
– Small Containers: For dips or spreads, tiny containers work well to keep everything organized.
Frequently Asked Questions
What are charcuterie cups?
Charcuterie cups are individual servings containing an assortment of meats, cheeses, fruits, and nuts, elegantly arranged for easy consumption.
Can I prepare charcuterie cups in advance?
Yes, you can prepare ingredients ahead of time. However, it’s best to assemble the cups shortly before serving to keep the contents fresh.
What dietary restrictions can I accommodate with DIY charcuterie cups?
You can create options that are vegetarian, vegan, gluten-free, or dairy-free by choosing appropriate ingredients that cater to those dietary needs.
How can I make my presentation more appealing?
Layering your ingredients in a visually pleasing manner and choosing colorful options will enhance your presentation.
Can these cups be served at any event?
Absolutely! They are perfect for weddings, birthday parties, casual gatherings, or even corporate events.
Conclusion
DIY Charcuterie Cups are a stunning, practical, and enjoyable addition to any gathering. By allowing for customization and variety, these individually portioned delights cater to diverse tastes and preferences. Whether you’re hosting a casual get-together or a formal event, charcuterie cups are sure to impress your guests. With minimal cleanup and a creative edge, they offer both satisfaction and style. Enjoy creating your unique combinations and watch as your guests indulge in these delicious, eye-catching treats!

DIY Charcuterie Cups: An Incredible Ultimate Guide to 7 Amazing Styles
- Total Time: 15 minutes
Ingredients
– Charcuterie Cups (e.g., plastic, bamboo, or glass)
– Assorted cured meats (salami, prosciutto, chorizo)
– A variety of cheeses (cheddar, gouda, brie, goat cheese)
– Fresh fruits (grapes, strawberries, apple slices)
– Pickles and olives
– Nuts (almonds, walnuts, pistachios)
– Dips (hummus, olive tapenade, mustard)
– Crackers or breadsticks
– Fresh herbs for garnish (optional)
Instructions
Creating your DIY Charcuterie Cups is a straightforward and enjoyable process. Follow these steps for a fantastic result:
1. Gather Your Materials: Collect all ingredients and your chosen charcuterie cups.
2. Prepare Ingredients: Slice cured meats and cheeses into bite-sized pieces. Cut fruits into manageable portions if necessary.
3. Create a Base: Start by adding a layer of nuts at the bottom of each cup. This helps stabilize the cup and adds a crunchy texture.
4. Add the First Layer: Place a selection of cured meats against one side of the cup.
5. Layer of Cheese: Add a few pieces of cheese next to the meats for a delightful combination.
6. Fruits and Vegetables: Fill in the gaps with fresh fruits such as grapes or sliced apples for a refreshing contrast.
7. Pickles and Olives: Tuck in a couple of pickles or olives for a tangy bite.
8. Include Dips: Place small containers of dip or spread beside the other ingredients, making them easily accessible.
9. Crackers or Breadsticks: Add crackers or breadsticks vertically into the cup for a fun touch.
10. Final Touch: Garnish the cups with fresh herbs, like rosemary or parsley, to enhance the visual appeal.
By following these steps, you’ll create stunning DIY Charcuterie Cups that are both delicious and visually impressive.
- Prep Time: 15 minutes
- Cook Time: 0 minutes
Nutrition
- Serving Size: 1 cup
- Calories: 250 kcal
- Fat: 15g
- Protein: 10g