
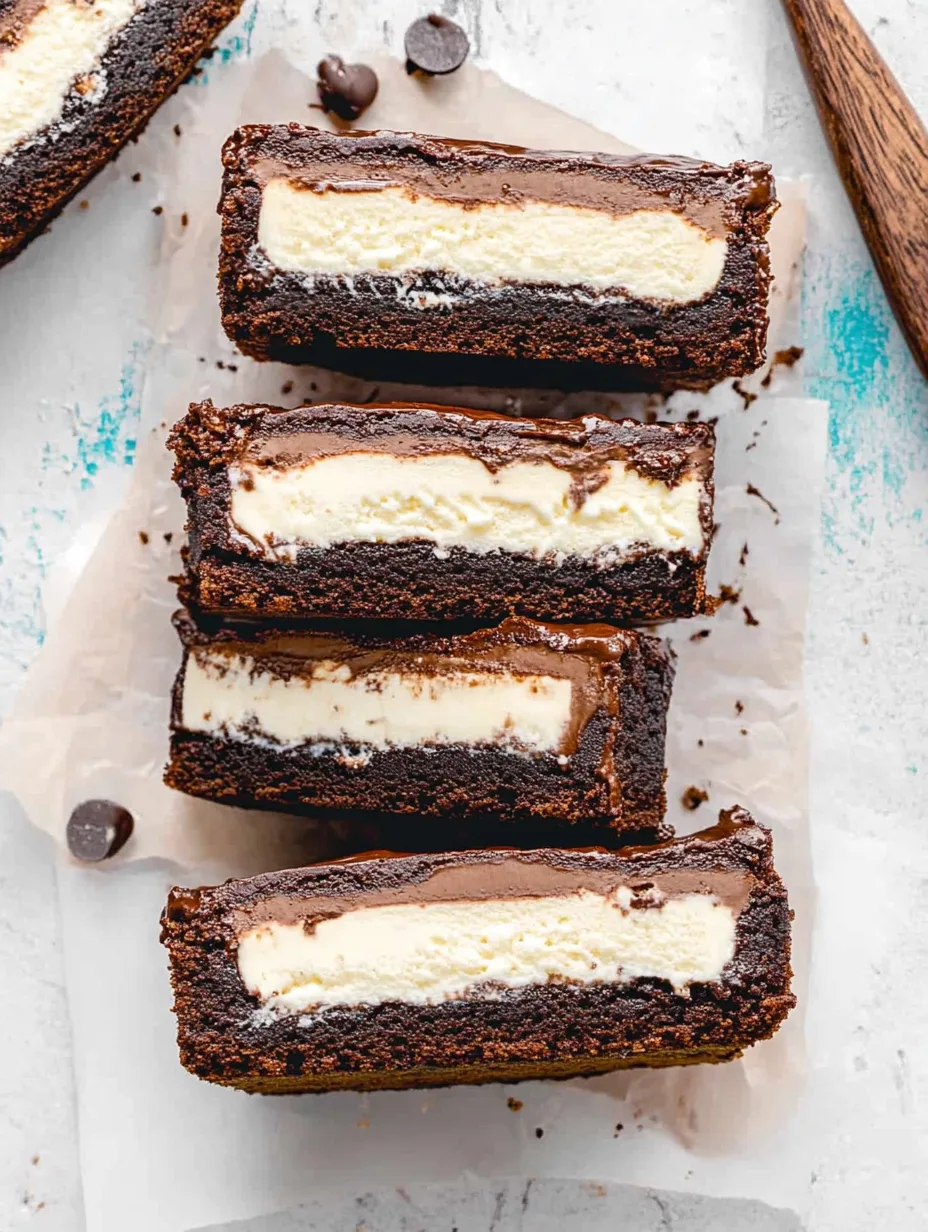
Brownie Ice Cream Sandwiches are an amazing way to indulge your sweet tooth. Combining rich, fudgy brownies with creamy ice cream creates a delightful treat that brings joy to any dessert table. This recipe is more than just a dessert; it’s a celebration of flavors and textures that will leave you craving more. Whether you’re hosting a summer gathering or simply want to pamper yourself, these sandwiches are guaranteed to impress.
The beauty of Brownie Ice Cream Sandwiches lies in their versatility. You can choose different ice cream flavors to suit your preferences, making this recipe customizable for everyone. Imagine biting into a soft brownie, only to find a cool and creamy filling. The contrast of warm and cold feels like a hug for your taste buds! Let’s explore the nuances of making this delightful treat, and you’ll soon see why these Brownie Ice Cream Sandwiches are a favorite for kids and adults alike.
Perhaps you’re wondering why this recipe stands out from the crowd. Each layer offers something unique – the dense, chocolaty brownies hold a special richness, while the ice cream adds an airy sweetness. Altogether, they form a quintessential dessert that represents warmth and comfort. Whether you indulge on your own or share with friends, making these sandwiches is an experience that brings joy and satisfaction.
In this guide, we’ll walk you through every aspect of making Brownie Ice Cream Sandwiches, from preparation to serving tips. Prepare to embark on a delicious adventure as you create your own magical treats!
Why You’ll Love This Recipe
Brownie Ice Cream Sandwiches combine treasures from two beloved desserts, creating an experience that excites the palate. Here are some fantastic reasons why you’ll adore this recipe:
1. Ultimate Indulgence – The rich chocolate flavor of brownies pairs perfectly with creamy ice cream, making every bite a delight.
2. Easily Customizable – With an array of ice cream flavors and toppings available, you can make each sandwich uniquely yours.
3. Simple to Make – Even novice bakers can perfect this recipe with straightforward steps that guide you each step of the way.
4. Perfect for Gatherings – These sandwiches make an excellent addition to any party or barbecue. They’re easy to serve and incredibly satisfying.
5. Healthier Options Available – Swap out regular ice cream for frozen yogurt or dairy-free alternatives for a lighter treat without sacrificing flavor.
6. Great for All Ages – Whether for kids or adults, everyone loves a good ice cream sandwich! They bring joy to any occasion.
These delectable treats offer a wonderful balance of flavors and textures, ensuring you’ll be reaching for seconds—and maybe thirds!
Preparation and Cooking Time
Creating these Brownie Ice Cream Sandwiches does take some time and patience, but the rewards are worth it! Here’s an overview of the time needed:
– Preparation Time: 15-20 minutes
– Baking Time: 25-30 minutes
– Cooling Time: 30 minutes
– Assembly Time: 10 minutes
– Total Time: Approximately 1 hour and 5 minutes
Keep in mind that letting the brownies cool completely is crucial for assembling your sandwiches to prevent the ice cream from melting too quickly. You can easily manage this recipe in a single afternoon!
Ingredients
– 1 cup unsalted butter, melted
– 2 cups granulated sugar
– 1 cup packed brown sugar
– 4 large eggs
– 1 teaspoon vanilla extract
– 1 cup all-purpose flour
– 1 cup unsweetened cocoa powder
– 1 teaspoon baking powder
– ½ teaspoon salt
– 2 cups ice cream (your favorite flavor)
– Whipped cream (optional)
– Chocolate syrup (optional)
Step-by-Step Instructions
Making Brownie Ice Cream Sandwiches involves a few essential steps that will guide you to creating these mouthwatering treats. Follow these instructions closely:
1. Preheat Oven: Start by preheating your oven to 350°F (175°C). Prepare a 9×13-inch baking pan by greasing it with butter or lining it with parchment paper.
2. Mix Wet Ingredients: In a large bowl, combine the melted butter, granulated sugar, and brown sugar. Stir until smooth. Add in the eggs, one at a time, mixing well after each addition. Finally, stir in the vanilla extract.
3. Combine Dry Ingredients: In another bowl, whisk together the flour, cocoa powder, baking powder, and salt until well combined.
4. Combine Mixtures: Gradually add the dry ingredients to the wet mixture, stirring until fully combined and no flour streaks remain.
5. Bake the Brownies: Pour the brownie batter into the prepared pan. Use a spatula to spread the batter evenly. Bake in the oven for 25-30 minutes. The brownies should be set but slightly gooey in the center.
6. Cool the Brownies: Once baked, remove the brownies from the oven and let them cool completely in the pan on a wire rack. This step is crucial to prevent melting the ice cream when the sandwiches are assembled.
7. Cut the Brownies: After the brownies have cooled, carefully remove them from the pan and cut them into squares or rectangular shapes, depending on how large you want your sandwich.
8. Assemble Sandwiches: Take one brownie piece and place a generous scoop of ice cream on top. Use another brownie piece to top it off, pressing slightly to seal the sandwich.
9. Freeze the Sandwiches: Place the assembled sandwiches on a baking sheet lined with parchment paper and freeze for at least an hour. This ensures they hold their shape.
10. Serve: Once frozen, remove the sandwiches from the freezer. You can drizzle them with chocolate syrup and add whipped cream if desired before serving.
How to Serve
Serving Brownie Ice Cream Sandwiches can be just as fun as making them! Here are some delightful ideas:
1. Creative Plating: Serve them on a large platter with decorative touches, like sprigs of mint or colorful fruit around the edges.
2. Pairing Options: Offer complementary flavors by pairing your sandwiches with fresh berries or even a scoop of extra ice cream on the side.
3. Flavor Options: Experiment with different ice cream flavors or toppings, such as sprinkles, crushed nuts, or a dusting of powdered sugar for added flair.
4. Make It Fun: Provide guests with fun toppings to customize their sandwiches. This allows everyone to create their perfect dessert.
5. Beverage Pairing: For an adult twist, consider pairing these sandwiches with dessert wines or coffee for a delightful after-dinner treat.
6. Portion Control: Remember, smaller portions encourage trying different flavors! Serve half sandwiches so guests can sample more than one.
By thinking creatively about how to serve them, you’ll create an experience that emphasizes enjoyment and togetherness, turning dessert time into a celebration!
Additional Tips
– Use Quality Ingredients: For the best flavor, select high-quality cocoa powder and ice cream. This will elevate the overall taste of your Brownie Ice Cream Sandwiches.
– Scoop Ice Cream Wisely: Ensure your ice cream is slightly softened before scooping. This will make it easier to spread between the brownies.
– Chill the Brownies: If you want to enhance the flavor, chill your brownies in the refrigerator before assembling the sandwiches. It gives them a firmer texture.
– Experiment With Toppings: Don’t hesitate to get creative with toppings! Crushed cookies, sprinkles, or even a dusting of sea salt can add an exciting twist.
– Cut Uniformly: For prettier presentations, use a sharp knife dipped in hot water to cut the brownies. This helps create clean edges for your sandwiches.
– Customize the Size: Tailor the size of your sandwiches based on your preference, making mini versions for bite-sized treats or larger ones for satisfying servings.
Recipe Variation
Feel free to try out these delightful variations of Brownie Ice Cream Sandwiches:
1. Peanut Butter Brownies: Add 1/2 cup of creamy peanut butter to the brownie batter for a nutty twist that pairs beautifully with chocolate and ice cream.
2. Mint Chocolate: Use mint chocolate chip ice cream to provide a refreshing contrast to the rich brownies. Add a few drops of mint extract to the brownie mix for extra minty flavor.
3. Fruit Swirl: Incorporate chopped strawberries or raspberries into the ice cream before assembling. This gives your sandwiches a fruity dimension and a pop of color.
4. Caramel Delight: Drizzle caramel sauce into the ice cream before placing it between the brownies. The sweet and salty combo will be a big hit.
5. Gluten-Free Option: Substitute regular flour with a gluten-free flour blend to cater to those with gluten sensitivities while maintaining deliciousness.
Freezing and Storage
– Storage: Keep your assembled Brownie Ice Cream Sandwiches in an airtight container in the freezer. They can maintain their quality for about 2-3 weeks.
– Pre-Assembly Options: You can freeze the brownies separately without the ice cream for up to a month, allowing you to assemble fresh sandwiches at a moment’s notice.
– Reviving Sandwiches: If the sandwiches become too hard, let them sit at room temperature for a few minutes before serving to soften slightly for an optimal eating experience.
Special Equipment
Having a few essential tools on hand will simplify the process of making your Brownie Ice Cream Sandwiches:
– Mixing Bowls: Essential for combining all ingredients efficiently.
– 9×13-inch Baking Pan: Ideal for baking your brownies evenly.
– Spatula: Useful for spreading the batter into the pan and assembling your sandwiches.
– Ice Cream Scoop: A well-sized scoop to create perfect portions of ice cream.
– Parchment Paper: Helps with easy brownie removal from the pan.
Frequently Asked Questions
Can I make these sandwiches ahead of time?
Absolutely! Assemble and freeze them a day or two in advance. They’ll be ready to serve when your guests arrive.
What are some good ice cream flavors to use?
Popular choices include vanilla, chocolate, mint chocolate chip, cookies and cream, or fruit flavors like strawberry or mango for something refreshing.
How can I prevent the brownies from sticking to the pan?
Always grease your pan or line it with parchment paper to ensure the brownies come out easily after baking.
Are Brownie Ice Cream Sandwiches messy to eat?
They can be! Provide napkins and plates for a less messy experience, as they can get a little gooey when the ice cream starts to melt.
Can I use store-bought brownies?
Certainly! If you’re in a pinch, use store-bought or boxed brownies. Just ensure they are thick enough to hold the ice cream.
Conclusion
Creating Brownie Ice Cream Sandwiches is a delightful and rewarding process. The combination of rich, fudgy brownies with creamy ice cream is an experience that captivates everyone. These sandwiches not only satisfy your sweet cravings but also provide an enjoyable activity for friends and family to share. The various customization options allow for creativity in the kitchen, making every sandwich a unique masterpiece. Whether served at parties, gatherings, or simply enjoyed at home, these treats are sure to become a cherished favorite. Get ready to embrace the joy of Brownie Ice Cream Sandwiches!
Brownie Ice Cream Sandwiches: An Incredible Ultimate Recipe
- Total Time: 52 minute
Ingredients
– 1 cup unsalted butter, melted
– 2 cups granulated sugar
– 1 cup packed brown sugar
– 4 large eggs
– 1 teaspoon vanilla extract
– 1 cup all-purpose flour
– 1 cup unsweetened cocoa powder
– 1 teaspoon baking powder
– ½ teaspoon salt
– 2 cups ice cream (your favorite flavor)
– Whipped cream (optional)
– Chocolate syrup (optional)
Instructions
Making Brownie Ice Cream Sandwiches involves a few essential steps that will guide you to creating these mouthwatering treats. Follow these instructions closely:
1. Preheat Oven: Start by preheating your oven to 350°F (175°C). Prepare a 9×13-inch baking pan by greasing it with butter or lining it with parchment paper.
2. Mix Wet Ingredients: In a large bowl, combine the melted butter, granulated sugar, and brown sugar. Stir until smooth. Add in the eggs, one at a time, mixing well after each addition. Finally, stir in the vanilla extract.
3. Combine Dry Ingredients: In another bowl, whisk together the flour, cocoa powder, baking powder, and salt until well combined.
4. Combine Mixtures: Gradually add the dry ingredients to the wet mixture, stirring until fully combined and no flour streaks remain.
5. Bake the Brownies: Pour the brownie batter into the prepared pan. Use a spatula to spread the batter evenly. Bake in the oven for 25-30 minutes. The brownies should be set but slightly gooey in the center.
6. Cool the Brownies: Once baked, remove the brownies from the oven and let them cool completely in the pan on a wire rack. This step is crucial to prevent melting the ice cream when the sandwiches are assembled.
7. Cut the Brownies: After the brownies have cooled, carefully remove them from the pan and cut them into squares or rectangular shapes, depending on how large you want your sandwich.
8. Assemble Sandwiches: Take one brownie piece and place a generous scoop of ice cream on top. Use another brownie piece to top it off, pressing slightly to seal the sandwich.
9. Freeze the Sandwiches: Place the assembled sandwiches on a baking sheet lined with parchment paper and freeze for at least an hour. This ensures they hold their shape.
10. Serve: Once frozen, remove the sandwiches from the freezer. You can drizzle them with chocolate syrup and add whipped cream if desired before serving.
- Prep Time: 15 minutes
- Cook Time: 25-30 minutes
Nutrition
- Serving Size: 12 sandwiches
- Calories: 350 kcal per sandwich
- Fat: 15g
- Protein: 5g