
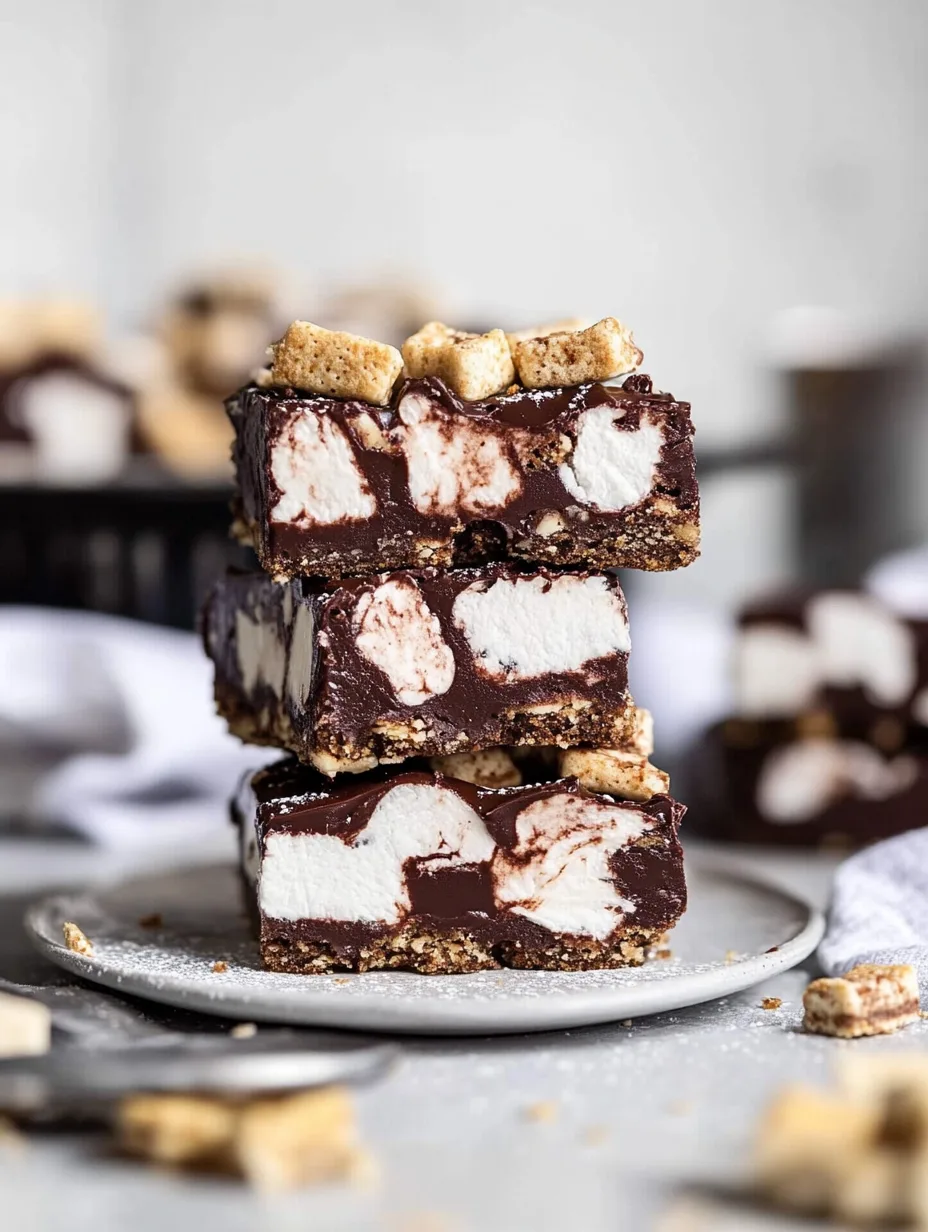
No Bake S’mores Bars are a delightful treat that brings the campfire classic right into your kitchen without the hassle of a stove. These bars deliver an amazing combination of flavors and textures, making them the ideal dessert for any occasion. Imagine biting into a sweet layer of graham crackers, gooey marshmallows, and rich chocolate, all wrapped in a perfectly blended bar. Whether you’re a s’mores fanatic or just seeking an easy and delicious dessert, this recipe is sure to impress your family and friends.
S’mores have long been associated with summer campouts and cozy bonfire nights, evoking memories of sticky fingers and laughter under the stars. With No Bake S’mores Bars, you can enjoy that nostalgia anytime, anywhere. The best part? You don’t need a campfire to make them! This recipe is straightforward, quick, and requires no baking—so you can whip up a batch in no time.
In this article, you’ll discover why this No Bake S’mores Bars recipe is a must-try, how to prepare it step by step, and tips on serving it perfectly. This is a dessert that brings joy not just through its delightful flavors but also thanks to its incredible simplicity. It’s perfect for gatherings, potlucks, or even just a relaxing evening at home. Let’s dive into the world of these decadent, no-bake treats!
Why You’ll Love This Recipe
No Bake S’mores Bars offer a satisfying taste experience that appeals to all ages. Here are a few reasons why this recipe will become a favorite in your kitchen:
1. Simple Ingredients: The ingredients are likely staples in your pantry, making it easy to whip up whenever a craving strikes.
2. Quick Preparation: With no cooking involved, you can prepare these bars in less than 30 minutes.
3. Versatile Flavor: You can customize your bars by adding toppings such as nuts, caramel, or different types of chocolate.
4. Perfect for Any Occasion: Whether it’s a family gathering, a birthday party, or just a treat for yourself, these bars are delightful.
5. Crowd-Pleaser: Everyone loves s’mores, and these bars are no exception. They’re sure to vanish quickly.
6. No Special Equipment Needed: You won’t need any fancy kitchen gadgets, just a mixing bowl and a pan.
These characteristics combine to make No Bake S’mores Bars an incredible dessert option for any home chef.
Preparation and Cooking Time
This recipe is designed to be quick and enjoyable. Here’s a breakdown of the time involved:
– Preparation Time: 20 minutes
– Chilling Time: 2 hours
– Total Time: 2 hours and 20 minutes
The short preparation time paired with the delightful outcome makes No Bake S’mores Bars a fantastic choice for dessert anytime!
Ingredients
– 2 cups graham cracker crumbs
– ½ cup unsweetened cocoa powder
– ½ cup unsalted butter, melted
– 1 cup powdered sugar
– 2 cups mini marshmallows
– 1 cup semi-sweet chocolate chips
– ½ cup milk chocolate chips (optional)
– Extra mini marshmallows and chocolate for topping (optional)
Step-by-Step Instructions
Creating No Bake S’mores Bars is a breeze if you follow these simple steps:
1. Prepare the Pan: Line a 9×9-inch square pan with parchment paper or grease it lightly with cooking spray.
2. Mix Graham Cracker Mixture: In a mixing bowl, combine graham cracker crumbs, cocoa powder, and melted butter. Mix well until fully combined and crumbly.
3. Add Sugar: Stir in the powdered sugar until the mixture becomes cohesive.
4. Press Into Pan: Transfer the mixture to the prepared pan and press down firmly with your hands to create an even layer.
5. Melt Chocolate: In a microwave-safe bowl, combine the mini marshmallows and semi-sweet chocolate chips. Microwave in 30-second intervals, stirring in between, until fully melted and smooth.
6. Spread Marshmallow Mixture: Pour the melted chocolate and marshmallow mixture over the graham cracker base, spreading it evenly.
7. Add Toppings: If desired, sprinkle additional mini marshmallows and chocolate chips on top.
8. Chill: Place the pan in the refrigerator for at least 2 hours or until the bars are set and firm.
9. Slice and Serve: Once chilled, lift the bars out of the pan using the parchment paper. Cut into squares or rectangles.
10. Enjoy: Serve chilled and enjoy your delicious No Bake S’mores Bars!
These steps ensure that your S’mores Bars turn out perfectly every time, with a rich and satisfying flavor.
How to Serve
Serving No Bake S’mores Bars is just as fun as making them! Consider these tips to elevate the experience:
1. Presentation: Arrange the bars on a decorative platter. Dust them with powdered sugar for a touch of elegance.
2. Pairing Options: Serve with a side of whipped cream or chocolate sauce for drizzling. Fresh berries also add a delightful contrast.
3. S’mores Theme: Set up a s’mores-themed dessert table with additional ingredients like graham crackers or chocolate for dipping.
4. Beverage Pairing: These bars go wonderfully with milk, coffee, or even a fun mocktail, enhancing the overall experience.
5. Storage: If you have leftovers, store them in an airtight container in the refrigerator. They can last up to a week—though they’ll likely be gone much sooner!
By following these serving suggestions, you’ll create an inviting atmosphere that complements the sweetness of your No Bake S’mores Bars. Whether sharing with friends or indulging alone, these bars promise a delightful experience!
In conclusion, No Bake S’mores Bars are an amazing and effortless way to enjoy the classic flavors of s’mores without the need for a campfire. With a few simple ingredients and steps, you can create a delicious treat that appeals to all. Perfect for any occasion, these bars will surely become a favorite in your home. Enjoy making and sharing this incredible recipe!
Additional Tips
– Use Quality Ingredients: For the best flavor, opt for high-quality graham crackers, chocolate, and mini marshmallows. The quality of ingredients greatly enhances the overall taste of your No Bake S’mores Bars.
– Allow to Chill Thoroughly: Be patient during the chilling stage. This ensures the bars set properly and makes them easier to cut into clean squares.
– Experiment with Toppings: Consider adding a drizzle of caramel, a sprinkle of sea salt, or crushed candy bars for extra flavor and crunch.
– Make It Fun: Involve kids in the preparation process to make it a fun family activity. They can help mix ingredients or add toppings.
– Cut Evenly: Use a sharp knife and a sawing motion to cut the bars for neat squares, ensuring that everyone gets the perfect portion.
Recipe Variation
Feel free to switch things up! Here are some delicious variations to try:
1. Nutty S’mores Bars: Add chopped nuts such as pecans or walnuts to the graham cracker mixture for added crunch.
2. Peanut Butter Twist: Mix in some creamy or crunchy peanut butter into the chocolate and marshmallow layer for a rich, nutty flavor.
3. Dark Chocolate Delight: Use dark chocolate chips instead of semi-sweet for a more intense chocolate flavor.
4. Tropical S’mores: Incorporate toasted coconut flakes into the graham cracker crust for a tropical flair.
5. Fruit-Infused: Layer in some fresh sliced bananas or strawberries between the graham cracker base and the chocolate mixture for a fruity touch.
Freezing and Storage
– Storage: Keep your No Bake S’mores Bars covered in an airtight container in the refrigerator. They will last about a week.
– Freezing: You can freeze individual bars for up to three months. Wrap each one in plastic wrap, then place them in a freezer-safe bag to prevent freezer burn. When ready to enjoy, simply thaw in the refrigerator before serving.
Special Equipment
While this recipe is easy to whip up without special equipment, here are a few items that can make the process smoother:
– Mixing bowls for combining the ingredients.
– A microwave-safe bowl for melting chocolate and marshmallows.
– A sharp knife for cutting the bars.
– A 9×9-inch square pan for setting the mixture.
Frequently Asked Questions
Can I make these bars gluten-free?
Yes! Use gluten-free graham crackers to create a gluten-free version of these delicious bars.
Can I add other flavors?
Absolutely! Feel free to experiment with flavored chocolate chips, like mint or butterscotch, for a unique twist.
How do I know when the bars are ready?
The bars are ready when they are firm to the touch and have set in the refrigerator. Give them at least two hours to chill completely.
Can I use regular marshmallows instead of mini?
Yes, you can use regular marshmallows; just chop them into smaller pieces for even distribution in the bars.
What if I don’t have cocoa powder?
If you don’t have cocoa powder on hand, you can omit it and use additional graham cracker crumbs for a simpler, classic s’mores flavor.
Conclusion
In summary, No Bake S’mores Bars are a quick and delightful dessert that embodies the nostalgic flavors of the campfire classic. With minimal effort and time required, you can create a treat that pleases both kids and adults alike. Their versatility means you can easily customize the recipe to suit your personal tastes or dietary needs. Whether served at a summer gathering, a family dessert night, or simply enjoyed at home, these bars are sure to become a staple in your kitchen. Get ready to savor every bite of this irresistible sweet treat!
No Bake S’mores Bars: An Incredible Ultimate Recipe
- Total Time: 31 minute
Ingredients
– 2 cups graham cracker crumbs
– ½ cup unsweetened cocoa powder
– ½ cup unsalted butter, melted
– 1 cup powdered sugar
– 2 cups mini marshmallows
– 1 cup semi-sweet chocolate chips
– ½ cup milk chocolate chips (optional)
– Extra mini marshmallows and chocolate for topping (optional)
Instructions
Creating No Bake S’mores Bars is a breeze if you follow these simple steps:
1. Prepare the Pan: Line a 9×9-inch square pan with parchment paper or grease it lightly with cooking spray.
2. Mix Graham Cracker Mixture: In a mixing bowl, combine graham cracker crumbs, cocoa powder, and melted butter. Mix well until fully combined and crumbly.
3. Add Sugar: Stir in the powdered sugar until the mixture becomes cohesive.
4. Press Into Pan: Transfer the mixture to the prepared pan and press down firmly with your hands to create an even layer.
5. Melt Chocolate: In a microwave-safe bowl, combine the mini marshmallows and semi-sweet chocolate chips. Microwave in 30-second intervals, stirring in between, until fully melted and smooth.
6. Spread Marshmallow Mixture: Pour the melted chocolate and marshmallow mixture over the graham cracker base, spreading it evenly.
7. Add Toppings: If desired, sprinkle additional mini marshmallows and chocolate chips on top.
8. Chill: Place the pan in the refrigerator for at least 2 hours or until the bars are set and firm.
9. Slice and Serve: Once chilled, lift the bars out of the pan using the parchment paper. Cut into squares or rectangles.
10. Enjoy: Serve chilled and enjoy your delicious No Bake S’mores Bars!
These steps ensure that your S’mores Bars turn out perfectly every time, with a rich and satisfying flavor.
- Prep Time: 20 minutes
- Cook Time: N/A
Nutrition
- Serving Size: 16 bars
- Calories: 250 kcal
- Fat: 12g
- Protein: 2g