
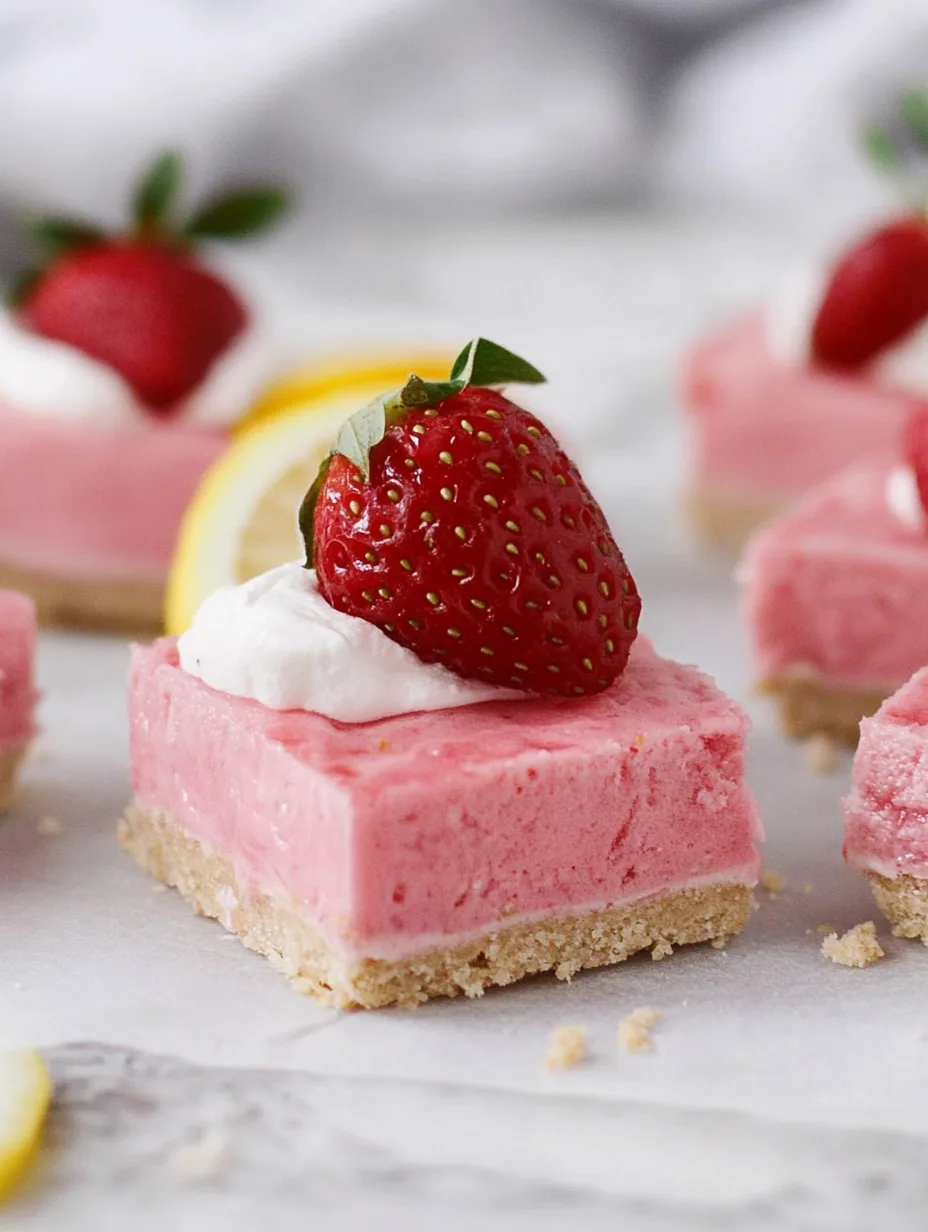
Frozen Strawberry Lemonade Bars are a refreshing, tangy treat perfect for hot summer days. Imagine biting into a sweet and tart frozen delight that offers the perfect balance of flavors in every bite. These bars are not only delicious but also incredibly easy to make, requiring very little time in the kitchen. They’re a fantastic option for gatherings, picnics, or just as a satisfying dessert for yourself. If you’re looking for a way to cool down and indulge at the same time, you’ve come to the right place!
These bars combine the juicy sweetness of strawberries with the bright zing of lemonade, creating an incredible frozen dessert that will leave you craving more. The combination of flavors is so vibrant that every bite feels like a burst of sunshine. If you’ve ever had a cold glass of strawberry lemonade on a hot day, you can imagine how delightful these bars are! They’re perfect for anyone — whether you’re a fan of fruit desserts or simply looking for something to satisfy a sweet tooth.
In this article, we will take you through the reasons why you’ll love these Frozen Strawberry Lemonade Bars, important preparation and cooking times, a detailed list of ingredients, and thorough step-by-step instructions to guide you to create this wonderful dessert. Get ready to enjoy something truly mouth-watering!
Why You’ll Love This Recipe
Frozen Strawberry Lemonade Bars are more than just dessert; they embody the essence of summer with their refreshing flavor profile. Here are some reasons why you’ll fall in love with this recipe:
1. Simple Ingredients: Most of these ingredients can be found in your pantry or local grocery store, making it easy to whip up.
2. Refreshing Flavor: The combination of strawberries and lemonade is a perfect blend of sweet and tart, ideal for beating the heat.
3. Perfect for Any Occasion: Whether it’s a backyard barbecue, a picnic, or just an afternoon treat, these bars fit seamlessly into any event.
4. Kid-Friendly: Children love the bright color and fruity flavors, making it a hit for family gatherings.
5. Healthy Option: Made with fresh fruit and minimal added sugar, these bars can be a healthier dessert choice.
6. Easy to Prepare: With straightforward steps, even novice bakers can create these incredible treats without any hassle.
With these factors in mind, it’s easy to see why Frozen Strawberry Lemonade Bars are not just a treat but a memorable experience that brings people together.
Preparation and Cooking Time
Creating these Frozen Strawberry Lemonade Bars is simple and quick. Here’s a breakdown of the time required:
– Preparation Time: 15 minutes
– Freezing Time: 4–6 hours (or overnight for best results)
– Total Time: Approximately 4 hours and 15 minutes (including freezing).
These times may vary slightly based on your kitchen equipment and the temperature of your ingredients. However, the vibrant flavors of these bars are definitely worth the wait!
Ingredients
– 2 cups fresh strawberries, hulled and chopped
– 1 cup freshly squeezed lemon juice (about 4-6 lemons)
– 1 cup granulated sugar
– 1 cup water
– 1 cup heavy whipping cream
– 1 teaspoon vanilla extract
– A pinch of salt
Step-by-Step Instructions
Making these Frozen Strawberry Lemonade Bars is straightforward. Follow these simple steps to create your delicious treats:
1. Prepare the Strawberries: In a blender, combine the chopped strawberries and blend until smooth. Set aside.
2. Make the Lemonade Mixture: In a saucepan, combine the granulated sugar and water. Heat over medium heat, stirring occasionally until the sugar has dissolved. Remove from heat and let it cool slightly.
3. Combine Ingredients: In a large bowl, combine the fresh lemon juice, blended strawberries, heavy whipping cream, and vanilla extract. Mix until well combined.
4. Add Sugar Water: Slowly pour the cooled sugar-water mixture into the bowl, stirring continuously until everything is fully incorporated.
5. Taste Test: At this point, taste the mixture and adjust sweetness or tartness as desired by adding more sugar or lemon juice. This step is important to ensure your bars have the right flavor balance.
6. Pour into Pan: Line an 8×8 inch baking pan with parchment paper and pour the mixture into it, smoothing the top with a spatula.
7. Freeze: Cover the pan with plastic wrap and place it in the freezer. Allow it to freeze for at least 4 to 6 hours, or overnight for the best results.
8. Cut into Bars: Once fully frozen, remove the pan from the freezer. Lift the parchment paper to remove the frozen block. Cut into squares or rectangles using a sharp knife.
9. Serve: Return the bars to the freezer for a few minutes, then serve immediately or store them in an airtight container in the freezer until ready to serve.
How to Serve
Presenting your Frozen Strawberry Lemonade Bars effectively can enhance their appeal. Here are some tips for serving:
1. Garnish: Consider garnishing each bar with a fresh strawberry slice or a sprig of mint to add a decorative touch.
2. Serving Platter: Use a vibrant platter to display the colorful bars beautifully. A clear glass tray can make them look even more appealing.
3. Pairing: Pair the bars with a refreshing beverage, such as iced tea or lemonade, to complement their tangy flavor.
4. Portion Size: Offer smaller portions to encourage guests to go back for seconds! This will also allow everyone to enjoy a variety of treats.
5. Storage: If you have leftovers, store them in a well-sealed container to maintain their freshness. They can last for several weeks.
By following these serving suggestions, you can elevate the entire experience of enjoying these incredible Frozen Strawberry Lemonade Bars and create lasting memories with family and friends. Enjoy!
Additional Tips
– Use Fresh Strawberries: For the best flavor, choose ripe, sweet strawberries. They will enhance the taste of your Frozen Strawberry Lemonade Bars.
– Chill Your Ingredients: Ensure that your heavy cream and other ingredients are cold before mixing. This can help them incorporate better and create a creamier texture.
– Adjust the Tartness: If you prefer a slightly sweeter bar, feel free to add more sugar to the lemonade mixture. Conversely, you can increase the lemon juice for an extra tang.
Recipe Variation
Experimenting with flavors can provide delicious twists! Here are a few variations to try:
1. Berry Medley: Substitute half of the strawberries with other berries, such as raspberries or blueberries, for an added flavor dimension.
2. Coconut Twist: Replace some of the heavy cream with coconut cream for a tropical flair.
3. Minty Fresh: Add fresh mint leaves while blending the strawberries to give your bars a refreshing hint of mint.
Freezing and Storage
– Storage: Keep the Frozen Strawberry Lemonade Bars in an airtight container in the freezer for optimal freshness. They can last for up to three weeks.
– Thawing: If you need to thaw the bars, do so by placing them in the refrigerator for about 30 minutes before serving. This makes them easier to cut and enjoy.
Special Equipment
To successfully prepare these delicious bars, you may need:
– Blender: For smooth strawberry puree.
– Saucepan: To dissolve sugar in water for the lemonade mixture.
– Baking Pan: An 8×8 inch pan is perfect for setting the bars.
Frequently Asked Questions
Can I use frozen strawberries for this recipe?
Yes, you can use frozen strawberries! Just allow them to thaw and drain excess liquid before blending.
How do I know when the bars are fully frozen?
When the bars are firm to the touch and have set completely, they are ready to be cut and served.
Can I add alcohol to these bars?
For an adult twist, consider adding a splash of vodka or rum to the mixture before freezing.
What if I don’t have a blender?
You can mash the strawberries by hand using a fork, but the texture will be less smooth.
Can I make these bars dairy-free?
Yes! Use coconut cream instead of heavy cream, and ensure that all other ingredients are dairy-free.
Conclusion
Frozen Strawberry Lemonade Bars are the ultimate summer treat, bursting with flavor and refreshingly light. Their simple preparation and delightful taste make them perfect for any occasion, from family gatherings to quiet evenings at home. Indulging in these bars is a fantastic way to cool down on a hot day while enjoying the vibrant flavors of fresh strawberries and zesty lemonade. With just a few ingredients and steps, you can create a memorable dessert that everyone will love. So, embrace the summer vibes and whip up a batch of these irresistible Frozen Strawberry Lemonade Bars today!
Frozen Strawberry Lemonade Bars: An Amazing Ultimate Recipe
- Total Time: 16 minute
Ingredients
– 2 cups fresh strawberries, hulled and chopped
– 1 cup freshly squeezed lemon juice (about 4-6 lemons)
– 1 cup granulated sugar
– 1 cup water
– 1 cup heavy whipping cream
– 1 teaspoon vanilla extract
– A pinch of salt
Instructions
Making these Frozen Strawberry Lemonade Bars is straightforward. Follow these simple steps to create your delicious treats:
1. Prepare the Strawberries: In a blender, combine the chopped strawberries and blend until smooth. Set aside.
2. Make the Lemonade Mixture: In a saucepan, combine the granulated sugar and water. Heat over medium heat, stirring occasionally until the sugar has dissolved. Remove from heat and let it cool slightly.
3. Combine Ingredients: In a large bowl, combine the fresh lemon juice, blended strawberries, heavy whipping cream, and vanilla extract. Mix until well combined.
4. Add Sugar Water: Slowly pour the cooled sugar-water mixture into the bowl, stirring continuously until everything is fully incorporated.
5. Taste Test: At this point, taste the mixture and adjust sweetness or tartness as desired by adding more sugar or lemon juice. This step is important to ensure your bars have the right flavor balance.
6. Pour into Pan: Line an 8×8 inch baking pan with parchment paper and pour the mixture into it, smoothing the top with a spatula.
7. Freeze: Cover the pan with plastic wrap and place it in the freezer. Allow it to freeze for at least 4 to 6 hours, or overnight for the best results.
8. Cut into Bars: Once fully frozen, remove the pan from the freezer. Lift the parchment paper to remove the frozen block. Cut into squares or rectangles using a sharp knife.
9. Serve: Return the bars to the freezer for a few minutes, then serve immediately or store them in an airtight container in the freezer until ready to serve.
- Prep Time: 15 minutes
- Cook Time: Total Time: 4 hours 15 minutes
Nutrition
- Serving Size: 9 bars
- Calories: 150 kcal
- Fat: 5g
- Protein: 1g