
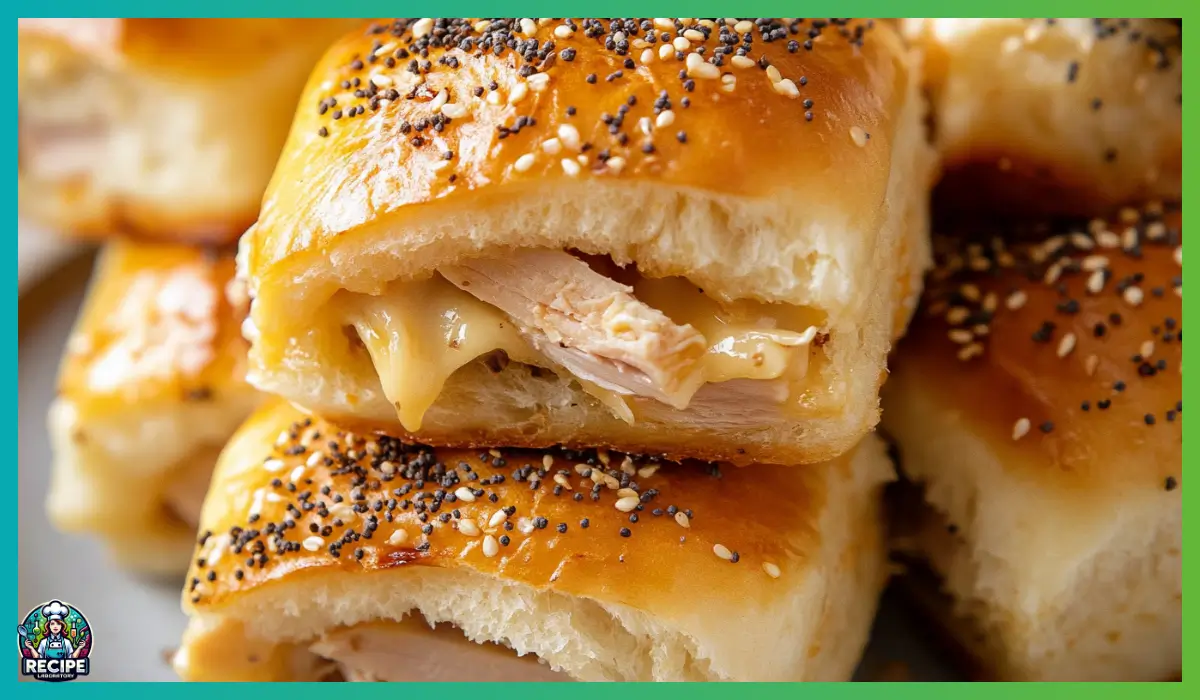
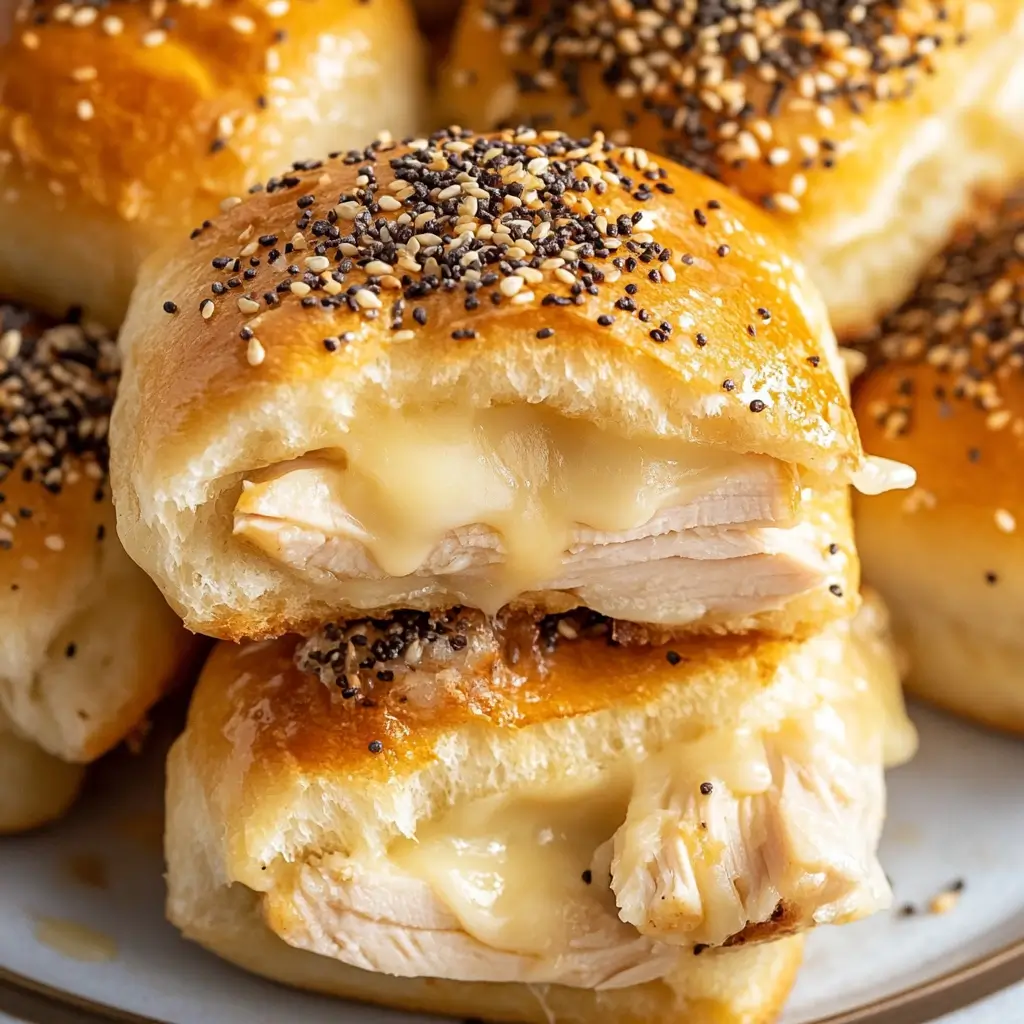
There’s something undeniably comforting about biting into a warm, gooey slider. The melty cheese, the tender oven-roasted turkey, and the soft, pillowy Hawaiian rolls all come together to create something greater than the sum of its parts. But what really takes these sliders over the top is the buttery sauce that soaks into the bread while it bakes. It’s tangy, slightly sweet, and packed with flavor thanks to Dijon mustard, Worcestershire sauce, dried onions, and a pinch of brown sugar. Each bite of these Oven baked sliders delivers a perfect balance of creamy, savory, and just the tiniest hint of sweetness.
These turkey and cheese sliders are the kind of food that makes people gather around the kitchen island and hover until the tray hits the table. Whether it’s game night, a casual get-together, a potluck, or just a cozy Sunday dinner with your family, these sliders are always a hit. They’re easy to make in a single baking dish, feed a crowd with minimal effort, and reheat like a dream if you’re lucky enough to have leftovers.
I first made these for a small family gathering when I didn’t want to fuss with a bunch of dishes but still wanted something warm and satisfying. To my surprise, the tray disappeared faster than anything I’ve ever served. My little nieces, my picky brother-in-law, and even my grandmother asked for seconds—and that rarely happens all at once. Since then, these sliders have become a regular in my home, especially when I need something quick, comforting, and shareable.
If you’re new to cooking or you’ve never made sliders before, don’t worry. This recipe is foolproof. It’s perfect for beginners and flexible enough to tweak to your taste. So, whether you’re cooking for a crowd or just want something special for dinner tonight, let me walk you through why this recipe belongs in your regular rotation.
Why You’ll Love This Oven baked sliders Recipe
One of the best things about these turkey and cheese sliders is how they check all the boxes: they’re delicious, easy, family-friendly, and just a little indulgent. Let’s start with how simple they are to put together. No complicated prep, no fancy equipment—just basic ingredients layered in a baking dish and popped into the oven. It’s the kind of recipe that’s hard to mess up, which means less stress and more confidence in the kitchen.
These sliders are also endlessly crowd-pleasing. Kids love the soft rolls and gooey cheese, while adults appreciate the flavorful butter sauce that elevates them beyond a basic sandwich. The combination of savory turkey and melty Havarti or Swiss cheese is classic, but it’s the sauce that really ties everything together. Dijon mustard adds tang, brown sugar brings balance, and Worcestershire sauce and dried onions give it that deep, savory flavor that makes you go back for seconds. And if you want to add a little extra texture, a sprinkle of everything bagel seasoning on top gives it a slight crunch and extra flavor in every bite.
What’s more, these sliders are great for meal prep and make-ahead situations. You can assemble them ahead of time and just bake them off when you’re ready to serve. They’re easy to scale up or down depending on how many people you’re feeding, and they reheat surprisingly well in the oven or microwave.
If you’re looking for a versatile dish that can serve as a main course, a hearty snack, or a party appetizer, these sliders are a must-try. They’re satisfying without being too heavy, flavorful without requiring hours in the kitchen, and guaranteed to bring people together. From busy weeknights to relaxed weekends, they fit into just about any meal plan—and once you’ve tried them, they’re bound to become a regular request in your household.
Health Benefits of these Oven baked sliders
While these sliders lean into comfort food territory, there are still several reasons to feel good about serving them. Let’s start with the turkey. Oven-roasted turkey is a lean protein source, meaning it provides all the essential amino acids your body needs without the high saturated fat content found in red meats. It’s a great option for anyone looking to maintain heart health, manage weight, or simply include more lean protein in their meals.
Next, the cheese. Havarti and Swiss cheese are both good sources of calcium, which is essential for strong bones and healthy teeth. They also offer protein and fat, which help keep you full and satisfied. If you’re watching your sodium or fat intake, you can choose reduced-sodium turkey and opt for lighter cheese versions without sacrificing too much flavor.
Now, let’s talk about the bread. Hawaiian rolls do add some sweetness and carbs, but they also provide energy. If you’re looking to increase fiber, you could swap in whole wheat slider buns or use half a roll per slider to reduce the carb load while still enjoying the flavor.
One of the most unique aspects of this recipe is the butter sauce, which includes Dijon mustard, a condiment made from mustard seeds that are high in selenium and magnesium—both important minerals for immune and metabolic function. Worcestershire sauce contains fermented ingredients that may support gut health, though it should be used in moderation due to its sodium content.
You can also modify this recipe to be a little lighter if desired. Try using olive oil in place of some of the butter, or reduce the amount of sauce if you prefer something a little less rich. You could even add some fresh spinach or arugula in the turkey layer to introduce leafy greens and boost nutrients without disrupting the flavor balance.
In moderation, these sliders can be part of a well-rounded diet. They’re hearty enough to satisfy cravings, packed with protein, and offer options for customization that suit different nutritional needs. As always, balance is key—and these sliders are an easy, delicious way to treat yourself while still making smart choices.
Preparation Time, Servings, and Nutritional Information of these Oven baked sliders
Total Time: 30 minutes
Prep Time: 10 minutes
Cook Time: 17 minutes (14 minutes covered, 3 minutes uncovered)
Servings: Makes 12 sliders
Each slider contains approximately:
Calories: 285
Protein: 14g
Carbohydrates: 22g
Fat: 15g
Fiber: 1g
Sugar: 4g
Sodium: 480mg
This recipe is ideal for feeding a family of four to six, especially when paired with a salad or side dish. If you’re hosting a larger group, simply double the recipe and use two baking dishes side by side. The short cooking time makes it easy to bake multiple batches if needed, and because the sliders are so simple to assemble, prepping them ahead of time won’t leave you scrambling in the kitchen.
In terms of kitchen tools, all you really need is a 9×13-inch baking dish, a sharp knife to slice the rolls, and a small bowl for mixing the sauce. That’s it. No mixers, food processors, or fancy gadgets required.
Ingredients List of these Oven baked sliders
To make these irresistible turkey and cheese sliders, here’s what you’ll need:
Main Ingredients
12 Hawaiian rolls – These are soft, sweet, and the perfect size for sliders. Their slightly sweet flavor complements the savory turkey and cheese beautifully.
½ pound sliced oven-roasted turkey – Go for deli-style turkey that’s sliced medium-thin. You want enough to add substance without overwhelming the bread.
10 slices Havarti or Swiss cheese – Havarti melts beautifully and has a mild, creamy flavor. Swiss is a classic pairing with turkey and brings a nutty depth.
Butter Sauce Ingredients
¾ cup (1½ sticks) unsalted butter – This is the base of the sauce, giving it richness and helping it soak into the rolls.
3 tablespoons Dijon mustard – Adds tang and sharpness to balance the sweetness of the rolls.
1 tablespoon packed brown sugar – Offers a touch of sweetness that rounds out the sauce.
2 teaspoons Worcestershire sauce – Brings that deep, umami flavor that ties everything together.
2 teaspoons dried minced onion – Adds savory onion flavor without needing to chop anything fresh.
½ teaspoon salt – Just enough to enhance the other flavors.
Optional Topping
Everything bagel seasoning – A flavorful, crunchy topping that adds texture and a hint of garlic, sesame, and onion to each bite.
If you need to make substitutions, you absolutely can. Use whole grain slider buns for more fiber, smoked turkey for a richer flavor, or a combination of cheeses for a fun twist. You can even swap in roasted chicken if that’s what you have on hand. This recipe is incredibly flexible and adapts well to different ingredients based on your preferences or what’s in your fridge.
Step-By-Step Cooking Instructions of these Oven baked sliders
Making these turkey and cheese sliders is as easy as layering a few delicious ingredients and letting the oven do the rest. Whether you’re an experienced home cook or still getting comfortable in the kitchen, this step-by-step guide will walk you through the process with confidence and clarity.
Step 1: Preheat and Prepare Your Baking Dish
Start by preheating your oven to 350°F (175°C). This ensures your sliders will bake evenly and get that perfect golden brown finish on top.
Next, grab a 9×13-inch baking dish and grease it lightly. You can use cooking spray, butter, or a little bit of oil—whatever you prefer. This step keeps the bottom rolls from sticking and helps them get slightly crisp.
Step 2: Slice the Hawaiian Rolls
Without separating the rolls, take a serrated knife and slice the entire loaf of Hawaiian rolls in half horizontally. The goal is to have one large top half and one large bottom half, similar to slicing a bagel.
Be gentle and go slow—you want the rolls to stay connected. Place the bottom half into your greased baking dish. This forms the base of your sliders and will absorb all the delicious flavors.
Step 3: Add the First Layer of Cheese
Now it’s time to start building. Lay down about half of your cheese slices directly onto the bottom half of the rolls. You want the slices to slightly overlap and cover the surface from edge to edge.
This first layer of cheese acts as a barrier to keep the bottom rolls from getting soggy, while also adding creaminess to every bite.
Step 4: Layer the Oven-Roasted Turkey
Next, evenly layer the sliced turkey over the cheese. You can fold or slightly bunch the slices to give the sliders more height and texture. Don’t worry about being overly precise here—just make sure the turkey is spread across the entire surface.
Use the full ½ pound for a generous filling. If you prefer extra meaty sliders, feel free to add more turkey, but remember that too much filling can make the rolls slide around when baking.
Step 5: Add the Second Layer of Cheese
Top the turkey with the remaining cheese slices, making sure to cover the turkey completely. This second layer will melt down into the turkey, helping to bind everything together. It also gives the sliders that irresistible cheese pull when you separate them later.
Step 6: Replace the Top Halves of the Rolls
Carefully place the top half of the rolls over your cheese and turkey layers. Try to line them up with the bottom rolls so that each slider has a neat top and bottom. Gently press down to secure the layers together, but don’t flatten them too much.
Step 7: Prepare the Butter Sauce
Now, let’s make the flavorful butter sauce. In a microwave-safe bowl, add ¾ cup of unsalted butter and microwave it until melted, about 45–60 seconds.
Once melted, whisk in the Dijon mustard, brown sugar, Worcestershire sauce, dried minced onion, and salt. Stir until everything is well combined.
This sauce might seem simple, but it brings huge flavor. The mustard gives it a tangy kick, the sugar adds balance, and the Worcestershire adds umami depth that ties everything together beautifully.
Step 8: Pour the Sauce Over the Sliders
Using a spoon or small ladle, pour the butter sauce evenly over the top of the sliders. Make sure to cover the tops of all the rolls and let some of the sauce drip down the sides. Use a brush if needed to help spread it out evenly.
Don’t worry if it looks like a lot of sauce—it will soak into the bread as it bakes, creating a rich, flavorful crust.
Step 9: Optional – Sprinkle Everything Bagel Seasoning
If you’re using everything bagel seasoning, now’s the time to sprinkle it on top. Just a light dusting over the rolls will add a burst of flavor and a bit of crunch. This step is optional but highly recommended for added texture and visual appeal.
Step 10: Cover and Bake
Cover your baking dish with aluminum foil. This traps the heat and helps the sliders bake evenly without drying out.
Bake in your preheated oven for 14 minutes. This allows the cheese to melt and the sauce to soak in.
After 14 minutes, remove the foil and continue baking uncovered for another 3 minutes. This step helps the tops get golden and slightly crisp.
Step 11: Slice and Serve
Once out of the oven, let the sliders rest for a minute or two. This makes them easier to slice and handle.
Use a sharp knife or spatula to cut between the rolls, separating them into individual sliders.
Serve warm, and watch them disappear faster than you can plate them.
How to Serve these Oven baked sliders
There are so many ways to serve these sliders, and that’s part of what makes them so versatile. Whether you’re setting them out for a party or plating them up for dinner, here are some fun and practical ideas to present them:
Serve them straight from the baking dish – If you’re hosting a casual event or game day party, leave the sliders in the baking dish and let guests serve themselves. Just place a spatula nearby and some small plates, and they’re good to go.
Plate with dipping sauces – While these sliders are flavorful on their own, they pair well with sauces like honey mustard, ranch dressing, or a light garlic aioli. Put out a few options for dipping to add variety.
Pair with sides – These sliders can stand alone as a main course or be served as part of a larger meal. A crisp salad, creamy coleslaw, or oven-roasted vegetables round them out beautifully.
Make it a full meal – For a satisfying dinner, serve the sliders with sweet potato fries, a fruit salad, or even a hearty soup like tomato basil or butternut squash.
Mini platter presentation – Arrange the sliders on a large wooden board with some grapes, sliced cucumbers, or chips around the edges. It looks impressive and makes entertaining feel effortless.
Kid-friendly setup – If you’re serving these to children, consider slicing them in half so they’re easier for small hands to handle. Pair with baby carrots, apple slices, or a small cup of yogurt for a balanced kids’ meal.
No matter how you serve them, the key is to enjoy them warm and fresh from the oven. That’s when the cheese is melty, the butter has soaked perfectly into the bread, and the flavors are at their peak.
Pairing Suggestions
The beauty of these sliders is that they can be dressed up or down depending on the occasion. Here are some of my favorite ways to pair them with drinks and sides for a complete and satisfying meal:
Side Dish Pairings
Crispy potato wedges – The savory richness of the sliders pairs perfectly with oven-roasted or air-fried wedges. Sprinkle with herbs or a bit of smoked paprika for added flavor.
Fresh green salad – A simple arugula salad with lemon vinaigrette provides a fresh, peppery contrast to the warm, buttery sliders. This pairing keeps the meal balanced and light.
Coleslaw – Creamy or vinegar-based coleslaw offers crunch and tang, which complements the soft texture and rich flavor of the sliders beautifully.
Macaroni salad – For a cookout or picnic vibe, creamy macaroni salad works wonderfully. The cool pasta salad adds a comforting contrast to the warm sliders.
Sweet corn on the cob – Especially during summer months, fresh corn on the cob brushed with a little garlic butter makes a great companion dish.
Drink Pairings (Non-Alcoholic)
Iced tea – A lightly sweetened black tea or a refreshing citrus herbal blend helps cut through the richness of the sliders.
Sparkling lemonade – The bubbles and tartness from fresh lemon juice add brightness and keep your palate refreshed.
Apple cider – Especially in the cooler months, warm or chilled apple cider enhances the autumnal feel of the meal.
Pomegranate juice spritzer – For a fruity twist, mix pomegranate juice with sparkling water for a tangy, fizzy beverage that pairs well with savory dishes.
Kids’ Pairings
Serve with milk, fruit juice, or even a berry smoothie. Add carrot sticks or applesauce on the side for a fun, wholesome kids’ plate.
These pairings help turn simple sliders into an unforgettable meal. Whether you’re serving a crowd or just making a cozy dinner for two, pairing the sliders with thoughtful sides and drinks makes the experience feel special.
Storage, Freezing & Reheating Instructions
One of the best things about these turkey and cheese sliders—besides how delicious they are—is how well they store and reheat. Whether you’re making them ahead for a party, stashing leftovers for lunch, or prepping for a busy week, this recipe is as practical as it is tasty. Let’s walk through how to properly store, freeze, and reheat them so they stay fresh, flavorful, and just as satisfying the second time around.
Storing Leftovers in the Refrigerator
If you’ve got a few sliders left after your meal, you’ll be happy to know they keep well in the fridge. Allow the sliders to cool to room temperature first. Then, place them in an airtight container or wrap them tightly with foil or plastic wrap. Store them in the refrigerator for up to 3 days.
When stored properly, the rolls stay soft, and the cheese and turkey remain flavorful. You can reheat them easily and enjoy them without sacrificing texture or taste.
Freezing Instructions
Want to prep a batch ahead of time or save extras for another week? These sliders freeze surprisingly well. To freeze, follow these steps:
- Let the baked sliders cool completely.
- Wrap each individual slider tightly in plastic wrap, then in a layer of aluminum foil.
- Place the wrapped sliders in a freezer-safe zip-top bag or airtight container.
You can also freeze the entire tray by wrapping the whole baking dish tightly in multiple layers of foil and plastic wrap, especially if it’s a freezer-safe dish.
Sliders can be frozen for up to 2 months. Be sure to label the container with the date so you can keep track of how long they’ve been stored.
Reheating Tips
To reheat refrigerated sliders, place them on a baking sheet and cover loosely with foil to prevent the tops from getting too crispy. Warm in a preheated 350°F oven for 10–12 minutes, or until heated through. For a crisper top, remove the foil during the last 2–3 minutes of baking.
If reheating from frozen, it’s best to thaw the sliders in the refrigerator overnight before baking. Once thawed, reheat them the same way as above. If you’re short on time, you can also reheat directly from frozen—just add 5–7 minutes to the total baking time and keep them covered for most of it to retain moisture.
Microwave reheating is also possible, especially for individual portions. Wrap a slider in a paper towel and microwave on medium power in 30-second increments until warm. However, note that the bread may become a little softer in texture compared to oven-reheating.
These sliders were made to be shared, but it’s nice knowing you can keep a few on hand for those moments when you want a quick, warm, comforting bite with zero fuss.
Common Mistakes to Avoid
Even a simple recipe like this has its little pitfalls if you’re not careful. Here are the most common mistakes people make with turkey and cheese sliders—and how to avoid them so you nail it on the first try.
1. Not slicing the rolls evenly
It’s tempting to rush this step, but uneven slicing can result in sliders that fall apart or bake inconsistently. Use a serrated bread knife and take your time to slice the rolls cleanly in half while keeping the top and bottom connected. A steady hand here goes a long way.
2. Overloading with meat or cheese
While it might seem like more is better, too much filling can cause the sliders to be unstable or soggy. Stick to the recommended ½ pound of turkey and 10 slices of cheese unless you’re confident your rolls can handle more. Balance is key.
3. Skipping the foil when baking
That foil is doing important work! It traps heat and moisture so the sliders bake evenly and the cheese melts perfectly. Baking uncovered from the start can dry out the tops or over-toast the bread before the insides are warm.
4. Pouring the sauce unevenly
Make sure the buttery sauce reaches all the rolls—especially the corners. Drizzle slowly and use a brush or spoon to help it coat everything. Uneven saucing can lead to dry spots in some sliders and soggy ones in others.
5. Not letting the sliders rest after baking
As tempting as it is to dive right in, give your sliders a minute or two to settle. This rest time helps the cheese set slightly and makes the sliders easier to cut and serve without everything falling apart.
Avoiding these mistakes will help you get consistent results and ensure that every bite is just as good as the last. A little patience and attention to detail go a long way, even in a dish as simple and cozy as sliders.
Pro Tips
To take your sliders from good to completely irresistible, here are some of my favorite pro tips. These are the little tweaks and techniques that elevate flavor, texture, and presentation, helping you get the most out of every batch.
1. Toast the bottom rolls lightly before assembling
For extra texture and a little more resistance to soaking, toast just the bottom half of the rolls in the oven for 3–5 minutes before adding the cheese and turkey. This helps them hold their shape and adds a subtle crispness.
2. Use freshly sliced turkey
If possible, ask for freshly sliced turkey at the deli counter instead of buying pre-packaged. The texture and flavor are usually better, and you can request your preferred thickness. A medium thickness works best—thin enough to fold but thick enough to hold up in baking.
3. Swap cheeses for flavor variations
Havarti and Swiss are delicious, but don’t be afraid to experiment. Smoked gouda adds richness, provolone brings subtle tang, and mozzarella gives you that stretchy melt. You can also mix two kinds of cheese for a custom flavor profile.
4. Customize the butter sauce with spices
Add a pinch of garlic powder, smoked paprika, or crushed red pepper flakes to your butter sauce for an extra flavor boost. These small touches can tailor the sliders to your taste or the vibe of your event.
5. Use parchment paper under the rolls
For easier cleanup and to prevent sticking, line your baking dish with parchment paper before placing the bottom halves of the rolls. It also makes transferring leftovers to a container much quicker.
6. Let the sauce sit for a minute before pouring
After mixing the butter sauce, give it a moment to rest. This allows the dried onions to rehydrate slightly, which brings out more flavor and helps them cook better during baking.
7. Add a vegetable layer for extra balance
If you’re feeling adventurous, try adding a thin layer of sautéed mushrooms, spinach, or caramelized onions between the turkey and cheese. It adds texture and a little nutritional value without changing the core flavor too much.
These tips are easy to implement but make a noticeable difference. They’ll help you create sliders that look impressive, taste incredible, and have your friends asking for the recipe every time.
Frequently Asked Questions (FAQs)
Every time I share this recipe with friends or on social media, I get a handful of great questions from curious home cooks. Whether you’re making these sliders for the first time or you’re already a fan looking to switch things up, here are some of the most common questions people ask—along with helpful, clear answers to guide you through every step.
Can I make these sliders ahead of time?
Absolutely. These sliders are perfect for prepping in advance. You can assemble the entire dish—layer the rolls, turkey, cheese, and pour the butter sauce over the top—then cover the pan with foil and refrigerate it for up to 24 hours. When you’re ready to bake, just let the dish sit at room temperature for about 15–20 minutes to take the chill off, then bake as directed. They come out just as melty and flavorful as if you made them fresh.
Can I freeze the sliders before baking them?
Yes, but with a small tweak. If you want to freeze them before baking, assemble the sliders but hold off on pouring the butter sauce. Wrap the unbaked sliders tightly in plastic wrap and foil, and freeze for up to 1 month. When you’re ready to bake, thaw in the fridge overnight, pour the butter sauce over the top, and then bake as usual.
What’s the best cheese to use?
Havarti and Swiss are the classic choices here because they melt beautifully and complement the turkey without overpowering it. However, feel free to experiment. Provolone, smoked mozzarella, white cheddar, or gouda all make excellent substitutes, depending on your flavor preferences.
Can I use a different kind of bread?
Definitely. While Hawaiian rolls are soft, sweet, and incredibly popular for sliders, you can swap in any small, soft dinner rolls or whole wheat slider buns. Just be aware that using a denser bread might slightly change the baking time and the way the butter sauce absorbs.
Can I make this recipe halal?
Yes! As written, this recipe is already halal-friendly. Just be sure your deli turkey is certified halal, and double-check the ingredients in your Worcestershire sauce, as some brands include anchovies. Opt for a halal version or use soy sauce as a substitute if needed.
Can I use leftover turkey instead of deli meat?
Of course. Leftover roasted turkey (especially around the holidays) works beautifully in this recipe. Just make sure the slices aren’t too thick, so they layer evenly between the rolls and reheat properly during baking.
What if I don’t have dried minced onion?
No problem. You can substitute with 1 teaspoon of onion powder for a smoother sauce or use finely chopped fresh onion if you sauté it first to soften the flavor. The dried minced onion adds a little texture and bite, but the recipe is still delicious without it.
Do I need to use the everything bagel seasoning?
Not at all. It’s completely optional. The sliders are flavorful and buttery on their own, but if you want to add a little crunch and extra seasoning, go for it. You can also try sesame seeds, poppy seeds, or even a sprinkle of dried herbs like oregano or thyme.
What can I serve with these sliders to make it a full meal?
These sliders pair well with a variety of sides. A fresh salad, roasted vegetables, sweet potato fries, or even a cup of soup rounds out the meal nicely. You can find full pairing ideas earlier in this article for inspiration.
How do I keep the sliders from getting soggy?
Great question! Make sure not to overload the sliders with sauce, and don’t skip the step of baking covered first, then uncovered. This balance allows the rolls to soak in flavor without becoming mushy. Also, using a cheese layer on the bottom creates a barrier to help prevent the bread from getting soggy.
These frequently asked questions cover most of the concerns or customizations you might be thinking about. Still unsure about something? Don’t hesitate to reach out or leave a comment if you try the recipe—I’d love to hear from you!
Conclusion & Call to Action
There’s just something special about a warm, melty slider that brings people together. These buttery turkey and cheese sliders are simple to make, packed with flavor, and endlessly adaptable to whatever you’ve got on hand. Whether you’re feeding a crowd or just treating yourself to something cozy and satisfying, this recipe delivers every single time.
From the first bite of sweet, soft Hawaiian rolls to the gooey cheese and savory turkey layered inside, it’s comfort food at its finest. And that tangy, buttery sauce? It soaks into the bread and creates a crave-worthy finish that people always remember. The best part is that they’re just as easy to make as they are to love—no complicated prep, no special tools, just a handful of ingredients and a little oven magic.
This recipe has become a staple in my kitchen, and I can’t wait for it to become one in yours too. Whether you’re whipping up a quick weeknight dinner, planning a make-ahead party dish, or simply craving a satisfying bite, these sliders are always the right choice.
Now it’s your turn. Try this recipe, make it your own, and share it with the people you love. If you do, I’d be so excited to see how it turns out for you! Snap a photo, tag me on social media, or drop a comment with your thoughts, questions, or even your favorite twist on the recipe.
Because the truth is, good food is meant to be shared—and these turkey and cheese sliders are the kind of dish that brings everyone to the table. Happy cooking, and enjoy every bite!
Print
Oven Baked Sliders – Easy Turkey and Cheese Recipe
- Total Time: 27 minutes
- Yield: 12 sliders 1x
- Diet: Halal
Description
These oven baked sliders are layered with savory deli turkey, melty cheese, and a buttery Dijon glaze, all tucked into soft Hawaiian rolls. Quick, flavorful, and absolutely addictive, they’re perfect for parties, family dinners, or game day gatherings.
Ingredients
-
12 Hawaiian rolls
-
½ pound sliced oven-roasted turkey
-
10 slices Havarti or Swiss cheese
For the Butter Sauce:
-
¾ cup (1½ sticks) unsalted butter
-
3 tablespoons Dijon mustard
-
1 tablespoon packed brown sugar
-
2 teaspoons Worcestershire sauce
-
2 teaspoons dried minced onion
-
½ teaspoon salt
-
Everything bagel seasoning (optional)
Instructions
-
Preheat oven to 350°F (175°C) and grease a 9×13-inch baking dish.
-
Slice the rolls horizontally and place the bottom half in the baking dish.
-
Layer half the cheese, all the turkey, then the remaining cheese.
-
Replace the top half of the rolls.
-
Melt butter and mix with mustard, brown sugar, Worcestershire sauce, onion, and salt.
-
Pour sauce evenly over the rolls. Sprinkle seasoning if desired.
-
Cover with foil and bake 14 minutes. Uncover and bake 3 more minutes.
-
Let cool slightly, slice, and serve warm.
Notes
-
Great for meal prep or making ahead for parties.
-
Try smoked turkey or swap in different cheeses for variety.
-
Use parchment paper for easier cleanup.
- Prep Time: 10 minutes
- Cook Time: 17 minutes
- Category: Appetizer, Main Dish
- Method: Baking
- Cuisine: American