
There’s just something about banana pudding that brings a sense of nostalgia, comfort, and complete joy. It’s the kind of dessert that makes people smile even before the first bite. Whether you’re gathering with family, attending a potluck, or just craving something sweet after dinner, no-bake banana pudding always finds a way to steal the show. And not just any banana pudding—this is the creamiest, dreamiest, most luscious banana pudding you’ll ever taste.
I still remember the first time I had this version. I was at a family reunion, and my cousin walked in with a giant trifle dish layered with golden Nilla wafers, perfectly sliced bananas, and a fluffy cloud of whipped topping. People were already hovering around it before it even made it to the dessert table. By the time I went back for seconds (yes, seconds), the bowl was almost scraped clean. That was my sign—I had to get the recipe. And ever since then, it’s been on rotation for nearly every get-together or special occasion.
What makes this banana pudding special isn’t just the flavor—though that alone will have you hooked—but also how easy it is to make. There’s no baking required, no eggs to temper, and no fussing with homemade custard. It’s rich without being heavy, sweet without being overwhelming, and it comes together in less than 20 minutes of hands-on time.
This dessert has that signature Southern charm but with a few modern shortcuts that make it both convenient and incredibly delicious. The cream cheese adds a tangy richness, the pudding makes it velvety smooth, and the sweetened condensed milk gives it that dreamy, indulgent sweetness that everyone loves. When layered with ripe bananas and crisp vanilla wafers that soften to the perfect texture after chilling, the whole thing becomes a cold, creamy hug in dessert form.
If you’ve never made banana pudding before, or if you’ve only ever had the instant box version, prepare to be amazed. This recipe is not just a crowd-pleaser—it’s a life-changer. Keep reading to discover why this might just become your new favorite dessert.
Why You’ll Love This no-bake banana pudding Recipe
There are so many reasons to fall head over heels for this banana pudding, but let’s start with the most obvious—it tastes absolutely incredible. Every single layer plays its part in delivering a mouthful of pure joy. The cream cheese adds a luxurious smoothness and slight tang that balances the sweetness from the condensed milk. The instant vanilla pudding brings a creamy, nostalgic flavor that blends beautifully with ripe bananas. And let’s not forget the Cool Whip, which adds that light, airy texture that makes each bite feel like a cloud.
Aside from the flavor, you’ll also love how incredibly simple and foolproof this dessert is. It’s a true no-bake recipe, which means no ovens, no stovetops, and no complicated techniques. You just need a few bowls, a mixer, and a bit of patience while it chills. Even if you’re new to cooking or not confident in the kitchen, this recipe is very beginner-friendly.
Another major plus is its versatility. You can make this in a trifle dish if you want something that looks fancy and elegant for a dinner party. Or you can go with a 9×13-inch pan if you’re bringing it to a potluck or family BBQ. It’s easy to transport, keeps well in the fridge, and is a total showstopper when it’s time to serve.
Let’s not forget how family-friendly this dessert is. Kids absolutely love it—it’s bananas, pudding, and cookies after all. But adults go crazy for it, too, especially once they realize there’s cream cheese and sweetened condensed milk involved. It’s the perfect blend of familiar and indulgent.
And perhaps one of the most underrated reasons? It can be made ahead of time. Actually, it should be made ahead so the flavors have time to meld and the wafers can soften into that perfect, cakey texture. That makes this recipe ideal for stress-free entertaining.
So whether you’re making dessert for your family, hosting a dinner, or just want to treat yourself on a Tuesday night, this banana pudding checks all the boxes. It’s creamy, crunchy, soft, fruity, and sweet—all in one spoonful. What more could you want?
Health Benefits of this no-bake banana pudding
While banana pudding may not be the first thing that comes to mind when you think of “healthy” desserts, there are actually a few healthful elements to appreciate in this recipe—especially when made with intention and balance.
First, let’s talk bananas. Bananas are naturally sweet and packed with nutrients like potassium, vitamin C, and vitamin B6. Potassium is essential for heart health and helps regulate blood pressure, while vitamin B6 supports brain function and energy metabolism. Bananas are also rich in dietary fiber, which helps with digestion and maintaining stable blood sugar levels.
Using bananas in dessert allows you to incorporate fruit in a delicious way, especially for picky eaters or kids who might otherwise avoid fresh produce. And because they’re naturally sweet, you don’t need to add a ton of extra sugar to the recipe—the fruit does some of the work for you.
Next up, we have dairy. This recipe includes cream cheese and milk, both of which provide calcium, protein, and vitamin D. These nutrients are essential for maintaining healthy bones and teeth, and they also support muscle function and overall energy levels.
Although sweetened condensed milk is definitely indulgent, it contributes a creamy richness that allows you to avoid adding extra sugar or heavy cream. Used in moderation, it helps give this dessert a luxurious mouthfeel while maintaining a surprisingly light texture.
If you’re using 2% milk or choosing a lower-fat cream cheese, you can easily reduce the fat content without compromising flavor. Additionally, Cool Whip is a lighter alternative to homemade whipped cream, and there are now reduced-fat or sugar-free options available on the market if you’re looking to lighten things up further.
While this banana pudding is undeniably a treat, it’s also a balanced way to indulge your sweet tooth with real ingredients—like fruit and dairy—instead of relying solely on empty-calorie desserts. And because it’s so satisfying, you don’t need a huge serving to feel content.
Ultimately, dessert doesn’t have to be “healthy” to be enjoyed as part of a balanced lifestyle. But when your dessert includes whole foods like bananas and milk and doesn’t require deep frying or processed syrups, you’re already making a more nourishing choice.
So enjoy this banana pudding with the confidence that not only is it delicious, but it’s also got a few redeeming qualities that make each bite even sweeter.
Preparation Time, Servings, and Nutritional Information
Let’s talk logistics. One of the best things about this banana pudding—aside from its flavor—is how quick and easy it is to put together. You don’t need to be in the kitchen for hours, and you won’t be left with a mountain of dirty dishes either.
Preparation Time:
-
Prep Time: 20 minutes
-
Chill Time: Minimum 1–2 hours (can chill longer or overnight)
-
Total Time: About 2 hours and 20 minutes (mostly hands-off)
Servings:
This recipe makes a generous batch—perfect for feeding a crowd. You can expect around 10 to 12 servings, depending on how big your portions are. If you’re serving it at a party with other desserts, you could easily stretch it to 14–16 small portions.
Nutritional Information (per serving, based on 12 servings):
-
Calories: 310
-
Protein: 4g
-
Carbohydrates: 38g
-
Sugar: 28g
-
Fat: 15g
-
Saturated Fat: 9g
-
Fiber: 1g
-
Calcium: 10% DV
-
Potassium: 8% DV
Of course, the nutrition can vary depending on the brands you use and if you make any substitutions (like low-fat milk or sugar-free pudding). But overall, this dessert gives you a good mix of energy, some nutrients from the bananas and dairy, and plenty of satisfaction from its creamy texture and sweet flavor.
If you’re trying to keep portion sizes in check, serving the pudding in small ramekins or dessert cups is a great idea. That way, you can enjoy a treat without going overboard.
Ingredients List of this no-bake banana pudding
Before we dive into the step-by-step instructions, let’s make sure you have everything you need on hand. This recipe uses simple, everyday ingredients that are easy to find in most grocery stores. Here’s what you’ll need:
8 oz cream cheese (softened to room temperature):
This adds a rich, tangy layer of flavor and a creamy texture to the pudding. Make sure it’s fully softened so it blends smoothly into the other ingredients.
14 oz can sweetened condensed milk:
This is the magic ingredient that gives the pudding its sweetness and silky consistency. It also helps balance the tartness of the cream cheese.
5 oz box instant vanilla pudding mix:
Be sure to use the instant kind—not cook-and-serve. The pudding mix thickens the dessert and gives it that classic banana pudding taste.
3 cups milk (2% or whole):
Milk activates the pudding mix and adds creaminess. You can use 2% or whole milk for best results.
2 tsp vanilla extract (or banana extract, optional):
Vanilla enhances the overall flavor, but if you want a stronger banana flavor, feel free to use banana extract instead—or even a mix of both.
8 oz tub Cool Whip (thawed):
You’ll fold half into the pudding mixture to give it a light, airy texture, and save the other half for spreading on top. Make sure it’s fully thawed for easy mixing.
11 oz box Nilla Wafers:
These are the classic cookie base for banana pudding. They add texture and soak up the flavors as the dessert chills. You’ll use about two-thirds of the box for layering.
5–7 bananas (ripe, sliced):
Ripe but not overripe bananas are best. Look for ones that are yellow with a few brown specks. You’ll slice them just before assembling to keep them fresh.
As you can see, the ingredient list is pretty simple, but each component plays an important role. With just a little prep, these everyday items transform into a dessert that feels completely indulgent and impressive.
Step-By-Step Cooking Instructions of this no-bake banana pudding
Now that you’ve gathered your ingredients and you’re ready to make something truly delicious, let’s walk through the process step by step. This recipe doesn’t require any complicated cooking techniques or specialty equipment. As long as you follow these instructions, you’ll end up with a creamy, dreamy banana pudding that everyone will rave about.
Step 1: Soften the Cream Cheese
Before you do anything else, make sure your cream cheese is fully softened. This is key for creating a smooth pudding base without lumps. Take the cream cheese out of the fridge about 30–45 minutes before you start. If you’re short on time, you can also soften it in the microwave. Just place it in a microwave-safe bowl and heat it in 10-second intervals until it’s soft but not melted.
Step 2: Beat the Cream Cheese
In a large mixing bowl, use an electric hand mixer or stand mixer to beat the softened cream cheese. Mix on medium speed for about 2–3 minutes, or until it’s completely smooth and fluffy. Scrape down the sides of the bowl occasionally to make sure there are no hidden lumps. This step is important because it creates a smooth base for the pudding.
Step 3: Add the Sweetened Condensed Milk
Once your cream cheese is silky smooth, pour in the can of sweetened condensed milk. Beat again on medium speed until the mixture is fully combined and smooth. You’ll notice it starting to take on a glossy texture. This is exactly what you want. The sweetness of the condensed milk balances the tang of the cream cheese and gives the pudding that rich, velvety feel.
Step 4: Mix in the Pudding and Milk
Now, add the dry instant vanilla pudding mix directly into the bowl. With the mixer running on low, gradually pour in the 3 cups of milk. Continue mixing until everything is fully incorporated. The mixture will look thin at first, but don’t worry—it will thicken as it sets. Once everything is combined, stir in the vanilla or banana extract for that extra boost of flavor. Mix just until blended.
Step 5: Fold in Half of the Cool Whip
Next, gently fold in half of the thawed Cool Whip (about 4 ounces). Use a spatula instead of a mixer for this step. You want to incorporate it without deflating the fluffiness. This step gives the pudding an airy, mousse-like texture that makes it feel light, even though it’s wonderfully rich.
Step 6: Slice the Bananas
Just before assembling, slice your bananas into thin, even rounds. Each slice should be about 1/4 inch thick. If you slice them too early, they may start to brown. To prevent that, wait until you’re ready to layer, or you can toss the slices lightly with lemon juice to slow down the browning process.
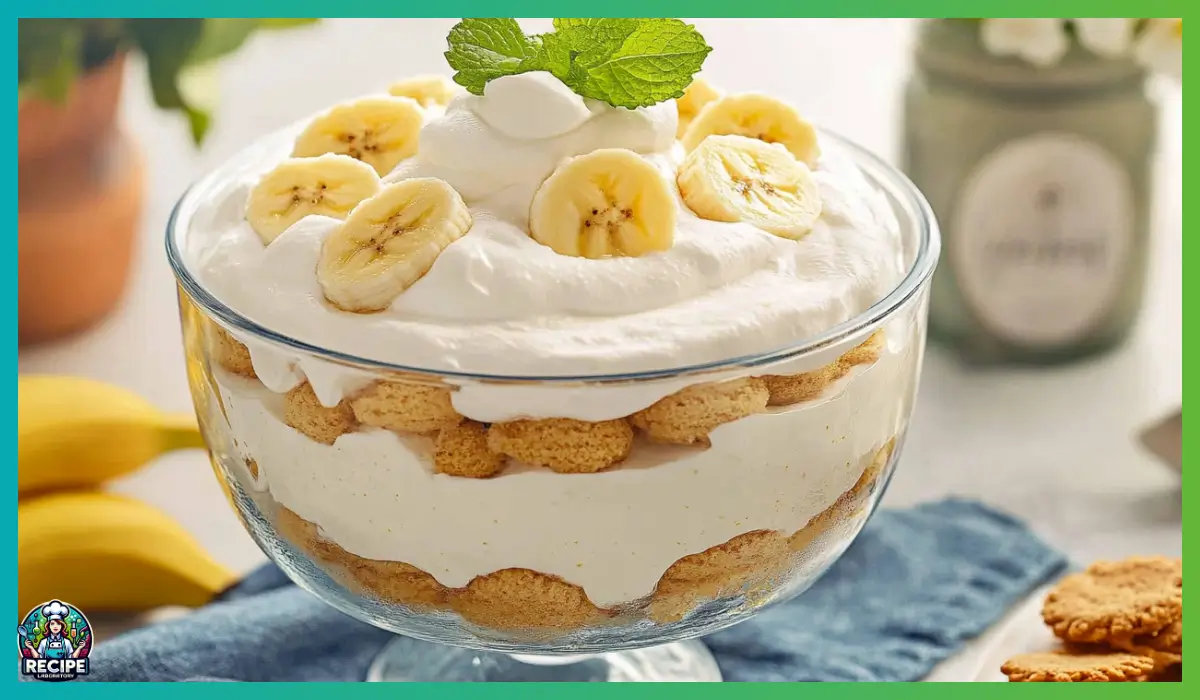
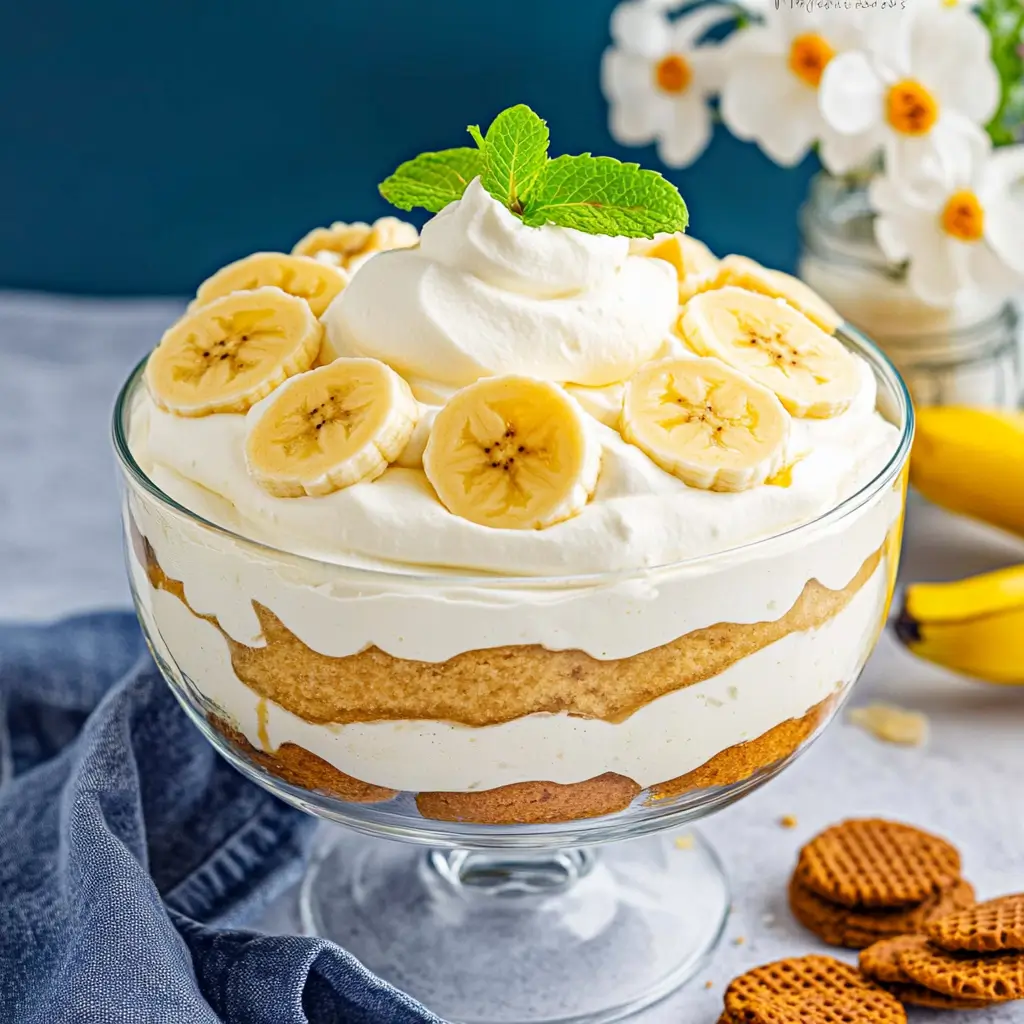
Step 7: Layer the Dessert
Now comes the fun part—assembling all the layers. You can use a trifle dish for a pretty presentation, or a 9×13-inch baking dish for a more casual family-style dessert. You could even portion it out into individual cups or mason jars for personal servings.
Start by placing a layer of Nilla wafers on the bottom of your dish. Arrange them in a single, even layer, filling in any gaps as best as you can.
Next, add a layer of banana slices. Try to cover most of the cookie layer, but don’t worry if a few spots peek through.
Now spoon about one-third of the pudding mixture over the bananas. Use the back of a spoon or a spatula to gently spread it into an even layer.
Repeat these steps—wafers, bananas, pudding—two more times for a total of three layers. You should end with pudding on top.
Step 8: Add the Final Cool Whip Layer
Once your layers are complete, spoon the remaining Cool Whip on top. Spread it evenly over the pudding. You can swirl it a bit with a spoon for a pretty finish or smooth it out completely if you prefer a clean look.
Optional: If you want to get a little fancy, you can garnish the top with extra banana slices, whole Nilla wafers, or even crushed cookies. Just be aware that banana slices on top may brown after a few hours, so it’s best to add them right before serving.
Step 9: Chill the Banana Pudding
Cover the dish with plastic wrap or foil and place it in the refrigerator. Let it chill for at least 1–2 hours before serving. If you have the time, chilling it overnight is even better. This allows the flavors to meld and the cookies to soften into a cake-like texture that’s simply irresistible.
Once chilled, scoop and serve with a big spoon—or, if you’re serving it in individual dishes, hand them out with little dessert spoons for a picture-perfect treat.
How to Serve this no-bake banana pudding
This banana pudding is versatile enough for any kind of occasion, from weeknight dinners to baby showers and everything in between. And because it looks so beautiful once layered and topped, it makes a stunning centerpiece for your dessert table.
One of the best ways to serve this dessert is straight from a trifle bowl. The glass sides show off the beautiful layers of cookies, bananas, and pudding. It looks like you spent hours putting it together, even though it only took minutes. Simply grab a large spoon and scoop generous portions into small bowls or dessert cups.
If you’re serving a crowd or want something more casual, a 9×13-inch pan works perfectly. Just cut out squares or scoop out servings with a spoon. It’s rustic, delicious, and no one will care if the layers aren’t perfect.
You can also make individual servings using mason jars or clear plastic cups. This is a fun way to serve dessert at parties or outdoor events. Everyone gets their own perfectly portioned pudding, and it’s easy to customize toppings.
Before serving, you might want to add a few fresh banana slices or a sprinkle of crushed Nilla wafers on top. This adds a nice crunch and gives each serving a fresh, finished look. Just be sure to add bananas right before serving so they don’t brown too quickly.
This pudding is best served cold, right from the fridge. The chilled texture makes it extra refreshing, especially on warm days.
Pairing Suggestions for this no-bake banana pudding
Banana pudding is such a star on its own, but you can definitely pair it with other dishes and beverages to create a well-rounded meal or dessert spread.
If you’re serving this at a cookout or picnic, it’s the perfect follow-up to classic BBQ fare. Think grilled chicken, burgers, or brisket with sides like baked beans, potato salad, or cornbread. The cool creaminess of the banana pudding balances out the savory, smoky flavors beautifully.
For a more elegant dinner party, serve the pudding after a lighter main course like roasted chicken, baked salmon, or a fresh vegetable pasta. It’s a nice contrast to savory dishes and won’t feel too heavy.
This dessert also pairs wonderfully with coffee or tea. The mild banana and vanilla flavors complement the bitterness of a hot cup of coffee or the herbal notes of tea. Serve it as an afternoon treat or finish off a brunch with it—you really can’t go wrong.
If you’re offering beverages alongside the dessert, here are a few ideas:
-
Iced tea or lemonade: These light, refreshing drinks make a great pairing for warm weather.
-
Sparkling water with citrus slices: Adds a refreshing contrast to the creamy pudding.
-
Caffe latte or a mild cappuccino: Perfect for a dessert-and-coffee moment.
-
Milk (for the kids): Classic and comforting.
And for themed events like baby showers or potlucks, consider offering mini desserts alongside the pudding, like mini cheesecakes or fruit tarts, to round out the spread.
Storage, Freezing & Reheating Instructions
One of the best parts about this banana pudding is how well it stores. That makes it a dream come true for entertaining or meal planning. It’s not only make-ahead friendly but also easy to store for later if you somehow end up with leftovers—which, let’s be honest, is rare.
How to Store in the Refrigerator
Once your pudding is assembled, cover it tightly with plastic wrap or foil. If you used a trifle bowl or glass dish without a lid, plastic wrap pressed gently against the top works best to prevent a skin from forming on the Cool Whip. If you’re using a 9×13-inch pan with a lid, even better.
Refrigerate for at least 2 hours before serving, but preferably overnight. The longer it chills, the better the flavors meld and the more the cookies soften to that signature cake-like consistency.
In terms of shelf life, banana pudding is best enjoyed within 3 days of making it. The bananas start to brown and break down after that point, and the cookies can become overly soft. While it’ll still be safe to eat, the texture won’t be quite as nice.
Freezing Instructions
Now, let’s talk about freezing. Technically, yes—you can freeze banana pudding, but I would only recommend it if you’re okay with a slight change in texture when it thaws.
The issue lies with the bananas and the pudding base. Frozen bananas can turn mushy when thawed, and the pudding can become slightly watery. However, if you want to freeze it anyway, here’s how:
- Use a freezer-safe, airtight container.
- Avoid adding fresh bananas if you’re freezing the whole dish. Instead, add them after thawing, just before serving.
- Wrap the container in an extra layer of plastic wrap or foil to prevent freezer burn.
Freeze for up to 1 month. To thaw, transfer the container to the refrigerator and let it defrost overnight. Once thawed, give it a gentle stir to bring it back to life and add fresh bananas for best flavor and texture.
Reheating? Not Needed!
This dish is served cold, so there’s no reheating required. In fact, that’s one of its many perks. Just pull it out of the fridge, scoop, and serve. If it’s been sitting for a few days and the surface looks a bit soft or watery, give it a quick stir or add a fresh layer of Cool Whip to refresh the look.
So, to recap:
- Store covered in the fridge for up to 3 days.
- Freeze without bananas for up to 1 month.
- Thaw overnight in the fridge.
- Serve cold—no reheating necessary.
Simple, low-maintenance, and still absolutely delicious every time.
Common Mistakes to Avoid in this no-bake banana pudding
Even though this banana pudding recipe is straightforward, there are a few common missteps that can affect the texture, appearance, or flavor. Let’s go over them so you can avoid any kitchen frustration and enjoy flawless pudding every time.
1. Using Bananas That Are Too Ripe
While soft, spotty bananas are great for banana bread, they’re not ideal for banana pudding. If they’re too ripe, they’ll brown quickly and turn mushy in the layers. Instead, go for bananas that are yellow with just a few brown spots. They’ll be sweet, flavorful, and hold their shape better.
2. Not Softening the Cream Cheese Properly
If your cream cheese is still cold when you start mixing, you’ll end up with a lumpy pudding. Be sure to let it sit at room temperature until fully softened, or microwave it in short bursts until it’s just soft—not hot or melted.
3. Using Cook-and-Serve Pudding Mix by Mistake
This recipe calls for instant pudding mix, which thickens without cooking. If you accidentally use the cook-and-serve kind, your mixture won’t set properly and the texture will be off. Always double-check the label.
4. Assembling the Layers Too Soon
If you slice your bananas or prepare the pudding too far in advance, the fruit can brown and the pudding can become watery. Try to assemble the layers shortly before chilling and serving. If needed, lightly toss the banana slices in lemon juice to slow down browning.
5. Not Letting It Chill Long Enough
The chilling step is more than just a suggestion. It gives the pudding time to thicken and allows the cookies to absorb moisture, becoming soft and cake-like. If you rush this and serve it too soon, the layers won’t be as cohesive and the texture won’t be as enjoyable.
6. Overmixing the Cool Whip
When folding in the Cool Whip, gentle is the way to go. Overmixing can deflate the whipped topping, leading to a denser, less airy pudding. Use a spatula and fold with light strokes until just combined.
Avoiding these mistakes will help ensure that your banana pudding turns out exactly the way it should—creamy, layered, and perfectly sweet.
Pro Tips of this no-bake banana pudding
If you want to take your banana pudding game from good to absolutely unforgettable, here are a few tried-and-true pro tips that make all the difference. These little touches elevate both the flavor and presentation.
1. Toast Your Nilla Wafers
Before layering, toast your Nilla wafers in the oven for 5–7 minutes at 300°F. This adds a deeper, nutty flavor and helps them hold their shape a bit longer after layering. The end result? Even better texture contrast between creamy pudding and softened cookie.
2. Layer Strategically
Place your bananas slightly overlapping, like shingles, so each spoonful delivers a consistent banana-to-pudding ratio. Also, when spreading the pudding over each layer, start from the center and gently push outward to keep the banana slices in place.
3. Add a Flavor Twist
Try swapping half the vanilla extract for banana extract to enhance the banana flavor without adding extra fruit. You can also add a pinch of cinnamon or nutmeg to the pudding mix for a subtle warm spice that pairs beautifully with the bananas and cream.
4. Use a Piping Bag for Neat Layers
If you’re assembling the pudding in individual cups or want super clean layers, use a piping bag (or a large zip-top bag with the corner snipped) to layer the pudding. This gives you more control and keeps the layers tidy and picture-perfect.
5. Make It the Day Before
Banana pudding tastes even better after sitting overnight. The cookies soften, the flavors meld, and the whole dessert takes on a rich, cake-like consistency. If you’re making this for a special event, prep it the night before and let it chill undisturbed.
With these tips in your back pocket, you’ll make a banana pudding that not only tastes amazing but also looks polished and professional.
Frequently Asked Questions (FAQs)
Even with a simple, no-bake recipe like this one, questions can still pop up—especially if it’s your first time making banana pudding or working with ingredients like Cool Whip or instant pudding. So, to help you feel totally confident, here are some of the most frequently asked questions about this recipe, along with clear and helpful answers.
Can I make this no-bake banana pudding ahead of time?
Absolutely. In fact, banana pudding is best when it’s made ahead of time. As the pudding chills, the Nilla wafers soften and the flavors have a chance to blend. Make it at least 2 hours in advance, but overnight is even better. Just be sure to keep it tightly covered in the refrigerator and don’t add fresh banana slices on top until you’re ready to serve.
How can I prevent the bananas from turning brown?
Bananas naturally brown when exposed to air, but there are a few tricks to slow this process down. First, use bananas that are ripe but still firm. Second, slice them just before layering. If you really want to protect their color, toss the slices in a bit of lemon juice. Just a light coat will help delay browning without changing the flavor much.
Can I use homemade whipped cream instead of Cool Whip?
Yes, you can substitute homemade whipped cream if you prefer not to use Cool Whip. Use 1 cup of heavy whipping cream and beat it with 2–3 tablespoons of powdered sugar until soft peaks form. Then, divide it as you would with the Cool Whip—half folded into the pudding and half saved for the topping. Just note that homemade whipped cream won’t hold its shape as long as Cool Whip, so the pudding might need to be eaten within a day or two.
What can I use instead of Nilla wafers?
If you don’t have Nilla wafers or want to try something different, there are a few great alternatives. Shortbread cookies, graham crackers, butter cookies, or even sponge cake cut into small pieces can work well. Each brings a different texture and flavor, so feel free to experiment based on your preferences or what you have on hand.
Can I make this no-bake banana pudding recipe gluten-free?
Yes, this banana pudding can easily be made gluten-free. Just use a gluten-free vanilla pudding mix and swap the Nilla wafers for a certified gluten-free vanilla cookie or graham-style cookie. Always double-check labels to ensure all ingredients are truly gluten-free.
Is there a dairy-free version?
This recipe is heavy on dairy, but you can make substitutions. Use dairy-free cream cheese, sweetened condensed coconut milk, almond or oat milk, and a dairy-free whipped topping like Cocowhip. Just make sure the instant pudding mix you use will set with the non-dairy milk (some won’t). Read the package instructions and choose a brand known to work with plant-based milks.
Can I use fresh whipped cream for a lighter texture?
Yes, if you prefer a lighter, more airy texture and don’t want to use Cool Whip, you can whip heavy cream with a little sugar and vanilla extract until soft peaks form. Just remember that it won’t stay stable as long in the fridge, so it’s best for same-day serving.
Can I double the no-bake banana pudding recipe?
Definitely. If you’re feeding a crowd or planning to serve this at a party, you can double all the ingredients and layer everything in a large punch bowl or two 9×13-inch pans. It’s a great way to ensure you have plenty to go around.
Can I freeze no-bake banana pudding?
You can, but it’s not recommended unless you’re okay with some texture changes. The bananas may turn mushy, and the pudding could separate slightly when thawed. If you do freeze it, avoid adding the bananas until after thawing, and stir the pudding well before serving to re-combine any separated layers.
Why is my pudding runny?
If your pudding didn’t set properly, it could be due to using the wrong kind of pudding mix (make sure it’s instant), not chilling it long enough, or using too much liquid. Be sure to follow the recipe measurements closely and allow at least 2 hours of chill time before serving.
These common questions cover just about everything you need to know to troubleshoot or tailor this banana pudding recipe to your needs. If you ever run into a new question, don’t hesitate to experiment—or reach out to your fellow dessert-lovers for tips!
Conclusion & Call to Action
So there you have it—a no-bake banana pudding that’s rich, creamy, sweet, and so satisfying that you’ll find yourself dreaming about the next time you get to make it. With its no-bake simplicity and crowd-pleasing flavor, it’s truly the kind of dessert that brings people together and earns a permanent spot in your recipe collection.
Whether you’re whipping this up for a family gathering, a potluck, or just a little something special to have in the fridge, this banana pudding delivers comfort and joy in every single spoonful. It has that nostalgic charm we all love but feels a little extra special thanks to the cream cheese and sweetened condensed milk. And because it’s layered and chilled, every bite is soft, creamy, and just slightly crunchy from those softened cookies—it’s a textural dream.
Even better, it’s a dessert that’s forgiving and flexible. You can switch up the flavors, use what you have on hand, and make it fit just about any dietary preference or event. No baking, no sweating over the stove—just mix, layer, chill, and enjoy. It doesn’t get much easier than that.
If you’ve made it this far, I hope you’re feeling excited and inspired to try this no-bake banana pudding in your own kitchen. Trust me—it’s one of those dishes that people remember. Don’t be surprised if you’re asked to bring it to every future party or family dinner.
And when you do make it, I’d absolutely love to hear how it turned out. Did you use a trifle bowl? Try a new twist on the flavor? Serve it at a gathering? Share your experience in the comments below, or even better, tag me on social media with a picture of your finished masterpiece. Seeing your creations and knowing that these recipes bring joy to your table is what this is all about.
Now, go grab those bananas and get layering. Your future self—and everyone lucky enough to share a bowl with you—will thank you.
Print
No-Bake Banana Pudding with Sweetened Condensed Milk
- Total Time: 2 hours 20 minutes (including chill time)
- Yield: 12 servings 1x
- Diet: Vegetarian
Description
This rich and creamy no-bake banana pudding is a classic Southern-style dessert made easy with sweetened condensed milk, instant pudding, ripe bananas, and layers of Nilla wafers. Perfect for potlucks, holidays, or a quick make-ahead treat.
Ingredients
-
8 oz cream cheese, softened
-
14 oz can sweetened condensed milk
-
5 oz box instant vanilla pudding mix
-
3 cups 2% or whole milk
-
2 tsp vanilla extract or banana extract (optional)
-
8 oz tub Cool Whip, thawed (use half in pudding, half for topping)
-
11 oz box Nilla Wafers
-
5–7 ripe bananas, sliced
Instructions
-
Beat softened cream cheese until smooth.
-
Add sweetened condensed milk, pudding mix, milk, and vanilla. Beat until smooth.
-
Fold in half the Cool Whip.
-
In a trifle bowl or 9×13 dish, layer:
-
One-third Nilla wafers
-
Sliced bananas
-
One-third pudding mixture
-
-
Repeat layers, ending with pudding.
-
Spread remaining Cool Whip on top.
-
Cover and chill for 1–2 hours or overnight.
Notes
-
Use ripe but firm bananas to avoid mushiness.
-
For extra banana flavor, use banana extract.
-
For best results, chill overnight before serving.
- Prep Time: 20 minutes
- Cook Time: 0 minutes (no-bake)
- Category: Dessert
- Method: No-Bake
- Cuisine: Southern American