
There’s something so familiar and heartwarming about hot chocolate. Whether it’s a snowy winter evening or just one of those days when you want to feel cozy, a cup of hot cocoa can instantly wrap you in comfort. It’s sweet, creamy, and topped with marshmallows—what’s not to love? That’s exactly the feeling this no-bake Hot Chocolate Cheesecake Dessert delivers, only instead of sipping it from a mug, you’ll be scooping it from a pan.
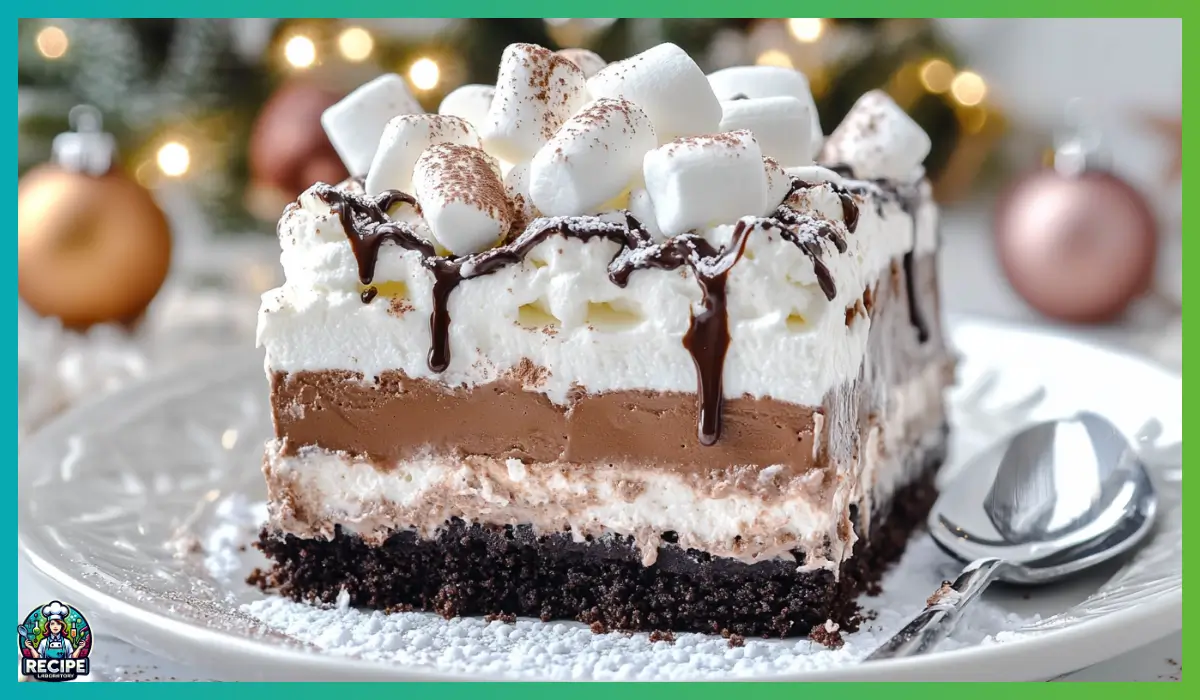
This recipe transforms the classic flavors of hot chocolate into a creamy, indulgent layered dessert that requires zero oven time. Yes, you read that right—it’s completely no-bake, making it perfect for busy days, warm-weather gatherings, or when you just can’t bear to turn on the oven. It starts with a chocolate cookie crust, rich and buttery, followed by a silky hot chocolate cheesecake layer filled with mini marshmallows. Then it’s topped with clouds of homemade whipped cream and finished with all your favorite hot cocoa toppings like more marshmallows, chocolate curls, or a drizzle of syrup.
I first made this dessert on a whim during a holiday get-together when I wanted something unique that still felt festive. It was such a hit that now my family asks for it at birthdays, potlucks, and honestly—whenever we need a little pick-me-up. It’s the kind of dessert that makes people smile, ask for seconds, and sneak another bite straight from the fridge.
What I love most about it—besides the fact that it tastes like a chocolate lover’s dream—is how simple it is. There’s no complicated water bath, no worrying about the cheesecake cracking, and no baking required. Just layer, chill, and enjoy.
So if you’re ready for something creamy, chocolatey, and absolutely irresistible, this Hot Chocolate Cheesecake Dessert might just become your new favorite treat.
Why You’ll Love This hot chocolate cheesecake Recipe
There are countless reasons to fall in love with this Hot Chocolate Cheesecake Dessert, but let’s break down a few of the standouts. Whether you’re a novice in the kitchen or a seasoned home cook, this dessert checks every box for flavor, texture, and convenience.
First and foremost, it’s incredibly easy to make. This is a no-bake dessert, which means no oven, no timers, and no stress. If you can mix, layer, and refrigerate, you can absolutely master this recipe. It’s perfect for beginners, fun for kids to help with, and a lifesaver for when your oven is already full of dinner or other baked goodies.
Another major reason to love it is the flavor. It has all the chocolatey richness of a mug of hot cocoa, but with the tangy, creamy finish of cheesecake. The cookie crust adds that crave-worthy crunch, while the whipped cream topping lightens everything up, making it feel fluffy and balanced. And let’s not forget those mini marshmallows nestled in the cheesecake layer—they give it little pops of chewy sweetness that truly evoke that hot chocolate feeling.
In addition to flavor, the texture combination is a huge win. The crust is firm yet buttery. The cheesecake layer is soft and silky with just enough structure to hold together beautifully. The whipped cream is light and airy. And the toppings? They add a visual wow factor and an extra boost of indulgence with every bite.
Lastly, it’s a crowd-pleaser. Kids love it, adults rave about it, and it fits into almost any occasion—from casual gatherings to special celebrations. You can also make it ahead of time, which means no last-minute scrambling before guests arrive.
So if you’re looking for a dessert that feels impressive but is secretly super simple, this one has your name written all over it.
Health Benefits
While this dessert is undeniably indulgent and rich, there are still a few silver linings when it comes to health and ingredient benefits—especially when compared to traditional baked cheesecakes or heavy layered desserts.
To begin with, this is a no-bake recipe, which means no added oils or fats from baking. It also skips the eggs and heavy cream cheese layers typically found in baked cheesecakes. Instead, we use a more modest amount of cream cheese combined with whipped cream to achieve that light yet creamy consistency. This cuts back on the saturated fat content, making each slice feel a little lighter on the stomach.
Next, let’s talk about the portion control benefits. Since the dessert is served chilled and in slices, you can easily serve smaller portions to satisfy a sweet tooth without overindulging. The richness of the chocolate and cream makes even a modest piece feel satisfying and indulgent.
Now, while chocolate sandwich cookies and mini marshmallows aren’t exactly health food staples, they do bring comfort and joy—and there’s something to be said about how food can support emotional well-being too. This dessert can be a great option when you need a mood booster or want to create special memories with friends and family.
Additionally, homemade whipped cream has less sugar than store-bought versions, and you can always control the sweetness to your liking. Using real vanilla extract and real dairy products also adds flavor without relying on artificial additives.
Lastly, you can customize this dessert to make it more health-conscious if desired. For example, opt for reduced-fat cream cheese or low-fat milk in the pudding mix. You can even swap the cookies for a lighter graham cracker base or experiment with sugar-free pudding mix to cut down on overall sugar.
In short, while this dessert is meant to be enjoyed as a treat, it’s one you can feel good about sharing—especially because you made it from scratch, with real ingredients, and a whole lot of love.
Preparation Time, Servings, and Nutritional Information
Before diving into the actual cooking process, it’s helpful to know how long this dessert takes to prepare, how many people it serves, and what kind of nutrition you’re looking at with each slice.
Let’s start with time. One of the best things about this dessert is how fast it comes together. From start to finish, you’ll spend about 30 minutes actively assembling the layers. However, it does need time to chill and set properly in the refrigerator, ideally for at least 4 hours—though overnight is even better if you’re prepping it ahead of time for an event. The chilling is completely hands-off, making this a low-maintenance dessert with big-time results.
As for servings, this recipe is made in a standard 9×13-inch pan, which yields approximately 12 to 16 servings depending on how large you slice it. If you’re serving this at a potluck, you could even stretch it to 20 smaller squares, especially if there are multiple desserts on the table.
Now, onto nutrition. Keep in mind that this is a dessert meant to be enjoyed as an occasional treat. On average, one serving contains:
- Calories: Approximately 380 to 420 per slice
- Protein: 3–4g
- Carbohydrates: 35–40g
- Sugars: 28–32g
- Fat: 24–28g
- Saturated Fat: 14–16g
Of course, these values can vary based on your specific brands and ingredient choices. You can adjust the nutritional profile by using low-fat cream cheese, swapping full-sugar pudding mix with a sugar-free version, or even reducing the amount of whipped cream used.
In short, while this dessert is rich and indulgent, it’s also portion-controlled, easy to share, and adaptable to suit your dietary needs.
Ingredients List
One of the best parts of this dessert is that the ingredients are simple, widely available, and probably already sitting in your pantry or fridge. There’s no need to hunt down anything fancy—just a few kitchen staples come together to create magic.
For the Crust:
- 36 chocolate sandwich cookies (like Oreos), crushed
These cookies form the base of the dessert, providing that classic chocolatey crunch. Crushing them into fine crumbs makes a firm, rich crust. - ½ cup unsalted butter, melted
The melted butter helps bind the cookie crumbs together and adds richness. Using unsalted butter allows you to better control the overall saltiness.
For the Hot Chocolate Cheesecake Layer:
- 8 oz cream cheese, softened
This is the creamy foundation of the cheesecake layer. Make sure it’s room temperature so it mixes smoothly without lumps. - ½ cup unsalted butter, softened
Adds smoothness and body to the cheesecake layer, complementing the tang of the cream cheese. - 1½ cups powdered sugar
Sweetens the cheesecake layer without making it grainy. Powdered sugar dissolves beautifully into the cream mixture. - 1 (3.4 oz) package instant chocolate pudding mix
This brings in the classic hot chocolate flavor and thickens the layer without needing to bake. - 1¼ cups cold milk
Used to mix with the pudding. Make sure the milk is cold so the pudding sets properly. - 1½ cups mini marshmallows
These give texture and nostalgic flavor, mimicking the marshmallows in a cup of hot cocoa.
For the Whipped Cream Layer:
- 2 cups heavy whipping cream
Whipped until fluffy, this becomes the top layer of the dessert, balancing the richness below. - 1 tsp vanilla extract
Adds a warm, aromatic flavor that ties everything together. - ¼ cup powdered sugar
Lightly sweetens the whipped cream without making it too heavy.
Optional Toppings:
- Mini marshmallows
- Chocolate curls or shavings
- Chocolate syrup or hot fudge drizzle
These toppings are optional, but they truly elevate the look and taste. Feel free to get creative!
Step-by-Step Cooking Instructions
Making this Hot Chocolate Cheesecake Dessert is truly as simple as it sounds. Even if you’re new to the kitchen or tend to avoid dessert recipes with too many steps, this one is extremely forgiving. Each layer comes together easily and builds on the last, making it a fun process with a beautiful result. Here’s how to make it, step by step.
Step 1: Prepare the Cookie Crust
The first step is all about building a sturdy, delicious base for the cheesecake. The chocolate cookie crust adds richness and a little crunch to contrast the creamy layers above.
- Start by placing 36 chocolate sandwich cookies into a food processor. Pulse until you get fine, even crumbs. If you don’t have a food processor, no worries—simply place the cookies in a sealed plastic bag and crush them with a rolling pin or the bottom of a heavy glass. It’s a great stress reliever too.
- Pour the cookie crumbs into a mixing bowl. Add ½ cup of melted unsalted butter and stir until all the crumbs are coated and resemble wet sand. This texture will help the crust hold together once it’s chilled.
- Now, press the cookie mixture firmly into the bottom of a 9×13-inch baking dish. Use the bottom of a measuring cup or a flat glass to press the crumbs into an even, tight layer. Make sure to get the edges, too.
- Place the crust in the refrigerator while you prepare the cheesecake layer. This gives it time to firm up and set, creating a strong foundation for the rest of the dessert.
Step 2: Make the Hot Chocolate Cheesecake Layer
This layer is where all the cozy hot chocolate flavors shine. It’s creamy, chocolatey, and filled with soft mini marshmallows for a fun surprise in every bite.
- In a large mixing bowl, beat 8 oz of softened cream cheese and ½ cup of softened unsalted butter until smooth and fluffy. This will take about 2–3 minutes using a hand or stand mixer. If you don’t have a mixer, a strong whisk and a little patience will do the trick.
- Once the mixture is smooth, gradually add in 1½ cups of powdered sugar. Beat until fully incorporated and creamy. Don’t rush this step—taking your time ensures the sugar dissolves properly for a silky texture.
- In a separate medium bowl, whisk together the 3.4 oz package of instant chocolate pudding mix and 1¼ cups of cold milk. Stir for about 1–2 minutes until it starts to thicken slightly. You don’t want it completely set—just thick enough to blend easily into the cream cheese mixture.
- Gently fold the pudding mixture into the cream cheese mixture. Use a spatula to mix until everything is well combined and you have a smooth, chocolatey filling.
- Add 1½ cups of mini marshmallows and fold them in. These add that hot cocoa vibe and a bit of texture. You can use more or fewer marshmallows depending on your preference.
- Remove the chilled crust from the refrigerator. Spoon the cheesecake filling over the crust and spread it into an even layer using a spatula. Be gentle to avoid disturbing the crust underneath.
- Return the pan to the fridge while you make the whipped cream topping.
Step 3: Make the Whipped Cream Layer
The whipped cream topping adds a light, airy finish that balances out the richness of the chocolate cheesecake layer. It’s made from scratch, which gives it a fresh flavor that you just can’t get from store-bought versions.
- In a chilled mixing bowl, pour 2 cups of heavy whipping cream. Add 1 tsp of vanilla extract and ¼ cup of powdered sugar.
- Using a hand mixer or stand mixer, beat on medium-high speed until stiff peaks form. This means the cream holds its shape when you lift the beaters. Don’t overbeat, or it can start to turn buttery.
- Once the whipped cream is ready, gently spread it over the cheesecake layer. Use a spatula or the back of a spoon to create soft swirls across the top—it doesn’t have to be perfect. In fact, a few rustic swoops make it look even more inviting.
Step 4: Chill the Dessert
Chilling is key for this dessert to set up properly and develop all those luscious layers.
- Cover the dish loosely with plastic wrap or foil. Place it in the refrigerator and let it chill for at least 4 hours. If possible, let it sit overnight to ensure the layers fully firm up and the flavors meld beautifully.
- Avoid cutting into it too soon, or you may end up with runny slices. Patience is definitely rewarded here.
Step 5: Add the Toppings Before Serving
This is where you can really have fun and make the dessert your own. The toppings aren’t required, but they add visual appeal and a final hit of indulgence.
- Just before serving, top the whipped cream layer with extra mini marshmallows. Scatter them across the surface for a playful and nostalgic look.
- Add chocolate curls or shavings by running a vegetable peeler along a bar of chocolate. It’s an easy trick that looks elegant and tastes amazing.
- Finally, drizzle with chocolate syrup or hot fudge. You can create a zigzag pattern, pour over individual slices, or just go wild across the top—whatever suits your mood.
And there you have it—a stunning, no-bake Hot Chocolate Cheesecake Dessert that’s as delicious as it is comforting.

How to Serve this hot chocolate cheesecake
Serving this dessert is almost as fun as making it. Once the layers are fully chilled and set, it’s time to slice and impress your guests—or just treat yourself.
Begin by using a sharp knife to cut clean slices. For the best results, rinse the knife with warm water and wipe it between each cut. This prevents the layers from smearing and keeps your slices looking picture-perfect. A metal spatula works great for lifting the pieces from the pan.
If you’re serving this at a dinner party or gathering, place each slice on a dessert plate and add a little flair. You can drizzle extra chocolate sauce over the top, add a dollop of whipped cream, or sprinkle crushed cookie crumbs for added texture.
For a more casual setting, you can serve it directly from the dish—family-style. It’s perfect for birthdays, movie nights, or potlucks where everyone grabs a piece and gathers around.
This dessert also works well in individual portions. You can divide the layers into small cups or jars for mini cheesecakes, which are perfect for events or packed lunches. They look adorable and feel extra special.
Pair each serving with a hot drink—like coffee or warm milk—to complement the cold, creamy layers. The contrast in temperature enhances the dessert’s richness and brings out the cocoa flavors even more.
Lastly, if you’re serving this to kids, consider topping it with sprinkles or crushed candy for a colorful twist. It’s an easy way to make it fun and festive for younger guests.
However you choose to serve it, this dessert is guaranteed to bring smiles and seconds.
Pairing Suggestions
While this dessert is a star on its own, it also pairs wonderfully with a range of sides and beverages that can take your presentation to the next level.
Starting with drinks, a warm cup of hot cocoa naturally complements the flavors in the cheesecake. You can also go for a latte, cappuccino, or even decaf coffee in the evening. The creamy, bitter notes of coffee help cut through the sweetness and balance the richness of the dessert.
If you’re looking for a more refreshing option, try serving it with a tall glass of cold milk or a warm herbal tea. Mint tea or cinnamon tea, in particular, adds a nice aromatic contrast to the chocolate. For something fancier, a frothy chai latte or spiced milk can really tie everything together.
As for food pairings, consider offering something crunchy and salty on the side. Pretzel sticks or salted almonds create a beautiful contrast in texture and taste. The saltiness brings out the chocolate even more and gives your dessert plate some variety.
For a larger dessert spread, serve this cheesecake alongside a fruit platter. Fresh berries like strawberries, raspberries, or blueberries provide a tart bite that contrasts nicely with the sweetness of the cheesecake. You could also offer a fruit sorbet or a citrus tart for those who prefer a lighter finish to their meal.
On colder days, serve it with warm brownies or a simple apple crisp to create a comforting dessert trio. The warmth from baked goods pairs so nicely with the cool, creamy layers of the cheesecake.
Finally, if you’re planning a dessert table for a gathering, consider offering mini versions of this cheesecake in cups or jars. That way, guests can sample several treats without committing to one big slice.
Storage, Freezing & Reheating Instructions
One of the great things about this no-bake dessert—besides how insanely delicious it is—is how well it holds up in the fridge and freezer. That means you can make it in advance, enjoy leftovers, and even freeze extra portions for later indulgence. Let’s talk about the best ways to store and serve it after the initial celebration is over.
Storing in the Refrigerator
After you’ve made the dessert and let it chill in the fridge for at least four hours (or overnight), you’ll want to store any leftovers properly to keep them fresh.
Cover the dish tightly with plastic wrap or aluminum foil. You can also transfer slices into airtight containers if you prefer storing individual servings. In the refrigerator, this dessert will stay fresh for up to 4–5 days. The texture of the crust may soften slightly over time, but the flavor stays absolutely wonderful.
To serve leftovers, simply slice and enjoy straight from the fridge—no reheating required. In fact, it’s best served cold since that’s when the cheesecake layer is at its dreamiest consistency.
Freezing for Later
If you want to keep it even longer, you’ll be happy to know that this dessert freezes beautifully. Whether you’re making it ahead for a holiday party or saving extra slices for future cravings, freezing is a great option.
To freeze the full dessert, wrap the entire pan securely with two layers of plastic wrap followed by a layer of foil. For best results, freeze without the optional toppings, and add them fresh after thawing.
For individual portions, slice the dessert into squares and place them on a parchment-lined baking sheet. Freeze until firm, then transfer the frozen pieces into a freezer-safe container or zip-top bag. Add a layer of parchment between slices to prevent sticking.
The dessert can be frozen for up to 2 months. When you’re ready to enjoy it again, transfer the slices to the refrigerator and allow them to thaw overnight. You can also let them sit at room temperature for about 30 minutes if you need them sooner.
Reheating Tips
Since this is a cold dessert, you won’t need to reheat it in the traditional sense. In fact, heating it could cause the layers to melt or lose structure. The best way to “revive” a frozen or chilled slice is simply to let it come slightly closer to room temperature before serving. This softens the crust and makes the whipped cream topping extra creamy.
In summary, this dessert is a dream when it comes to storage and planning ahead. You can make it days in advance, save leftovers, and even enjoy it weeks later from the freezer. It’s the ultimate make-ahead dessert for busy hosts and future-you.
Common Mistakes to Avoid
Even though this Hot Chocolate Cheesecake Dessert is incredibly simple to make, a few common pitfalls can trip up even the most confident bakers. But don’t worry—once you know what to watch for, they’re all easily avoidable. Here are some of the most frequent mistakes and how you can steer clear of them.
Using Warm Ingredients
One of the biggest issues that can affect the texture of your cheesecake layer is using warm or hot pudding or cream cheese. Make sure all your ingredients are at room temperature (except the cold milk for the pudding). Softened butter and cream cheese mix smoothly, but if they’re too warm, they can create a runny filling. Cold pudding helps everything firm up beautifully without getting watery.
Not Chilling Long Enough
It might be tempting to dig in after just an hour or two, especially when the kitchen smells like cocoa heaven. But this dessert really does need at least 4 hours in the refrigerator to set properly. Cutting it too soon can lead to messy slices and a loose, unstable texture. For the best presentation and flavor, chill overnight.
Overbeating the Whipped Cream
While making homemade whipped cream is easy and delicious, it’s important not to overdo it. Overbeating can cause the cream to turn grainy or start turning into butter. You’re aiming for stiff peaks—just enough for it to hold its shape. Once it’s there, stop mixing.
Skipping the Cookie Crust Chill
After pressing your cookie crust into the pan, always give it a little fridge time before adding the cheesecake layer. This helps it firm up and prevents the crust from crumbling or mixing into the filling.
Adding Toppings Too Early
It’s tempting to top your dessert with all the goodies as soon as it’s assembled, but if you add marshmallows or chocolate curls too early, they can become soggy in the fridge. Wait to add toppings until just before serving for the freshest texture and most visual impact.
Avoid these common slip-ups, and you’ll have a stunning, crowd-pleasing dessert that’s as flawless as it is delicious.
Pro Tips
If you really want to take your Hot Chocolate Cheesecake Dessert to the next level, these expert tips will help you get the best texture, flavor, and presentation every single time. They’re the little things that can make a big difference.
Tip 1: Use a Food Processor for the Crust
While crushing cookies by hand definitely works, a food processor will give you the most consistent, fine crumbs. This ensures your crust holds together well and gives a smoother base. If you don’t have a food processor, try sealing the cookies in a freezer bag and crushing them with a rolling pin.
Tip 2: Soften the Cream Cheese and Butter Properly
Let both the cream cheese and butter sit at room temperature for at least 30 minutes before mixing. This helps them whip up light and fluffy, without lumps. If you’re in a hurry, microwave them for just a few seconds—but don’t let them melt.
Tip 3: Chill Your Mixing Bowl for Whipped Cream
To get the fluffiest whipped cream, chill your mixing bowl and beaters in the fridge for 10 to 15 minutes before using. Cold equipment helps the cream whip faster and hold its peaks longer, especially if your kitchen is warm.
Tip 4: Customize Your Toppings
This recipe is perfect for playing around with toppings. Beyond the classic marshmallows and chocolate syrup, you could add crushed peppermint candies, a sprinkle of cinnamon, or even caramel sauce. Tailor it to the season or the occasion to keep things exciting.
Tip 5: Slice with a Warm Knife
For perfect, clean slices, run a sharp knife under hot water before each cut, and wipe it dry with a towel. This helps the blade glide through the layers without dragging or smearing.
These pro tips are all about making your dessert look as amazing as it tastes—and giving you confidence in the kitchen while you’re at it.
Frequently Asked Questions (FAQs)
Can I use store-bought whipped topping instead of homemade whipped cream?
Yes, you absolutely can! If you’re in a pinch or just prefer the convenience, an 8-ounce tub of whipped topping (like Cool Whip) will work well in place of the homemade whipped cream. Just make sure it’s fully thawed before spreading it over the cheesecake layer. However, if you have a few extra minutes, homemade whipped cream really brings that fresh, airy finish and gives the dessert a more elevated taste.
Can I make this dessert ahead of time?
Definitely. In fact, making it ahead is encouraged. This dessert tastes even better when the flavors have had time to meld together. You can prepare it up to 24 hours in advance. Just keep it covered in the fridge and add the toppings right before serving. That way, the marshmallows stay fluffy and the chocolate curls remain crisp.
What kind of chocolate pudding should I use?
You’ll want to use instant chocolate pudding mix, not the cook-and-serve variety. The instant mix thickens quickly when combined with cold milk, making it ideal for this no-bake recipe. Stick with the standard 3.4-ounce size box. For a more intense chocolate flavor, you can also try dark chocolate or chocolate fudge pudding mix.
Can I make this gluten-free?
Absolutely! To make the recipe gluten-free, simply swap the chocolate sandwich cookies for a gluten-free version. Many brands now offer gluten-free sandwich cookies that taste just like the originals. Be sure to also check the labels on your pudding mix and marshmallows to confirm they’re certified gluten-free.
Can I use low-fat or non-dairy alternatives?
Yes, with a few modifications. You can use low-fat cream cheese and reduced-fat milk in the pudding mixture without much change in flavor or texture. For a non-dairy version, try dairy-free cream cheese, plant-based whipped topping, and almond or oat milk. Keep in mind that the consistency may be slightly different, especially with non-dairy milk, so use a pudding mix that works with plant-based options.
What if I don’t have mini marshmallows?
No worries at all. If you can’t find mini marshmallows, you can chop up regular-sized ones or even leave them out entirely. The dessert will still taste amazing. Some people like to toast marshmallows and place them on top just before serving for a slightly smoky, campfire-like twist.
How long does this dessert need to chill?
This dessert needs at least 4 hours in the refrigerator to set properly. However, if you can plan ahead, letting it chill overnight gives it the best texture and flavor. The longer chilling time helps the layers firm up and makes slicing a breeze.
What if I don’t have a 9×13-inch pan?
You can easily divide the layers between two smaller pans—like two 8×8-inch square pans—or use a deep round dish instead. Just keep in mind that the thickness of the layers may vary slightly, and you’ll need to adjust your serving sizes accordingly.
Can I freeze this dessert?
Yes! This dessert freezes really well. Wrap the full pan or individual slices in plastic wrap, followed by foil or a freezer-safe bag. Freeze for up to 2 months. Thaw overnight in the fridge before serving. Just be sure to add your final toppings fresh after thawing for best texture and appearance.
Can I turn this into individual desserts?
Absolutely. This dessert is perfect for portioning into jars or small cups for individual servings. Just layer the crust, cheesecake filling, and whipped cream in each container, then chill as usual. It’s a great option for parties, picnics, or even meal-prepping a little treat for yourself.
These FAQs should cover just about everything you need to know to make this Hot Chocolate Cheesecake Dessert with total confidence. Still have questions? Feel free to experiment and make it your own—you’ll be surprised how adaptable this recipe can be.
Conclusion & Call to Action
There you have it—your complete guide to making the ultimate no-bake Hot Chocolate Cheesecake Dessert. From its rich, velvety chocolate cheesecake layer to the buttery cookie crust and fluffy whipped cream topping, every bite delivers comfort, nostalgia, and just the right touch of indulgence.
What makes this dessert truly special, beyond its irresistible flavor, is how easy it is to prepare. You don’t need a fancy mixer or baking experience. You don’t even need an oven. All you need is a few basic ingredients, a bit of layering, and a few hours of chilling time. The result? A dessert that looks like it came from a bakery, tastes like your favorite winter treat, and makes any moment feel extra cozy.
Whether you’re sharing it at a family gathering, bringing it to a potluck, or simply treating yourself after a long day, this dessert is guaranteed to bring smiles. It’s also a hit with kids and adults alike, so it’s a great go-to for just about any crowd.
And don’t be afraid to get creative with it. Swap in different pudding flavors, try fun toppings, or layer it into mini cups for a modern twist. The beauty of this recipe lies in how versatile and forgiving it is—you really can’t go wrong.
So now it’s your turn. I hope you’ll give this Hot Chocolate Cheesecake Dessert a try and fall in love with it just like I did. When you do, I’d love to hear how it turned out for you. Feel free to leave a comment, share your thoughts, or tag me in your delicious photos. Seeing your creations makes my day, and I’m always here to cheer you on in your kitchen adventures.
Happy no-baking, and enjoy every bite!
Print
Hot Chocolate Cheesecake Dessert: No-Bake, Creamy Treat
- Total Time: 4 hours, 30 minutes (includes chill time)
- Yield: 12–16 servings 1x
- Diet: Vegetarian
Description
This no-bake hot chocolate cheesecake brings cozy winter flavors into a creamy layered dessert. With a buttery cookie crust, fluffy whipped topping, and marshmallow-studded chocolate cheesecake filling, it’s the ultimate crowd-pleaser for holidays, potlucks, or anytime you crave a cool and comforting sweet treat.
Ingredients
-
Crust:
-
36 chocolate sandwich cookies (like Oreos), crushed
-
½ cup unsalted butter, melted
-
-
Hot Chocolate Cheesecake Layer:
-
8 oz cream cheese, softened
-
½ cup unsalted butter, softened
-
1½ cups powdered sugar
-
1 (3.4 oz) package instant chocolate pudding
-
1¼ cups cold milk
-
1½ cups mini marshmallows
-
-
Whipped Cream Layer:
-
2 cups heavy whipping cream
-
1 tsp vanilla extract
-
¼ cup powdered sugar
-
-
Optional Toppings:
-
Mini marshmallows
-
Chocolate curls or shavings
-
Chocolate syrup or hot fudge drizzle
-
Instructions
-
Crush cookies and mix with melted butter. Press into a 9×13″ dish. Chill.
-
Beat cream cheese and butter. Add powdered sugar.
-
In another bowl, whisk pudding with cold milk. Let it set slightly.
-
Fold pudding into the cream cheese mix. Stir in mini marshmallows. Spread over crust.
-
Whip cream with vanilla and powdered sugar until stiff peaks form. Spread over the cheesecake layer.
-
Chill for 4+ hours or overnight.
-
Top with mini marshmallows, chocolate curls, or drizzle just before serving.
Notes
-
Best when chilled overnight
-
Add toppings just before serving to prevent sogginess
-
Store in fridge up to 5 days; freeze for up to 2 months
-
Gluten-free cookies can be substituted
-
For neat slices, use a warm knife
- Prep Time: 30 minutes
- Cook Time: 0 minutes (no-bake)
- Category: Dessert
- Method: No-Bake
- Cuisine: American