
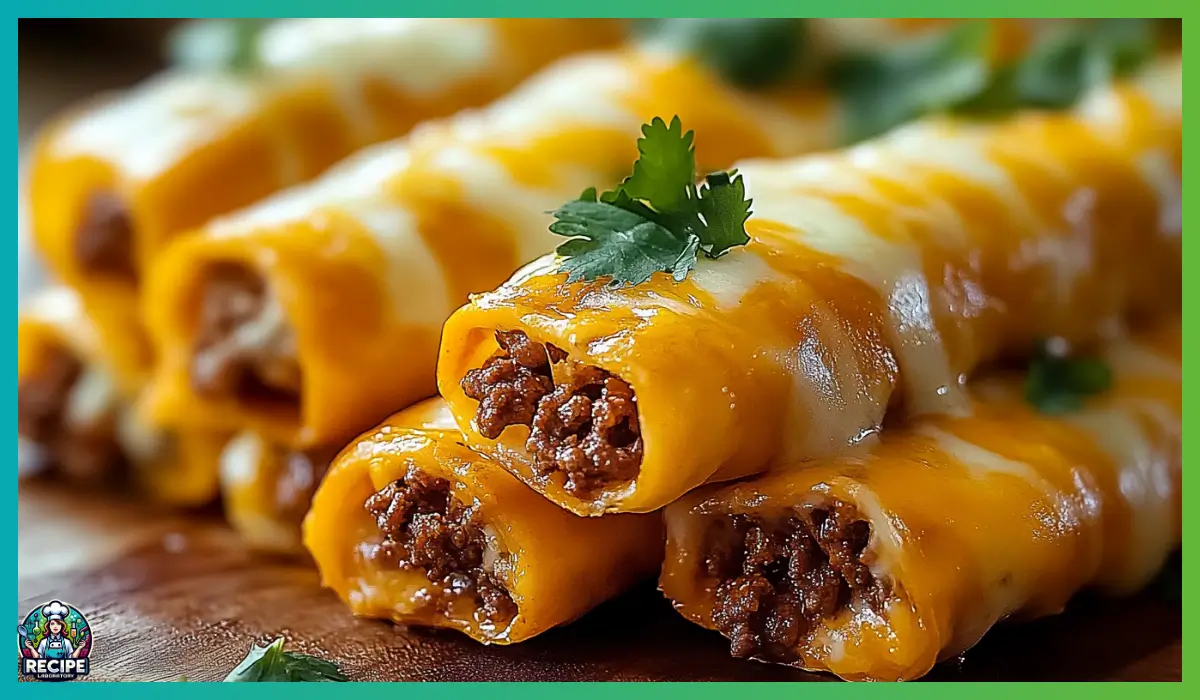
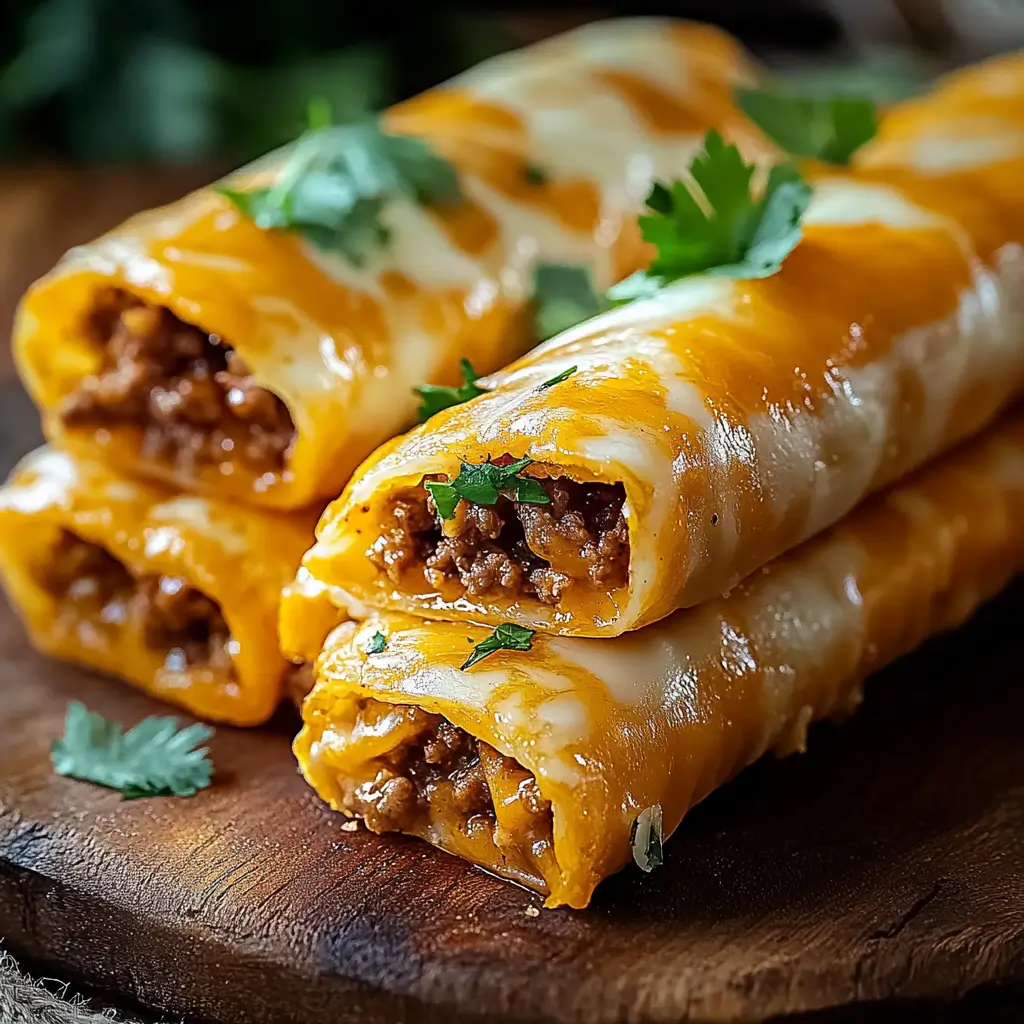
There’s something magical about cheesy, savory snacks that come together quickly and taste like you spent hours in the kitchen. These Cheesy Taco Sticks have become that go-to recipe in our house—the kind of snack that works perfectly for lazy Sundays, game nights, after-school treats, and even a casual dinner when paired with a simple salad or some roasted veggies. Think of them as a mash-up between a taco and a pizza roll, with all the gooey cheese and seasoned beef goodness you crave, wrapped up in soft, golden pizza dough.
What makes this recipe so special is how incredibly simple it is without sacrificing on flavor. You don’t need to be a professional cook or even a confident one. With a few pantry staples—like pre-made pizza dough, ground beef, taco seasoning, and string cheese—you can whip up a batch of these irresistible taco sticks in no time. And once you try them, you’ll understand why they disappear so fast every time I make them.
The first time I made these, it was honestly on a whim. I had leftover taco meat and a tube of pizza dough sitting in the fridge, and I just couldn’t do another plate of nachos or tacos. I needed something new but comforting. So I grabbed a few cheese sticks and started experimenting. What came out of the oven was so good, I had to pause mid-bite and immediately text the recipe to two friends. That’s how you know it’s a keeper.
If you’re looking for something easy, cheesy, and endlessly customizable, these Cheesy Taco Sticks are about to become your new obsession. Whether you serve them as a main course or an appetizer, they’ll bring that warm, satisfying flavor that makes everyone around the table smile.
Why You’ll Love This Recipe
There are so many reasons to love these cheesy taco sticks, and I could go on for days, but let’s start with the basics. This recipe is a triple threat: it’s easy, delicious, and family-approved. No matter who you’re feeding—picky kids, hungry teens, or snack-loving adults—this recipe hits the sweet spot between fun and filling.
First of all, let’s talk about how easy it is to make. We’re talking about minimal prep time and no complicated steps. The filling comes together quickly with just ground beef and taco seasoning, while the store-bought pizza dough makes assembly a breeze. You don’t need any fancy kitchen tools or techniques. If you can roll up a burrito, you can make these taco sticks.
Second, the flavor is next-level. You get the bold, savory seasoning from the taco meat paired with the melty, creamy goodness of the cheese sticks. The pizza dough gets golden and slightly crisp on the outside while staying pillowy-soft on the inside. And don’t even get me started on the buttery garlic-parsley glaze on top. It adds just the right amount of richness and makes your kitchen smell amazing while everything’s baking.
Third, these are super customizable. You can adjust the seasoning, add veggies to the filling, switch up the cheese, or even use ground turkey or chicken instead of beef. You can also make them spicy or keep them mild, depending on your family’s preferences. They work as a meal, snack, or party food, and they’re great for dipping in salsa, sour cream, or guacamole.
And finally, these taco sticks are a hit with both kids and adults. There’s something about food in stick form that just feels more fun and approachable. The cheese pull is real, and the filling is hearty enough to satisfy even the biggest appetites. Once you make these, don’t be surprised if your family starts requesting them weekly.
Health Benefits
While these Cheesy Taco Sticks are definitely a comfort food treat, there are still some surprising health benefits you might not expect. When you make them at home, you’re already ahead of the game in terms of controlling ingredients, portion sizes, and overall nutrition. And with a few smart tweaks, you can enjoy these without feeling like you’re throwing your healthy habits out the window.
Starting with the protein source—lean ground beef is packed with high-quality protein that helps support muscle health and keeps you feeling full longer. It’s also a great source of iron, zinc, and vitamin B12, which are essential for energy, immune function, and brain health. If you want to make the dish even lighter, you can easily substitute ground turkey or chicken, both of which offer lean protein with less saturated fat.
The cheese in this recipe contributes calcium, which is vital for strong bones and teeth. Colby jack or cheddar also brings in some vitamin A and a bit of healthy fat to keep the dish satisfying. If you’re watching your fat intake, consider using low-fat cheese sticks or even a part-skim mozzarella for a lighter alternative.
Using pre-made pizza dough can be a time-saver, but you can also look for whole wheat versions to add more fiber and nutrients. That extra fiber can help with digestion and keep blood sugar levels more stable. And while we do use melted butter to brush the tops, the amount is moderate and can be adjusted to your preference. You could even opt for olive oil if you’re looking for a heart-healthier option.
If you pair these taco sticks with some fresh veggies or a side salad, you’re turning them into a balanced meal. Adding a side of guacamole or avocado slices introduces healthy fats, while salsa gives you an extra dose of tomatoes and antioxidants.
In short, while these may look indulgent—and yes, they totally feel indulgent—they can fit into a balanced diet, especially when you’re mindful about ingredients and portions.
Preparation Time, Servings, and Nutritional Information
One of the best things about this recipe is how quick and straightforward it is. Even if you’re cooking on a busy weeknight or hosting friends last-minute, these Cheesy Taco Sticks come together effortlessly.
Preparation Time:
Prep Time: 15 minutes
Cook Time: 15 minutes
Total Time: 30 minutes
Servings:
This recipe makes 10 taco sticks, which can serve 4 to 5 people if you’re serving it as a main dish, or up to 10 if it’s being enjoyed as a snack or appetizer.
Nutritional Information (Per Taco Stick):
Calories: 350
Protein: 15g
Fat: 22g (10g saturated)
Carbohydrates: 20g
Sodium: 750mg
Fiber: 2g
These numbers are approximate and can vary depending on the specific ingredients you use, especially if you swap out the meat or cheese. But overall, you’re getting a fairly balanced bite with a nice mix of protein, fats, and carbs. You can easily track these into your daily meal plan or adjust portions if needed.
Ingredients List
To make these cheesy taco sticks, you only need a handful of ingredients, many of which you might already have on hand. Each one plays a key role in building layers of flavor and texture.
1 lb ground beef
Ground beef is the base of your taco filling. Go for leaner cuts if you want to keep things lighter, but any variety will work. Cook it until browned and crumbly for that perfect taco texture.
1 packet taco seasoning mix
This is what gives the filling that signature taco flavor. You can use any store-bought mix, or make your own using a blend of chili powder, cumin, paprika, garlic powder, onion powder, and salt.
1 tube Pillsbury pizza dough
Pre-made pizza dough keeps this recipe simple and speedy. Pillsbury’s classic version works great, but you can substitute with your favorite brand or even homemade dough if you prefer.
5 Colby jack or cheddar cheese sticks, halved
These cheese sticks melt perfectly inside the taco sticks, giving you that gooey, stretchy middle that everyone loves. Halving them gives you just the right amount for each stick.
4 tablespoons butter, melted
This is used to brush over the dough before baking, adding flavor and helping the crust brown beautifully.
1 teaspoon garlic powder
Garlic powder gives the butter mixture a savory depth that makes every bite more irresistible.
1 teaspoon dried parsley
A sprinkle of dried parsley adds a little color and a subtle herbal note to the butter topping.
All of these ingredients come together to create something much greater than the sum of their parts. Once you’ve got them ready, you’re well on your way to taco stick heaven.
Step-By-Step Cooking Instructions
Now let’s walk through exactly how to make these taco sticks, from browning the beef to pulling them out of the oven golden and bubbling. Follow these steps closely, and you’ll end up with a snack that’s crispy on the outside, cheesy on the inside, and bursting with taco flavor in every bite.
Step 1: Preheat the oven
Begin by preheating your oven to 400°F (200°C). This is the ideal temperature to give the dough a crisp, golden exterior while ensuring everything inside gets hot and melty.
Step 2: Prepare your baking sheet
Line a baking sheet with parchment paper or a silicone baking mat. This will prevent the taco sticks from sticking and make cleanup a breeze. If you don’t have parchment, lightly greasing the pan works too.
Step 3: Cook the ground beef
Place a large skillet over medium heat and add the ground beef. Break it up with a wooden spoon or spatula and cook until fully browned, about 7–8 minutes. Be sure to stir occasionally so it browns evenly. Once it’s cooked through, drain any excess fat from the pan. Then stir in the taco seasoning. If you’re using a packet, follow the directions—usually adding some water and simmering until thickened. Once done, remove the pan from heat and let the mixture cool slightly.
Step 4: Roll out the dough
Open the tube of pizza dough and roll it out on a lightly floured surface or a clean countertop. Try to get it into a rectangle shape. Then, using a pizza cutter or sharp knife, slice the dough into 10 equal rectangles. If they aren’t perfect, don’t stress—it’s a forgiving recipe.
Step 5: Assemble the taco sticks
Take one rectangle of dough and place a generous spoonful of the seasoned beef in the center. Don’t overfill or it’ll be hard to seal. Next, place half a cheese stick on top of the beef. Carefully roll the dough over the filling, tucking the ends in and pinching the seams to seal everything inside. Place the finished stick seam-side down on your prepared baking sheet. Repeat with the remaining dough and filling.
Step 6: Make the garlic butter topping
In a small bowl, mix together the melted butter, garlic powder, and dried parsley. Once all your taco sticks are assembled and on the tray, brush the tops generously with this mixture. It adds flavor and helps the dough turn a beautiful golden color.
Step 7: Bake
Transfer the baking sheet to the oven and bake for 12–15 minutes. Keep an eye on them toward the end. You want the tops to be golden brown and slightly puffed. The cheese inside should be melted and gooey. If your oven runs hot, check a minute or two early.
Step 8: Cool and serve
Remove from the oven and let them cool for about 5 minutes. This helps the filling set a bit and prevents burnt tongues from impatient bites. Serve with your favorite dips like sour cream, salsa, or guacamole.
How to Serve
Once your Cheesy Taco Sticks are fresh out of the oven, beautifully golden, and slightly cooled, the fun part begins—serving them up. These little pockets of joy are incredibly versatile, and the way you serve them can totally change the vibe of your meal. Whether you’re putting together a snack board, prepping a casual weeknight dinner, or serving appetizers for a party, these taco sticks fit right in.
For a simple and satisfying dinner, I love pairing the taco sticks with a fresh side salad. Something like chopped romaine or arugula tossed with a quick lemon vinaigrette balances the richness of the cheese and beef. Add a scoop of guacamole or some sliced avocado on the side, and you’ve got a meal that feels hearty without being heavy.
If you’re serving these as a game-day snack or party appetizer, arrange them on a large platter with multiple dipping sauces. Sour cream, salsa, spicy ranch, guacamole, or even queso dip are all amazing with these. Everyone loves having options, and it makes the whole presentation look more festive. Add a few colorful garnishes—maybe some lime wedges, fresh cilantro, or thinly sliced jalapeños—and suddenly you’ve got a show-stopper of a snack spread.
Another great way to serve these is as part of a “build-your-own taco stick” night. It’s fun for kids and adults alike. Just set out the cooked beef, shredded cheese or cheese sticks, and dough pieces, and let everyone fill and roll their own before baking. Not only is this interactive and fun, but it also lets everyone customize their own snack—extra cheese for one person, a spicier version for another, and maybe even a vegetarian one for someone else.
Finally, these taco sticks are amazing for on-the-go meals. Pack a few in lunchboxes with a small container of salsa or sour cream. They’re easy to reheat and stay soft and flavorful even a day or two later. However you decide to serve them, they’re bound to be a hit.
Pairing Suggestions
Now let’s talk about what goes well with Cheesy Taco Sticks. While they’re totally delicious on their own, pairing them with the right sides and drinks can elevate your meal from good to unforgettable. Since these are rich, cheesy, and savory, it’s best to balance them with lighter, fresher sides or pair them with bold flavors that can stand up to the taco spices.
Fresh Side Dishes
Start with a crunchy salad. A simple lettuce mix with cucumbers, tomatoes, and a citrusy vinaigrette can help cleanse your palate between bites. For something a bit more exciting, try a corn and black bean salad with lime dressing—it’s zesty, refreshing, and brings a Tex-Mex vibe that matches perfectly with the taco flavor.
You could also serve roasted or grilled vegetables on the side. Bell peppers, onions, and zucchini tossed in olive oil and seasoned with a pinch of cumin and garlic powder would be especially tasty. The roasted flavor works beautifully with the seasoned beef and cheese inside the sticks.
Fun Dipping Sauces
Dips are a must. Sour cream is the classic cool counterpart to spicy or savory dishes, and it’s a natural fit here. Salsa—whether it’s chunky, smooth, spicy, or mild—adds acidity and brightness. Guacamole adds richness and healthy fats that pair well with the crunchy, cheesy bite. If you like it spicy, try a chipotle mayo or a jalapeño-lime crema.
For Kids
If you’re serving this dish to kids, consider pairing it with buttered noodles or mac and cheese for an extra-comforting plate. Even sliced fruit or applesauce can round out a kid-friendly meal while keeping prep minimal.
For Adults
If you’re hosting friends or enjoying a casual dinner, consider sparkling water with lime, iced tea, or even a non-alcoholic mojito to bring some refreshing contrast. Since we’re keeping the recipe halal, these drinks are festive without relying on alcohol. The crisp, citrus-forward flavors work really well with the rich, savory notes of the taco sticks.
Whether you’re serving for a crowd or a quiet night in, pairing the taco sticks with the right sides makes all the difference. The key is to contrast textures and balance richness with freshness.
Storage, Freezing & Reheating Instructions
One of the things I love most about this recipe is how well it stores and reheats. These taco sticks are ideal for meal prep, lunchboxes, or quick snacks later in the week. Plus, you can freeze them—cooked or uncooked—and enjoy homemade taco goodness whenever the craving strikes.
Refrigerator Storage
Once the taco sticks are fully baked and cooled, store them in an airtight container in the refrigerator. They’ll keep well for up to 3 days. If you’re stacking them, place a sheet of parchment or wax paper between layers to prevent sticking.
Reheating Instructions
To reheat, you have a few options depending on your time and what kind of texture you want.
- Oven: Preheat your oven to 350°F (175°C), place the taco sticks on a baking sheet, and heat for 8–10 minutes. This will restore the crispy exterior while warming the inside evenly.
- Air Fryer: Set to 325°F and cook for 4–5 minutes. This gives you a super crispy crust without drying out the filling.
- Microwave: If you’re short on time, microwave on a microwave-safe plate for 45–60 seconds. Keep in mind the crust might be softer, but it’ll still taste great.
Freezing Instructions
If you want to freeze them, you can do it either before or after baking.
- To Freeze Before Baking: Assemble the taco sticks as usual, then place them on a parchment-lined baking sheet. Freeze for about 1–2 hours, or until solid. Transfer them to a freezer-safe bag or container and freeze for up to 3 months. When you’re ready to bake, no need to thaw—just add a few extra minutes to the baking time.
- To Freeze After Baking: Let the taco sticks cool completely. Wrap each one individually in plastic wrap, then store them in a freezer-safe container or bag. When reheating, bake at 350°F for 10–12 minutes from frozen or until heated through.
Having these ready to go in the freezer makes them a total lifesaver on busy nights.
Common Mistakes to Avoid in these easy cheesy taco sticks
Even with a simple recipe like this, a few common pitfalls can make or break your taco stick success. Let’s walk through the most important mistakes to avoid, so you can get the perfect golden, gooey result every time.
1. Overstuffing the Dough
It’s tempting to pack in as much filling as possible, but resist that urge. Too much beef or cheese can cause the dough to burst open during baking, resulting in a mess and uneven cooking. Stick to about 1–2 tablespoons of filling per stick, and make sure the edges are sealed tightly.
2. Not Draining the Ground Beef Properly
After browning the beef, make sure to drain off the excess fat. If you skip this step, the grease can seep into the dough, making it soggy and preventing it from baking evenly. Drain well before adding the taco seasoning.
3. Skipping the Garlic Butter Topping
This step might seem optional, but it really enhances the flavor and texture. The butter helps the dough brown beautifully while the garlic and parsley add a crave-worthy savory finish. Don’t skip it, and be generous with your brush strokes.
4. Not Preheating the Oven
Your oven needs to be fully preheated to 400°F before the taco sticks go in. A hot oven ensures the dough cooks quickly, giving you that crisp exterior and gooey center. Putting them in too early can lead to uneven cooking and underbaked dough.
5. Overbaking or Underbaking
Keep an eye on your taco sticks in the last few minutes of baking. If they’re too pale, the dough may still be raw in the center. If they’re overly dark, the crust can get tough. The sweet spot is a golden-brown color with a soft, puffy texture.
Avoiding these mistakes ensures your taco sticks come out just the way they should—crispy, melty, and packed with flavor.
Pro Tips of these easy cheesy taco sticks
Want to take your Cheesy Taco Sticks to the next level? These pro tips will help you master the technique and customize the recipe to your taste. Whether it’s your first time or your fiftieth, there’s always room for a little upgrade.
1. Use Freshly Grated Cheese for an Extra Gooey Center
While string cheese sticks are convenient, you can also use freshly grated cheese for a slightly more melty center. Try mixing Colby jack, cheddar, and mozzarella for a three-cheese blend that stretches beautifully when pulled apart.
2. Toast the Garlic Butter Topping for More Flavor
If you want a deeper flavor in your garlic butter, gently warm it on the stove or in the microwave for 30 seconds with the garlic powder and parsley before brushing it on. This gives it a richer, more developed taste.
3. Add Vegetables to the Filling
To sneak in some veggies or bulk up the filling, try adding sautéed onions, bell peppers, or even corn to the taco meat. Just be sure to cook off any extra moisture so it doesn’t make the dough soggy.
4. Chill the Dough Slightly for Easier Rolling
If your pizza dough gets too warm or sticky, pop it in the fridge for 10 minutes before rolling. Slightly chilled dough is easier to cut and shape, making the assembly process smoother.
5. Serve with Multiple Dips for a Flavor Party
Offering more than one dipping sauce not only makes the experience more fun, but also allows everyone to customize their bites. Keep it classic with sour cream and salsa, or add a spicy sriracha mayo for an extra kick.
Frequently Asked Questions (FAQs)
Every great recipe comes with a few questions, especially when it becomes part of your weekly rotation. Whether you’re making these Cheesy Taco Sticks for the first time or the fifteenth, these frequently asked questions will help troubleshoot common concerns, offer creative ideas, and make the whole process smoother.
Can I use homemade taco seasoning instead of store-bought?
Absolutely. If you prefer to avoid pre-packaged seasoning mixes, it’s easy to make your own. Combine 1 tablespoon chili powder, 1 teaspoon cumin, 1 teaspoon paprika, ½ teaspoon garlic powder, ½ teaspoon onion powder, ¼ teaspoon oregano, and salt to taste. You can also add a pinch of cayenne if you like a little heat. This homemade version is flavorful, customizable, and free of preservatives.
Can I make these taco sticks ahead of time?
Yes, and there are a couple of ways to do it. You can fully assemble the taco sticks, place them on a tray, cover tightly with plastic wrap, and refrigerate for up to 24 hours before baking. Or, bake them completely, let them cool, and store them in the fridge to reheat later. Either way, they’ll still taste fantastic.
Can I freeze these before baking?
Definitely. To freeze unbaked taco sticks, arrange them on a baking sheet and freeze until solid, then transfer them to a freezer-safe container or bag. When you’re ready to bake, you don’t need to thaw them—just bake straight from frozen, adding 3 to 5 extra minutes to the baking time. This is a great make-ahead strategy for busy weeks.
What if I don’t have pizza dough?
If you don’t have store-bought pizza dough, you can use crescent roll dough for a flakier texture, or even homemade pizza dough if you have a favorite recipe. Puff pastry can work too, though it will give the final result a lighter, crispier feel. Whatever dough you choose, just make sure it’s rolled thin enough to wrap around the filling and seal properly.
Can I make this recipe gluten-free?
Yes, with a few adjustments. Look for a gluten-free pizza dough alternative at your local grocery store or make your own using a gluten-free flour blend. Make sure your taco seasoning is also gluten-free, as some mixes may contain wheat-based fillers. With those substitutions, you’re good to go.
How can I keep the dough from tearing when rolling?
If your dough is tearing, it may be too warm or too thin. Let the dough chill in the fridge for 10–15 minutes before rolling it out. This firms it up, making it easier to handle. Also, don’t stretch it too thin; about ¼-inch thickness is ideal for holding the filling without tearing.
Can I make this vegetarian?
Yes, and it’s a great meatless option. Substitute the ground beef with cooked lentils, black beans, or even sautéed mushrooms and onions. Use the same taco seasoning, and everything else remains the same. The cheesy center and savory spices still shine through, even without the meat.
What cheeses work best besides Colby jack or cheddar?
Mozzarella melts beautifully and gives you that irresistible cheese pull. Pepper jack adds a spicy kick, while Monterey jack is another mild, creamy option. You can even blend two types together for more depth. The key is using a cheese that melts well and has a bold enough flavor to complement the taco seasoning.
Can I make mini taco sticks for parties or kids?
Absolutely! Just cut the dough into smaller rectangles and use smaller portions of meat and cheese. These mini versions are great for parties, lunchboxes, or snacks. Just reduce the baking time slightly—start checking at around 8 minutes to prevent overbaking.
What’s the best way to keep these warm for a crowd?
If you’re serving a large group, keep the baked taco sticks warm in the oven at the lowest temperature (usually around 170°F or 75°C) on a baking sheet. Cover loosely with foil to prevent them from drying out. You can also wrap them in foil and place in a slow cooker on the “warm” setting for a buffet-style setup.
These FAQs should cover most of the situations you’ll run into while making taco sticks, but if you have more questions, don’t hesitate to experiment. That’s part of the fun.
Conclusion & Call to Action
By now, you can probably already imagine how amazing your kitchen is going to smell when these Cheesy Taco Sticks are baking. The golden crust, the sizzling seasoned beef, the gooey cheese center—it all comes together in a way that’s somehow both nostalgic and new. Whether you’re cooking for family, friends, or just treating yourself, this recipe is one of those crowd-pleasers that everyone wants seconds of. And thirds.
The real beauty of this recipe lies in its flexibility. You can keep it simple or go all out with homemade dough, custom fillings, and an entire spread of dipping sauces. You can prep it ahead, freeze it for later, or get the kids involved in the kitchen on a quiet Sunday afternoon. No matter how you approach it, these taco sticks deliver the perfect mix of comfort food joy and handheld convenience.
If you’ve been looking for a fun, easy, and insanely tasty recipe to add to your regular rotation, this is it. Try it once, and I promise it’ll quickly become a household favorite. The kind of recipe you make again and again because it’s just that good—and just that easy.
When you do make them, I’d love to hear how they turned out for you. Did you add your own twist? Serve them with a special dip? Maybe your kids helped roll them out? Whatever the story, I’m always excited to hear how these recipes come to life in your home.
So grab your ingredients, roll up those sleeves, and get ready to make some magic. And when you’re done? Snap a pic, share your creation, and let me know how it went. Cheesy Taco Sticks are calling your name—don’t keep them waiting.
Print
Easy Cheesy Taco Sticks Recipe: Gooey, Family-Friendly Snack
- Total Time: 30 minutes
- Yield: 10 taco sticks 1x
- Diet: Halal
Description
Cheesy Taco Sticks are a fun, handheld twist on classic tacos—filled with seasoned beef and gooey cheese, wrapped in soft pizza dough, and brushed with garlic butter. Perfect for snacks, dinners, or party appetizers.
Ingredients
-
1 lb ground beef
-
1 packet taco seasoning mix
-
1 tube Pillsbury pizza dough
-
5 Colby jack or cheddar cheese sticks, halved
-
4 tbsp butter, melted
-
1 tsp garlic powder
-
1 tsp dried parsley
Instructions
-
Preheat oven to 400°F (200°C) and line a baking sheet with parchment paper.
-
Brown ground beef in a skillet over medium heat. Drain fat, add taco seasoning per package directions, and set aside.
-
Roll out pizza dough and cut into 10 equal rectangles.
-
Place seasoned beef and half a cheese stick on each dough piece, then roll and seal.
-
Place seam-side down on the baking sheet.
-
Mix melted butter, garlic powder, and parsley. Brush over taco sticks.
-
Bake 12–15 minutes or until golden brown. Cool slightly before serving.
Notes
-
For extra flavor, add sautéed onions or peppers to the beef mixture.
-
Use part-skim cheese for a lighter option.
-
Can be frozen before or after baking.
- Prep Time: 15 minutes
- Cook Time: 15 minutes
- Category: Snacks, Appetizers
- Method: Baking
- Cuisine: American, Tex-Mex