

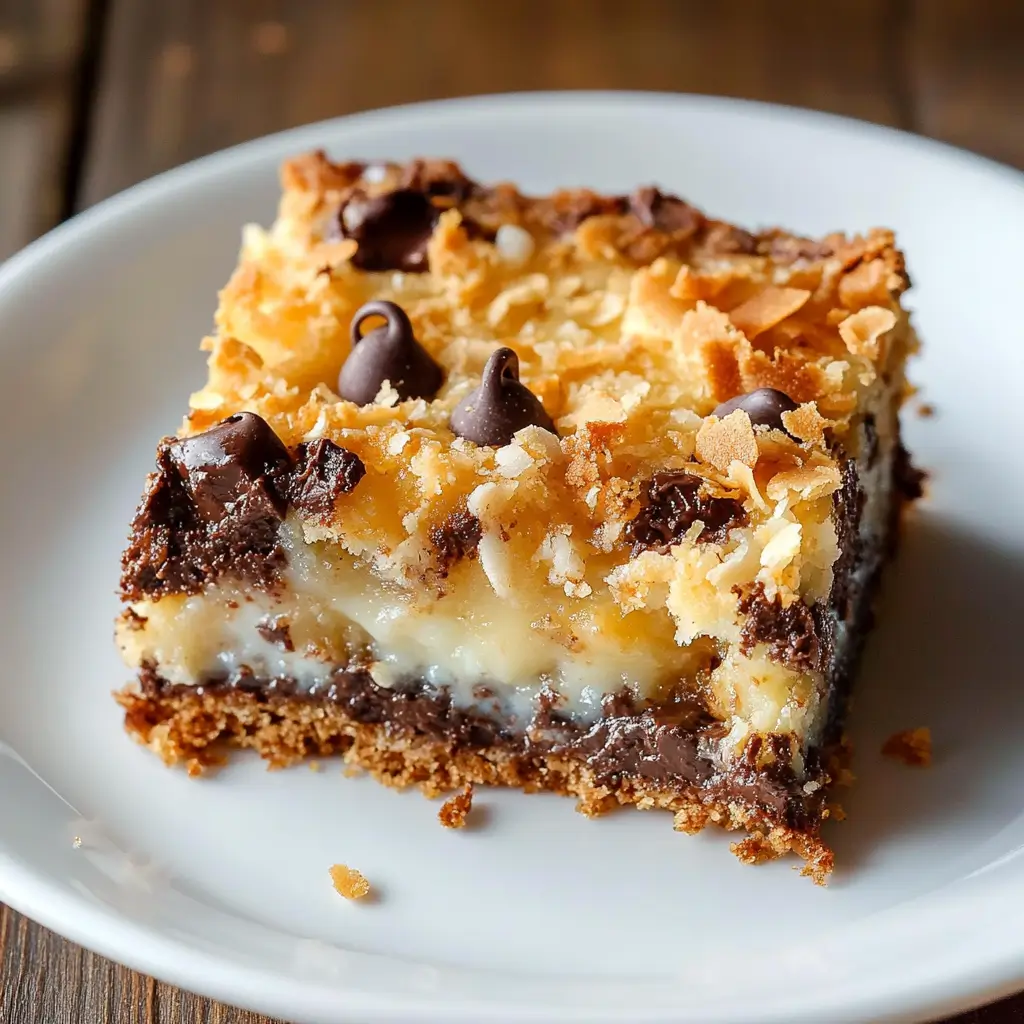
There’s something about dessert bars that feels like a warm, sweet hug from your favorite childhood memory. The simplicity of the layers, the buttery graham cracker base, the gooey sweetness of condensed milk, the rich chocolate chips, the chewy coconut, and the nutty crunch of pecans—all in one bite—make these Magic Cookie Bars absolutely unforgettable. If you grew up in a household where these bars were a regular weekend treat, you’ll know exactly what I mean. And if this is your first time hearing about them? Get ready to fall in love.
Magic Cookie Bars, often known as Hello Dolly Bars or Seven Layer Bars, are one of those classic American desserts that never go out of style. They’re quick, easy, and incredibly satisfying, with that perfect mix of textures and flavors. The best part is, you don’t need to be a pro baker to make them. There’s no dough to chill, no mixer to clean, and no complicated steps. Just layer the ingredients in a pan, bake, cool, and slice. That’s it.
Personally, these bars bring back so many memories of holidays with my family. My mom would always whip up a batch of them when we had guests over or needed a quick dessert to bring to a potluck. I’d sneak a few bites while they were cooling, too impatient to wait for them to set. Now, I find myself making them whenever I want to share something sweet with friends—or when I just need a cozy pick-me-up.
So whether you’re a seasoned home baker or someone who’s just now discovering the joy of homemade desserts, this recipe is about to become one of your go-tos. Simple, rich, and endlessly delicious, these Magic Cookie Bars are sure to win hearts wherever they go.
Why You’ll Love This Recipe
There are so many reasons to love Magic Cookie Bars, and once you make them for the first time, you’ll see why they’re a staple in so many households. First off, the ease of preparation is unbeatable. With no need for mixers or fancy tools, all you really have to do is layer everything into a baking pan and pop it into the oven. It’s a no-fuss dessert that delivers major flavor.
These bars are also incredibly versatile. While the classic combination of chocolate chips, coconut, and pecans is absolutely delicious, you can easily switch things up based on your personal preferences or whatever you have in your pantry. Swap the pecans for walnuts or almonds. Use dark chocolate or white chocolate instead of semi-sweet. The possibilities are endless.
But beyond that, the real magic lies in the texture. The graham cracker crust forms a crunchy, buttery base that holds up beautifully under the layers. The sweetened condensed milk brings everything together with a caramel-like richness that seeps into every corner. The chocolate melts slightly, becoming soft and gooey, while the shredded coconut and chopped pecans add chewiness and crunch. Every bite is a perfect contrast of soft, sticky, and crisp.
Another reason you’ll love this recipe? It’s incredibly family-friendly. Kids adore the sweet flavors, and it’s easy enough for them to help with the layering process. You can make it ahead of time, store it for days, and it travels well, making it a perfect treat for road trips, bake sales, lunchboxes, or afternoon coffee breaks.
And finally, let’s be honest—these bars just taste amazing. There’s a reason they’ve stuck around for decades. They hit that perfect sweet spot (literally) between indulgent and comforting. One square is never enough, and once you make them, your kitchen will smell so good that you’ll have trouble waiting for them to cool before diving in.
Health Benefits
While Magic Cookie Bars are definitely a treat and not something you’d label as a “health food,” that doesn’t mean they don’t offer some nutritional value. Like all things in life, balance is key. Enjoying a bar or two in moderation can absolutely be part of a well-rounded lifestyle. Plus, many of the ingredients used in this recipe have benefits that are worth noting.
Let’s start with the nuts—pecans, in this case. Pecans are rich in heart-healthy fats, particularly monounsaturated fats, which help to reduce bad cholesterol levels. They’re also a great source of fiber, protein, and several essential vitamins and minerals like manganese, copper, and thiamine. Adding pecans to your dessert gives you a boost of nutrition while also adding crunch and flavor.
Next, there’s coconut. Sweetened shredded coconut may have added sugar, but it still contains healthy fats known as medium-chain triglycerides (MCTs), which are quickly absorbed and used for energy. Coconut also offers fiber and a bit of iron, making it more than just a sweet filler.
Chocolate chips, especially if you opt for semi-sweet or dark varieties, contain antioxidants like flavonoids that have been linked to heart health and improved mood. While we’re not saying that chocolate is a health food, enjoying a small amount in a treat like this definitely has its benefits—especially if it brings you joy.
The graham crackers used for the crust are made from whole grains in many cases and offer a bit of fiber and iron. While they do contain sugar, they provide the structure and flavor needed to make these bars irresistible.
Even the sweetened condensed milk, though rich in sugar and calories, contains calcium and protein from milk. Its thick, syrupy consistency is what binds the layers together, so a little goes a long way.
Ultimately, the biggest health benefit may be emotional. Sharing a homemade dessert with your loved ones, making memories in the kitchen, and enjoying a moment of indulgence can have a powerful impact on mental well-being. Food is about nourishment, yes—but it’s also about connection, culture, and joy.
Preparation Time, Servings, and Nutritional Information
Making Magic Cookie Bars is as easy as it gets when it comes to homemade desserts. You don’t need to carve out your entire afternoon to bake a batch. In fact, the total prep and bake time is under an hour, making this a perfect last-minute treat.
Preparation Time:
Prep Time: 10 minutes
Bake Time: 30 minutes
Cooling Time: 1 hour (recommended for easier slicing)
Total Time: Approximately 1 hour and 40 minutes
Servings:
This recipe makes about 16 bars, depending on how large you cut them. For smaller bites or a crowd, you can cut them into 20–24 pieces.
Nutritional Information (Per Serving, based on 16 bars):
Calories: 285
Total Fat: 18g
Saturated Fat: 10g
Cholesterol: 25mg
Sodium: 90mg
Total Carbohydrates: 29g
Dietary Fiber: 2g
Sugars: 20g
Protein: 3g
Keep in mind that these values are approximate and can vary based on the specific brands of ingredients you use. While these bars are rich and indulgent, enjoying them in moderation is key. You can even make mini versions if you’re looking to enjoy a bite-sized treat without overindulging.
Ingredients List
One of the best things about this recipe is how short and accessible the ingredient list is. You might already have most of these in your pantry, and if not, they’re easy to find at any grocery store. Each ingredient plays a key role in both texture and flavor, so let’s take a closer look:
Butter (½ cup, unsalted)
This forms the rich, golden foundation of the crust. Melted in the pan, it helps the graham cracker crumbs come together and gives the base that perfect buttery crunch.
Light Brown Sugar (¼ cup, packed)
Brown sugar adds a deeper sweetness to the crust and contributes a slight molasses flavor that complements the coconut and chocolate beautifully.
Graham Cracker Crumbs (2 cups, about 15–16 full sheets)
These make up the bulk of the crust. Their subtle sweetness and crisp texture form the perfect base for the layers above.
Semi-Sweet Chocolate Chips (1 cup)
Chocolate chips melt just enough in the oven to add gooey pockets of chocolate in every bite. Semi-sweet is the ideal balance between rich and sweet, but you can experiment with other types.
Shredded Sweetened Coconut (1 cup)
Coconut gives the bars a chewy texture and a tropical flair. The sweetened variety is classic here, though you can use unsweetened if you prefer a less sweet version.
Pecans (¾ cup, coarsely chopped)
These add a lovely crunch and nutty flavor to balance the richness of the other ingredients. Coarsely chopped is best, so you get little chunks of pecan in every bite.
Sweetened Condensed Milk (1⅔ cups, or one 14-ounce can)
This is the “glue” that holds everything together. As it bakes, it turns golden and caramel-like, binding the layers while creating a soft, gooey texture.
Each of these ingredients works in harmony to create a dessert that’s both simple and impressive. There’s no need for fancy equipment or hard-to-find items—just honest, pantry-staple ingredients that come together like magic.
Step-By-Step Cooking Instructions
This recipe is as straightforward as it is delicious, which makes it perfect for both seasoned bakers and beginners. You’ll only need a single baking dish, a mixing bowl, and a spatula or spoon. Let’s break it down step by step so you can feel confident and relaxed as you move through the process. Each layer adds its own magic, so take your time and enjoy putting this together.
Step 1: Preheat the oven
Begin by preheating your oven to 350°F (175°C). This ensures the oven is hot and ready by the time you finish preparing your layers. A properly preheated oven is essential to help the crust bake evenly and the top get that perfect golden finish.
Step 2: Melt the butter directly in the baking dish
Place your ½ cup of unsalted butter into an 8×8-inch baking pan. You can also use a 9×9-inch pan if that’s what you have on hand; the bars will just be slightly thinner. Slide the dish into the preheated oven for about 5 minutes, or until the butter is fully melted. Keep a close eye on it—you want it melted but not browned.
Step 3: Prepare the graham cracker crust
While the butter is melting, combine the graham cracker crumbs and packed light brown sugar in a medium mixing bowl. Stir the mixture with a fork or spoon until the sugar is evenly distributed throughout the crumbs.
Once the butter is melted, carefully remove the baking dish from the oven (use oven mitts—it’ll be hot!). Pour the graham cracker and sugar mixture evenly over the melted butter. Use the back of a spoon or a silicone spatula to gently press it down into an even crust layer. Try to coat the entire bottom of the dish, pressing slightly into the corners so the crust holds together.
Step 4: Layer the chocolate chips
Sprinkle the semi-sweet chocolate chips evenly over the graham cracker crust. This will be the first layer of your gooey topping. Try to spread them out as evenly as possible so you get chocolate in every bite.
Step 5: Add the shredded coconut
Next, sprinkle the shredded sweetened coconut on top of the chocolate chips. The coconut will toast slightly during baking, giving the bars a lovely golden color and adding a chewy texture to contrast with the chocolate.
Step 6: Sprinkle the chopped pecans
Now add your coarsely chopped pecans. Distribute them evenly so every bar gets a bit of nutty crunch. If you’re not a fan of pecans, feel free to swap in walnuts or even chopped almonds. Just make sure the pieces aren’t too small, or they’ll get lost in the layers.
Step 7: Pour the sweetened condensed milk
Here’s where the real magic happens. Slowly pour the sweetened condensed milk evenly over the entire surface of the pan. Try to coat the toppings thoroughly, getting into all the little nooks and crannies. The milk will seep down and help everything bind together as it bakes, creating a luscious, chewy, slightly caramelized finish.
Step 8: Bake the bars
Place the baking dish back into the oven and bake for about 30 minutes, or until the top is golden brown and the edges are bubbling slightly. The coconut should be lightly toasted, and the condensed milk should have set into a sticky, golden layer. If your oven runs hot, start checking at 25 minutes to prevent over-browning.
Step 9: Cool completely before slicing
Once baked, remove the pan from the oven and let it cool completely on a wire rack. This is an important step—if you cut the bars while they’re still warm, they’ll fall apart and be messy. For clean, easy slices, allow the bars to cool for at least an hour. If you’re in a hurry, you can speed things up by popping the pan into the fridge for 30 minutes after the initial cooling period.
Step 10: Slice and serve
Once cool, use a sharp knife to cut the bars into squares. Depending on how large or small you like your servings, you can get anywhere from 16 to 24 pieces. Use a spatula to gently lift them from the pan, and get ready to enjoy.
How to Serve
One of the most delightful things about Magic Cookie Bars is how versatile they are when it comes to serving. They’re the kind of dessert that fits in anywhere—casual weeknight treats, festive holiday platters, potlucks, school bake sales, or just cozy evenings with tea or coffee.
Serve as a dessert platter centerpiece
Place the sliced bars on a serving tray with a mix of other cookies and sweets for a show-stopping dessert spread. Their layered look and golden top make them visually appealing, and their chewy, crunchy texture contrasts beautifully with soft cookies or fudgy brownies.
Serve with coffee or tea
The sweetness and richness of the bars make them the perfect pairing for a hot drink. They’re especially delicious with a strong cup of coffee or a glass of hot tea. If you’re hosting a brunch or afternoon tea, add these to your table as a crowd-pleasing treat.
Warm them slightly and serve with ice cream
For an extra indulgent dessert, warm a bar in the microwave for about 10–15 seconds and serve it with a scoop of vanilla ice cream. The heat softens the chocolate and coconut, making them even gooier and more irresistible.
Serve on a dessert board
Create a fun dessert board with a variety of treats—cut fruits, marshmallows, nuts, cookies—and place the bars front and center. Their chewy texture adds variety and richness to the spread.
Wrap and gift them
These bars also make a lovely edible gift. Wrap a few squares in wax paper and tie them with twine or place them in a small box or tin. Perfect for birthdays, holidays, or simple thank-you gifts.
Pairing Suggestions
Magic Cookie Bars are rich, sweet, and full of texture, which means they pair beautifully with a variety of drinks and side dishes. Whether you’re serving them as part of a dessert spread or enjoying a quiet treat at home, here are some ideas to enhance the experience.
Drinks to pair with
Coffee: A bold cup of black coffee or espresso is a perfect match. The bitterness of the coffee balances out the sweetness of the bars beautifully.
Tea: Try them with a black tea like Earl Grey or Assam, or a spiced chai for a warming combo. Herbal teas like mint or rooibos also work well.
Milk: A classic choice. The creaminess of milk tones down the richness and makes for a satisfying treat.
Hot chocolate: For those who want to double down on the indulgence, a mug of hot chocolate turns snack time into dessert heaven.
Fruits and fresh sides
Fresh berries: Strawberries, raspberries, or blueberries bring a tart contrast that cuts through the sweetness.
Fruit salad: A light fruit salad with citrus and melon offers a refreshing balance to the dense texture of the bars.
Yogurt: Pairing a bar with plain or lightly sweetened yogurt can balance out the richness and add a bit of tanginess.
Dessert boards and platters
When serving at a gathering, place Magic Cookie Bars alongside:
- Chocolate truffles
- Mini cupcakes
- Shortbread cookies
- Fruit skewers
- Nut clusters or spiced nuts
Their layered appearance and chewy texture make them a standout addition to any dessert tray or party spread.
Storage, Freezing & Reheating Instructions
Magic Cookie Bars store beautifully, which makes them an ideal make-ahead dessert. Whether you want to enjoy them all week or stash a few for future cravings, here’s how to store them properly.
Room temperature storage
Once the bars are completely cooled and cut, you can store them in an airtight container at room temperature for up to 5 days. Place parchment paper or wax paper between the layers to prevent them from sticking together.
Refrigerator storage
If you prefer your bars a little firmer or want to keep them longer, store them in the refrigerator. They’ll keep well for about 7 to 10 days when stored in an airtight container. Again, layer with parchment paper if stacking them.
Freezing instructions
These bars freeze wonderfully, so don’t hesitate to make a double batch and freeze the extras. Here’s how:
- Let the bars cool completely and slice them into squares.
- Place them on a baking sheet lined with parchment paper and freeze until solid (about 1 hour).
- Transfer the frozen bars to a freezer-safe container or zip-top bag, placing parchment between layers.
- Label with the date, and store for up to 3 months.
To thaw and reheat
Thaw bars at room temperature for 30–60 minutes. You can also warm them in the microwave for 10–15 seconds for that just-baked feel. If you’re serving a crowd, reheat a batch in a 300°F oven for about 8–10 minutes to refresh the texture and aroma.
Common Mistakes to Avoid
Even with a simple recipe like Magic Cookie Bars, there are a few common pitfalls that can affect the outcome. But don’t worry—every mistake is totally avoidable, especially when you know what to watch for. Let’s walk through some of the most frequent missteps so you can make a perfect batch every time.
Not pressing the crust firmly enough
One of the most common mistakes is not pressing the graham cracker crust firmly into the baking pan. If the crust is too loose or uneven, it may crumble when you slice the bars. Be sure to use the back of a spoon or a flat-bottomed measuring cup to gently but firmly press the crust into an even, compact layer.
Pouring the sweetened condensed milk too quickly
It’s tempting to just drizzle the condensed milk over the top and call it a day, but taking your time with this step is crucial. If you pour it all in one spot, it won’t spread evenly, and you might end up with dry patches or overly gooey corners. Instead, pour it slowly in a thin, even stream across the entire surface to make sure every inch of the bars gets coated.
Not layering in the correct order
There’s a reason for the specific layering order in this recipe. The graham cracker base needs to sit at the bottom to provide structure. The chocolate chips go in early so they can melt slightly, the coconut and nuts need to toast on top, and the condensed milk must go last to hold everything together. If you change the order, you risk uneven texture or flavor.
Overbaking or underbaking the bars
If you take the bars out of the oven too early, the condensed milk might not set properly, and the layers can be gooey in a not-so-good way. On the other hand, overbaking can dry out the coconut and make the bottom too hard. Start checking at the 25-minute mark—look for golden coconut and bubbling edges, which are signs they’re ready.
Cutting the bars while they’re still warm
This is a big one. Cutting too soon is the easiest way to end up with a gooey mess, no matter how delicious it tastes. The bars need to cool completely to firm up and hold their shape. For clean, sharp edges, wait at least one hour—or refrigerate them for 30 minutes after cooling.
Using sweetened condensed milk instead of evaporated milk
It’s easy to confuse the two if you’re new to baking, but they’re not interchangeable. Evaporated milk is thinner and unsweetened, while sweetened condensed milk is thick and syrupy. Using the wrong one will completely change the consistency and flavor of the bars.
Using old or stale ingredients
Since this recipe relies on pantry staples, it’s easy to forget how long some ingredients have been sitting in your cupboard. Stale graham crackers, rancid nuts, or dried-out coconut can really impact the flavor and texture. Always check expiration dates and give ingredients a quick taste or sniff test before using them.
Avoiding these simple mistakes will help you turn out perfectly layered, deliciously gooey Magic Cookie Bars every time you bake them.
Pro Tips
Once you’ve made Magic Cookie Bars a time or two, you’ll start to discover little tricks that make the process even smoother. Whether it’s about improving the texture, adding a personal twist, or just making cleanup easier, these pro tips will help you level up your baking game.
Line your pan with parchment paper for easy removal
This might be the best tip of all. Lining your baking dish with parchment paper not only helps prevent sticking, but also makes it easy to lift the entire batch out of the pan in one piece for slicing. Leave a bit of overhang on the sides so you can use it like handles to pull the bars out.
Toast your coconut and nuts for extra flavor
If you have a few extra minutes, pre-toast the coconut and chopped pecans before layering them. Toasting brings out deeper, nuttier flavors and adds an extra layer of richness to the bars. Simply spread them on a baking sheet and toast in a 325°F oven for about 5–7 minutes, or until golden and fragrant.
Chill the bars before slicing for clean, neat edges
Even if the bars have cooled at room temperature, popping them into the fridge for 30–45 minutes will make them firmer and easier to slice. Use a sharp knife, and wipe it clean between cuts for perfect squares every time.
Use a food processor to make graham cracker crumbs
While you can certainly crush graham crackers with a rolling pin in a zip-top bag, using a food processor gives you finer, more even crumbs, which help the crust hold together better. Just pulse until they resemble coarse sand.
Experiment with toppings
Feel free to personalize your bars by swapping or adding ingredients. Here are a few ideas:
- Replace chocolate chips with butterscotch chips, white chocolate, or dark chocolate chunks.
- Add a sprinkle of sea salt on top after baking to enhance the sweetness.
- Stir a handful of dried cranberries or chopped dates into the nut layer for a fruity twist.
- Use different nuts—walnuts, hazelnuts, or almonds all work beautifully.
Double the recipe for a crowd
If you’re baking for a larger group, you can easily double the recipe and bake it in a 9×13-inch pan. Just keep an eye on the baking time—it may take a few extra minutes in a larger dish.
Don’t skimp on the sweetened condensed milk
That thick, syrupy layer is what holds everything together and creates the signature gooey texture. Make sure to use the full amount—one 14-ounce can. Scrape out the can completely so you don’t leave any behind.
With these tips in your back pocket, your Magic Cookie Bars will come out even more delicious and polished than before.
Frequently Asked Questions (FAQs)
Can I make Magic Cookie Bars ahead of time?
Absolutely. These bars actually taste even better the next day after the flavors have had time to settle. Just bake, cool, and store them in an airtight container at room temperature or in the fridge. They’re perfect for making ahead of holidays, parties, or busy weeks.
Can I freeze Magic Cookie Bars?
Yes, and they freeze beautifully. Cut the bars, freeze them in a single layer on a tray, then transfer to a freezer-safe bag or container. They’ll keep for up to three months. Thaw at room temperature before serving, or enjoy them straight from the freezer for a firmer, chewier texture.
Can I make these without coconut?
Yes, although coconut is a signature ingredient in classic Magic Cookie Bars, you can skip it or replace it with something else—like chopped dried fruit or additional nuts. Just be aware that omitting the coconut may slightly change the texture.
Are there any gluten-free options?
To make these gluten-free, simply use gluten-free graham crackers for the crust. Everything else in the recipe is naturally gluten-free, but be sure to check your labels—especially for sweetened condensed milk and chocolate chips—to avoid hidden gluten.
Can I use margarine instead of butter?
While you can use margarine in a pinch, butter is strongly recommended for its flavor and richness. Margarine may also make the crust slightly greasier or softer, depending on the brand.
Can I use a different type of nut?
Absolutely. Pecans are classic, but walnuts, almonds, or even hazelnuts can work wonderfully. You can also use a mix of nuts if that’s what you have on hand.
Can I make them dairy-free?
To make dairy-free Magic Cookie Bars, use a dairy-free butter alternative and a plant-based condensed milk (available at many specialty stores or online). Just be sure your chocolate chips are dairy-free as well.
How do I keep the bars from falling apart?
Let them cool completely before slicing. Also, make sure you’re using enough sweetened condensed milk to bind everything together. Chilling the bars before cutting also helps them hold their shape.
What’s the difference between Magic Cookie Bars and Hello Dolly Bars?
They’re the same thing! Different regions and families call them by different names—Magic Cookie Bars, Hello Dolly Bars, or even Seven Layer Bars (if other toppings are added). The recipe is essentially identical.
Do I need to grease the baking dish?
If you’re not using parchment paper, then yes, you’ll want to lightly grease the pan to prevent sticking. However, parchment paper is highly recommended for easy removal and cleanup.
Conclusion & Call to Action
Magic Cookie Bars are the kind of dessert that makes you feel instantly at home. They’re sweet, buttery, a little chewy, a little crunchy, and completely addictive. Whether you know them as Hello Dolly Bars or Seven Layer Bars, one thing is for sure: these treats never go out of style.
They’re the ultimate combination of convenience and comfort—easy to whip up with basic pantry ingredients, but so indulgent and satisfying. They make any occasion feel special, from family movie night to a holiday dessert buffet, and they travel well, store well, and freeze like a dream.
What’s more, they’re endlessly customizable. You can tailor them to your taste with different chips, nuts, and add-ins, or keep it classic and stick to the tried-and-true original. Either way, you’re going to end up with something delicious.
If you’ve never made them before, I truly hope this guide gives you the confidence and excitement to try. And if they’re already a favorite in your household, maybe you picked up a few new tips and tricks today. Either way, it’s time to grab your baking pan, preheat that oven, and create a little magic in your kitchen.
Once you’ve baked your batch, don’t forget to share your results. Snap a photo and tag me on social media—I’d love to see your delicious creations and hear how you made the recipe your own. And if you have any questions or creative variations, feel free to drop them in the comments. Happy baking!
Print
Magic Cookie Bars: The Easiest Gooey Dessert You’ll Ever Make
- Total Time: 1 hour 40 minutes (includes cooling time)
- Yield: 16 bars 1x
- Diet: Vegetarian
Description
This Magic Cookie Bars recipe layers buttery graham cracker crust, chocolate chips, sweet coconut, crunchy pecans, and creamy condensed milk into a gooey, chewy, irresistible dessert bar.
Ingredients
-
½ cup unsalted butter
-
¼ cup light brown sugar, packed
-
2 cups graham cracker crumbs (about 15–16 full sheets)
-
1 cup semi-sweet chocolate chips
-
1 cup shredded sweetened coconut
-
¾ cup pecans, coarsely chopped
-
1⅔ cups sweetened condensed milk (one 14 oz can)
Instructions
-
Preheat oven to 350°F (175°C).
-
Melt butter in an 8×8-inch pan in the oven.
-
Mix graham cracker crumbs and brown sugar, then press over melted butter.
-
Layer chocolate chips, shredded coconut, and pecans.
-
Pour sweetened condensed milk evenly over the top.
-
Bake for 30 minutes until coconut is golden brown.
-
Cool completely before slicing into bars.
Notes
-
For cleaner slices, chill before cutting.
-
Use parchment paper to easily lift bars from pan.
-
Swap pecans with any nuts of choice or leave out for a nut-free version.
- Prep Time: 10 minutes
- Cook Time: 30 minutes
- Category: Dessert
- Method: Baking
- Cuisine: American