
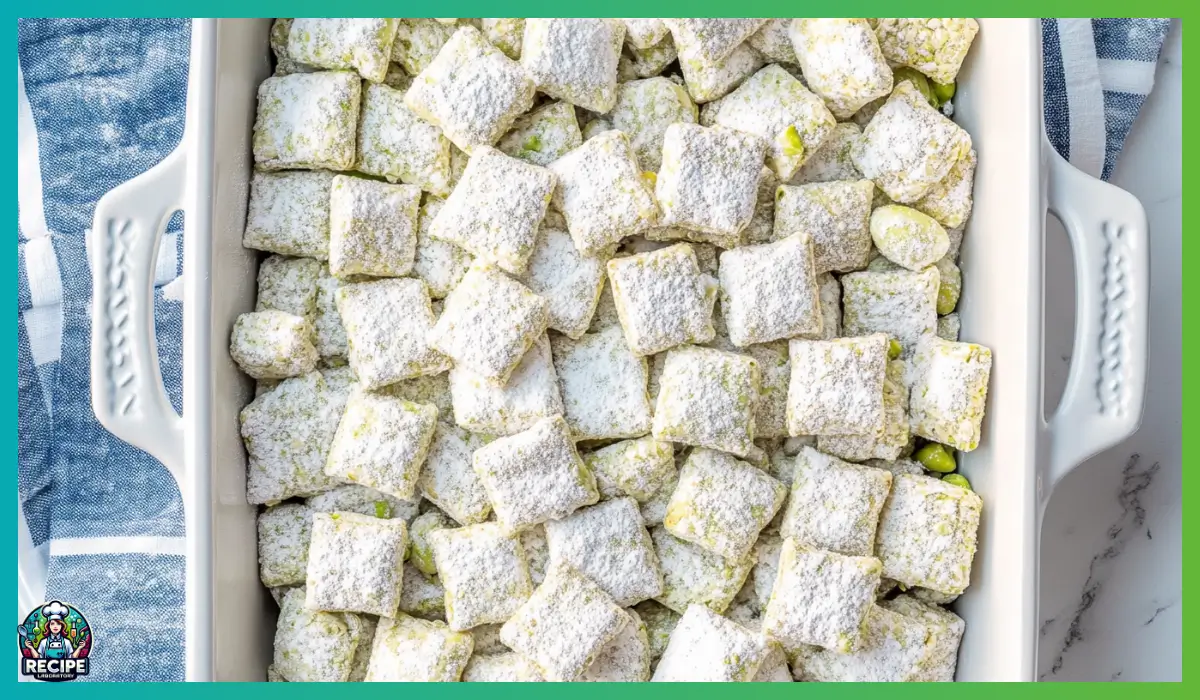
There’s something timeless and universally loved about puppy chow, also known as muddy buddies. It’s that sweet, crunchy, powdered-sugar-dusted snack that always finds a place at parties, potlucks, road trips, and cozy movie nights. While the original chocolate-and-peanut-butter version has its own loyal fanbase (I mean, who could resist it?), there’s a world of possibilities out there for flavor variations. Today, we’re talking about a recipe that’s both unexpected and unforgettable: Pistachio Puppy Chow.
Now, I know what you’re thinking—pistachio? In puppy chow? But trust me on this one. This version is soft in color, elegant in flavor, and totally irresistible. By using instant pistachio pudding mix and a hint of almond extract, this puppy chow takes on a light, nutty essence that pairs beautifully with the creamy sweetness of melted white chocolate. The cereal base still gives us that classic crunch we all love, while the powdered sugar coats each piece in that oh-so-satisfying dusting that keeps your fingers happily sticky.
This recipe came about after a trip to the store where I stumbled across pistachio pudding mix on the shelf. I had no intention of buying it, but something about it made me curious. It reminded me of the pistachio-flavored desserts my grandmother used to make—subtle, a little nostalgic, and always comforting. After a few experiments in the kitchen, this version of puppy chow became a family favorite overnight. It’s now one of my go-to snacks for everything from spring brunches to holiday treat boxes.
And the best part? It’s completely no-bake and ridiculously easy to whip up. You don’t need to be a seasoned baker or spend hours in the kitchen. Just a handful of pantry staples, one large mixing bowl, and a few minutes of stirring and shaking—and you’ve got a batch of pistachio puppy chow that tastes like you’ve been planning it for days.
So if you’re looking for something unique yet comforting, elegant yet simple, this recipe might just become your new favorite. Let’s get into it.
Why You’ll Love This Recipe
There are so many reasons this pistachio puppy chow deserves a permanent spot in your snack rotation. From its flavor profile to its ease of preparation, every part of this recipe is designed to be both enjoyable to make and even more enjoyable to eat. Here’s exactly why you’ll fall in love with it.
1. It’s a No-Bake Recipe That’s Practically Foolproof
You don’t need an oven, or a candy thermometer. You don’t even need to dirty a bunch of dishes. This recipe is about as simple as it gets—perfect for busy weeknights, last-minute guests, or a lazy Sunday afternoon when you just want something sweet without the hassle.
2. Unique Flavor That Feels Fancy But Is So Easy
Most people are familiar with traditional puppy chow flavors—chocolate, peanut butter, Nutella, maybe even cookies and cream. But pistachio? It’s unexpected, and that’s part of what makes it so fun. The light green color adds a touch of springtime cheer, and the nutty almond-pistachio flavor combo gives it a sophisticated edge.
3. Kid-Friendly and Party-Approved
While the flavor leans a bit more refined, it’s still super approachable. Kids love it. Adults can’t stop eating it. And because it’s not messy or sticky once it cools, it’s ideal for parties, lunchboxes, or snack jars. Just be warned—it disappears fast.
4. Minimal Ingredients, Maximum Flavor
With only six core ingredients, you get a surprising depth of flavor. Almond extract gives a slight floral aroma that brings out the natural nuttiness of the pistachio pudding, while the buttery white chocolate ties it all together into a creamy, crunchy bite.
5. Perfect for Gifting or Holiday Treats
Pack it in cute bags or small containers and you’ve got a thoughtful homemade gift that looks and tastes special. It’s a great addition to treat boxes, teacher gifts, and holiday dessert platters.
Once you try this, you’ll be looking for excuses to make another batch. Fortunately, it’s so quick and easy, you won’t need an excuse at all.
Health Benefits
While it’s true that pistachio puppy chow leans more into the indulgent treat category, that doesn’t mean it doesn’t come with a few redeeming qualities. With a few thoughtful ingredients and portion awareness, you can still enjoy this snack as part of a balanced lifestyle. Let’s explore the health benefits hidden within this sweet treat.
1. Pistachio Pudding and Nut Flavors: A Touch of Nutrients
The star flavor of this recipe comes from instant pistachio pudding mix. While the pudding itself is used mainly for flavor and coating texture, pistachios are naturally rich in antioxidants, healthy fats, and plant-based protein. Even in extract or mix form, the flavor evokes those natural nutty benefits. If you’re inspired to go a step further, you could even add a sprinkle of crushed pistachios for a crunchy, nutrient-boosted topping.
2. Almond Extract: More Than Just Flavor
Almond extract might seem like just a flavor enhancer, but it brings more to the table. Almonds are known for their heart-healthy fats, fiber, and vitamin E content. While the extract is used sparingly, it adds depth of flavor and ties beautifully with the pistachio to create a more layered taste experience.
3. White Chocolate and Moderation
White chocolate, made from cocoa butter, offers a creamy base for melting and coating. While it does contain sugar and fat, using it in small quantities—as we do here—keeps the sweetness in check. Plus, cocoa butter contains stearic acid, a fat that doesn’t raise LDL cholesterol as much as other saturated fats. So when enjoyed mindfully, white chocolate can still have a place in your diet.
4. Rice Chex Cereal: Gluten-Free and Light
Rice Chex cereal is naturally gluten-free and lower in sugar compared to many other cereals. It offers a light, crispy base that soaks up the chocolate coating without getting soggy. You also get a little iron and B vitamins from the fortified grains, making this a slightly better-for-you base than other options.
5. Portion Control and Customization
One of the healthiest things about this recipe is that it’s easy to portion. You can serve it in small snack cups, zip-top bags, or jars to help control how much you’re eating at a time. Plus, if you’re looking to tweak it further, you can reduce the powdered sugar, mix in chopped nuts, or even swap in dairy-free white chocolate if needed.
So while this isn’t a “health food” per se, it’s absolutely a treat you can enjoy without guilt. Life is about balance, and there’s room for something sweet and nostalgic on the menu now and then.
Preparation Time, Servings, and Nutritional Information
Before diving into the fun part—making this addictively delicious pistachio puppy chow—let’s talk logistics. How long will it take? How many people can it serve? And what exactly are you consuming with each handful?
Total Time Required
Prep Time: 10 minutes
Cooling Time: 20–30 minutes (optional, but recommended for best texture)
Total Time: Approximately 30–40 minutes
You could technically eat it right after mixing, but it’s best to give it some time to cool and set, which allows the chocolate to harden slightly and helps the powdered coating stick better.
Serving Size and Yield
Yield: Makes about 7 to 8 cups of puppy chow
Serving Size: Approximately 1/2 cup
Total Servings: 14–16 servings
This makes enough for a party snack bowl or to divide into individual snack packs for later. If you’re planning to serve a crowd or give it away as gifts, consider doubling the recipe—it scales beautifully.
Nutritional Information (Per Serving)
- Calories: ~180
- Fat: 7g
- Saturated Fat: 4g
- Carbohydrates: 28g
- Sugar: 18g
- Protein: 1g
- Fiber: <1g
- Sodium: 85mg
These numbers are approximate and can vary depending on the specific brands you use. If you’re looking to lighten it up a bit, you can reduce the powdered sugar slightly or mix in air-popped popcorn to stretch the batch with fewer calories.
Ingredients List
Here’s everything you’ll need to make this easy pistachio puppy chow. Each ingredient plays a unique role, and we’ll talk about what they do and why they matter.
- ⅔ cup powdered sugar
This gives the finished puppy chow its signature powdery coating and adds sweetness. It also helps absorb any excess moisture from the melted chocolate coating so everything stays crisp. - 1 box (3.4 oz) instant pistachio pudding mix
This is the secret ingredient that infuses the snack with rich pistachio flavor and a beautiful pale green hue. Make sure you’re using instant pudding mix, not cook-and-serve. - ¼ teaspoon almond extract
Adds a subtle nutty aroma and depth that enhances the pistachio flavor. A little goes a long way, so measure carefully. - 5 cups Rice Chex cereal
Light, crispy, and neutral in flavor, this is the perfect base to soak up the white chocolate coating. You can also use Corn Chex if preferred. - 2 cups white chocolate chips
These melt into a creamy, rich coating that holds everything together. Choose high-quality chips for best flavor and smooth texture. - ¼ cup butter, cut into pieces
Butter helps the white chocolate melt evenly and adds a little richness to the mix.
Optional add-ins you can consider:
- Crushed pistachios for added crunch
- A pinch of sea salt for a sweet-salty contrast
- Sprinkles or edible glitter for a festive touch
Once you’ve gathered your ingredients, you’re just minutes away from one of the most addictive snacks you’ll ever make. Let’s move into the full step-by-step instructions next.
Step-by-Step Cooking Instructions
Making pistachio puppy chow is simple and satisfying, but even the easiest recipes benefit from a little attention to detail. Follow these clear steps to create a batch that’s evenly coated, bursting with flavor, and irresistibly crunchy. We’ll break it down into prep, melting, mixing, coating, and cooling.
Step 1: Prepare Your Flavor Coating Bag
What You’ll Do:
Start by making your pistachio-sugar coating mix.
How to Do It:
- In a large zip-top bag (gallon size works best), combine ⅔ cup powdered sugar with 1 box (3.4 oz) instant pistachio pudding mix.
- Add ¼ teaspoon almond extract directly into the dry mix.
- Seal the bag and shake it vigorously for 20–30 seconds. This helps the extract distribute evenly and clump-free across the dry mix.
Helpful Tips:
- You can stir this mixture in a bowl first if you’re worried about the almond extract forming little clumps.
- For extra fine coating, you can pulse the pudding mix and sugar together in a food processor for 5 seconds before adding the extract.
Why This Step Matters:
This sweet, fragrant coating will cling to the outside of the chocolate-covered cereal and create that classic puppy chow texture—dusty, sweet, and finger-licking good.
Step 2: Melt the White Chocolate and Butter
What You’ll Do:
Create the smooth, velvety coating that binds everything together.
How to Do It:
- In a microwave-safe bowl, combine 2 cups white chocolate chips with ¼ cup butter, cut into small pieces to ensure even melting.
- Microwave in 30-second intervals on medium-high power. After each interval, remove the bowl and stir thoroughly.
- Repeat until the mixture is completely smooth and glossy. This usually takes around 1 minute to 1 minute 30 seconds, depending on your microwave.
Helpful Tips:
- Don’t rush this step. Overheating white chocolate can cause it to seize up or burn. Stirring between intervals is essential to help it melt evenly.
- If your chocolate looks too thick, you can add a teaspoon of neutral oil or a splash of milk to thin it out, but this usually isn’t necessary if you’re using good-quality white chocolate chips.
Why This Step Matters:
The white chocolate and butter mixture is the backbone of this recipe. It adds richness, helps the pudding/sugar mix stick, and gives the cereal that luscious coating we’re aiming for.
Step 3: Coat the Cereal in Chocolate
What You’ll Do:
Gently fold the white chocolate mixture into your Chex cereal without crushing it.
How to Do It:
- Place 5 cups of Rice Chex cereal into a large mixing bowl.
- Pour the melted white chocolate mixture over the top.
- Using a spatula or wide spoon, gently stir and fold the cereal until all pieces are coated. This should take about 2 to 3 minutes.
Helpful Tips:
- Be gentle! You don’t want to crush the cereal into crumbs. Use a folding motion—scoop under the cereal, lift, and turn.
- Make sure to scrape the sides and bottom of the bowl to get all the melted chocolate distributed evenly.
Why This Step Matters:
Even coating ensures every bite has that creamy pistachio flavor and delightful crunch. Skimping here can lead to clumps or uneven sweetness.
Step 4: Coat with the Pistachio Powder Mix
What You’ll Do:
Dust the chocolate-covered cereal in the pistachio-flavored sugar for flavor and texture.
How to Do It:
- Working quickly (while the coating is still a little warm), transfer the cereal into your prepared zip-top bag with the pistachio pudding and sugar mixture.
- Seal the bag tightly, making sure there’s some air left inside to allow movement.
- Shake the bag for about 1 to 2 minutes until the cereal is well coated and no pieces are visibly sticky.
Helpful Tips:
- Do this in batches if your bag isn’t big enough. Overcrowding the bag can lead to uneven coating.
- Flip the bag around and shake from all sides—side to side, up and down, even gentle rolling.
Why This Step Matters:
This is where the magic happens. The powder clings to the white chocolate and forms that signature dusty, sweet outer layer. This is what transforms plain cereal into full-fledged puppy chow.
Step 5: Cool and Set
What You’ll Do:
Let the mixture cool and harden so the chocolate sets and the coating sticks.
How to Do It:
- Line a large baking sheet or your counter with parchment or wax paper.
- Spread the coated cereal out in an even layer, breaking up large clumps with your hands or a spatula.
- Let sit at room temperature for 20 to 30 minutes until dry to the touch.
Helpful Tips:
- Avoid refrigerating—this can cause the chocolate to “sweat” and make the coating damp.
- If you’re in a rush, place the tray in front of a fan to speed up the cooling process.
Why This Step Matters:
Allowing the mix to cool keeps it crisp and prevents it from clumping in storage. It also helps the pudding/sugar layer adhere firmly.
Step 6: Store or Serve
Once your pistachio puppy chow has cooled and dried completely, it’s ready to enjoy or store.
Serving Suggestions:
- Pour it into a pretty bowl for snacking
- Package in decorative bags for gifting
- Serve in small cups at parties or potlucks
Storage Tips:
- Store in an airtight container or zip-top bag at room temperature for up to 1 week
- For longer storage, refrigerate in a sealed container for up to 2 weeks
- Make sure it’s completely dry before storing to avoid sogginess
Congratulations! You’ve just made a beautiful batch of pistachio puppy chow, and it’s guaranteed to be a hit.
Now that you know exactly how to make it, let’s explore how to serve it for maximum delight.

How to Serve
There’s no wrong way to eat pistachio puppy chow—but there are definitely some fun and creative ways to present it. Whether you’re serving it for guests, gifting it to loved ones, or enjoying it solo with a good movie, here are some ideas to make your presentation shine.
Serve It Family Style
One of the easiest and most inviting ways to serve this treat is in a large decorative bowl at the center of your table. It encourages snacking, chatting, and those inevitable moments where someone says, “I can’t stop eating this!”
- Use a pretty glass or ceramic bowl to showcase the light green color
- Add a small serving spoon if you want to avoid hands-in-the-bowl scenarios at parties
Portion It into Snack Cups
If you’re hosting a party or event, consider portioning the puppy chow into individual paper snack cups or cupcake liners.
- Ideal for kids’ birthday parties, movie nights, and lunchboxes
- Keeps portions in check while making cleanup a breeze
Add It to Dessert Boards
Puppy chow makes a delightful addition to a dessert charcuterie board.
- Pair it with cookies, chocolate-covered pretzels, dried fruit, and mini marshmallows
- Include a variety of textures and flavors to create contrast
Use as a Topping
Looking to turn a basic dessert into something special? Use your pistachio puppy chow as a topping for:
- Vanilla or pistachio ice cream
- Greek yogurt with honey
- Cupcakes or frosted brownies
With these ideas, you’ll find yourself making this recipe not just for snacking, but for all kinds of creative culinary uses. And speaking of creativity, let’s look at some perfect pairings to go with this unique treat.
Awesome! Let’s keep the momentum going. You’ve already got your pistachio puppy chow perfectly prepped, coated, and cooled—now it’s time to dive into how to pair it, store it, and make sure you’re doing everything possible to enjoy it at its absolute best. From flavor matches to storage tricks, and common pitfalls to pro-level insights, we’re covering it all.
Pairing Suggestions
Pistachio puppy chow is incredibly versatile, and while it’s a standout treat all on its own, pairing it with complementary flavors, drinks, or dishes can really take things to the next level. Whether you’re hosting a party or putting together a thoughtful snack spread, these pairing ideas will help your pistachio puppy chow shine even brighter.
Beverage Pairings
1. Hot Beverages
The sweet, nutty flavor of this puppy chow pairs beautifully with warm drinks, especially those with contrasting or complementary flavors. Try it with:
- Green tea – Enhances the light pistachio flavor and offers an earthy contrast.
- Chai latte – The spice and creaminess balance the sweetness of the snack.
- Coffee or espresso – Bitter notes from black coffee help cut through the richness of the white chocolate.
- Warm almond milk – Keeps things cozy and nutty without overwhelming the flavor.
2. Cold Beverages
If you’re serving this at a brunch or afternoon gathering, a cool, refreshing drink can offer balance.
- Sparkling lemonade – The tartness contrasts the sweetness.
- Cucumber mint water – A fresh, clean palate cleanser between sweet bites.
- Iced matcha latte – Gives you that green-on-green aesthetic and deep umami flavor that complements pistachio perfectly.
Snack & Food Pairings
Puppy chow works well alongside other light, snackable foods. Here are a few pairings to round out your sweet-and-savory menu:
- Cheese cubes and crackers – Offer salty balance.
- Fresh fruit like strawberries, kiwi, or grapes – Juicy, tart contrast to the crunchy sweetness.
- Roasted nuts or trail mix – For added protein and a more satisfying snack board.
- Mini muffins or scones – Create a brunch dessert platter with various textures and flavors.
Dessert Pairings
Don’t be afraid to use this as part of a larger dessert experience.
- Vanilla panna cotta or pudding – Spoon pistachio puppy chow over creamy desserts for a crunchy topping.
- Frosted cupcakes – Decorate with a sprinkle of puppy chow right before serving.
- Trifles or layered desserts – Use the puppy chow as one of the crunchy layers in a dessert parfait.
Pairing is all about balance—whether that’s sweetness with spice, crunch with cream, or nutty with fruity, these combinations ensure your pistachio puppy chow plays well with others and feels like part of a thoughtfully crafted spread.
Storage, Freezing & Reheating Instructions
Now that you’ve made this crunchy, sweet snack mix, you’ll want to know how to keep it fresh for as long as possible. While this treat is best when it’s fresh and crispy, it stores well and even holds up beautifully in the freezer.
Storing Pistachio Puppy Chow
Room Temperature:
- Best for Short-Term: Keep in an airtight container at room temperature for up to 5–7 days.
- Ideal Storage Containers: Use resealable zip-top bags, glass jars with tight lids, or food-safe storage containers.
- Keep it Dry: Always make sure the puppy chow is completely cooled and dry before sealing. Moisture can make it soggy quickly.
Refrigeration (Optional):
- If your kitchen is warm or humid, you can refrigerate the snack for longer shelf life—up to 2 weeks.
- Use a tightly sealed container to prevent condensation.
- Let it come to room temperature for 10–15 minutes before eating for the best texture.
Freezing Instructions
Can You Freeze Puppy Chow?
Yes—puppy chow freezes surprisingly well and actually stays crispy!
How to Freeze It:
- Spread it out on a baking sheet and place in the freezer for 30 minutes to firm up (this step prevents clumping).
- Transfer to a freezer-safe zip-top bag or airtight container.
- Freeze for up to 3 months.
How to Thaw:
- Remove from the freezer and allow to thaw at room temperature for 10–15 minutes.
- No reheating needed—just make sure it’s fully thawed so it’s not sticky or damp.
Reheating Instructions
Puppy chow doesn’t typically need to be reheated, but if you’ve stored it somewhere cold and it feels a bit “dull” or less crisp, here’s what you can do:
- Quick Refresh: Spread it on a baking sheet and pop into a low oven (200°F) for 5 minutes.
- Cool Before Serving: Let it cool again for about 10 minutes to restore that signature crunch.
With these storage and freezing tips, you can always keep a batch of pistachio puppy chow on hand for unexpected guests, party prep, or those late-night snack cravings.
Common Mistakes to Avoid
Even with simple, no-bake recipes, there are a few missteps that can turn a great idea into a sticky mess. Avoid these common mistakes to ensure your pistachio puppy chow comes out picture-perfect every time.
1. Overheating the White Chocolate
White chocolate can be temperamental. If you microwave it for too long or on too high of a setting, it can scorch or seize up into a grainy mess.
Avoid It By:
- Melting slowly in 30-second bursts and stirring well between each interval.
- Using a microwave-safe bowl and avoiding direct stovetop heat unless you’re using a double boiler.
2. Not Coating the Cereal Evenly
Uneven coating means some cereal pieces will be overly sweet while others will be bland or dry.
Avoid It By:
- Gently folding the cereal until every piece is fully coated with the melted chocolate mixture.
- Taking your time—rushing the mixing step leads to clumps and uneven flavor.
3. Adding the Powder Coating Too Late
If you wait too long after pouring the chocolate on the cereal, the chocolate will harden and the sugar coating won’t stick properly.
Avoid It By:
- Moving quickly from the mixing bowl to the zip-top bag while the coating is still slightly warm and tacky.
4. Using Cook-and-Serve Pudding Mix
This recipe relies on instant pudding mix for the correct texture and coating. Cook-and-serve pudding won’t mix properly and will result in a clumpy mess.
Avoid It By:
- Checking the label on the box to confirm you’re using instant pudding.
5. Storing While Warm
Sealing your puppy chow in a container before it’s completely cool can trap steam, making it soggy and sticky.
Avoid It By:
- Spreading it out and letting it cool fully before storage.
By dodging these pitfalls, you’ll guarantee that every batch is just as crunchy, flavorful, and beautiful as the last.
Pro Tips
Ready to level up your pistachio puppy chow? These expert tips will help you get the best possible texture, flavor, and presentation every single time.
1. Use High-Quality White Chocolate
Not all white chocolate is created equal. Some chips are waxy and don’t melt smoothly, leading to a clumpy coating.
Pro Tip:
Use a brand with cocoa butter listed as a primary ingredient. Ghirardelli and Guittard are excellent choices.
2. Add a Tiny Pinch of Salt
A touch of salt enhances the sweetness and balances the flavor. It brings out the nuttiness in both the pistachio and the almond extract.
Pro Tip:
Use flaky sea salt and add just a pinch after coating, while the chocolate is still slightly wet.
3. Experiment with Texture Add-Ins
Want to take this up a notch? Add in a mix of textures after coating:
- Crushed pistachios for crunch
- Mini marshmallows for softness
- Dried cranberries for a sweet-tart contrast
4. Make It Colorful for the Holidays
This light green snack is perfect for spring or winter themes. Want to match a festive event?
Pro Tip:
Add pastel sprinkles for Easter, red and green sugar pearls for winter holidays, or edible glitter for birthdays.
5. Use a Cooling Rack for Drying
Spreading the coated cereal on a parchment-lined cooling rack allows for better airflow underneath, which helps the mix cool faster and prevents sogginess.
Pro Tip:
If you don’t have a rack, just use parchment or wax paper on the counter or a baking sheet.
These tips ensure that your pistachio puppy chow isn’t just good—it’s unforgettable.
Frequently Asked Questions (FAQs)
You’ve got questions, I’ve got answers! Let’s cover some of the most common questions that pop up when making this snack.
1. Can I use a different cereal instead of Rice Chex?
Absolutely. While Rice Chex is light and crisp, you can use Corn Chex, Wheat Chex, or even Crispix. Just be mindful that different cereals may absorb the chocolate coating differently and slightly alter the texture.
2. Is there a dairy-free version of this recipe?
Yes! Use dairy-free white chocolate chips and plant-based butter or coconut oil. Just check that your pudding mix is also dairy-free—some instant mixes contain milk derivatives.
3. Can I make this gluten-free?
Rice Chex is naturally gluten-free, but always check your packaging to confirm. Also verify that your pudding mix and other add-ins are labeled gluten-free.
4. What if I don’t like almond extract?
No problem. Almond extract adds a floral nutty note, but you can substitute it with vanilla extract or leave it out entirely. You’ll still get great pistachio flavor from the pudding mix.
5. Can I reduce the sugar?
You can reduce the powdered sugar slightly if you prefer a less sweet snack. Try cutting it down to ½ cup—you’ll still get good coverage with a lighter sweetness.
6. Can I add real pistachios?
Yes! Chopped pistachios make a great addition. Sprinkle them on after coating and before drying to ensure they stick.
7. How do I keep puppy chow from getting soggy?
Make sure it’s fully cooled before storing, and avoid exposing it to moisture. Use airtight containers and don’t store in the fridge unless absolutely necessary.
8. Can kids help make this?
Yes! Kids can help shake the bag, stir the cereal, and spread the mixture to cool. Just be cautious during the chocolate melting step—always supervise.
9. What’s the best way to gift this?
Scoop into clear cellophane bags and tie with ribbon. Add a printed tag with the flavor and a short note for a personal touch.
10. Can I double the recipe?
Definitely. Just make sure to melt the chocolate in batches so you don’t overcrowd your mixing bowl, and use a large zip-top bag or do the coating in stages.
Let’s bring this recipe journey to a warm, satisfying close. You’ve got all the steps, tips, and answers you need to make the perfect Pistachio Puppy Chow, so now it’s time to wrap things up with some final thoughts and encouragement to dive in and start creating.
Conclusion & Call to Action
Pistachio Puppy Chow isn’t just another snack—it’s a little celebration in a bowl. It’s proof that something easy can still feel thoughtful, and that the best recipes don’t have to be complicated or time-consuming to be completely satisfying. With its crisp texture, sweet powdered coating, and that subtle, nutty pistachio flavor that lingers just long enough to make you reach for another handful, this recipe checks every box.
What makes it especially lovable is how adaptable and shareable it is. You can pack it up for road trips, scatter it across dessert tables, sneak it into movie nights, or tie it up in little bags for sweet, edible gifts. It doesn’t melt in your hand (after it sets), and it’s just as beloved by kids as it is by adults who are secretly relieved there’s no peanut butter involved this time. Whether you’re making this for a casual weekend treat or prepping ahead for a special gathering, it’s going to deliver. Every. Single. Time.
And you saw just how easy it is to make. No oven, no fancy tools, no skills beyond stirring and shaking. Yet the end result feels special—because it is. You added your time, your touch, and your curiosity. Maybe you even invited your kids to help or made it while listening to your favorite playlist. Those are the things that turn simple recipes into lasting traditions.
So now it’s your turn.
Make it once, and I promise, you’ll be hooked. I can’t wait for you to experience how ridiculously good this pistachio puppy chow is—and even more than that, I’m excited to see how you make it yours. Will you add sprinkles? Swap in dark chocolate? Double the batch and tuck some away in the freezer for later? That’s the fun part—this is just the beginning.
If you try this recipe, let me know how it went! Snap a photo of your finished puppy chow and tag me on social media, or leave a comment to share what you loved, what you tweaked, and how fast it disappeared from the bowl. Recipes are even better when they’re shared—and your version might just inspire someone else to give it a go.
Until next time, happy snacking, and don’t forget to make extra—because you’re going to need it.
Print
Pistachio Puppy Chow Recipe – Easy No-Bake Sweet Snack Mix
- Total Time: 30 minutes (includes cooling)
- Yield: 14–16 servings 1x
- Diet: Vegetarian
Description
This no-bake Pistachio Puppy Chow is sweet, crunchy, and packed with nostalgic flavor. Made with Chex cereal, white chocolate, and pistachio pudding mix, it’s the perfect snack for parties, holidays, or whenever you need a quick treat.
Ingredients
-
⅔ cup powdered sugar
-
1 box (3.4 oz) instant pistachio pudding mix
-
¼ tsp almond extract
-
5 cups Rice Chex cereal
-
2 cups white chocolate chips
-
¼ cup butter, cut into pieces
Instructions
-
In a large zip-top bag, combine powdered sugar, pistachio pudding mix, and almond extract. Shake well.
-
In a microwave-safe bowl, melt white chocolate chips and butter in 30-second intervals, stirring until smooth.
-
Pour melted mixture over Rice Chex cereal in a large bowl. Stir gently to coat evenly.
-
Transfer coated cereal into the bag with the pistachio-sugar mix. Seal and shake to coat.
-
Spread out on parchment paper and let cool completely before serving or storing.
Notes
-
Use high-quality white chocolate for best results.
-
Make sure cereal is fully coated before adding the powdered sugar mix.
-
Cool completely before storage to maintain crunch.
-
Store in airtight container up to 1 week or freeze up to 3 months.
- Prep Time: 10 minutes
- Cook Time: 10 minutes
- Category: Snack, Dessert
- Method: Baking
- Cuisine: American