
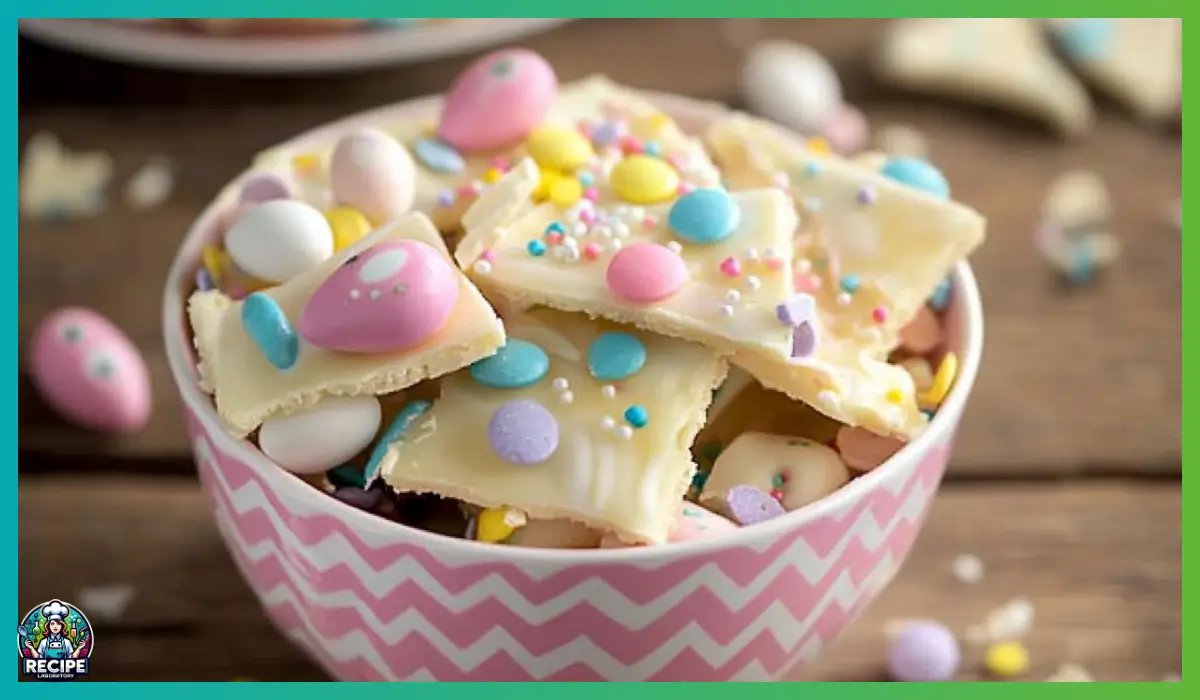
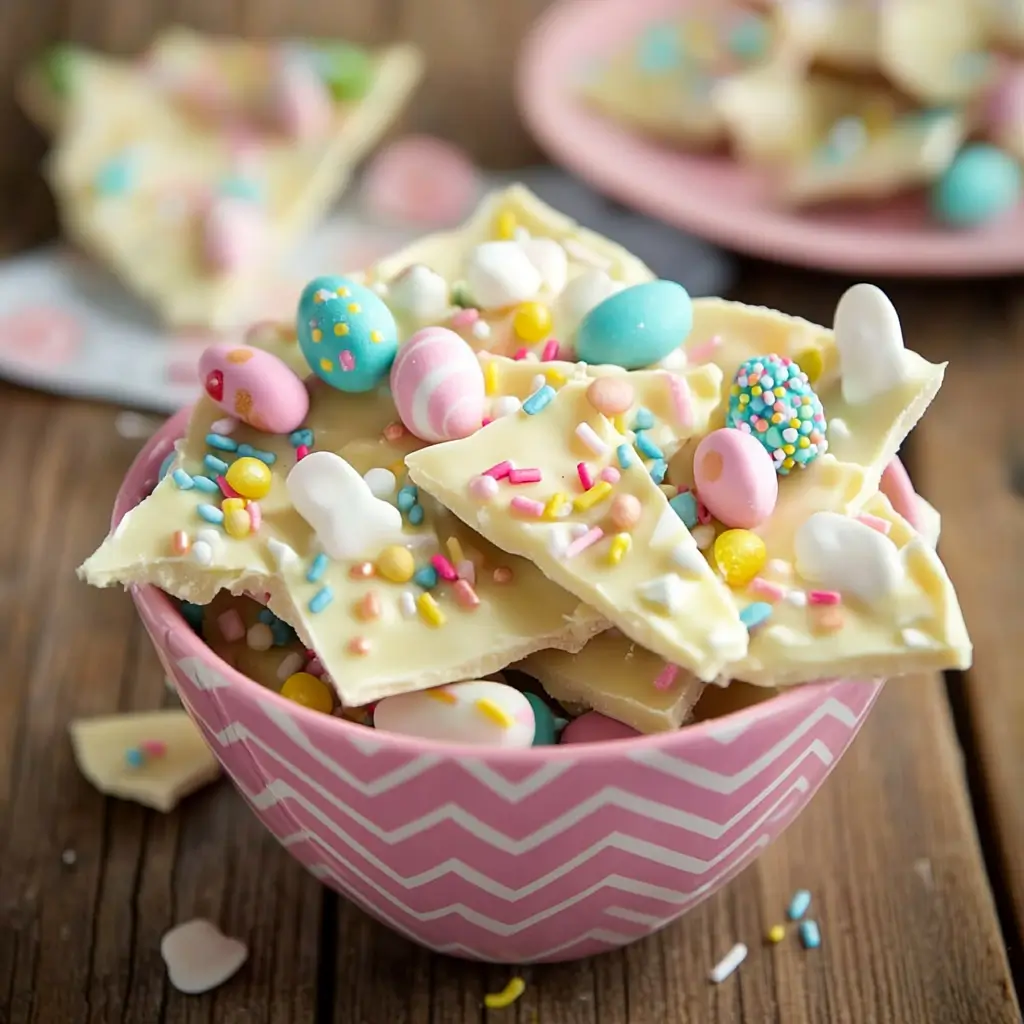
If you’re looking for a fun, colorful, and incredibly easy treat to brighten up your Easter celebrations, then this Easter White Chocolate Bark recipe is for you. There’s something so joyful about breaking apart a sheet of vibrant, candy-studded chocolate and sharing it with friends and family. And the best part? It takes just a few minutes to make, making it the perfect last-minute dessert or gift.
I remember the first time I made this white chocolate bark for an Easter gathering. I was in a rush and needed something quick but festive. As soon as I spread the melted white chocolate onto the parchment paper and tossed on pastel-colored candies and sprinkles, it felt like I was creating edible art. Not only did it look stunning, but it was also a hit with both the kids and adults. Everyone kept reaching for another piece, their fingers dusted with sprinkles and chocolate smudges.
This recipe is a win-win. It’s so easy that you can involve the kids in the decorating process, letting them sprinkle on candies and get creative. And with just a few simple ingredients, it’s also one of those recipes that you can whip up with minimal effort but maximum visual appeal. Whether you’re serving it at an Easter brunch, adding it to your dessert table, or packing it up as little gifts for friends and neighbors, this white chocolate bark is a guaranteed crowd-pleaser.
Why You’ll Love This Recipe
There are so many reasons to fall in love with this Easter White Chocolate Bark recipe. First of all, it’s incredibly simple to make. There’s no baking required, no complicated techniques, and no special equipment needed. If you can operate a microwave and use a spoon, you can make this delightful treat.
The visual appeal is another huge plus. The white chocolate base makes the pastel-colored candies and sprinkles pop beautifully, making it not just a dessert but also a decorative piece for your Easter table. You can customize it with your favorite Easter-themed sprinkles or mix in different candies to suit your preferences.
Another reason you’ll adore this recipe is its versatility. It’s perfect for gifting, party favors, or even just as a sweet snack to have around during the holiday. It’s also a great way to use up leftover Easter candies if you’re looking to repurpose them creatively.
The flavor combination of creamy white chocolate with the crunchy, sweet candy pieces is pure bliss. Each bite is a mix of smooth and crisp textures that keeps you coming back for more. Plus, this recipe is gluten-free, making it a great option for those with dietary restrictions.
And let’s not forget how kid-friendly this recipe is. Whether you’re looking for a fun Easter activity to do with your children or simply want to make something festive without the hassle, this recipe is your answer.
Health Benefits
While this Easter White Chocolate Bark is undeniably a treat, it does offer some interesting aspects from a health perspective. Let’s break down the health benefits of the key ingredients used in this recipe.
White chocolate, unlike milk or dark chocolate, is made from cocoa butter, milk solids, and sugar. While it lacks the antioxidant benefits of dark chocolate, it is still a source of calcium due to the milk solids. Calcium is essential for maintaining strong bones and teeth. Additionally, cocoa butter contains healthy fats that can provide energy and support skin health.
The candies added to this bark may not be particularly nutritious, but they do offer a fun and colorful addition that can be enjoyed in moderation. Plus, indulging in a sweet treat every now and then can be part of a balanced lifestyle, promoting mental well-being and allowing you to satisfy your cravings without feeling deprived.
If you’re looking to make this recipe slightly healthier, you can opt for dark chocolate or sugar-free white chocolate instead. You can also add in some dried fruits or nuts to increase the nutrient content and provide extra fiber and healthy fats.
Lastly, making your own candy bark allows you to control portion sizes and choose the best quality ingredients. It’s a great way to treat yourself and your family with something homemade, minimizing the use of processed ingredients often found in store-bought chocolates.
Preparation Time, Servings, and Nutritional Information
Preparation Time: 15 minutes
Cooling Time: 2 hours (or 30 minutes if using the refrigerator)
Total Time: 2 hours 15 minutes
Servings: Approximately 12 servings (varies based on size of pieces)
Nutritional Information (Per Serving):
Calories: 320
Fat: 18g
Saturated Fat: 11g
Cholesterol: 10mg
Sodium: 35mg
Carbohydrates: 36g
Fiber: 0.5g
Sugars: 34g
Protein: 3g
Please note that the nutritional values are estimates based on the listed ingredients. If you make any substitutions or additions, the nutritional information will change.
Ingredients List
- 2 pounds white chocolate, chopped (Use high-quality white chocolate like Ghirardelli for the best creamy, smooth texture. Make sure to chop the chocolate finely to ensure even melting.)
- 1+ cup small Easter candies (You can use colorful candies like M&Ms, mini Robin Eggs, or any other Easter-themed chocolates you like. Feel free to mix and match for a festive variety.)
- Sprinkles (Easter-themed or colorful sprinkles work best. Think pastel-colored nonpareils, confetti sprinkles, or even small candy shapes.)
This ingredient list is incredibly simple and flexible. You can customize the toppings to your liking, whether you prefer extra candy, sprinkles, or even a drizzle of dark or milk chocolate for added flavor contrast.
Step-By-Step Cooking Instructions
Making Easter White Chocolate Bark is a straightforward process, but there are a few tips and tricks to ensure the best results. Let’s break down each step to make it as easy as possible.
Step 1: Prepare Your Work Area
- Start by lining a baking sheet with parchment paper. This will make it easy to remove the hardened bark without it sticking to the tray.
- Make sure your work surface is clean and ready for action since you’ll be working quickly once the chocolate is melted.
Step 2: Melt the White Chocolate
- Place the chopped white chocolate in a microwave-safe bowl.
- Microwave the chocolate in 30-second intervals, stirring thoroughly after each interval. This helps to prevent the chocolate from scorching and ensures even melting.
- Continue the process until the chocolate is completely smooth and melted. This usually takes about 2 minutes total.
- If you prefer, you can also melt the chocolate using a double boiler over low heat, stirring frequently until melted.
Step 3: Spread the Melted Chocolate
- Pour the melted white chocolate onto the parchment-lined baking sheet.
- Using a spatula, spread the chocolate to about 1/4-inch thickness. You don’t have to worry about making it perfectly even; a rustic look works just fine.
Step 4: Decorate the Chocolate Bark
- While the chocolate is still warm and soft, sprinkle the candies and sprinkles evenly over the surface.
- Gently press the candies down with your hands or a spatula to help them stick to the chocolate as it cools.
- Feel free to get creative with your decoration! You can even drizzle extra melted chocolate over the top for added texture and flavor.
Step 5: Let the Chocolate Cool and Harden
- Allow the decorated chocolate to cool completely at room temperature for about 2 hours. This slow cooling process helps the chocolate maintain its smooth texture and shiny appearance.
- If you’re in a hurry, place the baking sheet in the refrigerator for about 30 minutes. Just be mindful that sudden temperature changes can cause the chocolate to lose its glossiness, but it’ll still taste amazing.
Step 6: Break the Bark Into Pieces
- Once the chocolate is fully hardened, carefully lift the parchment paper off the baking sheet.
- Break the bark into pieces of various sizes using your hands. You can also use a sharp knife if you prefer more uniform pieces, but the rustic, irregular look is part of its charm.
Step 7: Store and Enjoy
- Transfer the chocolate bark pieces to an airtight container and store at room temperature for up to 2 weeks.
- If you live in a warm climate, you may want to refrigerate it to prevent melting.
And that’s it! You’ve just made a beautiful, delicious batch of Easter White Chocolate Bark with minimal effort.
How to Serve
This Easter White Chocolate Bark is a versatile treat that can be served in many delightful ways. Whether you’re gifting it, serving it at a party, or simply enjoying it as a snack, here are some fun serving ideas:
- On an Easter Dessert Table: Arrange the colorful bark pieces on a decorative platter or tiered tray for a stunning visual centerpiece. It pairs beautifully with other Easter treats like cupcakes, cookies, and brownies.
- As Gift Bags: Place pieces of the bark in clear cellophane bags tied with pastel ribbons. These make adorable party favors for kids’ Easter egg hunts or thoughtful gifts for friends and neighbors.
- Mixed Candy Bowls: Serve alongside other Easter candies in a festive candy dish for a sweet and colorful display.
- Paired with Coffee or Hot Chocolate: Enjoy a piece or two with a warm drink for a cozy, indulgent moment.
- Crumbled Topping: Break the bark into smaller bits and sprinkle it over ice cream, yogurt, or even frosted cupcakes for a fun twist.
The beauty of this recipe is that it’s not only a treat but also a decorative element you can use to enhance your holiday spreads.
Pairing Suggestions
Easter White Chocolate Bark is a treat that can be paired with various other dishes and beverages to create a well-rounded dessert experience. Here are some fantastic pairing ideas:
- Hot Beverages: The creamy sweetness of white chocolate bark complements rich, warm drinks like coffee, hot chocolate, or spiced chai tea. Serve a piece alongside your drink for a satisfying afternoon treat.
- Fruit Platters: Pairing this bark with fresh fruits like strawberries, raspberries, or grapes adds a refreshing contrast to the sweet chocolate. You can even serve it alongside fruit dips for a fun twist.
- Dessert Charcuterie Boards: Combine pieces of Easter White Chocolate Bark with cookies, marshmallows, nuts, and dried fruits for a festive and diverse dessert board.
- Milkshakes: Crumble the bark and mix it into vanilla or strawberry milkshakes for a delightful, crunchy texture.
- Pastries: Serve the bark with buttery pastries like croissants or scones during an Easter brunch. The sweet and creamy chocolate provides a delightful complement to the flaky texture of baked goods.
This versatile treat pairs well with so many different flavors, making it a perfect addition to various dessert spreads.
Storage, Freezing & Reheating Instructions
This Easter White Chocolate Bark stores wonderfully, which makes it ideal for making ahead or keeping on hand for a quick treat.
Storage:
- Store the broken pieces of bark in an airtight container at room temperature for up to 2 weeks.
- If you live in a warm or humid environment, consider storing the bark in the refrigerator to prevent melting. However, keep in mind that refrigeration can cause chocolate to develop a white, powdery appearance known as “bloom.” This doesn’t affect the flavor, but it can alter the appearance slightly.
Freezing:
- To freeze the bark, place the pieces in a single layer on a parchment-lined baking sheet and freeze for about 1 hour.
- Once frozen, transfer the pieces to a freezer-safe container or heavy-duty freezer bag.
- The bark will keep well in the freezer for up to 3 months.
Reheating or Refreshing:
- There’s no need to reheat the bark, but if you prefer to enjoy it slightly softened, let it sit at room temperature for about 10 minutes after taking it out of the refrigerator or freezer.
Following these storage tips ensures your Easter White Chocolate Bark maintains its freshness and delightful texture for whenever you’re ready to enjoy it.
Common Mistakes to Avoid
While this recipe is straightforward, there are a few common mistakes you’ll want to avoid to ensure perfect results:
- Overheating the Chocolate: White chocolate is very delicate and can easily burn. Be sure to melt it in short intervals in the microwave or use a double boiler over low heat to avoid scorching.
- Not Stirring Enough: When melting chocolate, stirring frequently is essential to ensure even melting. It also prevents hot spots that can cause the chocolate to seize.
- Using Low-Quality Chocolate: Opt for high-quality white chocolate like Ghirardelli. Cheaper white chocolate can contain more fillers and less cocoa butter, resulting in a waxy or overly sweet final product.
- Cooling Too Quickly: If you rush the cooling process by putting the chocolate directly in the freezer, it can affect the texture and shine. Cooling at room temperature is best for appearance and texture, but refrigeration works in a pinch.
- Not Pressing Toppings: If you don’t gently press the candies and sprinkles into the melted chocolate, they may fall off once the bark is hardened. Pressing them lightly ensures they stay put.
Avoiding these common pitfalls will help you achieve a beautiful, smooth, and delicious white chocolate bark every time.
Pro Tips
To make your Easter White Chocolate Bark even better, here are some pro tips to consider:
- Use Candy Melts for Extra Color: For a festive touch, melt some pink, yellow, or blue candy melts and drizzle them over the white chocolate before adding the candies and sprinkles. It adds a pop of color and extra flavor.
- Add Texture: Mix in some crushed pretzels, chopped nuts, or dried fruits to add more texture and complexity to each bite.
- Use a Silicone Mat: If you want a perfectly smooth surface, spread the chocolate over a silicone baking mat instead of parchment paper. It helps create an even layer and makes the bark easier to peel off.
- Make Ahead of Time: This bark can be made several days in advance, making it a great option for stress-free holiday planning.
- Personalize It: Add a special touch by using alphabet candy letters to spell out holiday-themed messages on the bark. It’s a cute and fun way to make your dessert even more festive.
Now that you’re armed with all these tips, you’re well on your way to making the most stunning Easter White Chocolate Bark ever.
Frequently Asked Questions (FAQs)
Here are some common questions about making Easter White Chocolate Bark, along with helpful answers to ensure your dessert turns out perfectly every time:
1. Can I use chocolate chips instead of chopped white chocolate bars?
Yes, you can use white chocolate chips, but be aware that some brands add stabilizers to chips that can make them harder to melt smoothly. If you use chips, make sure to melt them gently using short intervals in the microwave or over a double boiler. Also, high-quality brands like Ghirardelli or Nestlé Premier White Morsels tend to melt better.
2. What if my chocolate seizes and becomes grainy while melting?
This usually happens when moisture gets into the chocolate or if it’s overheated. To fix it, add a small amount of vegetable oil or cocoa butter (about 1 teaspoon at a time) and stir vigorously until the chocolate smooths out again. If the seizing is severe, you may need to start over with fresh chocolate.
3. Can I make this recipe ahead of time?
Absolutely! This bark is perfect for making ahead. Simply store it in an airtight container at room temperature for up to 2 weeks or in the refrigerator if you prefer a slightly firmer texture.
4. Can I add other toppings to the bark?
Yes, you can get creative with your toppings. Try adding chopped nuts, crushed pretzels, dried fruits, or even edible glitter for a touch of sparkle. The possibilities are endless, so feel free to customize it to your liking.
5. How can I make the bark look neater and more professional?
To achieve a cleaner look, spread the melted chocolate over a silicone baking mat instead of parchment paper. You can also use a spatula or offset knife to create an even layer. For a polished finish, drizzle some colored chocolate over the bark after applying the candies and sprinkles.
6. What is the best way to break the bark into pieces?
You can simply use your hands to break the bark into rustic, uneven pieces. If you prefer more uniform pieces, use a sharp knife to carefully cut the bark into squares or triangles.
7. Can I use dark or milk chocolate instead of white chocolate?
Definitely! While white chocolate creates a beautiful, vibrant contrast with the pastel candies, you can use milk or dark chocolate if you prefer. Feel free to mix chocolates for a marbled effect.
8. Why is my bark turning white or developing spots after cooling?
This is likely chocolate bloom, which occurs when the cocoa butter separates from the chocolate due to temperature changes. It’s more of an aesthetic issue than a taste issue. To prevent this, allow the chocolate to cool at room temperature rather than rushing the process by putting it directly in the freezer.
9. Can I use leftover Easter candy for this recipe?
Absolutely! This recipe is an excellent way to use up leftover Easter candies. Chop them into smaller pieces if needed and scatter them over the melted chocolate before it hardens.
10. How can I make this bark gluten-free?
The bark itself is naturally gluten-free if you use pure white chocolate. However, make sure the candies and sprinkles you use are labeled gluten-free. Always double-check ingredient labels to be safe.
Answering these common questions should help you make the most of your Easter White Chocolate Bark experience. But if you have more questions, feel free to ask away!
Conclusion & Call to Action
Congratulations! You’ve just discovered how to make the easiest, most delightful Easter White Chocolate Bark that’s perfect for celebrating the holiday in style. This recipe’s beauty lies in its simplicity — with just a few ingredients and a little bit of creativity, you can whip up a treat that’s not only delicious but also visually stunning.
Whether you’re making this bark for your Easter brunch, gifting it to loved ones, or simply treating yourself, it’s sure to bring smiles all around. The combination of creamy white chocolate with crunchy, colorful candies is pure bliss. And the best part? You can completely customize it to suit your tastes and the occasion.
If you’re looking to make this recipe your own, try experimenting with different toppings, chocolates, or even adding a drizzle of caramel for extra richness. And if you’re feeling extra crafty, package up pieces of the bark in cute little bags or jars to spread the Easter cheer to friends and family.
I can’t wait for you to give this Easter White Chocolate Bark recipe a try! When you do, be sure to let me know how it turns out. Share your photos, experiences, and any fun twists you added to make it your own. I’d love to hear from you!
Now, grab your ingredients, roll up your sleeves, and get ready to create something sweet, colorful, and utterly delightful. Happy Easter and happy baking!
Print
Easter White Chocolate Bark Recipe – Quick and Festive Treat
- Total Time: 2 hours 15 minutes
- Yield: Approximately 12 servings 1x
- Diet: Gluten Free
Description
This Easter White Chocolate Bark is a quick and festive treat made with creamy white chocolate, colorful Easter candies, and fun sprinkles. It’s perfect for holiday parties, gifts, or just a sweet snack to brighten your day.
Ingredients
-
2 pounds white chocolate, chopped (e.g., Ghirardelli white chocolate bars)
-
1+ cup small Easter candies (e.g., M&Ms, mini Robin Eggs)
-
Sprinkles (Easter-themed or colorful sprinkles)
Instructions
-
Melt Chocolate: Place chopped white chocolate in a microwave-safe bowl. Microwave in 30-second intervals, stirring in between, until smooth.
-
Spread Chocolate: Spread melted chocolate onto a parchment-lined baking sheet to about 1/4-inch thickness.
-
Decorate: Sprinkle candies and sprinkles over the chocolate. Gently press them into the chocolate to help them stick.
-
Cool: Let the chocolate cool at room temperature for about 2 hours or place it in the refrigerator to speed up the cooling process.
-
Break Into Pieces: Once fully hardened, break the bark into shards.
-
Store and Enjoy: Store in an airtight container at room temperature for up to 2 weeks.
Notes
-
For extra color, drizzle melted pink or blue candy melts over the top before adding sprinkles.
-
To prevent candies from falling off, gently press them into the melted chocolate.
-
Store in the refrigerator if you live in a warm climate to prevent melting.
- Prep Time: 15 minutes
- Cook Time: 0 minutes (Cooling time: 2 hours)
- Category: Dessert
- Method: No-Bake
- Cuisine: American