
We’ve all been there—standing in the protein bar aisle, overwhelmed by the dozens of options claiming to be the healthiest, tastiest, and most effective snack out there. But here’s the thing: Nothing beats the satisfaction of making your own Homemade Protein Bars at home. Not only can you control the quality of ingredients, but you also get to customize the flavors and textures to suit your cravings. Plus, it’s way cheaper than buying the fancy packaged stuff.
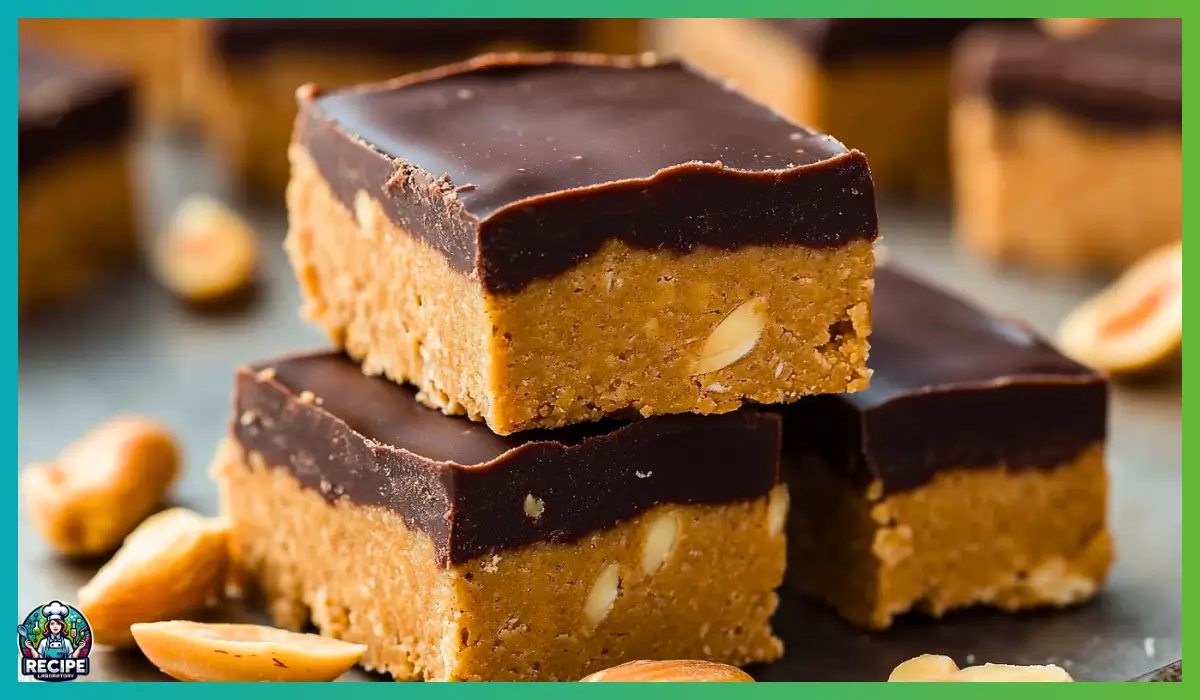
This recipe for homemade protein bars is incredibly simple. It’s made with wholesome ingredients like peanut butter, protein powder, pure maple syrup or honey, and just a touch of salt to bring everything together. And if you’re feeling a little extra? Melted chocolate chips can be drizzled or coated over the bars to create a rich, indulgent finish.
What I love most about this recipe is its versatility. Whether you’re making these bars as a pre-workout snack, a mid-afternoon energy boost, or even a satisfying dessert, they fit perfectly into any part of your day. And the best part? No baking is required. Just mix, shape, chill, and enjoy. It’s that easy.
I remember the first time I made these bars. I was in the middle of a busy workweek and needed something to keep me going without the sugar crash. I tossed a few ingredients together, hoping for the best. And what came out of that experiment? Absolute magic. These bars have been a staple in my kitchen ever since. Trust me, once you try making them, you’ll wonder why you ever bought protein bars from the store in the first place.
Why You’ll Love This Recipe
Easy and Convenient to Make
These homemade protein bars are the definition of simplicity. With just five main ingredients and a few minutes of prep, you can whip up a batch of these delicious bars without breaking a sweat. No baking required, and the whole process is practically foolproof.
Customizable to Fit Your Tastes
What’s amazing about this recipe is how customizable it is. Prefer almond butter over peanut butter? Go for it. Want to make it dairy-free or vegan? Use a plant-based protein powder and pure maple syrup. Plus, you can easily add mix-ins like dried fruits, nuts, or seeds to boost the flavor and texture.
Budget-Friendly and Healthier Than Store-Bought
Store-bought protein bars can be pricey and often packed with preservatives, added sugars, or artificial ingredients. Making your own bars at home not only saves money but also ensures you’re fueling your body with wholesome, natural ingredients. You get all the flavor and nutrients without the unnecessary junk.
Perfect for Any Time of Day
These bars are versatile enough to enjoy any time of day. Whether you need a quick breakfast, a mid-morning pick-me-up, or something to power you through your afternoon slump, these protein bars have you covered. And if you’re craving something sweet after dinner? They double as a healthier dessert option.
Health Benefits
Protein-Packed for Muscle Recovery and Energy
One of the biggest perks of this recipe is the impressive protein content. With protein powder as one of the main ingredients, these bars are designed to provide sustained energy, help with muscle recovery, and keep you feeling fuller for longer. This makes them ideal for those with active lifestyles or anyone looking to increase their protein intake in a delicious way.
Balanced Nutrients for a Well-Rounded Snack
These bars aren’t just about protein. The peanut butter provides healthy fats that support brain function and heart health, while the maple syrup or honey offers natural sugars for quick energy without the nasty sugar crash. It’s a balanced combination that gives your body what it needs to stay energized and focused.
Customizable for Dietary Preferences
Making these bars at home gives you the freedom to tailor them to your dietary needs. You can easily make them gluten-free by using a gluten-free protein powder. If you’re following a low-carb or keto-friendly diet, opt for a low-carb protein powder and a sugar-free syrup. The possibilities are endless, making this recipe a perfect fit for various lifestyles.
Reduced Sugar and No Artificial Ingredients
Unlike many store-bought protein bars that are loaded with artificial sweeteners and preservatives, this homemade version keeps things clean and simple. Using pure maple syrup or honey as a natural sweetener gives you the sweetness you crave without compromising on quality.
Preparation Time, Servings, and Nutritional Information
Preparation Time
- Mixing Time: 10 minutes
- Chilling Time: 30 minutes
- Total Time: 40 minutes
Servings
This recipe makes about 10–16 bars, depending on how large you cut them. Perfect for meal prep or sharing with family and friends.
Nutritional Information (Per Serving – Based on 12 Bars)
- Calories: Approximately 250 kcal
- Protein: 12g
- Carbohydrates: 15g
- Fat: 16g
- Fiber: 3g
- Sugar: 6g
Nutritional values will vary depending on the protein powder and sweetener used. If you want to make them lower in calories or sugar, use a sugar-free syrup or a lower-fat peanut butter.
Ingredients List
- 1 1/2 cups peanut butter (Or an allergy-friendly alternative like almond butter or sunflower seed butter)
- 3/4 cup protein powder (90g) Unsweetened is preferred for better control over sweetness. Vanilla or chocolate flavors work great, too.
- 1/4 cup pure maple syrup or honey (Both work well, but honey provides a slightly richer sweetness)
- 1/2 tsp salt (To enhance the flavor, especially if using unsalted peanut butter)
- 4 oz melted chocolate chips (optional) For coating or drizzling over the bars. Dark, milk, or even white chocolate works wonderfully.
Step-By-Step Cooking Instructions
Step 1: Mix Ingredients
In a large bowl, combine the peanut butter, protein powder, maple syrup or honey, and salt. Stir the mixture with a sturdy spoon or spatula until a thick, dough-like consistency forms. If the mixture feels too dry, you can add a tablespoon of water or milk (dairy or non-dairy) to help bind everything together.
Step 2: Shape the Bars
Line an 8×8 inch pan with parchment paper for easy removal. Press the mixture evenly into the pan, using the back of a spoon or your hands to flatten and smooth the surface. If you prefer individual bars, you can shape them by hand instead of pressing them into the pan.
Step 3: Chill the Mixture
Place the pan in the refrigerator and let it chill for about 30 minutes or until the mixture is firm enough to cut. Chilling helps the bars hold their shape and makes them easier to handle.
Step 4: Optional Chocolate Coating
While the bars are chilling, melt the chocolate chips in a microwave-safe bowl in 30-second intervals, stirring between each interval until smooth. You can either spread the melted chocolate over the entire surface of the chilled mixture or dip each bar individually for a thicker coating. Chill again to let the chocolate set.
Step 5: Slice and Store
Once the bars are fully chilled and the chocolate is set, use a sharp knife to cut them into 10–16 bars, depending on your preferred size. Store the bars in an airtight container in the fridge for up to a week, or freeze for longer storage.

How to Serve
These homemade protein bars are not just a grab-and-go snack; they can be enjoyed in a variety of ways that make them even more delicious and versatile. Here are some of the best serving ideas:
As a Quick Breakfast
Mornings can be hectic, but having a batch of these bars ready to go makes breakfast stress-free. Pair a protein bar with a hot cup of coffee or your favorite smoothie for a balanced, energizing start to your day.
Pre- or Post-Workout Snack
Need a boost of energy before hitting the gym? Or maybe you’re looking for something nutritious to aid in muscle recovery afterward? These protein bars are perfect for both. The protein content helps with muscle repair while the healthy fats and natural sugars provide lasting energy.
Dessert-Style Treat
Turn your protein bars into a decadent dessert by drizzling them with extra melted chocolate or sprinkling them with shredded coconut, crushed nuts, or even freeze-dried fruit. Serve them chilled or slightly warmed for a gooey, satisfying treat.
With Fresh Fruits
For a well-rounded snack, enjoy a protein bar alongside a serving of fresh fruit like apple slices, banana chunks, or berries. The natural sweetness of the fruit pairs beautifully with the rich, nutty flavor of the bars.
As Part of a Balanced Meal
If you’re in the mood for something more substantial, crumble a bar over a bowl of Greek yogurt and top it with fresh berries and a drizzle of honey. It’s a satisfying and protein-packed breakfast or lunch that’ll keep you full for hours.
Pairing Suggestions
Pairing your homemade protein bars with the right foods and drinks can enhance their flavor and nutritional benefits. Here are some pairing ideas to try:
Beverages
- Coffee or Espresso: The slight bitterness of coffee complements the sweetness of the bars, especially if you’ve added a chocolate drizzle.
- Green Smoothies: Pair your protein bar with a nutrient-packed green smoothie made from spinach, banana, almond milk, and a little extra protein powder for a powerful, energy-boosting combo.
- Herbal Tea: A soothing cup of herbal tea like peppermint or chamomile is perfect if you’re enjoying the bars as a nighttime treat.
Fruits and Yogurt
- Fresh Berries: The tartness of berries like strawberries, raspberries, or blueberries provides a lovely contrast to the richness of the peanut butter base.
- Greek Yogurt: Dip pieces of the bar into thick, creamy yogurt for a delightful and protein-packed snack.
- Banana Slices: The natural sweetness of bananas pairs perfectly with the chocolate drizzle, especially if you went for a full coating.
Nut Butters and Spreads
- Spread a thin layer of almond butter or cashew butter over the bars for an extra hit of creaminess and flavor.
- Try them with a dollop of sugar-free jam for a delicious PB&J-style snack.
Low-Carb Options
If you’re following a low-carb or keto diet, pair the bars with unsweetened almond milk or bulletproof coffee for a satisfying and energy-boosting combo.
Storage, Freezing & Reheating Instructions
Proper storage is essential to keep your homemade protein bars fresh and delicious. Here’s how to do it:
Storing in the Refrigerator
Store the cut bars in an airtight container and keep them in the refrigerator. They’ll stay fresh for up to one week. Refrigeration helps maintain their firm texture and prevents them from becoming too soft.
Freezing for Longer Storage
If you’ve made a large batch or want to keep some bars for later, freezing is an excellent option. Place the bars on a baking sheet lined with parchment paper and freeze until solid (about an hour). Once frozen, transfer them to a freezer-safe container or zip-top bag. They’ll keep well for up to 3 months.
Reheating or Serving from the Freezer
You can enjoy the bars straight from the freezer for a firmer, chewier texture. Alternatively, let them thaw at room temperature for about 10–15 minutes for a softer bite. If you coated them with chocolate, the chocolate will remain firm even after thawing, making for a delightful crunch.
Keeping Them Fresh
To prevent the bars from drying out, you can wrap them individually in plastic wrap or wax paper before storing them in a container. This is especially helpful if you’re planning to freeze them for long-term storage.
Common Mistakes to Avoid
Making homemade protein bars is pretty straightforward, but there are a few common mistakes you’ll want to avoid to ensure the best results:
Using Too Much Protein Powder
It’s tempting to pack in as much protein as possible, but using too much protein powder can make your bars dry, crumbly, and unappealing. Stick to the recipe’s recommended amount or add just a little extra if necessary.
Not Mixing Thoroughly
If you don’t mix the ingredients well, you’ll end up with uneven bars where some bites are too dry or too sweet. Take your time to ensure the dough is well-combined before pressing it into the pan.
Skipping the Chilling Step
The chilling process is crucial for the bars to firm up properly. If you skip this step, you’ll end up with a sticky mess that’s difficult to cut and handle.
Adding Too Much Liquid
If the mixture feels too dry, adding a tablespoon of liquid can help. However, adding too much will cause the bars to become overly soft and difficult to shape. Always add liquid in small amounts and test the texture as you go.
Improper Storage
Leaving the bars out at room temperature for too long can cause them to spoil or become unappetizingly soft. Always store them in the fridge or freezer for the best texture and freshness.
Pro Tips
Use High-Quality Protein Powder
Choosing the right protein powder makes all the difference. Look for one that complements your preferred flavor profile. Vanilla and chocolate are classic options, but feel free to experiment with other flavors like peanut butter, cinnamon roll, or even cookies and cream.
Add Mix-Ins for Extra Texture
For added texture and flavor, try mixing in ingredients like chopped nuts, dried fruits, coconut flakes, or chia seeds. Just be mindful of the overall consistency so the bars hold together properly.
Adjust Sweetness to Taste
If you prefer sweeter bars, add a bit more maple syrup or honey. For a lower-sugar option, try using a natural low-calorie sweetener like monk fruit or stevia.
Use a Silicone Spatula for Mixing
A sturdy silicone spatula works best for mixing thick ingredients like peanut butter and protein powder. It helps you incorporate everything evenly without creating a mess.
Let Them Rest Before Cutting
Once the bars have chilled, let them sit at room temperature for a few minutes before slicing. This will make cutting easier and help prevent the bars from crumbling.
Frequently Asked Questions (FAQs)
When it comes to making homemade protein bars, a few common questions tend to pop up. Let’s cover them all so you can feel completely confident about making this recipe.
Can I Use a Different Nut Butter Instead of Peanut Butter?
Yes, absolutely! This recipe is highly versatile. You can easily swap peanut butter for almond butter, cashew butter, sunflower seed butter, or even tahini if you prefer a nut-free option. Just keep in mind that the texture and flavor might change slightly depending on what you use. Almond butter tends to produce a slightly firmer bar, while sunflower seed butter can be a little softer.
What Type of Protein Powder Should I Use?
You can use any protein powder you like, but keep in mind that the texture and taste will vary depending on the type. Whey protein powder works particularly well for a smooth and chewy texture. Plant-based protein powders like pea, hemp, or brown rice protein are excellent for those following a vegan or dairy-free diet, but they may produce a slightly grittier texture.
Also, unsweetened protein powder is recommended for more control over the sweetness level, but flavored protein powders like vanilla, chocolate, or peanut butter are fantastic if you want to enhance the flavor profile of your bars.
How Do I Make These Protein Bars Vegan?
Making this recipe vegan is super easy. Simply use a plant-based protein powder and replace honey with pure maple syrup or agave nectar. The rest of the ingredients are already plant-based, so you won’t have to make any other changes.
Can I Make These Protein Bars Gluten-Free?
Yes! To make them gluten-free, use a protein powder that’s certified gluten-free. Additionally, double-check all your ingredients to ensure they are free of any gluten-containing additives.
How Long Will These Protein Bars Last?
When stored properly in an airtight container in the refrigerator, these bars will stay fresh for up to one week. If you freeze them, they’ll keep for up to three months.
Can I Use a Different Sweetener?
Absolutely. While maple syrup and honey are the most common sweeteners used for this recipe, you can also try agave nectar, brown rice syrup, or even sugar-free alternatives like monk fruit syrup or erythritol syrup if you’re watching your sugar intake.
What’s the Best Way to Melt Chocolate Chips for the Drizzle?
The easiest way to melt chocolate chips is by microwaving them in a microwave-safe bowl in 30-second intervals. Stir between each interval until smooth. Alternatively, you can melt them using a double boiler on the stovetop. Adding a teaspoon of coconut oil to the chocolate can help create a smooth, glossy texture that spreads more easily.
How Can I Make the Bars More Chewy?
If you prefer a chewier texture, consider adding ingredients like shredded coconut, chopped dates, or oats. You can also reduce the protein powder slightly and increase the amount of peanut butter or liquid sweetener.
Why Are My Bars Crumbly?
If your bars are crumbling when you try to cut them, it’s likely because the mixture is too dry. This can happen if you use too much protein powder or not enough peanut butter or liquid sweetener. To fix this, try adding a tablespoon of water, milk, or additional peanut butter and mixing well until the mixture is cohesive.
Can I Make These Bars Crunchy Instead of Chewy?
Yes! For a crunchy texture, try adding ingredients like crushed nuts, crispy rice cereal, or cacao nibs to the mixture before pressing it into the pan. You can also bake the bars at a low temperature (around 300°F) for 10–12 minutes to give them a crispy exterior.
Can I Double the Recipe?
Definitely! This recipe is very easy to scale. Simply double the ingredients and press the mixture into a larger pan or make two batches. Just make sure to increase the chilling time slightly if the bars are thicker than usual.
How Do I Cut the Bars Neatly?
To get clean, even slices, use a sharp knife and wipe the blade clean between each cut. For extra precision, you can even warm the knife slightly under hot water, dry it off, and then make your cuts. This works especially well if you’ve coated the bars with chocolate.
Can I Use These Bars for Weight Loss?
Yes, these bars can absolutely fit into a weight loss plan, especially if you’re mindful of portion sizes and ingredients. To lower the calorie count, you can use a low-calorie protein powder, sugar-free sweetener, and a low-fat nut butter. Since these bars are high in protein, they can help curb your appetite and keep you feeling full longer.
What Should I Do if the Mixture Is Too Dry?
If the mixture seems too dry and crumbly while mixing, simply add a tablespoon of water, milk, or extra peanut butter and stir again. Continue adding small amounts of liquid until the dough reaches a thick, sticky consistency that holds together when pressed.
Conclusion & Call to Action
And there you have it—your ultimate guide to making homemade protein bars that are not only delicious and nutritious but also incredibly easy to make. Whether you’re looking for a post-workout snack, a healthy dessert, or just a quick energy boost throughout the day, these bars have got you covered.
What I love most about this recipe is how versatile it is. You can tweak the ingredients to suit your dietary preferences, add your favorite mix-ins, and even experiment with different protein powders to find your perfect flavor combination. It’s such a fun and rewarding process.
So, why not give these homemade protein bars a try? Once you taste the rich, nutty goodness combined with your choice of sweetener and chocolate drizzle, I guarantee you’ll be hooked. Plus, the satisfaction of knowing exactly what’s in your snack is unbeatable.
If you decide to make these bars, I’d love to hear how they turned out for you! Feel free to leave a comment below or share your creation on social media. Tag me so I can see your delicious masterpiece. And if you have any tips or creative variations you’d like to share, I’m all ears! Happy snacking, and enjoy your protein-packed creations.
Print
Homemade Protein Bars – Easy No-Bake Recipe
- Total Time: 40 minutes (Including chilling)
- Yield: 10-16 bars 1x
- Diet: Gluten Free
Description
These homemade protein bars are the perfect high-protein, no-bake snack made with peanut butter, protein powder, honey or maple syrup, and a touch of salt. Customize them with chocolate drizzle for extra decadence. Ideal for meal prep, post-workout fuel, or a healthy dessert option.
Ingredients
-
1 1/2 cups peanut butter (or allergy-friendly alternative)
-
3/4 cup protein powder (90g, unsweetened preferred)
-
1/4 cup pure maple syrup or honey
-
1/2 tsp salt
-
4 oz melted chocolate chips (optional, for coating or drizzle)
Instructions
-
Mix Ingredients: In a large bowl, combine peanut butter, protein powder, maple syrup or honey, and salt. Stir until a thick dough forms.
-
Shape the Bars: Press the mixture into a lined 8×8 inch pan or shape into bars by hand.
-
Chill: Refrigerate for 30 minutes or until firm.
-
Optional Chocolate Coating: Spread melted chocolate over the top of the bars or dip bars individually. Chill to set the chocolate.
-
Slice & Store: Cut into 10-16 bars. Store in the fridge for up to a week or freeze for longer storage.
Notes
-
-
For a vegan option, use plant-based protein powder and maple syrup instead of honey.
-
For a gluten-free version, ensure your protein powder is certified gluten-free.
-
Add mix-ins like chopped nuts, dried fruits, or shredded coconut for extra flavor and texture.
-
- Prep Time: 10 minutes
- Cook Time: 0 minutes (No baking required)
- Category: Snacks, Dessert, Post-Workout
- Method: No-Bake
- Cuisine: American