
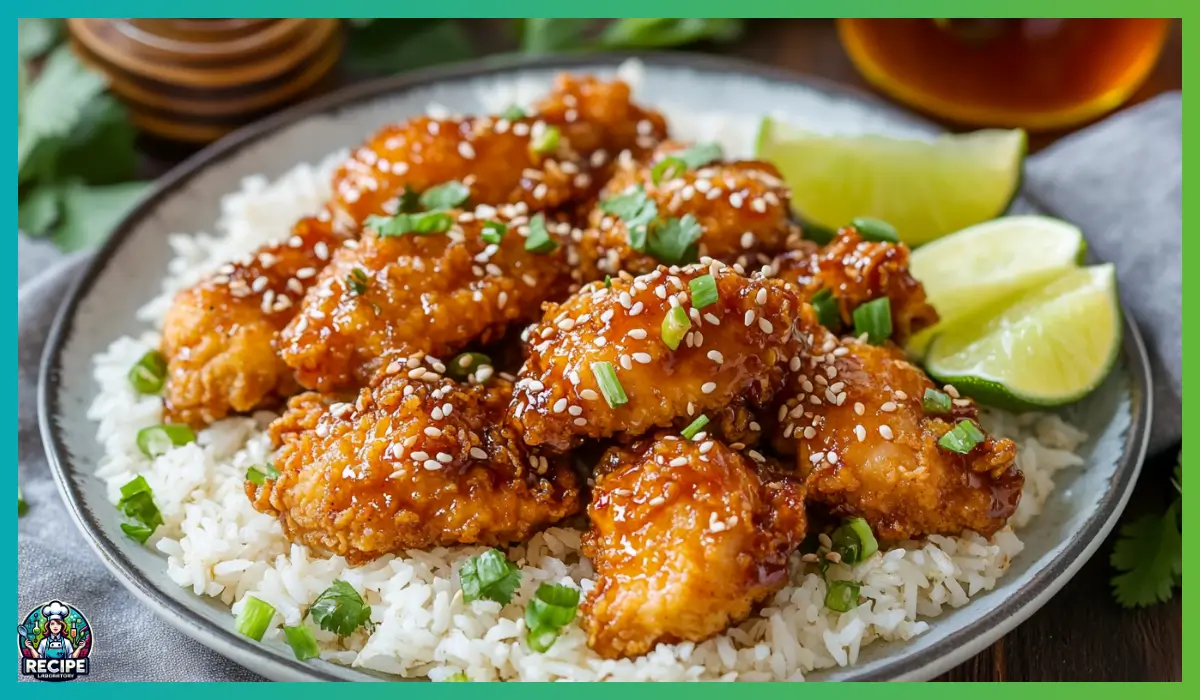
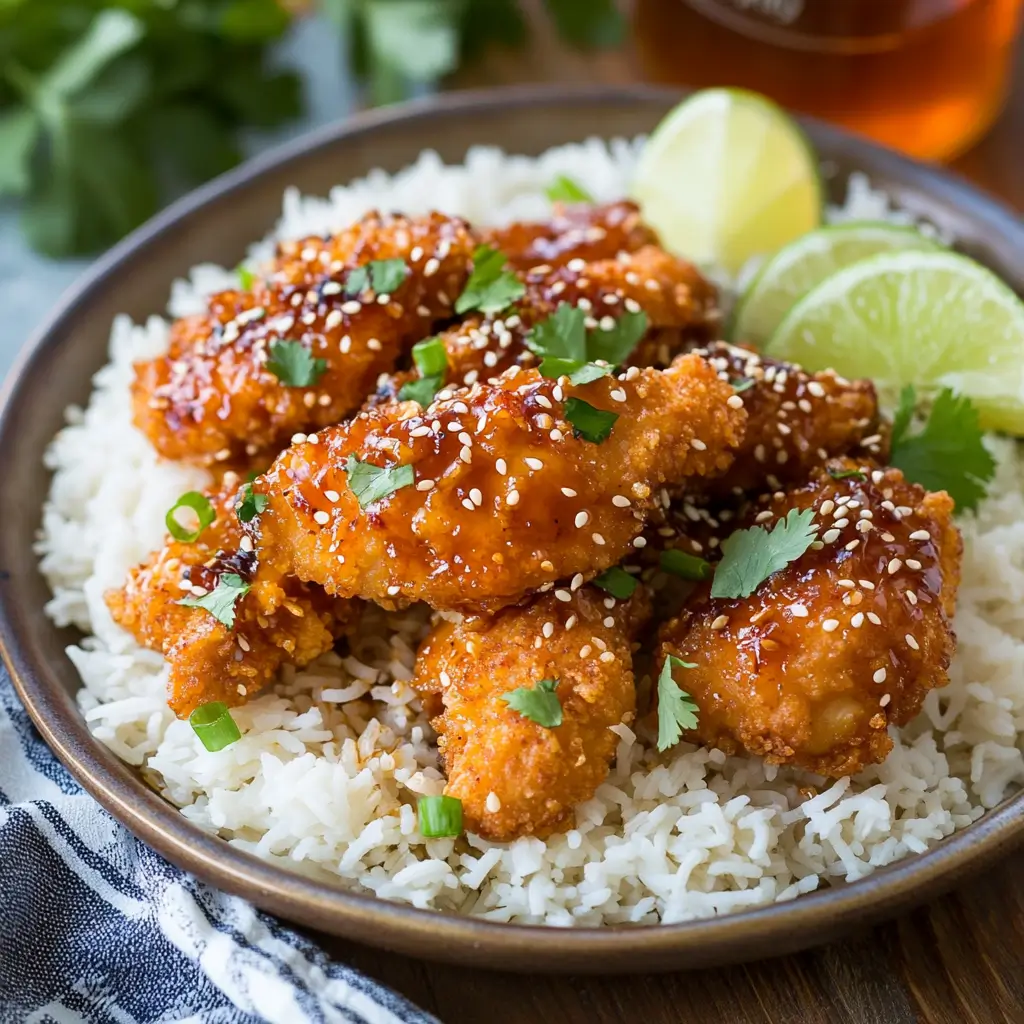
If you’re a fan of crispy, juicy chicken with a touch of sweetness and heat, then you’re about to meet your new favorite recipe. These Hot Honey Chicken Tenders are everything you could possibly want in a chicken dish. They’re golden-brown, perfectly seasoned, and coated in a sticky, spicy, honey sauce that makes every bite feel like a little celebration. The best part? They’re baked, not fried, which means you get all the crunch without the guilt.
I first tried hot honey chicken tenders at a friend’s dinner party, and let me tell you, it was love at first bite. The contrast between the crispy coating and the sweet-yet-fiery honey glaze was pure magic. Naturally, I had to go home and try my own version. After a few tweaks and test runs, this recipe was born. Now, it’s a staple at our family dinners, game nights, and pretty much any time we’re craving something incredibly delicious yet super easy to make.
This recipe is perfect for busy weeknights when you want something special but don’t have hours to spend in the kitchen. Plus, it’s super versatile—you can serve it with rice, on a salad, or even as a sandwich filling. The flavor combination is just that good. Whether you’re cooking for your family or hosting a casual dinner with friends, these Hot Honey Chicken Tenders are guaranteed to be a hit.
Why You’ll Love This Recipe
There’s so much to adore about this Hot Honey Chicken Tenders recipe. From the flavor explosion to the ease of preparation, it’s got something for everyone. Here’s why you’ll keep coming back to it:
Unbeatable Flavor Combo: The contrast between the crunchy, well-seasoned chicken and the smooth, sweet, and spicy honey sauce is simply irresistible. The hot honey sauce gives just the right amount of heat without overpowering the dish.
Crispy Yet Healthy: Since these chicken tenders are baked instead of fried, you get all the satisfying crunch without the excess oil. Plus, using panko breadcrumbs instead of regular ones adds an extra level of crispiness.
Simple Ingredients: You probably have most of the ingredients in your kitchen already. It’s a great way to elevate basic pantry staples like flour, honey, and hot sauce.
Kid-Friendly: Despite the heat, this recipe is surprisingly kid-friendly. You can always adjust the spice level to suit younger palates by reducing the hot sauce or skipping the chili flakes.
Perfect for Meal Prep: This recipe is ideal for prepping ahead. You can marinate the chicken overnight for even more tenderness or make a big batch to freeze and reheat whenever you’re craving it.
Versatile Serving Options: These tenders work wonderfully in various dishes. Serve them with mashed potatoes, toss them in a salad, or pair them with roasted veggies. The possibilities are endless!
If you’re ready to experience crispy, spicy, sweet goodness in every bite, keep reading for the full breakdown of this must-try recipe.
Health Benefits
You might be thinking, “How can something so delicious actually be good for me?” Well, while Hot Honey Chicken Tenders are certainly comfort food, there are a few health benefits that make them a better option than your average fried chicken.
Lean Protein: By using chicken tenders or boneless chicken thighs, you’re providing your body with high-quality protein that helps with muscle building, tissue repair, and overall health. Chicken is also a great source of essential vitamins and minerals like B6, niacin, and phosphorus.
Baked, Not Fried: Since these tenders are baked instead of deep-fried, you’re significantly cutting down on the unhealthy fats and calories. Brushing the chicken with olive oil or melted butter before baking ensures crispiness without the need for deep frying.
Buttermilk Marination: Soaking the chicken in buttermilk or milk mixed with vinegar helps to tenderize the meat, making it juicier and more flavorful. Plus, buttermilk is rich in probiotics, which are beneficial for digestion.
Antioxidant Benefits: The hot honey sauce contains chili flakes and hot sauce, both of which are rich in antioxidants. These compounds can help reduce inflammation and improve heart health.
Natural Sweeteners: Using honey instead of refined sugar provides a natural source of antioxidants. Honey also has antibacterial properties and can help soothe sore throats or boost immunity.
Versatile Diet Options: This recipe is easy to make gluten-free by swapping out the flour and panko breadcrumbs for gluten-free alternatives. If you’re looking to reduce carbs, you can use almond flour instead of all-purpose flour.
You don’t have to feel guilty indulging in this meal. It’s all about smart ingredient choices and better cooking methods. Now, let’s get to the fun part—making these beauties!
Preparation Time, Servings, and Nutritional Information
One of the best things about this recipe is how straightforward it is. From start to finish, you’ll have mouthwatering Hot Honey Chicken Tenders ready to devour in under an hour.
Preparation Time: 15 minutes (plus at least 15 minutes for marination; overnight is even better)
Cooking Time: 20-25 minutes
Total Time: 50-55 minutes
Servings: Serves 4
Nutritional Information (Per Serving):
Calories: 425
Protein: 32g
Carbohydrates: 45g
Fat: 15g
Saturated Fat: 4g
Cholesterol: 85mg
Sodium: 700mg
Fiber: 2g
Sugar: 20g (from honey)
Please note that nutritional values can vary based on specific ingredients used. This breakdown assumes you’re using regular buttermilk, olive oil, and standard panko breadcrumbs.
Ingredients List
To make these Hot Honey Chicken Tenders, you’ll need two simple ingredient lists—one for the chicken and one for the hot honey sauce.
For the Chicken:
- 1 lb chicken tenders or boneless chicken thighs, cut into strips
- 1/2 cup buttermilk (or regular milk mixed with 1 tsp vinegar)
- 1 cup panko breadcrumbs (for extra crunch!)
- 1/2 cup all-purpose flour
- 1 tsp paprika
- 1/2 tsp garlic powder
- Salt and pepper, to taste
- 2 tbsp olive oil or melted butter (for brushing)
For the Hot Honey Sauce:
- 1/3 cup honey
- 2 tbsp hot sauce (adjust to your spice preference)
- 1 tbsp apple cider vinegar (for a little zing!)
- 1/4 tsp chili flakes (optional, if you want extra heat)
The ingredient list might seem long, but most of it is probably sitting in your pantry right now. And if not, a quick trip to the grocery store will sort you out.
Now, let’s jump straight into the fun part—making this deliciousness from scratch!
Step-By-Step Cooking Instructions
Alright, it’s time to turn those simple ingredients into golden, crispy Hot Honey Chicken Tenders that everyone will love. Follow these straightforward steps, and you’ll have a flavorful meal ready in no time.
1: Prepare Your Oven and Baking Sheet
- Preheat your oven to 425°F (220°C). This high temperature is crucial for achieving that perfectly crispy texture.
- Line a baking sheet with parchment paper and lightly grease it with olive oil or nonstick spray. This step prevents sticking and helps your tenders cook evenly.
2: Marinate the Chicken
- Place your chicken tenders or boneless chicken thigh strips in a medium-sized bowl.
- Pour in the buttermilk (or regular milk mixed with 1 tsp vinegar) over the chicken. This marination process not only tenderizes the chicken but also enhances flavor.
- Let the chicken soak for at least 15 minutes. If you have extra time, consider marinating it for a few hours or even overnight for ultra-juicy tenders.
- While the chicken marinates, you can start preparing the breadcrumb mixture.
3: Prepare the Breadcrumb Coating
- In a shallow dish, combine the following dry ingredients:
- 1 cup panko breadcrumbs
- 1/2 cup all-purpose flour
- 1 tsp paprika (for a smoky kick)
- 1/2 tsp garlic powder (for subtle, savory depth)
- Salt and pepper, to taste (I recommend about 1/2 tsp salt and 1/4 tsp pepper for a balanced flavor).
- Mix the ingredients thoroughly with a fork or whisk to ensure even distribution of flavors.
4: Bread the Chicken
- Remove each piece of chicken from the buttermilk, allowing the excess liquid to drip off.
- Dip the chicken pieces, one by one, into the breadcrumb mixture. Make sure to press gently so the coating sticks well. The panko should fully cover each strip, giving you that extra crunch factor once baked.
- Place the coated chicken strips onto your prepared baking sheet, making sure they are spaced apart. Crowding them can cause uneven cooking.
5: Prepare for Baking
- Lightly brush each piece of breaded chicken with olive oil or melted butter. This step ensures a golden, crispy finish. You don’t need much—just a gentle brush to add moisture and promote browning.
- Flip the chicken pieces and repeat the brushing process on the other side.
6: Bake the Chicken
- Transfer the baking sheet to the preheated oven.
- Bake for 20-25 minutes, flipping the chicken pieces halfway through to ensure even cooking.
- Check for doneness by cutting into the thickest piece of chicken. It should be white and opaque throughout, with clear juices running out. If you have a meat thermometer, the internal temperature should read 165°F (74°C).
- Once fully cooked, remove the chicken from the oven and let it rest for a few minutes. This resting time helps the juices redistribute, keeping the tenders moist and delicious.
7: Prepare the Hot Honey Sauce
While your chicken is baking, it’s the perfect time to whip up that mouthwatering hot honey sauce. Here’s how:
- In a small saucepan, combine the following:
- 1/3 cup honey
- 2 tbsp hot sauce (Feel free to adjust according to your spice tolerance. Less for mild, more for heat lovers.)
- 1 tbsp apple cider vinegar (for a subtle tang that balances the sweetness)
- 1/4 tsp chili flakes (Optional, for those who want an extra spicy kick.)
- Place the saucepan over medium-low heat and stir constantly. You want the ingredients to blend smoothly, but be careful not to overheat the mixture, as honey can scorch quickly.
- Once the sauce is well-combined and heated through (about 2-3 minutes), remove it from heat and set aside.
Step 8: Toss and Serve
- Now comes the fun part. Drizzle the hot honey sauce over the baked chicken tenders. You can also toss them in a large bowl to coat them more evenly.
- For a little extra presentation, sprinkle some freshly chopped parsley or green onions over the top. The vibrant green adds a nice contrast to the golden-brown chicken.
Step 9: Taste and Adjust
- Give the chicken a taste and adjust seasoning if necessary. If you like more heat, you can always drizzle on a little extra hot sauce or sprinkle some chili flakes over the top.
- Serve immediately while the chicken is still hot and crispy.
Cooking doesn’t have to be intimidating. Just follow these steps, and you’ll be rewarded with a crispy, tender, and irresistibly sweet-and-spicy dish. Next, let’s talk about how to serve these beauties.
How to Serve
These Hot Honey Chicken Tenders are so versatile that you can serve them in several delicious ways. Here are a few ideas to get you started:
As a Main Dish:
- Serve the tenders over a bed of steamed rice for a simple, comforting meal.
- Pair them with creamy mashed potatoes and roasted vegetables for a hearty dinner.
- Plate them alongside a fresh, crisp side salad to keep things light.
In a Sandwich:
- Place the tenders in a soft brioche bun with lettuce, pickles, and a drizzle of ranch dressing for a drool-worthy chicken sandwich.
- Add some coleslaw on top for extra crunch and freshness.
With Dipping Sauces:
- Offer some ranch, blue cheese dressing, or spicy mayo on the side for those who love dipping.
On a Salad:
- Slice the tenders and add them to a mixed greens salad with avocado, cherry tomatoes, cucumbers, and a honey mustard dressing.
As an Appetizer:
- Serve them as party finger food with toothpicks and a selection of sauces for guests to choose from.
The possibilities are truly endless. And the best part? No matter how you serve them, they’re bound to be a hit.
Pairing Suggestions
While these Hot Honey Chicken Tenders are insanely delicious on their own, pairing them with the right side dishes and drinks can take your meal to the next level. Whether you’re going for a casual dinner or a fun gathering, here are some perfect pairings:
Side Dishes:
- Creamy Mashed Potatoes: The rich, buttery smoothness of mashed potatoes balances out the sweet-and-spicy notes of the tenders. Plus, who doesn’t love mashed potatoes with crispy chicken?
- Coleslaw: A fresh, tangy coleslaw provides a nice, crunchy contrast to the juicy chicken. For extra flavor, try a honey mustard or apple cider vinaigrette-based slaw.
- Roasted Vegetables: Roasted carrots, brussels sprouts, or sweet potatoes make excellent sides that complement the hot honey glaze beautifully.
- Mac and Cheese: If you’re feeling indulgent, a creamy, cheesy side of macaroni and cheese will pair wonderfully with the heat and sweetness of the chicken.
- Simple Green Salad: For a lighter option, toss together some mixed greens, cucumbers, tomatoes, and avocado with a light vinaigrette.
Beverage Pairings:
- Lemonade: A refreshing glass of iced lemonade helps cut through the heat and adds a lovely citrusy note to your meal.
- Iced Tea: Sweet tea or even herbal iced tea with mint can be a fantastic way to cleanse your palate between bites.
- Sparkling Water with Lime: For a non-alcoholic yet sophisticated choice, sparkling water with a splash of lime juice works perfectly.
Additional Toppings and Sauces:
- Ranch or Blue Cheese Dressing: A creamy, cooling dip makes for an irresistible pairing with the hot honey sauce.
- Spicy Mayo: For those who love a double dose of heat, mix mayo with a dash of hot sauce and a sprinkle of paprika.
- Extra Hot Honey Sauce: Keep some sauce on the side for dipping if you want more of that delicious sweet heat!
Pairing these tenders with the right accompaniments will only elevate their deliciousness. But what if you want to save some for later? Let’s talk about how to store, freeze, and reheat them properly.
Storage, Freezing & Reheating Instructions
If you’re lucky enough to have leftovers (or you made a big batch on purpose—smart move!), here’s how to properly store, freeze, and reheat your Hot Honey Chicken Tenders without sacrificing flavor or texture.
Storing Leftovers:
- Allow the chicken tenders to cool completely before storing.
- Place them in an airtight container and keep them in the refrigerator for up to 3 days.
- To maintain crispiness, place a paper towel at the bottom of the container to absorb any moisture.
Freezing for Later:
- To freeze, lay the cooked chicken tenders on a baking sheet lined with parchment paper and place them in the freezer until they are solid (about 1-2 hours).
- Once frozen, transfer them to a freezer-safe container or zip-top bag, making sure to remove as much air as possible before sealing.
- Properly stored, the tenders can be kept in the freezer for up to 3 months.
Reheating Instructions:
- From the Refrigerator:
- Preheat the oven to 375°F (190°C).
- Place the chicken tenders on a baking sheet and bake for about 10 minutes, or until heated through and crispy.
- From the Freezer:
- Preheat the oven to 375°F (190°C).
- Arrange the frozen chicken tenders on a baking sheet and bake for 20-25 minutes, flipping halfway through.
- For extra crispiness, turn on the broiler for the last 2 minutes of cooking.
- Microwave Option (Not Recommended):
- You can microwave the tenders for a quick fix, but this method tends to make them soggy. If you must, do it in short 30-second intervals and finish by broiling them for a few minutes to restore some crispiness.
Now that you know how to make these delicious chicken tenders and store them properly, let’s make sure you avoid some common mistakes that can ruin a perfectly good batch.
Common Mistakes to Avoid
Even the most delicious recipes can go wrong if you’re not careful. Here are some common pitfalls to steer clear of when making Hot Honey Chicken Tenders:
Skipping the Marination:
- Marinating the chicken in buttermilk isn’t just a fancy extra step. It’s essential for tenderizing the meat and infusing it with moisture and flavor. If you skip this step, you’re likely to end up with dry, bland chicken.
Overcrowding the Baking Sheet:
- If you place the chicken pieces too close together, they will steam instead of bake. This prevents them from becoming crispy and golden. Always leave space between each piece.
Using Regular Breadcrumbs Instead of Panko:
- Panko breadcrumbs create that light, airy crunch that makes these tenders so addictive. Regular breadcrumbs will work but won’t give you the same crispy texture.
Forgetting to Flip the Chicken:
- If you don’t flip the chicken halfway through baking, one side will be golden and crispy while the other remains soft and pale. Make sure to flip for even browning.
Burning the Hot Honey Sauce:
- When preparing the sauce, it’s essential to heat it gently over medium-low heat. If you let it boil or cook for too long, the honey can burn and become bitter.
Not Adjusting Spice Levels:
- Everyone’s tolerance for heat is different. If you’re serving these tenders to kids or people sensitive to spice, reduce the hot sauce and chili flakes to suit their taste.
Keeping these points in mind will help you achieve the best results every time. But let’s take it a step further and look at some pro tips to elevate your cooking even more.
Pro Tips
If you want to go from making great Hot Honey Chicken Tenders to making unforgettable ones, these tips are for you:
1. Marinate Overnight for Maximum Tenderness:
- If time allows, let the chicken marinate in the buttermilk overnight. The acidity in the buttermilk breaks down the proteins in the chicken, making it super tender and juicy.
2. Toast Your Panko:
- For an extra-crispy coating, toast the panko breadcrumbs in a dry skillet over medium heat for about 3-5 minutes before using them. This step gives them a head start in the browning process.
3. Use a Wire Rack:
- If you have one, place a wire rack over your baking sheet and bake the chicken on that. This allows hot air to circulate all around the chicken, resulting in even crispiness.
4. Make Extra Sauce:
- Double the hot honey sauce recipe and keep some on the side for drizzling over the chicken or serving as a dip. You can also store it in a jar and keep it in the fridge for up to 2 weeks.
5. Customize the Spice Level:
- Add more or less hot sauce and chili flakes according to your preference. You can even sprinkle extra chili flakes over the finished tenders for a spicy finishing touch.
Frequently Asked Questions (FAQs)
To make sure you have the smoothest cooking experience possible, here are answers to some common questions about making Hot Honey Chicken Tenders:
1. Can I use chicken breasts instead of tenders or thighs?
Yes, absolutely! Chicken breasts work just as well. Just cut them into thin strips so they cook evenly and achieve that beautiful crispy texture.
2. What if I don’t have buttermilk?
No worries! You can make a simple substitute by mixing 1/2 cup of regular milk with 1 teaspoon of vinegar or lemon juice. Let it sit for about 5 minutes before using it. This mixture mimics the acidity of buttermilk, which helps tenderize the chicken.
3. Can I make this recipe gluten-free?
Yes, you can. Simply swap the all-purpose flour for gluten-free flour and use gluten-free panko breadcrumbs. You’ll still get a fantastic crunch without compromising on flavor or texture.
4. How do I make this recipe less spicy?
If you’re sensitive to heat or making this for kids, just reduce the amount of hot sauce in the honey sauce or omit the chili flakes altogether. You can also mix some honey mustard into the sauce for a milder, sweeter glaze.
5. Can I air-fry the chicken tenders instead of baking them?
Yes! To air-fry, preheat your air fryer to 375°F (190°C). Arrange the breaded chicken tenders in a single layer in the air fryer basket. Air fry for 12-15 minutes, flipping halfway through. They’ll turn out wonderfully crispy and delicious.
6. What’s the best way to reheat these tenders to keep them crispy?
The best method is to reheat them in the oven at 375°F (190°C) for about 10 minutes. You can also use an air fryer at 350°F (175°C) for about 5 minutes. Avoid microwaving unless you’re okay with losing the crispy texture.
7. Can I make the hot honey sauce ahead of time?
Yes! You can make the sauce up to 2 weeks in advance and store it in an airtight jar in the refrigerator. Just warm it slightly before serving to loosen it up.
8. Is it okay to skip the olive oil or butter brushing step before baking?
While you technically can skip it, the olive oil or butter helps the coating crisp up and turn golden. If you prefer to go oil-free, just be aware that your tenders may not have the same satisfying crunch.
9. Can I freeze the chicken before cooking?
Definitely! You can bread the chicken, lay it on a baking sheet, and freeze it until solid. Then, transfer the pieces to a freezer-safe bag or container. When you’re ready to bake, there’s no need to thaw—just pop them straight into the oven and bake for an additional 5-10 minutes.
10. What can I do with leftover hot honey chicken tenders?
Oh, so many things! Slice them up and toss them into a salad, stuff them into sandwiches or wraps, or serve them over waffles for an epic sweet-and-spicy brunch. They also make fantastic toppings for loaded fries or pizza.
Now that your questions are answered, you’re all set to dive into the cooking process with confidence. Let’s finish this up with some final words of encouragement and a friendly call to action!
Conclusion & Call to Action
You made it! You’ve just unlocked the secret to making the most addictive, flavorful Hot Honey Chicken Tenders you’ll ever taste. With their golden, crispy coating and sticky, sweet-yet-spicy glaze, these tenders are pure comfort food magic. Whether you’re serving them as a main dish, a party appetizer, or even a meal prep option, they’re sure to impress everyone who tries them.
One of the best things about this recipe is how adaptable it is. You can make it as spicy or as mild as you want, tweak the coating to suit gluten-free diets, or even try air-frying instead of baking. The possibilities are endless. Plus, the fact that they’re baked rather than fried means you can indulge guilt-free.
Ready to give it a try? You’ve got everything you need to make this recipe a roaring success. Don’t be afraid to experiment a little and make it your own. And when you do, I’d love to hear about it!
Once you’ve made these Hot Honey Chicken Tenders, drop a comment below to let me know how they turned out. Did you tweak the recipe to suit your taste buds? Serve it in a fun, creative way? Share your experience, and feel free to tag me on social media with your mouthwatering photos—I can’t wait to see your delicious creations!
Happy cooking! Now go make some Hot Honey Chicken Tenders that’ll knock everyone’s socks off.
Print
Hot Honey Chicken Tenders Recipe – Crispy, Sweet & Spicy Perfection
- Total Time: 50 minutes
- Yield: 4 servings 1x
- Diet: Halal
Description
These Hot Honey Chicken Tenders are crispy, juicy, and coated in a mouthwatering sweet-and-spicy honey glaze. Baked to golden perfection, they deliver the ultimate comfort food experience without the guilt of frying. Ideal for dinner, appetizers, or even meal prep.
Ingredients
For the Chicken:
-
1 lb chicken tenders or boneless chicken thighs, cut into strips
-
1/2 cup buttermilk (or milk mixed with 1 tsp vinegar)
-
1 cup panko breadcrumbs
-
1/2 cup all-purpose flour
-
1 tsp paprika
-
1/2 tsp garlic powder
-
Salt and pepper, to taste
-
2 tbsp olive oil or melted butter (for brushing)
For the Hot Honey Sauce:
-
1/3 cup honey
-
2 tbsp hot sauce (adjust for spice level)
-
1 tbsp apple cider vinegar
-
1/4 tsp chili flakes (optional, for extra heat)
Instructions
-
Preheat oven to 425°F (220°C). Line a baking sheet with parchment paper and lightly grease.
-
Marinate chicken strips in buttermilk for at least 15 minutes.
-
Mix panko, flour, paprika, garlic powder, salt, and pepper in a shallow dish.
-
Coat each chicken strip in the breadcrumb mixture, pressing gently to help it stick.
-
Place chicken on the baking sheet, brush with olive oil or butter, and bake for 20-25 minutes, flipping halfway through.
-
Prepare hot honey sauce by heating honey, hot sauce, apple cider vinegar, and chili flakes over medium-low heat until smooth.
-
Drizzle or toss chicken in hot honey sauce and serve immediately.
Notes
-
For extra tenderness, marinate the chicken overnight.
-
Adjust the hot sauce for more or less heat.
-
To reheat, bake at 375°F (190°C) for 10 minutes or air fry at 350°F (175°C) for 5 minutes.
- Prep Time: 15 minutes (plus marination)
- Cook Time: 25 minutes
- Category: Main Dish, Appetizer
- Method: Baking
- Cuisine: American