
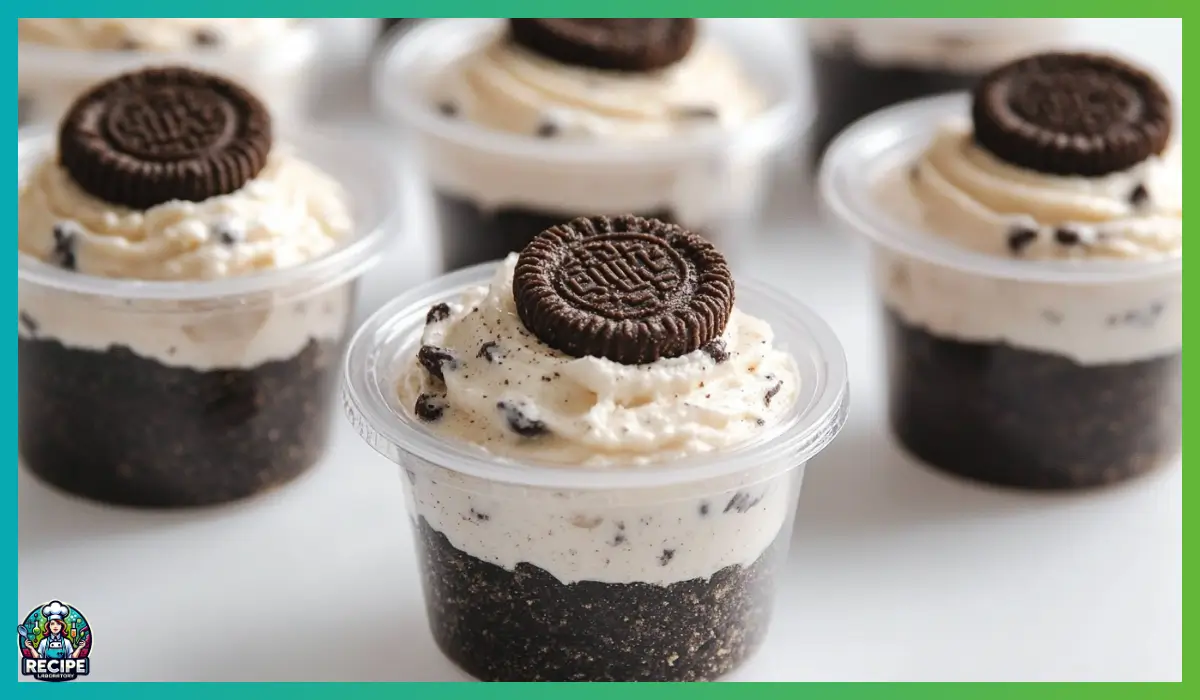
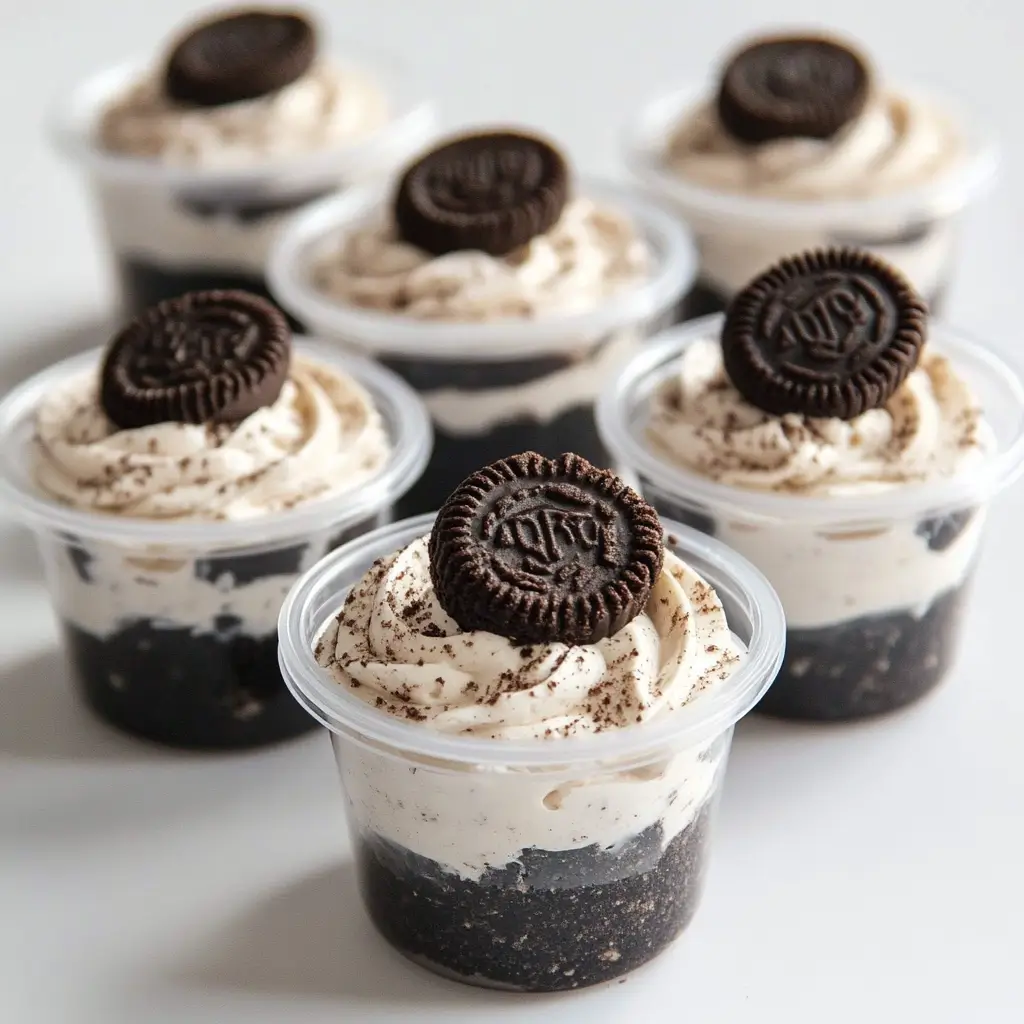
Oreo Cheesecake Dessert Cups are one of those treats that feel like pure indulgence in every creamy, chocolatey spoonful. They’re rich, velvety, and have that unmistakable Oreo crunch that we all know and love. Whether you’re making them for a party, a cozy family night, or just as a special treat for yourself, these dessert cups are guaranteed to hit the spot. Plus, the fact that they’re served in individual portions makes them even more charming. No slicing, no mess—just grab a spoon and dig in.
I remember the first time I made these; it was for a last-minute dinner party where I needed something impressive yet easy to put together. With just a few basic ingredients and minimal effort, these Oreo Cheesecake Dessert Cups were born. And let me tell you, they were a hit. The layers of buttery, crunchy Oreo crust, creamy cheesecake filling, and more Oreos sprinkled on top were just irresistible. From that day on, they became my go-to dessert for special occasions or whenever I craved something decadent but simple to make.
What makes this recipe even more fantastic is that it doesn’t require any baking. That’s right, zero oven time. So, if you’re in the mood for a dessert that’s quick, creamy, and downright delicious, you’re in the right place. This recipe will walk you through each step so you can create your own Oreo Cheesecake Dessert Cups without any stress or hassle. Let’s get started on making something unforgettable.
Why You’ll Love This Recipe
There are plenty of reasons to fall head over heels for these Oreo Cheesecake Dessert Cups. Whether you’re a seasoned baker or someone who only steps into the kitchen on special occasions, this recipe is perfect for you. Let’s dive into why this dessert is a must-try:
First of all, it’s incredibly easy to make. With no baking required, you can whip up these cups in no time. You only need a few simple ingredients, most of which you probably already have in your kitchen. And if you don’t, they’re all easy to find at your local grocery store. No fancy or complicated techniques are needed—just mix, layer, and chill.
Secondly, the taste and texture are out of this world. The creamy cheesecake filling combined with the crunch of Oreo cookies creates an irresistible contrast that will have everyone asking for seconds. The richness of the cream cheese is balanced perfectly by the sweetness of the whipped cream and the delightful crunch of Oreos. It’s like the best parts of a cheesecake and an Oreo cookie came together to create something magical.
Another reason to love this recipe is how versatile it is. You can easily adjust the portions to make a few cups for yourself or a whole batch for a crowd. It’s also a fantastic make-ahead dessert, which means you can prepare it in advance and simply pull it out of the fridge when you’re ready to serve. It’s perfect for parties, potlucks, or just satisfying your sweet tooth on a quiet evening.
Last but not least, the presentation is absolutely charming. Serving these desserts in individual cups or jars makes them look sophisticated and elegant without requiring any complicated plating skills. Plus, everyone gets their own personal serving, which makes it feel extra special.
Health Benefits
While Oreo Cheesecake Dessert Cups are definitely a treat meant for indulgence, that doesn’t mean you can’t enjoy them as part of a balanced lifestyle. Let’s break down some of the components and their potential health benefits:
Cream Cheese
While cream cheese is often considered a rich ingredient, it does offer some nutritional value. It contains vitamin A, which is essential for maintaining good vision, healthy skin, and immune function. It also provides a small amount of protein and healthy fats, which can contribute to feeling satisfied after eating.
Heavy Whipping Cream
Whipping cream, though high in calories, provides some beneficial nutrients as well. It contains fat-soluble vitamins like A, D, E, and K. When consumed in moderation, it can be part of a healthy diet and provide a sense of fullness and satisfaction.
Oreos
While Oreos are definitely a sugary treat, they do offer some iron content due to the cocoa used in their production. However, their primary purpose in this recipe is to deliver that delicious, familiar chocolate flavor and satisfying crunch.
Making Your Own Variations
One way to make this dessert a bit lighter is by using reduced-fat cream cheese or substituting part of the heavy cream with Greek yogurt for added protein and a little tanginess. Another option is to use sugar-free or low-sugar Oreo alternatives if you’re trying to cut back on sugar.
Portion Control
Since these dessert cups are served in individual portions, they make it easier to enjoy a treat without going overboard. This can be helpful for those who want to indulge responsibly.
Mindful Indulgence
Remember, there’s nothing wrong with enjoying a decadent dessert every once in a while. The key is to savor it and make it part of a balanced lifestyle. You can also pair it with healthier options like fresh berries to add some extra nutrients and brighten up the flavor.
Great! Let’s dive into the next sections, making sure to keep the structure clear and detailed for you.
Ingredients List
To make these creamy, dreamy Oreo Cheesecake Dessert Cups, you’ll need the following ingredients. Be sure to have everything ready before you begin to make the process as smooth as possible.
Crust Layer
- 12 Oreo Cookies: Crushed into fine crumbs. This will be the base layer, providing a rich, chocolatey crunch.
- 3 Tablespoons Butter: Melted and mixed with the Oreo crumbs to form a cohesive, buttery crust.
Cream Filling
- 8 Ounces Cream Cheese (Softened): The key to a rich, creamy texture. Make sure it’s fully softened for easy mixing.
- 1/2 Cup Powdered Sugar: Adds just the right amount of sweetness without making the mixture grainy.
- 1 Teaspoon Vanilla Extract: Provides that lovely, aromatic hint of vanilla to enhance the overall flavor.
- 1 1/2 Cups Heavy Whipping Cream (Cold): Whipped to stiff peaks to create a light and airy texture within the creamy filling.
- 6 Oreo Cookies (Crushed into Small Chunks): Adds delightful Oreo bits throughout the creamy filling for extra texture and flavor.
Topping (Optional)
- Crushed Oreo Cookies: Sprinkled on top for more crunch and visual appeal.
- Whipped Cream: Adds a touch of elegance and extra creaminess.
- Chocolate Drizzle: A rich, decadent finish that makes each cup feel extra special.
Ingredient Notes
- Feel free to use reduced-fat cream cheese if you’re looking to lighten things up a bit.
- You can also substitute store-bought whipped topping if you’re in a hurry, but freshly whipped cream always tastes best.
- For extra flavor, you can use flavored Oreos like mint or peanut butter if you’re feeling adventurous.
Now that you’ve got all your ingredients ready, let’s get into the fun part: making these delicious Oreo Cheesecake Dessert Cups!
Step-By-Step Cooking Instructions
Making these Oreo Cheesecake Dessert Cups is a straightforward process, but let’s break it down into simple steps to make sure everything turns out perfectly.
Prepare the Crust
- Crush the Oreo Cookies:
- Start by crushing 12 Oreo cookies into fine crumbs.
- You can do this by placing the cookies in a plastic bag and crushing them with a rolling pin, or you can use a food processor for finer crumbs.
- Make sure the crumbs are evenly crushed to create a smooth base for your dessert cups.
- Combine with Melted Butter:
- In a medium-sized bowl, mix the Oreo crumbs with 3 tablespoons of melted butter.
- Stir well until all the crumbs are evenly coated with the butter. This helps the crumbs stick together when pressed into the serving cups.
- Press the Mixture into Cups:
- Divide the crumb mixture evenly among your serving cups or small jars.
- Press about 2 tablespoons of the mixture into the bottom of each cup, using the back of a spoon or your fingers to pack it down firmly.
- Set the cups aside while you prepare the cream filling.
Make the Cream Filling
- Soften and Beat the Cream Cheese:
- In a large mixing bowl, beat 8 ounces of softened cream cheese until smooth and creamy.
- Make sure to beat out any lumps so the final texture is silky smooth. This step usually takes about 2-3 minutes.
- Add Powdered Sugar and Vanilla:
- Add 1/2 cup powdered sugar and 1 teaspoon vanilla extract to the cream cheese.
- Mix well until everything is fully combined and the mixture is smooth.
- Whip the Heavy Cream:
- In a separate, chilled bowl, pour 1 1/2 cups of cold heavy whipping cream.
- Using an electric mixer, whip the cream on medium-high speed until stiff peaks form. This usually takes about 3-5 minutes.
- You’ll know it’s ready when the cream holds its shape and doesn’t slide off the beater when lifted.
- Fold Whipped Cream into Cream Cheese Mixture:
- Gently fold the whipped cream into the cream cheese mixture.
- Use a spatula to fold, not stir, so you don’t deflate the whipped cream.
- The result should be a smooth, creamy, and airy filling.
- Add Oreo Chunks:
- Gently fold in the 6 crushed Oreo cookies (broken into small chunks).
- Distribute the Oreo pieces evenly throughout the creamy mixture.
Assemble the Dessert Cups
- Spoon or Pipe the Filling:
- Divide the creamy filling evenly over the prepared Oreo crusts in your cups.
- You can either spoon the mixture in or pipe it for a more polished presentation.
- Add Toppings (Optional):
- Sprinkle additional crushed Oreos over the top of each cup.
- Add a dollop of whipped cream for a pretty finish.
- Drizzle with chocolate sauce if desired for that extra wow factor.
Chill and Serve
- Refrigerate the Dessert Cups:
- Cover and refrigerate the cups for at least 1 hour before serving. This chilling time allows the cream filling to firm up and the flavors to meld together.
- Serve and Enjoy:
- Once the dessert cups are nicely chilled, they are ready to be served.
- Grab a spoon and dig into the creamy, Oreo-filled goodness!
Now that you’ve made your Oreo Cheesecake Dessert Cups, it’s time to think about the best way to serve them.
How to Serve
Oreo Cheesecake Dessert Cups are already adorable and delicious on their own, but there are some creative ways to serve them that can make them even more special. Here are some ideas:
Classic Presentation
- Serve the dessert cups straight from the fridge with a spoon, allowing guests to dig right in.
- Add a dollop of whipped cream on top and sprinkle a few extra Oreo crumbs for added crunch and visual appeal.
Layered Look
- If you want a more sophisticated presentation, alternate layers of Oreo crumbs and creamy filling.
- This technique creates beautiful, eye-catching layers that are sure to impress.
Topping Bar
- If you’re serving these at a party, set up a small topping bar with options like mini chocolate chips, caramel sauce, fresh berries, or even crushed peanut butter Oreos.
- Guests can customize their own dessert cups for a fun, interactive experience.
Elegant Jars
- Use small mason jars or decorative glass cups to elevate the presentation.
- Tie a little ribbon around each jar to make them extra special for events like birthdays or holidays.
Absolutely! Let’s keep the detailed guide going.
Pairing Suggestions
Oreo Cheesecake Dessert Cups are already a delightful treat on their own, but pairing them with the right drinks and complementary dishes can elevate the entire experience. Here are some of the best pairing options to consider:
Beverages
- Milk (The Classic Choice): Nothing goes better with Oreos than a cold glass of milk. Serve alongside your dessert cups for that nostalgic cookies-and-cream experience.
- Coffee: A hot cup of coffee provides a wonderful contrast to the creamy, sweet dessert. Whether it’s a bold espresso, a latte, or even a flavored mocha, coffee enhances the richness of the cheesecake filling.
- Hot Chocolate: If you’re feeling extra indulgent, a cup of hot chocolate topped with whipped cream and crushed Oreos makes the perfect pairing for this dessert.
- Iced Coffee or Frappuccino: For a refreshing combo, serve these dessert cups with a chilled coffee drink. The slight bitterness of coffee balances the sweetness beautifully.
- Vanilla Milkshake: Make it a double Oreo experience by serving these cups with an Oreo-flavored milkshake. Talk about decadence!
Desserts
- Brownie Bites: Serve alongside small, fudgy brownie bites for a rich and chocolatey dessert platter.
- Chocolate Dipped Strawberries: Fresh fruit pairs surprisingly well with the creamy filling and Oreo crunch. Plus, it adds a touch of elegance to your dessert spread.
- Vanilla Panna Cotta: If you want to create a mixed dessert table, pairing these cups with a creamy panna cotta can provide a delightful variety of textures and flavors.
Savory Pairings
Believe it or not, serving a sweet dessert like this with something savory beforehand can enhance the overall dining experience. Here are some ideas:
- Salty Snacks: Chips, pretzels, or salted caramel popcorn can offer a nice balance of sweet and salty flavors.
- Charcuterie Board: If you’re hosting a party, offer a cheese and charcuterie board before serving these Oreo Cheesecake Dessert Cups. The rich, creamy dessert will feel even more satisfying following savory cheeses and meats.
- Spicy Dishes: Pairing this dessert with a meal that includes a bit of spice (like buffalo wings or chili) creates a fascinating contrast that will leave everyone feeling satisfied.
Presentation Ideas
- For a party, consider serving these dessert cups on a tray with small dessert spoons tied with decorative ribbons.
- You can also serve them with chocolate-dipped Oreo cookies on the side for a fun and indulgent touch.
Now that you have some fun ideas for serving and pairing these delicious Oreo Cheesecake Dessert Cups, let’s talk about how to store them properly.
Storage, Freezing & Reheating Instructions
If you’re planning to make these Oreo Cheesecake Dessert Cups ahead of time or save some for later, here’s everything you need to know about storing, freezing, and reheating them (if needed).
Storage
- Refrigeration: Store the prepared dessert cups covered with plastic wrap or lids in the refrigerator.
- Shelf Life: These Oreo Cheesecake Dessert Cups will stay fresh for up to 3-4 days when stored properly.
- Serving Tip: If the cups have been in the fridge for more than a day, allow them to sit at room temperature for about 10 minutes before serving. This helps the creamy filling soften slightly for the best texture.
Freezing
Yes, you can absolutely freeze these dessert cups if you want to prepare them well in advance. Here’s how:
- Freezing Instructions:
- Wrap each individual dessert cup tightly with plastic wrap.
- Place the cups in an airtight container or a large freezer-safe bag.
- Label and date the containers so you can easily track freshness.
- Storage Time: These dessert cups can be frozen for up to 2 months.
- Thawing: When you’re ready to enjoy them, transfer the cups from the freezer to the refrigerator and allow them to thaw overnight. For a quicker option, let them sit at room temperature for about 30 minutes.
Reheating (If Needed)
Since these dessert cups are a no-bake treat, there’s really no need to reheat them. However, if you’ve frozen them and want them to have that freshly-made texture, just follow the thawing instructions above.
Important Tips for Freezing
- If you’re planning to freeze the dessert cups, avoid adding whipped cream or chocolate drizzle before freezing.
- Instead, freeze the dessert cups plain and add the toppings once they’ve thawed and are ready to be served.
- Using freezer-safe glass jars or silicone molds can help maintain the texture and appearance of the dessert cups during freezing.
Now that you know how to store and freeze these delightful dessert cups, let’s go over some of the most common mistakes people make and how to avoid them.
Common Mistakes to Avoid
Even though this recipe is incredibly simple, a few common mistakes can affect the final result. Here’s how to avoid them:
Not Softening the Cream Cheese Properly
- Using cold cream cheese will make it difficult to achieve a smooth, creamy filling.
- Solution: Make sure to let the cream cheese sit at room temperature for at least 30 minutes before beating it. If you’re short on time, you can microwave it for about 15 seconds (unwrapped and on a microwave-safe plate) to soften it.
Over-Mixing the Whipped Cream
- Over-beating the heavy cream can result in a grainy texture instead of smooth, silky peaks.
- Solution: Whip the cream just until stiff peaks form and stop immediately.
Not Folding Ingredients Gently
- Stirring too vigorously when combining the whipped cream with the cream cheese mixture can deflate the whipped cream, resulting in a dense, heavy filling.
- Solution: Use a gentle folding motion with a spatula, moving from the bottom of the bowl up to the top until everything is combined.
Skipping the Chilling Step
- Serving the dessert cups too soon can result in a runny filling that doesn’t hold its shape.
- Solution: Make sure to chill the cups for at least 1 hour before serving. For best results, you can even chill them overnight.
Using Wet Oreo Crumbs
- If your Oreo crumbs are too damp from the butter, the crust layer can end up soggy.
- Solution: Make sure you’re mixing the crumbs and melted butter until they are just moistened but not overly wet.
Now that you know what to avoid, it’s time to level up your dessert-making game with some pro tips!
Absolutely! Let’s keep going with all the juicy details.
Pro Tips
Making Oreo Cheesecake Dessert Cups is already straightforward, but following these expert tips will ensure you achieve the most delicious, creamy, and perfectly layered results every time.
Tip 1: Use Chilled Heavy Whipping Cream
When whipping heavy cream, it’s crucial to start with cold cream. This will help you achieve stiff peaks faster and create a fluffier texture for your filling. For best results, chill the mixing bowl and beaters in the freezer for about 10 minutes before whipping the cream.
Tip 2: Don’t Rush the Chilling Process
Patience is key when it comes to chilling these dessert cups. Even though you can technically serve them after 1 hour of chilling, giving them a bit more time (like 2-4 hours or even overnight) will result in a firmer texture and better flavor.
Tip 3: Customize the Oreo Flavor
While classic Oreos are fantastic, don’t be afraid to switch things up. Try using Mint Oreos, Peanut Butter Oreos, Golden Oreos, or even Birthday Cake Oreos for a fun twist. Each variation will bring a unique flavor profile to your dessert cups.
Tip 4: Presentation Matters
If you want to impress your guests, use a piping bag to layer the cream filling neatly over the crust. This not only looks elegant but also makes serving more precise. A large round or star tip works beautifully.
Tip 5: Make It Ahead of Time
These Oreo Cheesecake Dessert Cups are ideal for making ahead of time. You can prepare them up to 24 hours in advance and store them covered in the fridge until ready to serve. This makes them a perfect choice for parties and special occasions.
Tip 6: Add Extra Crunch
If you like extra texture in your dessert, try mixing in chopped nuts, chocolate chips, or bits of caramel along with the crushed Oreos. It adds a delightful crunch and a hint of extra flavor.
Tip 7: Adjust Sweetness to Taste
If you prefer your desserts on the less-sweet side, you can reduce the amount of powdered sugar in the cream filling. Start with 1/4 cup instead of 1/2 cup and adjust according to your preference.
Tip 8: Use High-Quality Vanilla Extract
For the best flavor, always use pure vanilla extract rather than imitation vanilla. It makes a significant difference in the overall taste of your dessert.
Tip 9: Go for Layers
If you want to create a show-stopping dessert, try making layered cups with alternating Oreo crust, cream filling, and more crushed Oreos. This creates a stunning visual effect and adds even more deliciousness.
Tip 10: Keep Your Whipped Cream Toppings Fresh
If you’re adding whipped cream on top, it’s best to do so just before serving. Alternatively, use stabilized whipped cream (with a bit of gelatin mixed in) to ensure it holds its shape for longer.
Now that you’re armed with all the pro tips, let’s tackle the most common questions people have about this delicious dessert.
Frequently Asked Questions (FAQs)
You might have a few lingering questions before you dive into making these Oreo Cheesecake Dessert Cups. Here are some of the most common ones and their answers:
Q1: Can I use store-bought whipped topping instead of making my own whipped cream?
Yes, you can! If you’re short on time, you can definitely use store-bought whipped topping (like Cool Whip). However, freshly whipped cream gives the dessert a richer, more luxurious texture and flavor.
Q2: How can I make this dessert ahead of time?
You can prepare the dessert cups up to 24 hours in advance. Simply cover them with plastic wrap or lids and store them in the refrigerator until ready to serve. This makes them an excellent choice for parties or special events.
Q3: Can I freeze these dessert cups?
Yes, you can freeze them! Just follow the instructions mentioned earlier for proper freezing. Remember to add whipped cream and toppings after thawing for best results.
Q4: Can I make this recipe gluten-free?
Absolutely! Simply use gluten-free Oreo cookies (like the gluten-free version by Nabisco) and proceed with the recipe as usual. It’s a fantastic option for those with gluten sensitivities or allergies.
Q5: What if I don’t have a food processor to crush the Oreos?
No problem! Just place the Oreos in a zip-top bag and use a rolling pin to crush them. This method works perfectly fine and requires no special equipment.
Q6: Can I double or halve the recipe?
Yes, this recipe is very easy to scale up or down. To double, simply double all the ingredients. To halve, use half the ingredients. The ratios stay the same, making adjustments hassle-free.
Q7: Why is my cream filling too runny?
If the filling is too runny, it’s likely that the heavy whipping cream wasn’t whipped to stiff peaks. Make sure the cream is properly chilled and whipped thoroughly before folding it into the cream cheese mixture.
Q8: Can I use low-fat cream cheese?
Yes, you can use low-fat cream cheese, but keep in mind that the texture may not be as creamy and rich. If you’re looking for a lighter option, consider using a mix of low-fat cream cheese and Greek yogurt for a bit of added protein and creaminess.
Q9: Can I add fruit to this dessert?
Definitely! Adding fresh berries like strawberries, raspberries, or blueberries can provide a refreshing burst of flavor and balance out the richness of the cream filling.
Q10: What if I don’t have piping bags?
You don’t need piping bags to assemble this dessert. Simply use a spoon to layer the cream filling over the crust, or use a zip-top bag with the corner snipped off as a DIY piping bag.
Now that you have all the information you need, let’s wrap this up with an inviting conclusion and call to action.
Conclusion & Call to Action
You did it! Now you have everything you need to make these incredible Oreo Cheesecake Dessert Cups. From the buttery Oreo crust to the smooth and creamy cheesecake filling, every spoonful is pure bliss. The best part? It’s all done with no baking required. Just mix, layer, chill, and enjoy!
Whether you’re making these for a family gathering, a party, or just a cozy night in, they’re guaranteed to be a hit. And with all the customization options—using different Oreos, adding fresh fruit, or even layering the cups—you can truly make this recipe your own.
Now it’s time to roll up your sleeves and create these dreamy dessert cups. I promise, they’ll be a total crowd-pleaser. And once you’ve made them, I’d love to hear how it went!
If you try this recipe, please leave a comment below to share your experience. What did you love about it? Did you try any fun variations? And if you’re feeling extra generous, share a photo of your beautiful creations on social media and tag me—I love seeing your amazing desserts come to life.
Are you ready to indulge in creamy, Oreo-packed goodness? Grab your ingredients, and let’s get started!
Print
Oreo Cheesecake Dessert Cups – The Best No-Bake Oreo Treat
- Total Time: 1 hour 25 minutes (Including chilling time)
- Yield: 6 Dessert Cups 1x
- Diet: Vegetarian
Description
These delicious Oreo Cheesecake Dessert Cups are rich, creamy, and incredibly easy to make with no baking required. With layers of buttery Oreo crust, smooth cheesecake filling, and extra Oreo chunks, they’re the perfect treat for parties, gatherings, or a cozy night in.
Ingredients
Crust Layer:
- 12 Oreo Cookies (crushed into fine crumbs)
- 3 Tablespoons Butter (melted)
Cream Filling:
- 8 Ounces Cream Cheese (softened)
- 1/2 Cup Powdered Sugar
- 1 Teaspoon Vanilla Extract
- 1 1/2 Cups Heavy Whipping Cream (cold)
- 6 Oreo Cookies (crushed into small chunks)
Topping (Optional):
- Crushed Oreo Cookies
- Whipped Cream
- Chocolate Drizzle
Instructions
Prepare the Crust:
- Crush 12 Oreos into fine crumbs.
- Mix crumbs with melted butter until well-coated.
- Press 2 tablespoons of mixture into the bottom of each serving cup.
Make the Cream Filling:
4. Beat softened cream cheese until smooth.
5. Add powdered sugar and vanilla extract; mix well.
6. Whip cold heavy cream until stiff peaks form.
7. Gently fold whipped cream into the cream cheese mixture.
8. Fold in crushed Oreo chunks.
Assemble the Dessert Cups:
9. Spoon or pipe the filling over the crust layer in each cup.
10. Top with crushed Oreos, whipped cream, and chocolate drizzle if desired.
Chill & Serve:
11. Refrigerate for at least 1 hour before serving.
Notes
- For a firmer filling, chill for 2–4 hours or overnight.
- Customize the flavor by using flavored Oreos (e.g., mint, peanut butter, golden).
- Store in the fridge for up to 3 days or freeze for up to 2 months.
- Prep Time: 25 minutes
- Cook Time: 0 minutes (No baking required)
- Category: Dessert
- Method: No-Bake
- Cuisine: American