
Easter is a time of celebration, family gatherings, and, of course, delicious desserts. Among the many treats that grace the table, cheesecakes are always a favorite. But what if you could enjoy all the rich, creamy goodness of cheesecake without ever turning on the oven? That is exactly what makes these Easter No-Bake Mini Cheesecakes so special.
These little pastel-colored treats are not only adorable but also incredibly easy to make. With a simple cookie crust, a fluffy vanilla-flavored cheesecake filling, and festive decorations, they bring a delightful balance of texture and flavor. Whether you are hosting an Easter brunch, looking for a fun activity to do with the kids, or just want a quick and tasty dessert, these cheesecakes are the perfect choice.
What makes these mini cheesecakes even better is their versatility. You can adjust the colors, flavors, and toppings to suit your preference. Since they are made in individual servings, they are great for portion control and easy to serve. Plus, their no-bake nature means you save time and energy while still impressing your guests with a dessert that looks as good as it tastes.
In this guide, we will walk you through everything you need to know to make these Easter No-Bake Mini Cheesecakes from scratch. From the ingredients list to step-by-step instructions, serving suggestions, and even storage tips, this comprehensive guide will ensure that your cheesecakes turn out perfect every time. So, let’s get started on creating a dessert that is as delightful to make as it is to eat.
Why You’ll Love This Recipe
There are countless reasons to love these Easter No-Bake Mini Cheesecakes, but here are a few highlights that make them stand out from traditional cheesecake recipes.
First and foremost, they require no baking at all. This means no need to worry about cracking, overbaking, or a water bath. Since they set in the fridge, they are practically foolproof, making them perfect for beginners and experienced bakers alike.
Another major advantage of this recipe is its convenience. Preparing a traditional cheesecake can take hours, but these mini cheesecakes come together quickly. With a simple cookie crust and a creamy filling that takes minutes to whip up, you can have a stunning dessert with minimal effort.
These mini cheesecakes are also incredibly versatile. You can customize the colors to match the Easter theme or even swap in different flavor extracts for a unique twist. They are perfect for kids and adults alike, and they make a great addition to any Easter dessert spread.
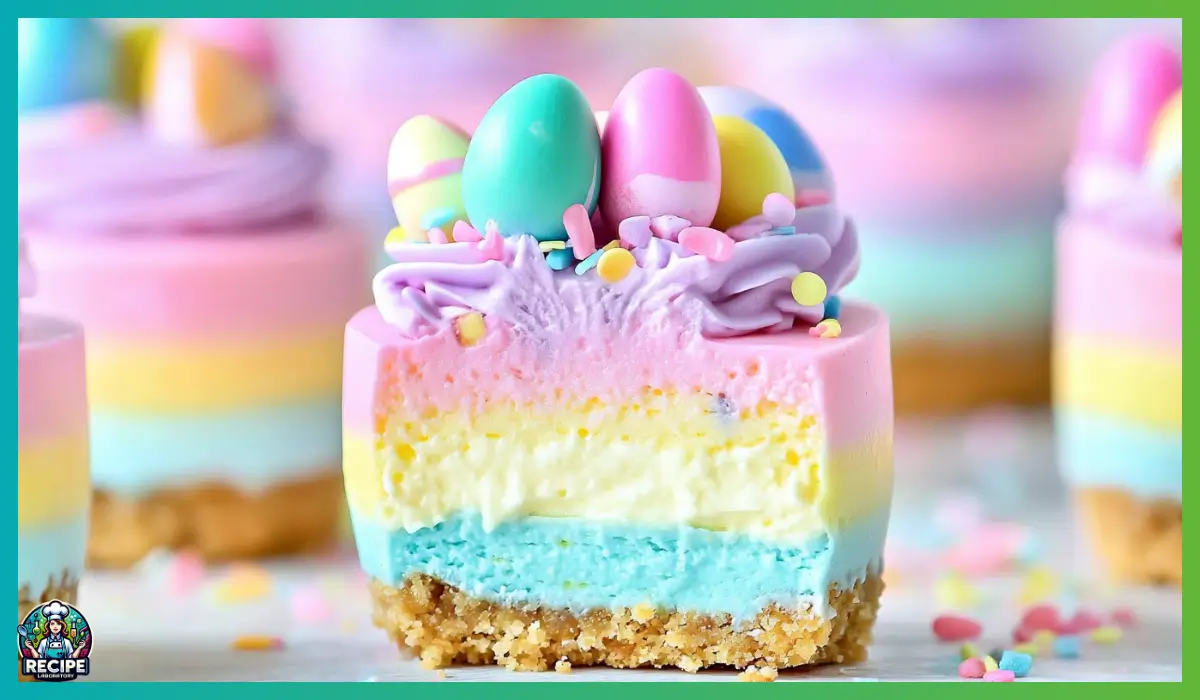
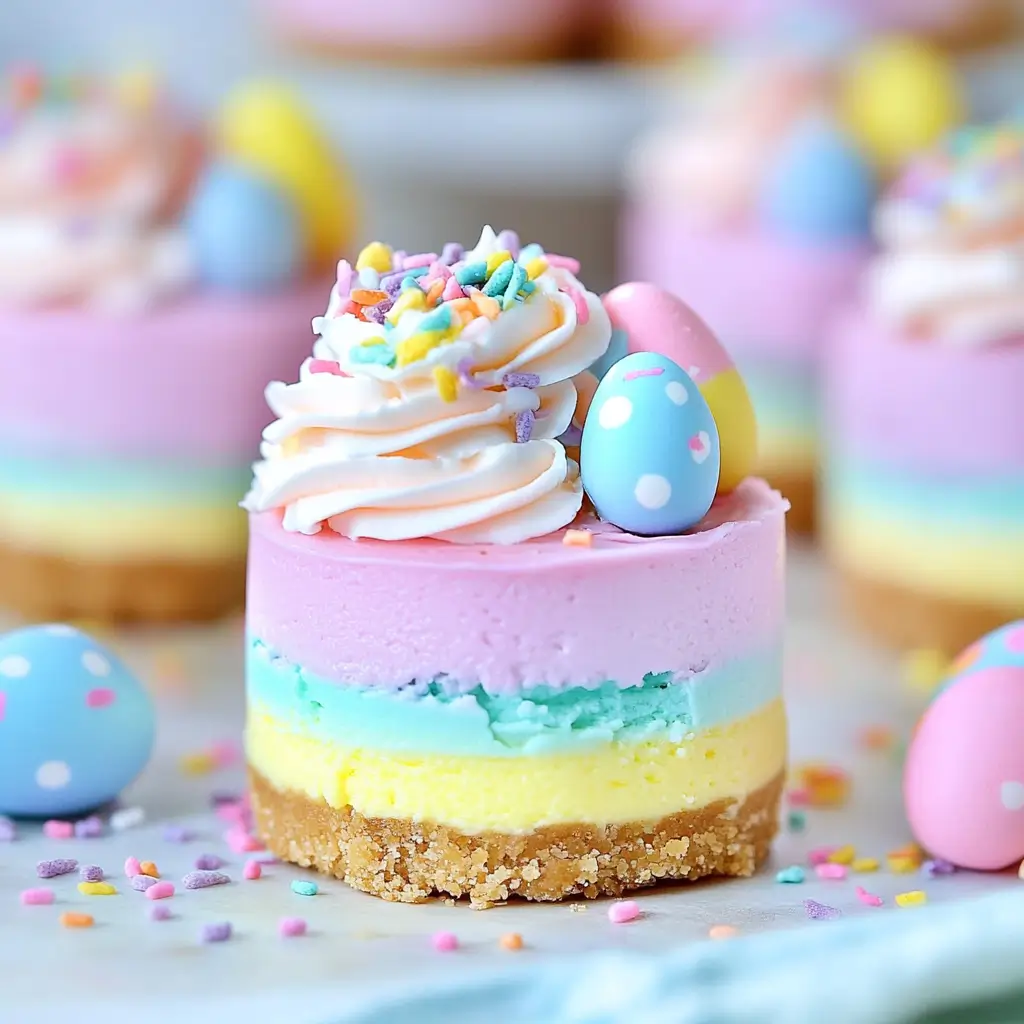
Finally, they are visually stunning. The pastel-colored layers give them a festive look that fits perfectly with the Easter season. Topped with whipped cream, Easter candy eggs, and sprinkles, they become an eye-catching centerpiece on any table.
Whether you are looking for a quick and easy dessert, a fun recipe to make with the family, or a deliciously creamy treat, these Easter No-Bake Mini Cheesecakes check all the boxes.
Health Benefits
While cheesecakes are typically seen as an indulgence, these mini versions come with a few benefits that make them a better choice than traditional desserts.
One of the main advantages is portion control. Since they are made in individual servings, it is easier to enjoy a sweet treat without overindulging. Unlike full-sized cheesecakes, which can lead to excessive portions, these mini cheesecakes offer a balanced amount of dessert in every bite.
Another benefit is the simplified ingredient list. Traditional cheesecakes often contain heavy ingredients, but this recipe uses a light and fluffy filling made with cream cheese and whipped cream. The lack of eggs and heavy baking ingredients means the texture is smoother and easier on digestion.
Additionally, these cheesecakes are gluten-friendly, depending on the type of cookies you use for the crust. By swapping out the shortbread cookies for a gluten-free alternative, you can easily make a dessert that is safe for those with gluten sensitivities.
Lastly, the incorporation of fresh lemon juice adds a hint of citrus, which not only enhances the flavor but also provides a small dose of vitamin C. While this is still a dessert, it is comforting to know that some ingredients contribute a bit of nutritional value.
Preparation Time, Servings, and Nutritional Information
These Easter No-Bake Mini Cheesecakes are not only easy to make but also quick to prepare. Here is a breakdown of the time required and the servings you can expect.
- Prep Time: 1 hour
- Chill Time: 2 hours
- Total Time: 3 hours
- Servings: 6 mini cheesecakes
Nutritional Information (Per Cheesecake):
- Calories: ~280 kcal
- Protein: 4g
- Carbohydrates: 22g
- Fat: 20g
- Sugar: 15g
Ingredients List
To make these Easter No-Bake Mini Cheesecakes, you will need the following ingredients.
For the Crust:
- 6 oz shortbread cookies (about 12 cookies)
- 1 tbsp unsalted butter, melted
For the Cheesecake Filling:
- 1 packet (¼ oz) unflavored powdered gelatin
- 2 tbsp cold water
- 1 lb full-fat cream cheese, softened
- ½ tsp lemon juice
- 1 tsp vanilla bean paste (or vanilla extract)
- Pinch of salt
- ½ cup granulated sugar
- 1 cup heavy cream
For Decorating:
- Assorted food coloring (pastel shades recommended)
- ½ cup whipped cream
- Easter candy eggs
- Sprinkles
Step-By-Step Cooking Instructions
1. Prepare the Crust
Crush the shortbread cookies into fine crumbs using a food processor or by placing them in a resealable plastic bag and crushing them with a rolling pin. Once crushed, transfer the crumbs to a bowl and mix them with the melted butter.
Evenly distribute the mixture into the bottoms of a silicone muffin pan, pressing down firmly to form the crust layer. Place the pan in the fridge while you prepare the filling.
2. Make the Cheesecake Mixture
In a small bowl, mix the gelatin and cold water, then let it sit for about 5 minutes to bloom. Once bloomed, microwave the mixture for 10-15 seconds until fully melted and smooth.
In a separate mixing bowl, beat the cream cheese, sugar, lemon juice, vanilla, and salt together until smooth and creamy. Slowly add the heavy cream, mixing until everything is well combined and light in texture. Finally, stir in the melted gelatin, ensuring it is fully incorporated into the mixture.
3. Divide and Color the Filling
Divide the cheesecake mixture evenly into four bowls. Add a few drops of food coloring to each bowl, using pastel shades such as pink, blue, green, and yellow. Gently mix until the colors are well incorporated.
4. Layer the Cheesecakes
Remove the muffin pan from the fridge. Spoon a layer of one color onto the crust, smoothing it out evenly. Repeat this process with each colored layer until all the cheesecake mixture is used.
5. Chill and Set
Place the muffin pan in the freezer for at least 2 hours to allow the cheesecakes to firm up completely. Once set, carefully remove them from the silicone mold and let them thaw for about 30 minutes before serving.
6. Decorate and Serve
Top each cheesecake with a swirl of whipped cream, then decorate with Easter candy eggs and sprinkles. Serve immediately or store in the fridge until ready to enjoy.
How to Serve
These Easter No-Bake Mini Cheesecakes are best served chilled. Arrange them on a festive platter and garnish with additional Easter-themed decorations for a stunning dessert display.
Pairing Suggestions
Pairing these Easter No-Bake Mini Cheesecakes with the right beverages and complementary desserts can elevate your dessert experience. Since these cheesecakes are light, creamy, and slightly tangy, they go well with a variety of drinks and side treats.
Beverages to Serve with Mini Cheesecakes
1. Hot Beverages: Warm drinks contrast beautifully with the chilled cheesecakes.
- Coffee: A rich espresso or a cappuccino balances the sweetness of the cheesecake with its slight bitterness.
- Tea: A floral chamomile tea or Earl Grey enhances the vanilla and lemon flavors.
- Hot Chocolate: If serving to kids, a cup of hot cocoa makes for a deliciously sweet pairing.
2. Cold Beverages: Chilled drinks work well to enhance the refreshing taste of these cheesecakes.
- Sparkling Lemonade: The tanginess of citrus enhances the vanilla undertones.
- Iced Tea: A lightly sweetened peach or raspberry iced tea is a fantastic pairing.
- Milk: A classic option that balances out the sweetness.
Side Desserts to Pair with Cheesecakes
Since these cheesecakes are creamy, pairing them with something crunchy or fruity adds great contrast.
- Fruit Salad: A fresh bowl of berries (strawberries, blueberries, raspberries) provides a tart contrast.
- Easter Sugar Cookies: If you’re hosting an Easter celebration, pastel-colored cookies complement the cheesecakes beautifully.
- Chocolate-Dipped Strawberries: These add a touch of decadence and pair well with the creaminess of the cheesecake.
Storage, Freezing & Reheating Instructions
Proper storage ensures your cheesecakes stay fresh and delicious for days. Since they are no-bake, they require refrigeration or freezing rather than being left at room temperature.
Refrigeration
- Store the mini cheesecakes in an airtight container in the refrigerator for up to 4-5 days.
- Keep them covered to prevent them from absorbing any fridge odors.
- If you have decorated them with whipped cream, it is best to consume them within 2-3 days as the whipped cream may lose its texture.
Freezing
- These cheesecakes freeze exceptionally well, making them perfect for make-ahead desserts.
- Place them on a baking sheet and freeze uncovered for 1 hour to firm up. Then transfer them to a freezer-safe container, layering them with parchment paper to prevent sticking.
- Store them in the freezer for up to 1 month for best quality.
- To serve, remove them from the freezer and let them thaw in the refrigerator for 3-4 hours before eating.
Reheating or Thawing
- Never microwave cheesecakes to soften them. Instead, let them thaw naturally at room temperature for about 30 minutes before serving.
- If they have been in the refrigerator, they are ready to eat immediately after taking them out.
Common Mistakes to Avoid
Even though this is a simple recipe, small missteps can affect the texture and presentation of your cheesecakes. Here are the most common mistakes and how to avoid them.
1. Not Allowing the Gelatin to Bloom Properly
Gelatin helps the cheesecake set properly. If you don’t allow it to bloom (absorb water before melting), it may not mix well, leading to a runny filling. Always let it sit for 5 minutes in cold water before microwaving.
2. Overmixing the Filling
While you want a smooth filling, overmixing can introduce too much air, causing it to lose structure. Mix until just combined for the best texture.
3. Skipping the Chilling Time
If you don’t let the cheesecakes chill long enough, they won’t set properly. Give them at least 2 hours in the freezer before serving.
4. Using Too Much Food Coloring
Pastel shades require only a few drops of food coloring. Adding too much can result in overly bright or artificial-looking colors.
5. Not Using a Silicone Mold
Removing the cheesecakes from a regular muffin tin can be challenging. A silicone muffin pan makes it much easier to pop them out without damaging their shape.
Pro Tips
To take your Easter No-Bake Mini Cheesecakes to the next level, follow these expert tips.
1. Use a Food Processor for the Crust
For a fine and even crumb, use a food processor instead of manually crushing the cookies. This ensures a well-packed crust that holds together better.
2. Let the Cream Cheese Reach Room Temperature
Softened cream cheese blends much more smoothly and prevents lumps in the filling. Take it out of the fridge 30 minutes before starting the recipe.
3. Experiment with Different Flavors
Instead of vanilla, try using:
- Almond extract for a nutty undertone.
- Coconut extract for a tropical twist.
- Orange zest for a bright citrus kick.
4. Make a Large Cheesecake Instead of Minis
If you prefer a full-sized cheesecake, press the crust into an 8-inch springform pan and layer the filling the same way. Increase the chilling time to 4 hours for a firm set.
5. Use a Piping Bag for Even Layers
For precise and beautiful layers, use a piping bag to distribute each color evenly before smoothing with a spatula.
6. Decorate Just Before Serving
If you are making these cheesecakes in advance, wait until serving time to add the whipped cream and decorations. This keeps the toppings fresh and prevents them from softening.
Frequently Asked Questions (FAQs)
1. Can I Make These Cheesecakes Without Gelatin?
Yes! If you prefer a vegetarian option, you can use agar-agar instead. Substitute ½ teaspoon of agar powder and dissolve it in warm water before adding it to the cheesecake mixture.
2. How Can I Make This Recipe Gluten-Free?
Simply replace the shortbread cookies with gluten-free cookies like almond flour cookies or gluten-free graham crackers.
3. Can I Use Different Colors?
Absolutely! You can customize the colors to match any occasion. For example:
- Pastel pink, blue, and yellow for Easter.
- Red and green for Christmas.
- Orange and black for Halloween.
4. Can I Use Store-Bought Whipped Cream?
Yes, but homemade whipped cream has a fresher taste and better texture. If using store-bought, go for a high-quality option with real dairy ingredients.
5. How Long Do These Cheesecakes Last in the Fridge?
They stay fresh for 4-5 days in an airtight container in the refrigerator.
6. Can I Make These Cheesecakes in Advance?
Yes! You can prepare them up to a week in advance and freeze them. Just remember to thaw them before serving.
Conclusion & Call to Action
These Easter No-Bake Mini Cheesecakes are the perfect combination of adorable, delicious, and easy to make. With their creamy texture, colorful layers, and festive decorations, they are a fantastic addition to any Easter celebration. The fact that they require no baking makes them a hassle-free dessert that anyone can make, regardless of baking experience.
Whether you are serving these at an Easter brunch, making them as a fun activity with the kids, or simply looking for a quick and tasty treat, these cheesecakes are a guaranteed hit. Plus, their make-ahead nature means you can prepare them in advance and have them ready whenever you need.
If you try this recipe, I would love to hear how it turned out! Share your creations, experiment with different flavors, and enjoy the process of making these delightful mini cheesecakes. Don’t forget to let me know—what’s your favorite Easter dessert? Leave a comment and happy baking!
Print
Easter No-Bake Mini Cheesecakes – Easy Colorful Spring Dessert
- Total Time: 3 hours
- Yield: 6 mini cheesecakes 1x
- Diet: Vegetarian
Description
These Easter No-Bake Mini Cheesecakes are creamy, colorful, and easy to make! With a buttery cookie crust and fluffy cheesecake filling, they’re the perfect springtime treat.
Ingredients
- For the Crust:
- 6 oz shortbread cookies (about 12 cookies)
- 1 tbsp unsalted butter, melted
- For the Cheesecake Filling:
- 1 packet (¼ oz) unflavored gelatin
- 2 tbsp cold water
- 1 lb full-fat cream cheese, softened
- ½ tsp lemon juice
- 1 tsp vanilla bean paste (or extract)
- Pinch of salt
- ½ cup granulated sugar
- 1 cup heavy cream
- For Decorating:
- Assorted pastel food coloring
- ½ cup whipped cream
- Easter candy eggs
- Sprinkles
Instructions
- Make the Crust: Crush cookies into fine crumbs and mix with melted butter. Press into a muffin tin or silicone mold and chill.
- Prepare the Cheesecake Filling: Bloom the gelatin in cold water for 5 minutes, then melt in the microwave.
- Mix the Cream Cheese Base: Beat cream cheese, sugar, lemon juice, vanilla, and salt until smooth. Gradually add heavy cream, then mix in the melted gelatin.
- Color the Filling: Divide the mixture into four bowls and add pastel food coloring to each.
- Assemble the Cheesecakes: Layer each color into the crust molds and smooth the tops.
- Chill & Set: Freeze for at least 2 hours, then carefully remove from molds.
- Decorate & Serve: Top with whipped cream, candy eggs, and sprinkles. Let thaw for 30 minutes before serving.
Notes
- Use a silicone mold for easy removal.
- Cheesecakes can be stored in the fridge for 4-5 days or frozen for 1 month.
- Substitute agar-agar for a vegetarian-friendly version.
- Prep Time: 1 hour
- Cook Time: 2 hours
- Category: Dessert
- Method: No-Bake
- Cuisine: American