
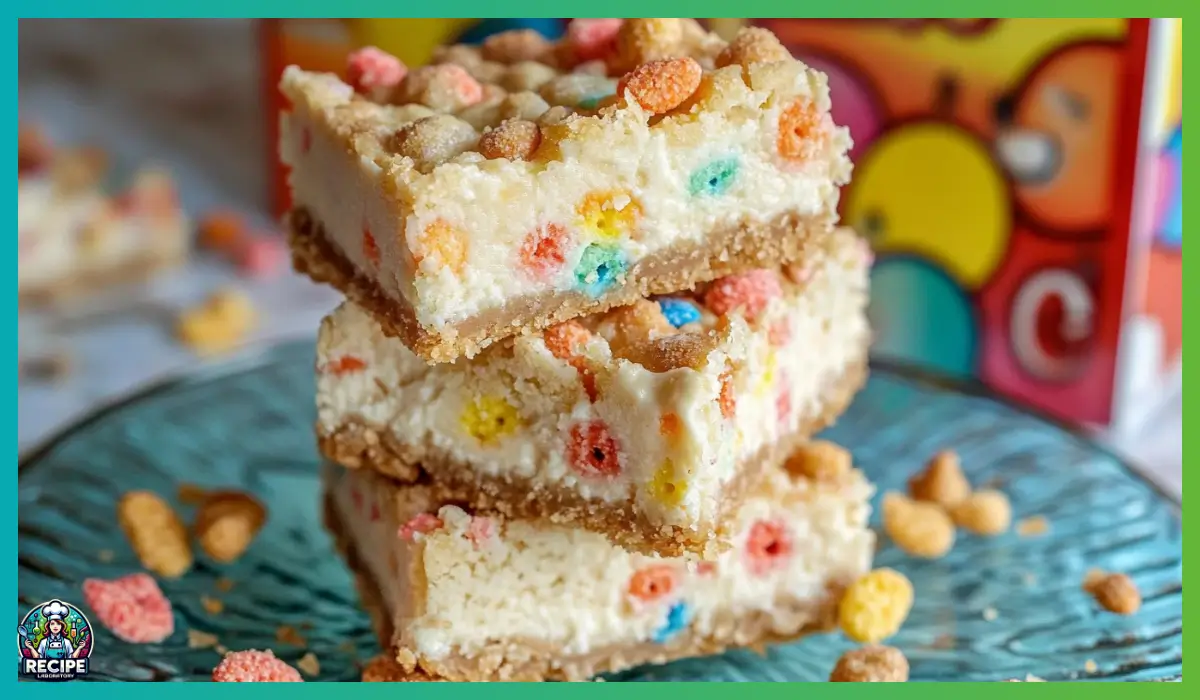
Desserts have a unique way of bringing joy to any occasion, and when a recipe combines the nostalgia of childhood cereals with the rich creaminess of cheesecake and the chewy goodness of cookies, the result is pure magic. Fruity Pebbles Cookie Cheesecake Bars are the ultimate treat for anyone who enjoys a dessert that is both visually stunning and irresistibly delicious.
These bars feature a buttery sugar cookie base, a luscious cheesecake layer, and a crunchy Fruity Pebbles topping, making them a perfect blend of textures and flavors. The combination of chewiness, creaminess, and crunch ensures that every bite is a delightful experience. Whether you’re looking for a fun dessert for a party, a colorful treat for kids, or simply something indulgent to satisfy your sweet tooth, this recipe checks all the boxes.
What makes this dessert even more special is its simplicity. Using store-bought sugar cookie dough as a base means you can create a show-stopping dessert without spending hours in the kitchen. The cheesecake layer is smooth and rich, made with just a handful of ingredients, while the Fruity Pebbles add a playful crunch and a pop of color.
These Fruity Pebbles Cookie Cheesecake Bars are perfect for birthdays, bake sales, or casual get-togethers. They are easy to make, require minimal ingredients, and can be prepared in advance, making them a stress-free option for busy bakers. If you’re ready to bring a fun and colorful twist to your dessert table, this recipe is for you.
Why You’ll Love This Recipe
One of the best things about this recipe is how effortlessly it comes together. Unlike traditional cheesecake, which can be time-consuming and requires careful monitoring, this recipe simplifies the process by layering a rich cheesecake mixture over a pre-made sugar cookie dough base. The result is a dessert that delivers all the decadence of cheesecake without the hassle.
The vibrant colors of Fruity Pebbles make this dessert visually appealing, making it a great choice for parties and special occasions. Kids and adults alike will love the playful aesthetic, and it’s sure to be a conversation starter at any gathering.
Another reason to love these Fruity Pebbles Cookie Cheesecake Bars is their balanced combination of flavors and textures. The cookie layer is sweet and chewy, the cheesecake filling is creamy and slightly tangy, and the Fruity Pebbles add a light, crisp texture. This balance ensures that every bite is indulgent but not overwhelmingly sweet.
Additionally, this recipe is incredibly versatile. You can switch out the Fruity Pebbles for another cereal of your choice, such as Cocoa Pebbles, Froot Loops, or even Cap’n Crunch. If you’re a fan of white chocolate, you can drizzle some over the top for extra sweetness. For those who love a bit of crunch, adding crushed nuts or even a sprinkle of sea salt can elevate the flavor profile.
Finally, these bars store well, making them perfect for meal prepping desserts in advance. Whether you’re making them for a special occasion or just to have a sweet treat on hand, you’ll appreciate how easy they are to store and serve later.
Health Benefits
While Fruity Pebbles Cookie Cheesecake Bars are undeniably a treat, there are some surprising benefits to the ingredients used in this recipe. The key is moderation—enjoying these bars as an occasional indulgence while appreciating the nutritional components they bring.
Cream cheese, the star ingredient of the cheesecake layer, is a good source of calcium and contains small amounts of protein. Calcium is essential for strong bones and teeth, making this dessert a small but enjoyable way to incorporate dairy into your diet. Additionally, cream cheese contains healthy fats that help with vitamin absorption and provide a satisfying richness to the dessert.
Eggs, another key ingredient, are packed with protein and essential vitamins such as B12 and D. They contribute to the creamy consistency of the cheesecake layer while providing essential nutrients that support brain function and overall health.
While sugar cookie dough is primarily made from flour and sugar, it does provide carbohydrates that give energy. When paired with the protein from eggs and dairy, this dessert can be a more balanced treat compared to store-bought options filled with artificial preservatives.
Fruity Pebbles cereal, while known for its bright colors and sweet flavor, is often fortified with essential vitamins and minerals, including iron, folic acid, and B vitamins. While it’s not a health food, it does contain some nutritional value, making it a more fun way to enjoy a classic childhood ingredient.
Overall, while these bars should be enjoyed in moderation, they offer a delightful way to satisfy sweet cravings while incorporating some beneficial ingredients.
Preparation Time, Servings, and Nutritional Information
One of the best things about Fruity Pebbles Cookie Cheesecake Bars is that they require minimal prep time and can be made in advance. This makes them an excellent choice for busy individuals who want to enjoy a delicious homemade dessert without spending hours in the kitchen.
Preparation Time:
- Prep Time: 10 minutes
- Cook Time: 30 minutes
- Chill Time: 2 hours
- Total Time: About 2 hours 40 minutes
Servings:
- Makes 12 bars
Nutritional Information (Per Serving):
- Calories: Approximately 250
- Carbohydrates: 30g
- Fat: 12g
- Protein: 3g
- Sugar: 18g
Ingredients List
To make these Fruity Pebbles Cookie Cheesecake Bars, you will need simple, easy-to-find ingredients.
For the Cookie Layer:
- 1 package (16.5 oz) sugar cookie dough (or homemade)
- ¾ cup Fruity Pebbles cereal
For the Cheesecake Layer:
- 8 oz cream cheese, softened
- ¼ cup granulated sugar
- 1 teaspoon vanilla extract
- 1 large egg
For the Topping:
- ½ cup Fruity Pebbles cereal
Step-By-Step Cooking Instructions
- Preheat the Oven:
- Preheat your oven to 350°F (175°C).
- Grease a 9×9-inch baking dish with butter or non-stick spray.
- Prepare the Cookie Base:
- Open the package of sugar cookie dough and press it evenly into the bottom of the greased baking dish.
- Sprinkle ¾ cup of Fruity Pebbles evenly over the cookie dough, pressing them in gently.
- Make the Cheesecake Layer:
- In a medium-sized bowl, beat cream cheese, sugar, vanilla extract, and egg until the mixture is smooth and well combined.
- Pour the cheesecake mixture over the cookie base, spreading it evenly with a spatula.
- Bake the Bars:
- Place the baking dish in the preheated oven and bake for 25-30 minutes, or until the cheesecake layer is set and no longer jiggles in the center.
- Add the Topping:
- As soon as you remove the bars from the oven, sprinkle the remaining ½ cup Fruity Pebbles on top.
- Cool and Chill:
- Let the bars cool to room temperature before transferring them to the refrigerator.
- Refrigerate for at least 2 hours to allow the cheesecake layer to firm up.
- Slice and Serve:
- Once fully chilled, use a sharp knife to cut the bars into squares.
- Serve immediately or store for later.

How to Serve
Fruity Pebbles Cookie Cheesecake Bars are best enjoyed chilled, straight from the refrigerator. The cool and creamy cheesecake layer contrasts beautifully with the soft cookie base and the crisp Fruity Pebbles topping, creating the perfect bite. These bars are ideal for a variety of occasions, from casual family desserts to special celebrations.
For an elegant presentation, arrange the bars on a serving platter and dust them lightly with powdered sugar. This simple touch adds a bakery-style finish that makes them look even more irresistible. If you want to take them to the next level, serve them with a dollop of freshly whipped cream or a drizzle of white chocolate for extra decadence.
If you’re serving these at a party, consider cutting them into smaller, bite-sized pieces. This allows guests to enjoy them as finger food without needing a fork or plate. To add a fun, interactive element, set up a dessert bar with toppings such as melted chocolate, caramel sauce, or crushed nuts so guests can customize their bars to their liking.
Pairing these bars with a cold glass of milk is a classic choice, especially for kids. For adults, a strong cup of coffee or a cappuccino balances the sweetness and enhances the flavors. If you’re serving them as a dessert at a brunch or afternoon tea, a fruit-based drink like a berry smoothie or iced tea provides a refreshing contrast.
No matter how you serve them, these bars are sure to be a hit. Their playful colors and incredible flavor make them a dessert that brings joy to every occasion.
Pairing Suggestions
The unique combination of flavors in Fruity Pebbles Cookie Cheesecake Bars makes them a great match for a variety of beverages and complementary desserts. If you’re planning a full dessert spread, consider these pairing ideas to enhance the overall experience.
Beverage Pairings:
- Coffee: A strong espresso or a creamy latte complements the richness of the cheesecake layer.
- Milk: A classic pairing that enhances the cereal flavors and balances the sweetness.
- Tea: A fruity herbal tea, such as raspberry or hibiscus, brings out the berry-like notes in Fruity Pebbles.
- Milkshakes: A vanilla or strawberry milkshake makes an indulgent pairing for those who love extra sweetness.
Dessert Pairings:
- Fruit Sorbet: A tart raspberry or lemon sorbet provides a refreshing contrast to the creamy and sweet bars.
- Chocolate Treats: Dark chocolate brownies or chocolate-dipped strawberries add a rich contrast to the fruity flavors.
- Vanilla Ice Cream: A scoop of ice cream on the side turns these bars into a more indulgent plated dessert.
If you’re serving these bars at a party, consider pairing them with other colorful treats, such as cake pops or rainbow cupcakes, to create a visually appealing dessert table. Whether served alone or as part of a larger spread, these bars will be a standout treat.
Storage, Freezing & Reheating Instructions
Proper storage is key to keeping Fruity Pebbles Cookie Cheesecake Bars fresh and delicious. Since they contain a cheesecake layer, they should always be stored in the refrigerator.
Refrigerator Storage:
- Place the bars in an airtight container and store them in the refrigerator for up to 5 days.
- If stacking them, place parchment paper between layers to prevent sticking.
- Serve them straight from the fridge or let them sit at room temperature for 5-10 minutes for a slightly softer texture.
Freezing Instructions:
- These bars freeze well, making them a great make-ahead dessert.
- Wrap individual bars tightly in plastic wrap, then place them in an airtight container or a freezer bag.
- Freeze for up to 2 months.
- To enjoy, thaw the bars in the refrigerator overnight or let them sit at room temperature for 30 minutes before serving.
Reheating Instructions:
- These bars are best enjoyed chilled, but if you prefer them slightly warm, microwave a piece for 5-10 seconds to soften the cookie layer.
- Avoid overheating, as this can cause the cheesecake layer to become too soft.
By following these storage tips, you can enjoy these bars anytime without worrying about freshness.
Common Mistakes to Avoid
Even though this recipe is simple, there are a few common mistakes that can affect the final result. Avoiding these pitfalls will help ensure your Fruity Pebbles Cookie Cheesecake Bars turn out perfectly every time.
- Overbaking the Bars: The cheesecake layer should be set but still slightly jiggly in the center when removed from the oven. Overbaking can cause it to dry out and become too firm.
- Not Letting the Bars Chill Completely: Chilling is crucial for allowing the flavors to develop and for the cheesecake layer to firm up properly. Skipping this step can result in a messy texture when cutting.
- Using Cold Cream Cheese: If the cream cheese is too cold, it won’t blend smoothly, leading to lumps in the cheesecake mixture. Always use softened cream cheese for a silky texture.
- Pressing the Fruity Pebbles Too Hard: While you want them to stick to the surface, pressing them too firmly can cause them to become soggy when the bars chill. A light sprinkle is best.
- Not Greasing the Pan Properly: To prevent sticking, always grease your baking dish or use parchment paper for easy removal.
By keeping these tips in mind, you can avoid common pitfalls and create a dessert that looks and tastes amazing.
Pro Tips
To take your Fruity Pebbles Cookie Cheesecake Bars to the next level, try these expert tips and tricks:
- Use a Parchment Paper Liner: Lining your baking dish with parchment paper makes it easier to lift out the bars and cut them cleanly.
- Chill Overnight for Best Flavor: While a minimum of 2 hours of chilling is recommended, letting the bars sit overnight enhances the flavors and improves the texture.
- Slice with a Hot Knife: Run a sharp knife under hot water, dry it, and then slice the bars. This helps create clean, sharp edges.
- Customize with Different Cereals: Try swapping Fruity Pebbles for Cocoa Pebbles, Froot Loops, or even Cinnamon Toast Crunch for a fun twist.
- Add a Drizzle of Chocolate: Melted white chocolate or a cream cheese glaze drizzled on top adds extra sweetness and an elegant finish.
These small adjustments can make a big difference in the final result, ensuring that your dessert is both beautiful and delicious.
Frequently Asked Questions (FAQs)
1. Can I use homemade sugar cookie dough instead of store-bought?
Yes! If you prefer homemade cookie dough, just ensure it is rolled out evenly and presses well into the pan.
2. Do I have to use Fruity Pebbles, or can I use a different cereal?
You can experiment with different cereals, such as Cocoa Pebbles, Froot Loops, or Rice Krispies, for a unique flavor variation.
3. How do I know when the cheesecake layer is done baking?
The cheesecake layer should be set around the edges but still have a slight jiggle in the center. It will continue to firm up as it cools.
4. Can I freeze these bars?
Yes! Wrap them individually and store them in the freezer for up to 2 months. Thaw in the refrigerator before serving.
5. How do I prevent the Fruity Pebbles from getting soggy?
To keep them crisp, sprinkle them on top right after baking, rather than mixing them into the cheesecake layer.
Conclusion & Call to Action
Fruity Pebbles Cookie Cheesecake Bars are a fun, colorful, and delicious dessert that brings a nostalgic twist to a classic cheesecake treat. With their chewy cookie base, creamy cheesecake filling, and crunchy Fruity Pebbles topping, they offer an irresistible combination of textures and flavors.
This easy-to-make recipe is perfect for any occasion, from birthdays to bake sales, or simply as a treat to enjoy at home. The best part is that they can be made ahead of time, stored for later, and customized to suit your personal preferences.
Now it’s your turn to try this recipe! Gather your ingredients, follow the steps, and create a batch of these delightful bars. Don’t forget to share your results—snap a picture and tag your friends or family on social media. If you loved this recipe, let us know in the comments and tell us how you customized your bars.
Enjoy your baking adventure, and happy snacking!
Print
Fruity Pebbles Cookie Cheesecake Bars – A Fun & Colorful Dessert
- Total Time: 2 hours 40 minutes (including chilling)
- Yield: 12 bars 1x
- Diet: Vegetarian
Description
fun and colorful dessert with a chewy sugar cookie base, a creamy cheesecake layer, and a crunchy Fruity Pebbles topping. Perfect for parties, bake sales, or an indulgent treat at home!
Ingredients
For the Cookie Layer:
- 1 package (16.5 oz) sugar cookie dough
- ¾ cup Fruity Pebbles cereal
For the Cheesecake Layer:
- 8 oz cream cheese, softened
- ¼ cup granulated sugar
- 1 teaspoon vanilla extract
- 1 large egg
For the Topping:
- ½ cup Fruity Pebbles cereal
Instructions
- Preheat the oven to 350°F (175°C) and grease a 9×9-inch baking dish.
- Press the sugar cookie dough into the bottom of the pan. Sprinkle ¾ cup Fruity Pebbles evenly over the dough and press gently.
- In a bowl, beat cream cheese, sugar, vanilla extract, and egg until smooth. Pour over the cookie base, spreading evenly.
- Bake for 25-30 minutes, or until the cheesecake layer is set.
- Remove from the oven and immediately sprinkle the remaining ½ cup Fruity Pebbles on top.
- Let the bars cool to room temperature, then refrigerate for at least 2 hours before slicing.
- Cut into squares and enjoy!
Notes
- Use room-temperature cream cheese for a smooth cheesecake layer.
- Chill overnight for the best texture and flavor.
- Store in an airtight container in the fridge for up to 5 days or freeze for up to 2 months.
- Prep Time: 20 minutes
- Cook Time: 30 minutes
- Category: Dessert
- Method: Baking
- Cuisine: American